1. Introduction
This manual provides detailed instructions for the operation and maintenance of your Xelarvex 64GB Voice Activated Recorder. Please read this manual thoroughly before using the device to ensure proper functionality and to maximize its capabilities. Keep this manual for future reference.
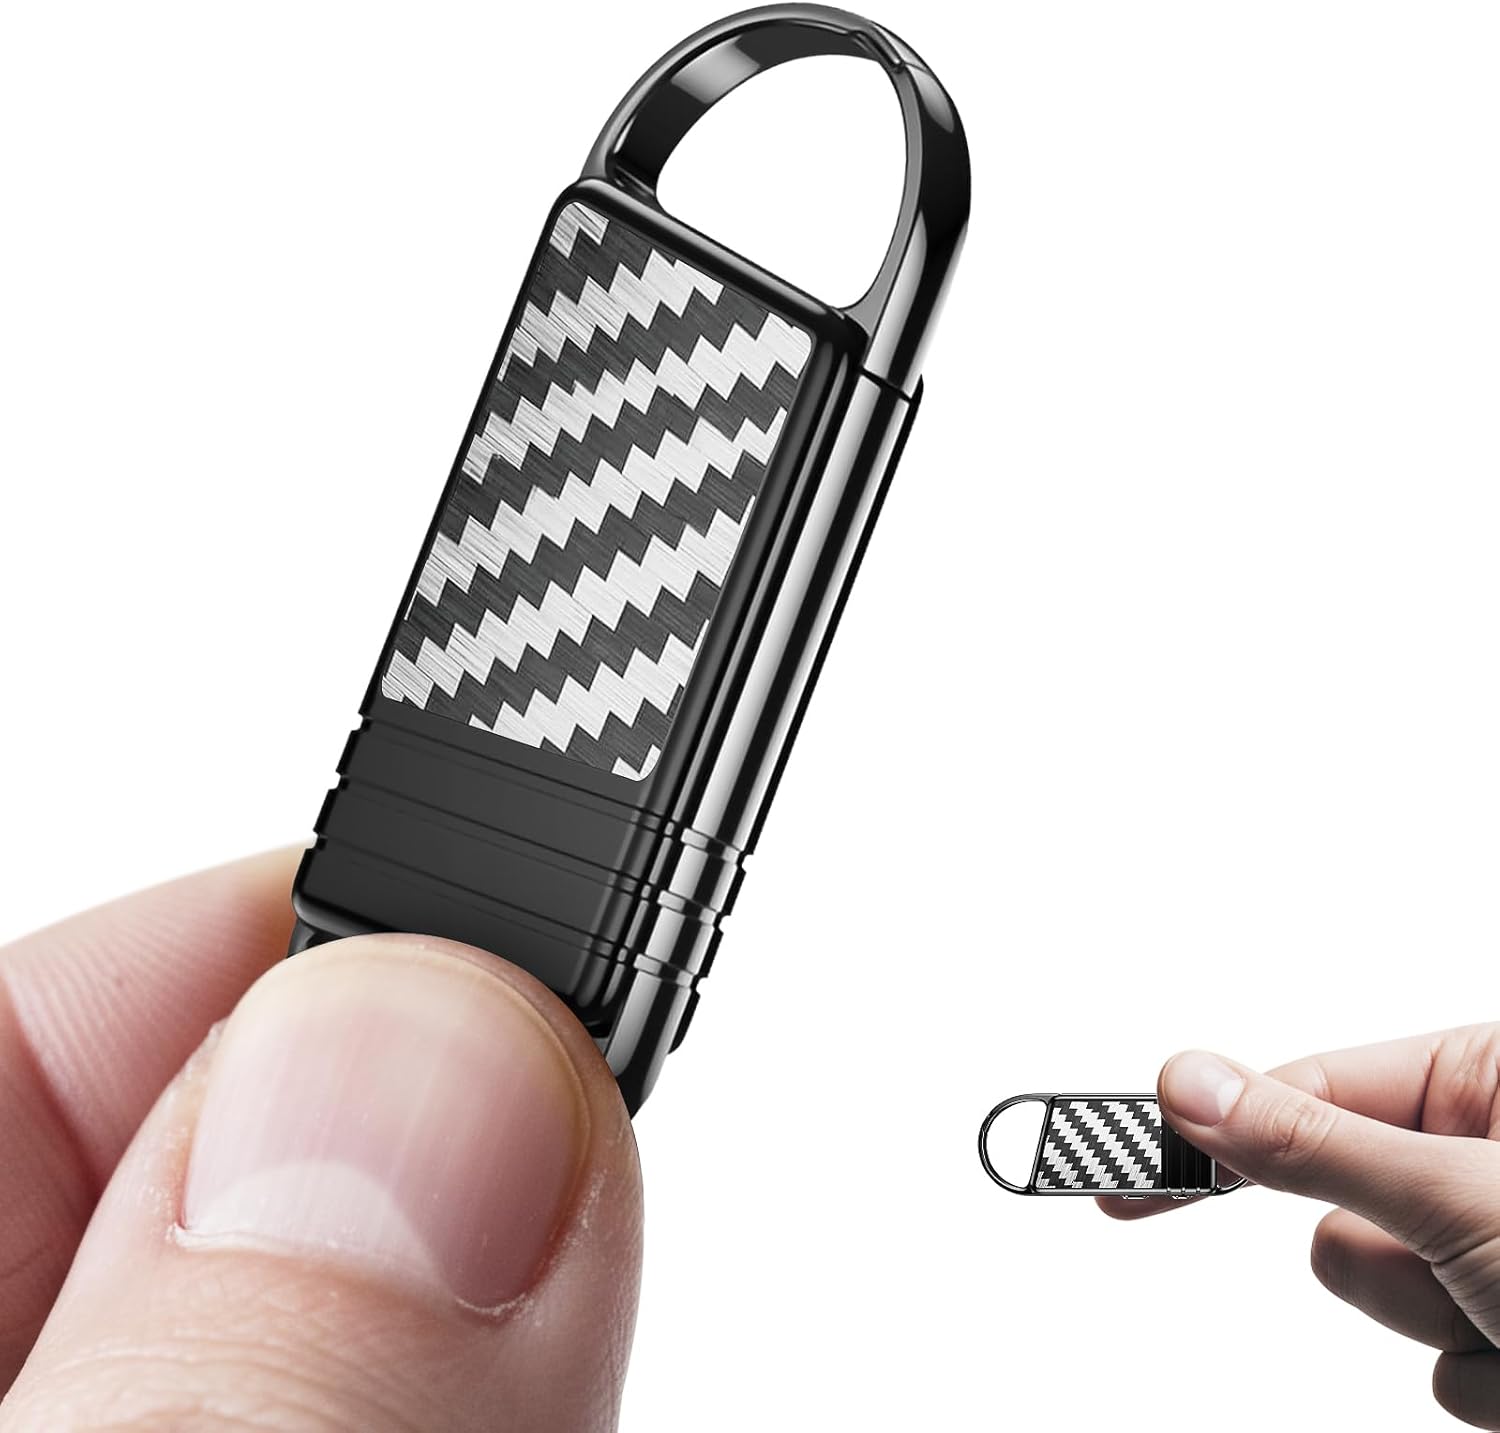
The Xelarvex Voice Activated Recorder is a compact and powerful audio recording device designed for various applications, including lectures, meetings, and interviews. It features AI-intelligent noise reduction, voice-activated recording, and a long-lasting battery, all within a portable design.
2. Product Overview
2.1. Package Contents
- Xelarvex 64GB Voice Activated Recorder
- USB Type-C Cable (for charging and data transfer)
- User Manual
2.2. Device Features
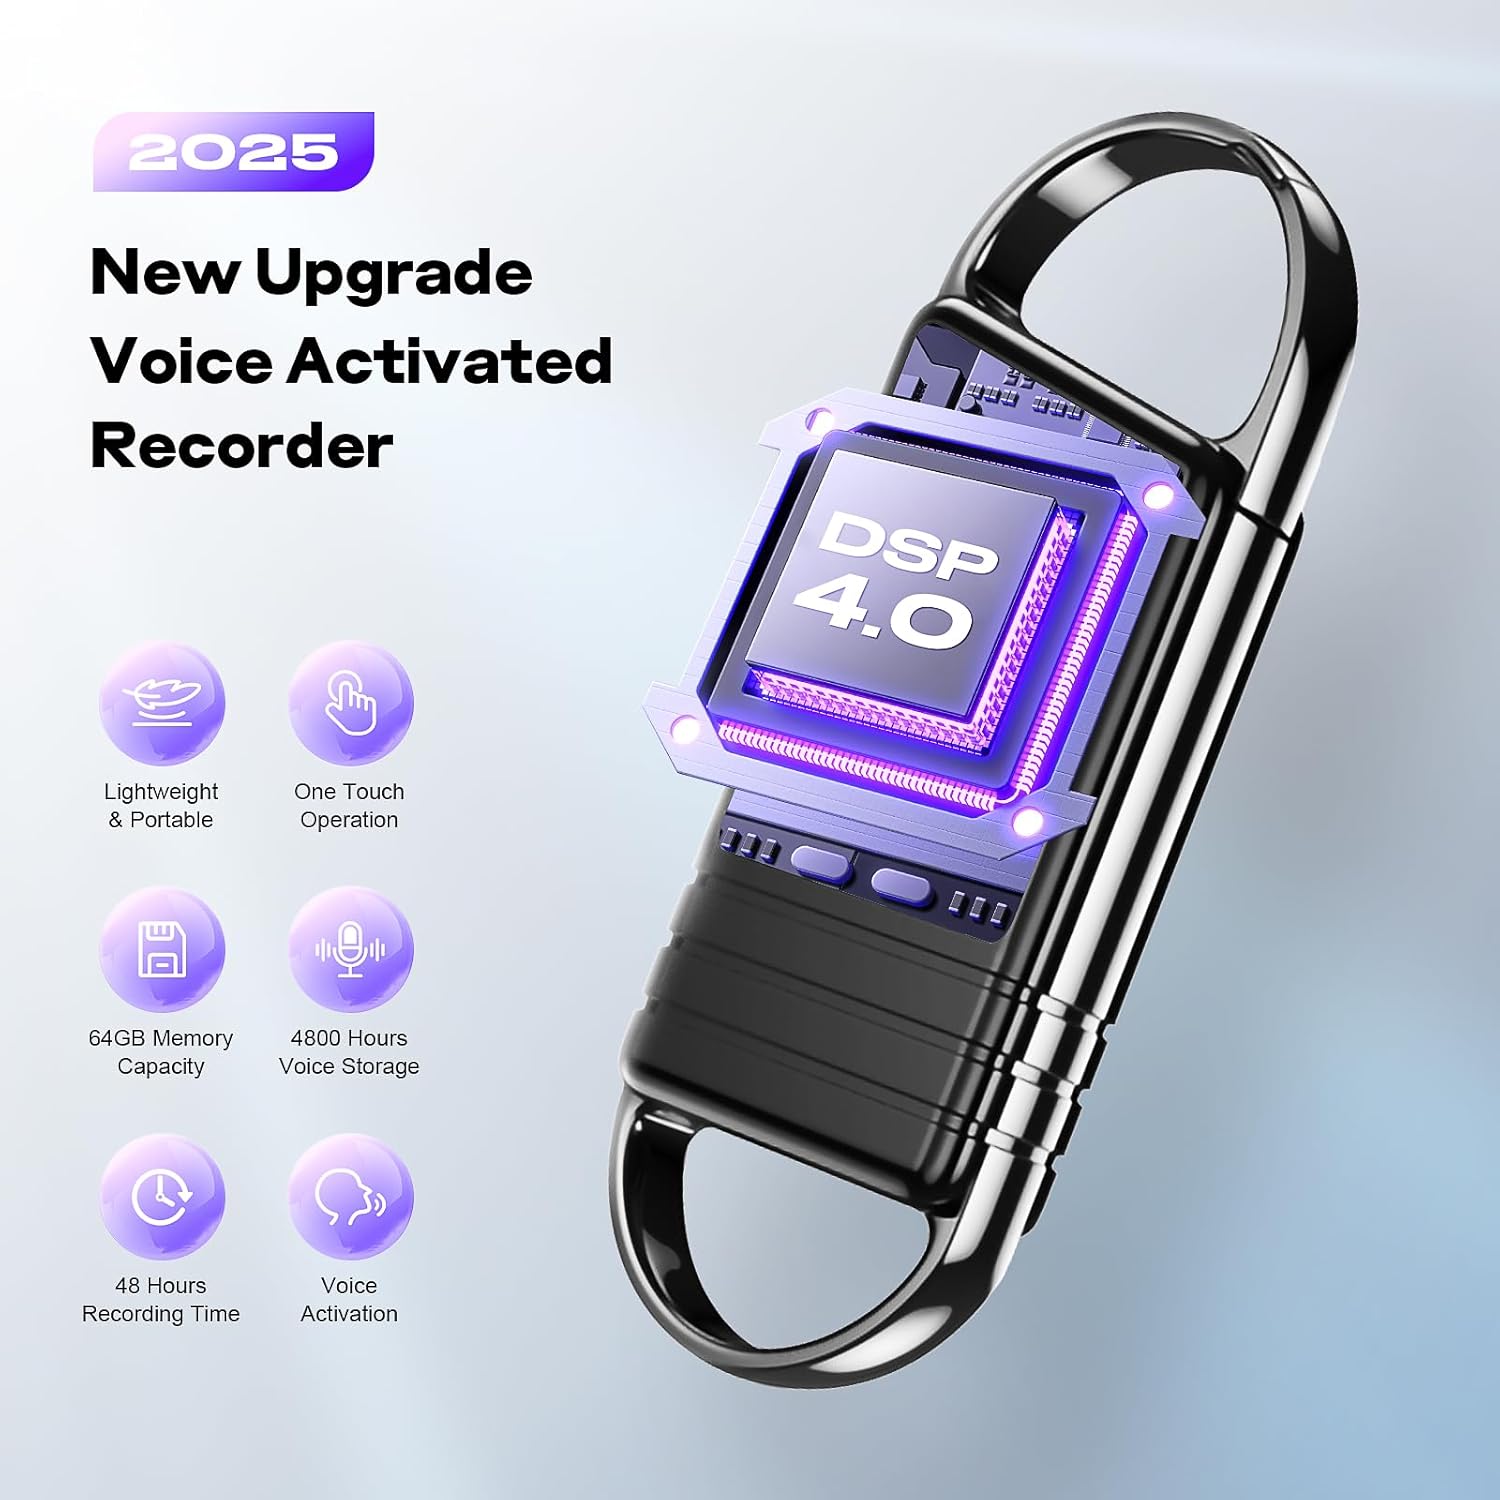
- 64GB Internal Storage: Provides up to 4,800 hours of audio recording capacity (at 192Kbps).
- Voice-Activated Recording (VAR): Automatically starts recording when sound is detected and pauses during silence, optimizing storage space.
- AI Noise Cancellation: Utilizes an AI smart sound processing chip to reduce ambient noise by up to 97%, ensuring clear audio.
- Long Battery Life: Up to 48 hours of continuous recording on a single 1.5-hour full charge. Features automatic file saving before powering off due to low battery.
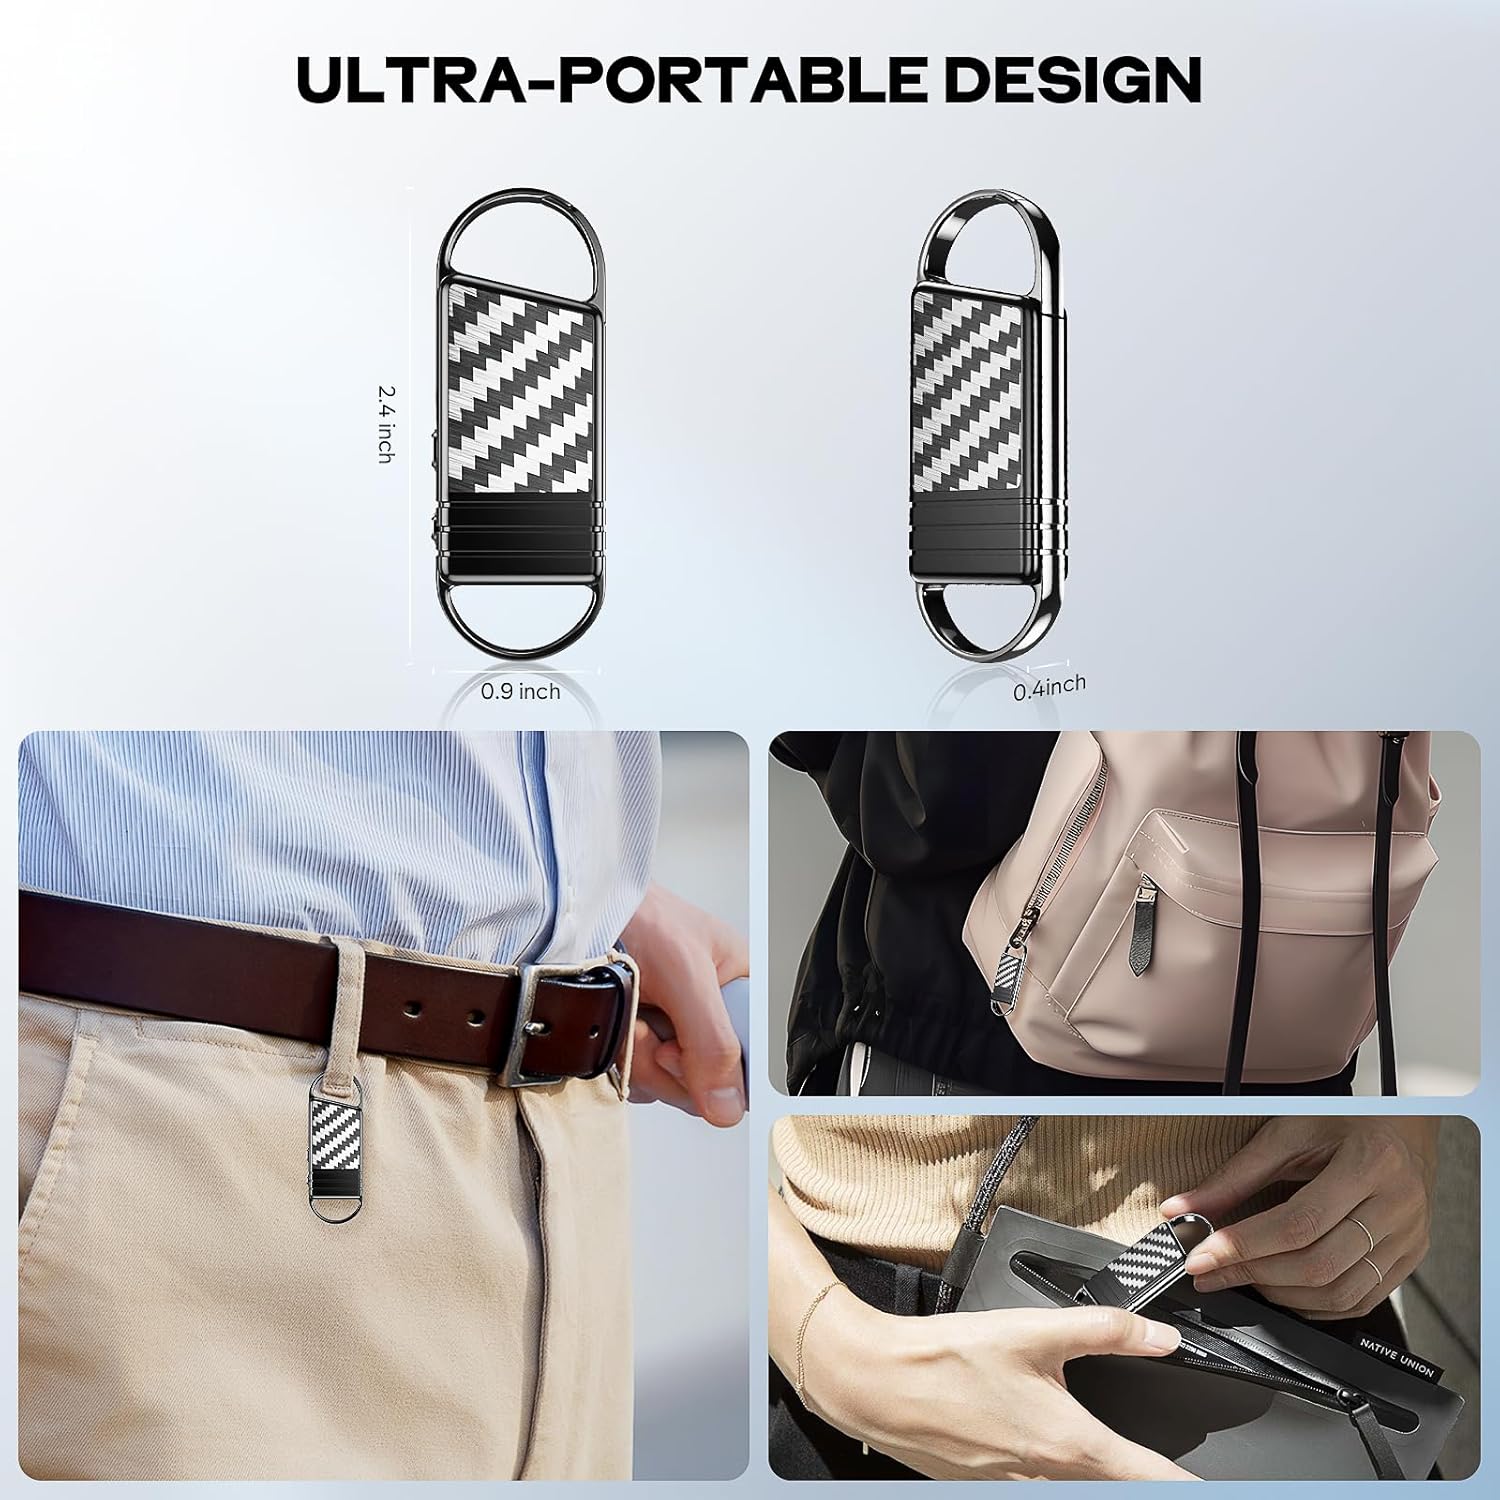
- Ultra-Portable Design: Weighs approximately 1 ounce, making it easy to carry and discreetly use.
- Multi-Functional: Compatible with personal computers (Windows/Mac) and Android phones for file management.
- Built-in Microphone: Integrated microphone for convenient audio capture.
- 3.5mm Headphone Jack: For direct audio playback.
2.3. Device Diagram
Refer to the image below for a visual representation of the recorder's components and features.
3. Setup
3.1. Charging the Device
Before first use, fully charge the recorder. Connect the supplied USB Type-C cable to the recorder's charging port and the other end to a USB power adapter (not included) or a computer's USB port. A full charge typically takes approximately 1.5 hours. The device will indicate charging status (e.g., an LED indicator).
3.2. Initial Power On
Locate the power switch or button on the device. Slide or press it to the 'ON' position to power on the recorder. The device may display a startup indicator or light up.
4. Operating Instructions
4.1. Basic Recording
- Power On: Ensure the device is powered on.
- Start Recording: Locate the recording button or switch. Press or slide it to initiate recording. An indicator light (e.g., red LED) typically confirms recording is active.
- Stop Recording: Press or slide the recording button/switch again to stop recording. The device will automatically save the current recording file.
4.2. Voice-Activated Recording (VAR)
The Voice-Activated Recording feature allows the device to record only when sound is detected, conserving battery and storage space. This feature is ideal for lectures or meetings where there may be periods of silence.

To activate VAR: Consult your device's specific controls. Typically, there is a dedicated switch or a menu option to enable or disable voice activation. When enabled, the recorder will automatically start recording when sound levels exceed a certain threshold (e.g., >45dB) and pause when sound levels drop below it (e.g., <45dB).
4.3. AI Noise Reduction
The recorder is equipped with an AI smart sound processing chip that actively reduces ambient noise. This feature is automatically engaged to enhance audio clarity, making recordings more intelligible, especially in noisy environments.

4.4. Playback
To listen to your recordings directly from the device:
- Connect headphones to the 3.5mm headphone jack.
- Use the device's navigation buttons (if available) to browse and select recordings.
- Press the play button to start playback.
Alternatively, recordings can be played back by connecting the device to a computer or smartphone (see Section 5).
4.5. File Management
Recordings are saved as WAV files. To manage, transfer, or delete files, connect the recorder to a computer or compatible smartphone.
5. Connecting to Computer/Phone
The Xelarvex recorder is designed for easy file transfer and management with personal computers (Windows and Mac) and Android phones.

5.1. Connecting to a Computer
- Connect the recorder to your computer using the supplied USB Type-C cable.
- The recorder will appear as a removable storage device (e.g., a USB drive) on your computer.
- Open the drive to access your recorded WAV files. You can copy, move, or delete files as needed.
5.2. Connecting to an Android Phone
For Android phones, you may need an OTG adapter (not included) to connect the USB Type-C cable from the recorder to your phone. Once connected, the phone should recognize the recorder as external storage, allowing you to manage files through a file manager application.
6. Maintenance
- Cleaning: Use a soft, dry cloth to clean the device. Avoid liquid cleaners or abrasive materials.
- Storage: Store the recorder in a cool, dry place away from direct sunlight and extreme temperatures.
- Battery Care: To prolong battery life, avoid fully discharging the battery frequently. Charge the device regularly, even if not in use for extended periods.
- Data Backup: Regularly back up important recordings to your computer or cloud storage to prevent data loss.
7. Troubleshooting
| Problem | Possible Cause | Solution |
|---|---|---|
| Device does not power on. | Low battery. | Charge the device for at least 1.5 hours. |
| Cannot record. | Insufficient storage space. | Delete old files or transfer them to a computer to free up space. |
| Poor audio quality. | Microphone obstructed; excessive background noise. | Ensure microphone is clear. Use AI Noise Reduction in noisy environments. Position closer to the sound source. |
| Device not recognized by computer. | Faulty USB cable; incorrect connection; driver issue. | Try a different USB port or cable. Ensure the cable is securely connected. Restart the computer. |
| Voice Activation not working. | VAR is disabled; sound level too low. | Ensure VAR is enabled. Increase sensitivity if adjustable, or place closer to the sound source. |
8. Specifications
| Feature | Detail |
|---|---|
| Brand | Xelarvex |
| Model | Voice Activated Recorder |
| Storage Capacity | 64GB (approx. 63.99 GB usable) |
| Recording Time | Up to 4,800 hours (at 192Kbps) |
| Battery Life (Continuous Recording) | Up to 48 hours |
| Charging Time | Approx. 1.5 hours |
| Weight | Approx. 1 ounce (28 grams) |
| Dimensions | Approx. 2.4 x 0.9 x 0.4 inches (based on image 71QRyuRxAsL) |
| Audio Format | WAV |
| Hardware Interface | USB Type-C |
| Microphone | Built-In |
| Headphones Jack | 3.5 mm |
| Compatible Devices | Personal Computer (Windows, Mac), Android Phones |

9. Warranty and Support
Xelarvex products are designed for reliability and performance. For warranty information and customer support, please refer to the official Xelarvex website or contact your retailer. Keep your purchase receipt as proof of purchase for warranty claims.
For technical assistance or inquiries, please visit the Xelarvex support page or contact their customer service department. Contact details are typically provided on the product packaging or the official brand website.