1. Introduction
This manual provides comprehensive instructions for the installation, operation, and maintenance of your MASTERFUN Automatic Aluminum Chicken Coop Door, model JSM16BK. Please read this manual thoroughly before installation and use to ensure proper function and safety.
2. Safety Information
- Always ensure the installation area is clear of obstructions.
- Keep hands and fingers away from the door mechanism during operation to prevent injury.
- The door features an anti-pinch safety mechanism. If an obstruction is detected, the door will reverse and stop. However, always supervise initial operations.
- Do not attempt to modify the device. Use only original parts and accessories.
- Ensure the solar panel is installed in a location that receives adequate sunlight for optimal charging.
- This product is designed for outdoor use and is weather-resistant. However, extreme weather conditions may affect performance.

Figure 2.1: Gentle Anti-Pinch Protection. The door automatically reverses and stops if resistance is detected, preventing injury to animals.
3. Package Contents
Verify that all components are present and undamaged upon unpacking.
- Automatic Chicken Coop Door Unit x1
- Wireless Remote Control x1
- 7W Solar Panel x1
- Universal Mounting Bracket x1
- USB Charging Cables x2
- Instruction Manual x1
- Mounting Screws x8
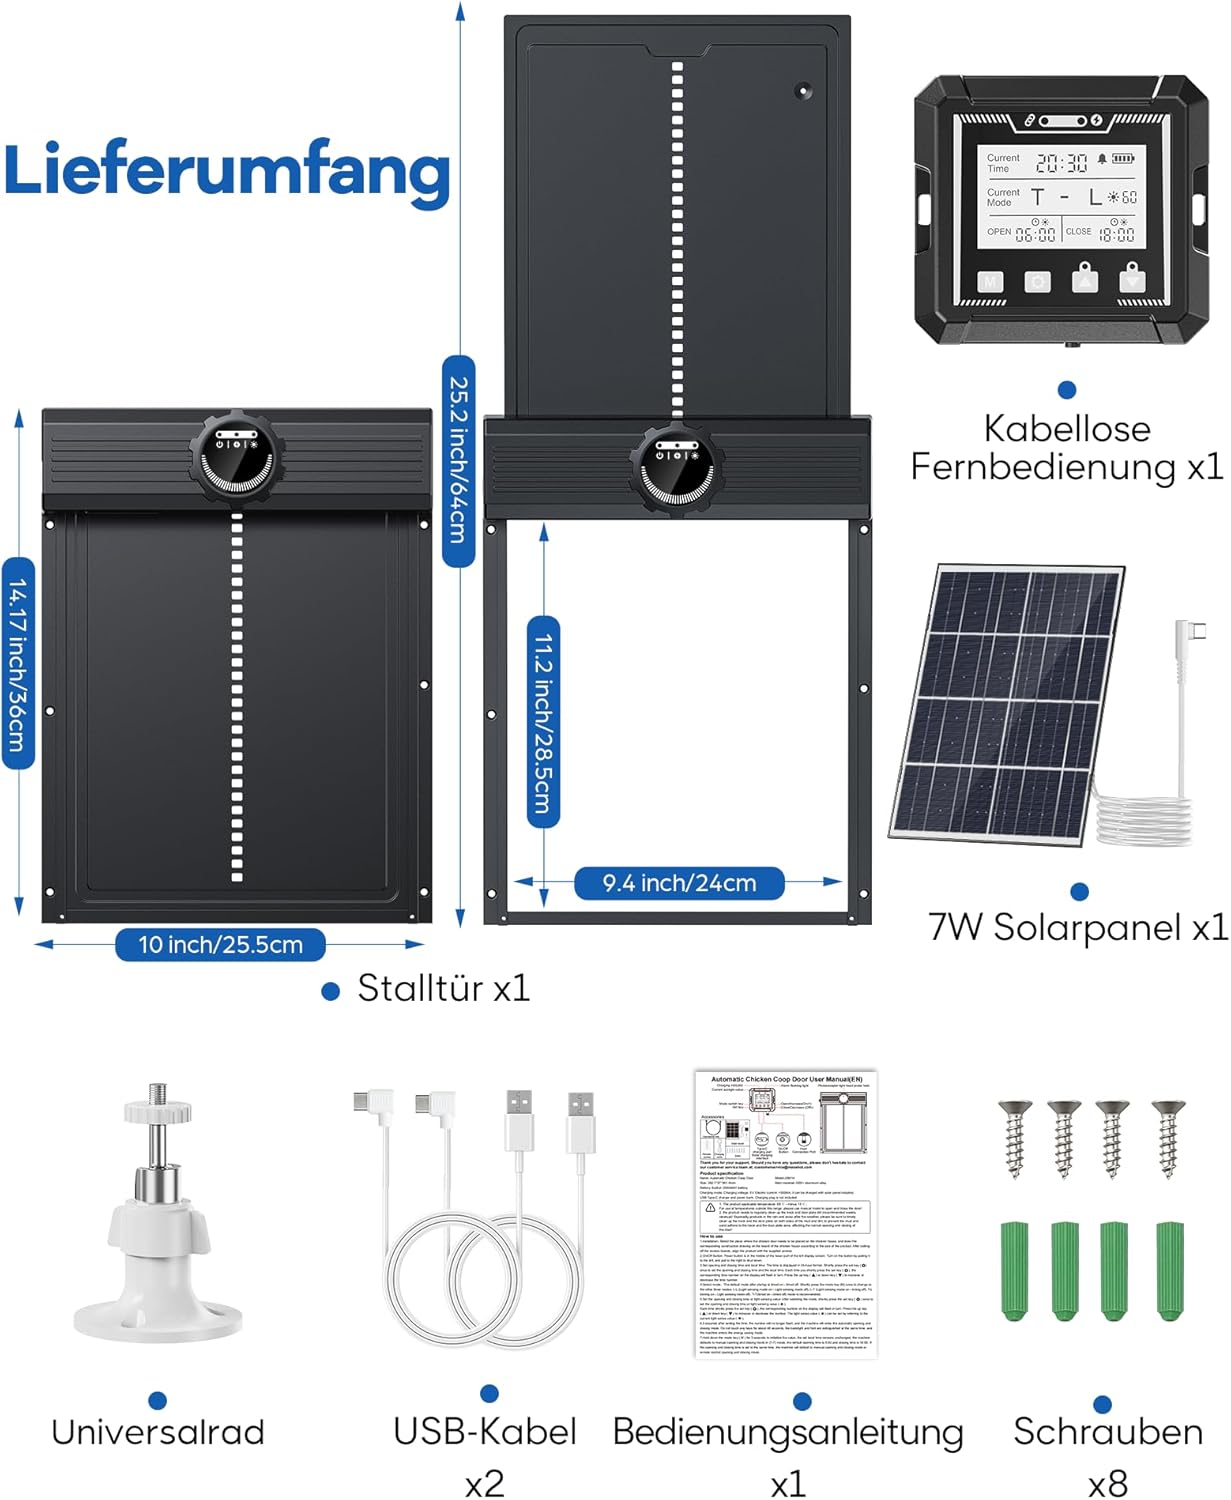
Figure 3.1: Package Contents. All items included in your purchase.
4. Setup and Installation
- Prepare the Installation Area: Ensure the coop opening is clean and free of debris. The door requires a flat surface for mounting.
- Mount the Door Unit: Position the automatic door unit over the coop opening. Use the provided mounting screws to securely attach the unit to the coop structure. Ensure it is level and operates smoothly without obstruction.
- Install the Solar Panel: Choose a location for the 7W solar panel that receives maximum direct sunlight throughout the day. Use the universal mounting bracket to secure the solar panel. Connect the solar panel cable to the charging port on the main door unit.
- Initial Charge: Before first use, it is recommended to fully charge the door's internal battery using either the solar panel or one of the provided USB cables connected to a suitable power adapter (not included).
- Remote Control Pairing (if necessary): The remote control should be pre-paired. If not, refer to the "Operating Instructions" section for pairing procedures.

Figure 4.1: Charging Options. The door can be charged via the solar panel or a USB cable.
5. Operating Instructions
5.1. Remote Control Operation
The wireless remote control allows for convenient operation and programming from a distance of up to 120 meters.
- OPEN Button: Press to manually open the door. A green light on the remote indicates the door is open.
- CLOSE Button: Press to manually close the door. A green light on the remote indicates the door is closed.
- Programming Buttons: Use these buttons to set timers and adjust light sensor sensitivity. Refer to the remote control's display for specific programming steps.

Figure 5.1: Door Status at a Glance. The remote control displays current settings and door status.

Figure 5.2: Dedicated Wireless Control. Reliable remote operation with a range of up to 120 meters.
5.2. Automatic Operating Modes
The door offers flexible control options using a combination of light sensor and timer functions.
- Mode A (Light Open / Light Close): The door opens at dawn (based on light sensor) and closes at dusk (based on light sensor).
- Mode B (Light Open / Timer Close): The door opens at dawn (based on light sensor) and closes at a set time.
- Mode C (Timer Open / Timer Close): The door opens at a set time and closes at a set time.
- Mode D (Timer Open / Light Close): The door opens at a set time and closes at dusk (based on light sensor).
To select and configure these modes, use the programming buttons on the remote control. Refer to the remote control's display for detailed instructions on setting specific times and light sensitivity levels.
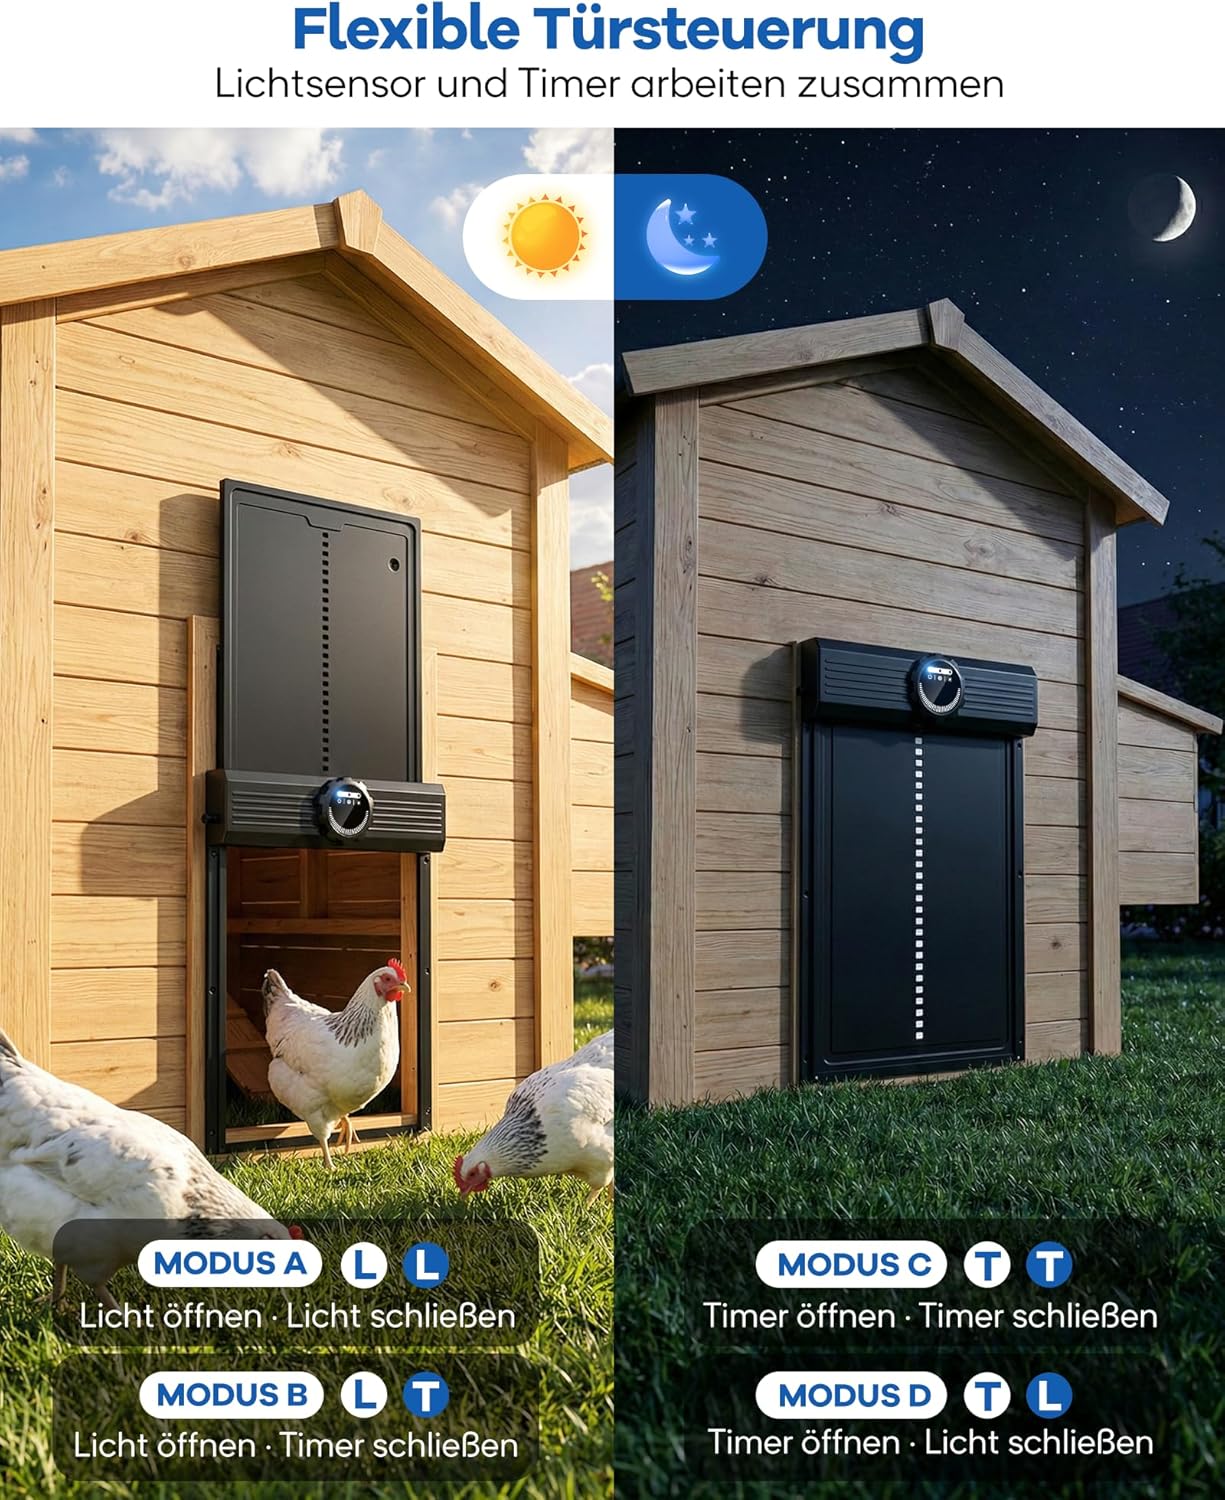
Figure 5.3: Flexible Door Control. Choose from four operating modes combining light sensor and timer functions.
6. Maintenance
- Cleaning: Periodically clean the door and its tracks to ensure smooth operation. Use a damp cloth to wipe away dirt and debris. Do not use harsh chemicals.
- Solar Panel: Keep the solar panel clean and free of dust, leaves, or snow to maximize charging efficiency.
- Battery Life: The integrated battery provides up to one month of operation on a full charge. Monitor the battery indicator on the remote control. Recharge as needed via solar power or USB.
- Inspection: Regularly inspect the door for any signs of wear or damage. Ensure all mounting screws are tight.
Figure 6.1: Long-lasting Power. The controller offers extended battery life and flexible charging options.
7. Troubleshooting
| Problem | Possible Cause | Solution |
|---|---|---|
| Door does not open/close automatically. | Incorrect timer settings, insufficient light for sensor, low battery, obstruction. | Check timer settings on remote. Ensure light sensor is clean and unobstructed. Charge the battery. Check for physical obstructions in the door path. |
| Remote control not working. | Remote battery low, out of range, interference. | Replace remote battery. Move closer to the door unit. Reduce potential interference sources. |
| Door stops mid-operation. | Obstruction detected by anti-pinch sensor. | Clear any obstructions from the door path. The door should resume operation or can be manually reset. |
| Low battery warning. | Battery charge is low. | Ensure solar panel is clean and receiving sunlight. Connect USB charger for a full charge. |

Figure 7.1: Instant Warnings for Anomalies. The system provides alerts for various operational issues.
8. Specifications
- Model Number: JSM16BK
- Brand: MASTERFUN
- Material: Aluminum
- Color: Black
- Product Dimensions (Door Unit): 28 cm (L) x 10 cm (W) x 36 cm (H)
- Door Opening Dimensions: Approximately 24 cm (W) x 28.5 cm (H)
- Weight: 1.69 kg
- Special Features: Solar-powered, Wireless Remote Control, Light Sensor, Timer Function, Anti-Pinch Safety, Weather-resistant (IP67)
- Battery Life: Up to 1 month (on full charge)
- Charging Time: Approximately 3 hours (via USB)
- Solar Panel: 7W
- Remote Control Range: Up to 120 meters
- Recommended Use: Outdoors, suitable for all chicken breeds.

Figure 8.1: Weather-Resistant Design. Built to withstand various outdoor conditions.
9. Warranty and Support
MASTERFUN products are designed for durability and reliability. Specific warranty details may vary by region and retailer. Please retain your proof of purchase for warranty claims.
For technical support, troubleshooting assistance, or to inquire about replacement parts, please contact your retailer or visit the official MASTERFUN website. Provide your product model number (JSM16BK) and a detailed description of the issue when seeking support.
Note: Information regarding specific warranty periods or direct manufacturer contact details was not available in the provided product data. Please refer to your purchase documentation for precise warranty terms.