1. Introduction
Welcome to the user manual for your Ambition Wireless Tattoo Machine, Standard Model. This guide provides essential information for the safe and effective operation, maintenance, and troubleshooting of your new tattoo pen. Please read this manual thoroughly before first use and retain it for future reference.
2. Safety Information
For external use only. Always prioritize safety when operating tattoo equipment. Failure to follow safety guidelines can result in injury or damage to the device.
- Ensure the machine is clean and sterilized according to industry standards before each use.
- Always use sterile, single-use needle cartridges.
- Do not operate the machine if it appears damaged or malfunctioning.
- Keep the machine away from water and other liquids to prevent electrical hazards.
- Store the machine in a dry, safe place when not in use.
- Keep out of reach of children.
3. Package Contents
Verify that all items are present in your package:
- 1 x Wireless Tattoo Machine (with 42 mm grip)
- 1 x Extra 34 mm grip
- 1 x RCA adapter
- 1 x Fast charging cable
- 1 x Zipper box
4. Product Overview
The Ambition Wireless Tattoo Machine is a high-performance rotary tattoo pen designed for precision and durability. It features a brushless motor and a high-capacity battery for extended operation.
Key Features:
- Material: Constructed from aluminum alloy body and stainless steel drive bar.
- Motor: Custom brushless motor (20x10 mm) for low vibration and reduced noise. Motor speed: 12V/10500 RPM, Torque: 180 g.cm.
- Battery: 2400 mAh capacity with a color touch screen. Offers 8-10 hours of operation at 8V.
- Voltage Output: Adjustable from 1V to 12V with a fixed current of 2A.
- Stroke Length: 4.0 mm.
- Display: Color touch screen with high sensitivity, operable even with gloves. Features include voltage, hertz, billing function, timer, flashlight page, time, and date.
- Grips: Includes two interchangeable grips (42 mm and 34 mm) for comfortable handling.

Image: The Ambition Wireless Tattoo Machine with its digital display, highlighting key specifications such as weight, size, motor details, battery capacity, and voltage range.
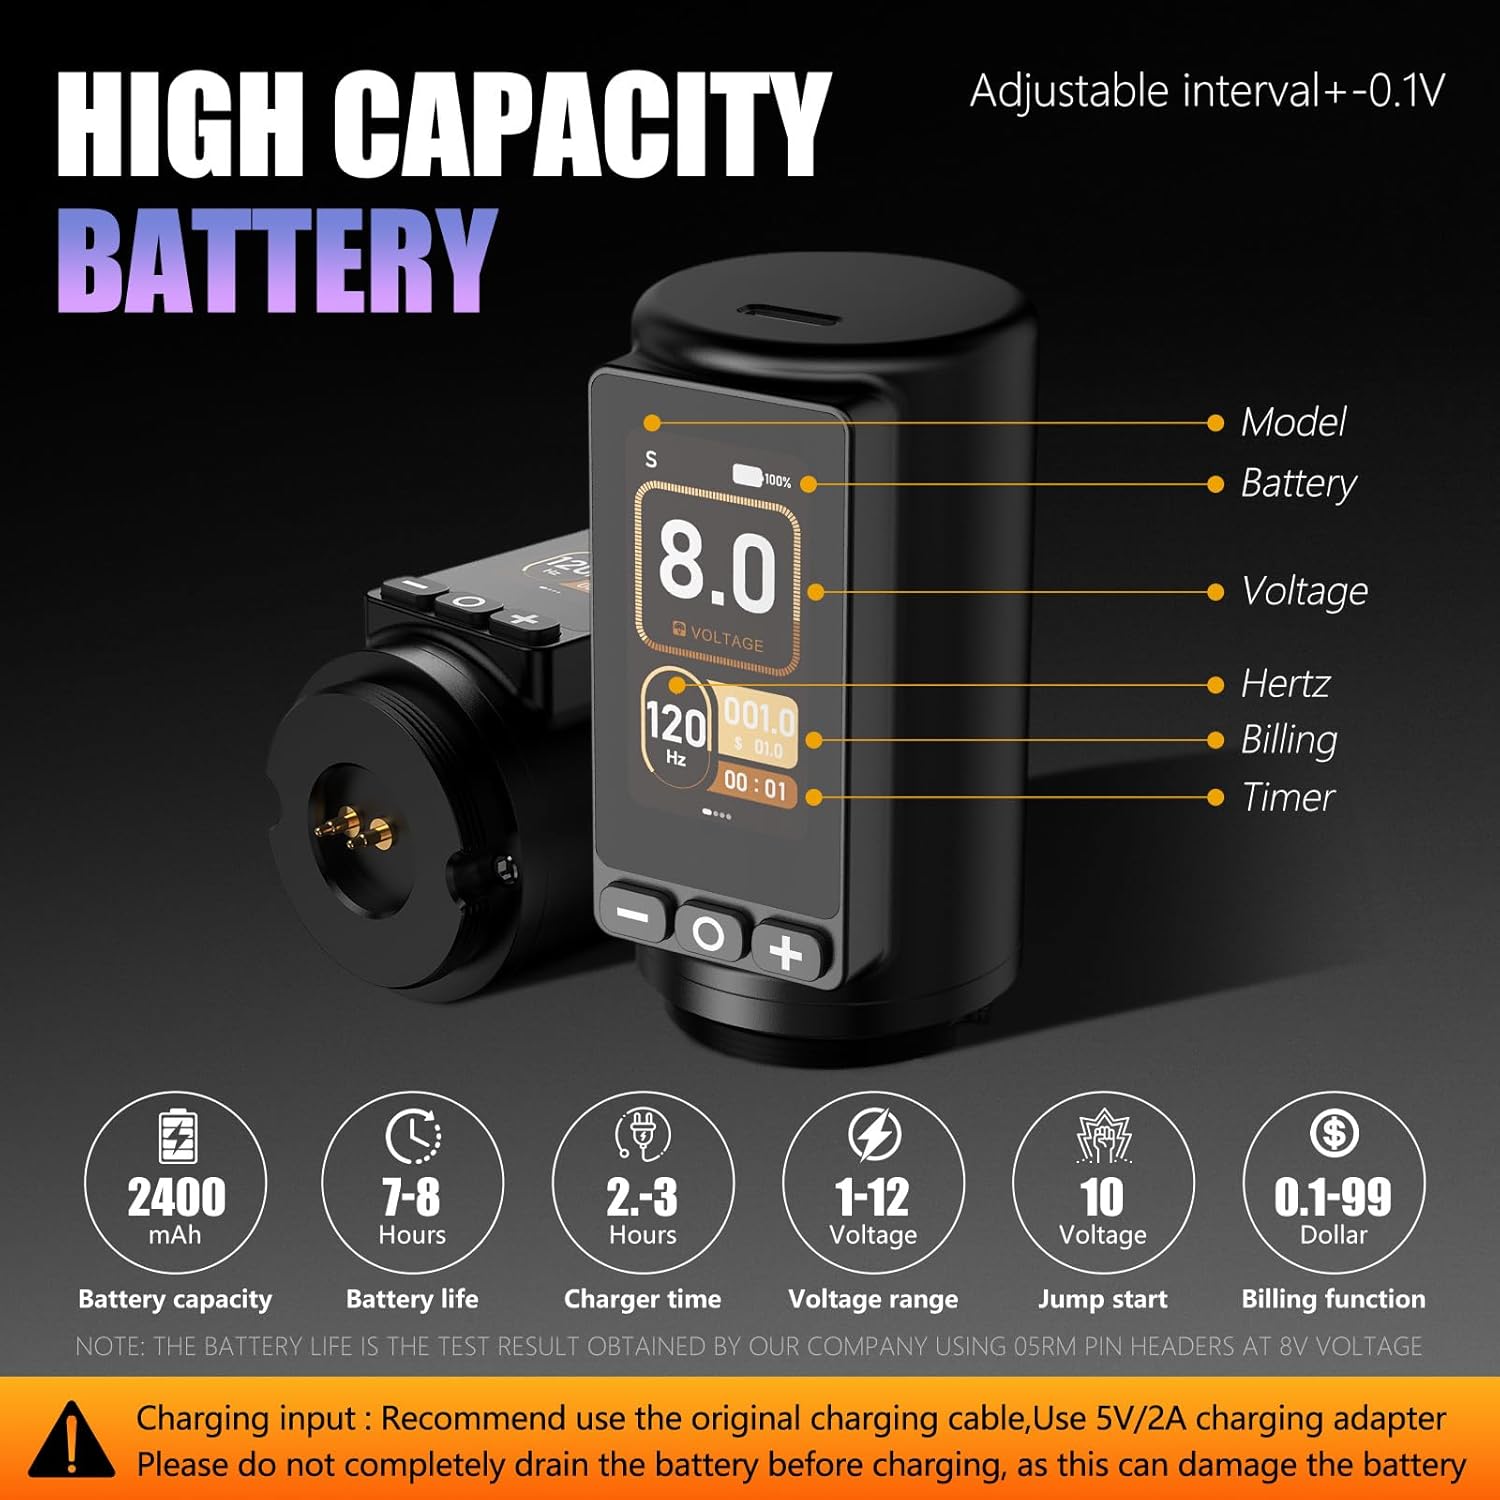
Image: An illustration of the machine's direct drive system, emphasizing the straight drive bar for less resistance and powerful needle impact.

Image: A detailed view of the machine's high-capacity 2400mAh battery and color touch screen, showing various display functions like voltage, hertz, and timer.

Image: The tattoo machine demonstrating its versatility, capable of both wireless operation and wired use via an RCA adapter when the battery is depleted.

Image: The machine presented with its two ergonomic grip options (42mm and 34mm), designed for comfort during long tattooing sessions.
5. Setup
5.1. Charging the Battery
- Connect the provided fast charging cable to the charging port on the machine.
- Plug the other end of the cable into a 5V/2A charging adapter (not included).
- The display will indicate charging status. A full charge typically takes 2-3 hours.
- Important: Do not completely drain the battery before charging, as this can damage the battery life.
5.2. Attaching the Grip
- Select your preferred grip size (42 mm or 34 mm).
- Twist the grip onto the machine body until it is securely fastened.
5.3. Inserting a Needle Cartridge
- Ensure the machine is powered off.
- Gently push the needle cartridge into the front opening of the machine until it clicks into place.
- Twist the grip to adjust needle depth as required.
5.4. Wired Operation (RCA Adapter)
If the battery runs out or for preference, the machine can be operated with an RCA cable.
- Remove the battery pack by twisting it off.
- Attach the provided RCA adapter to the machine body.
- Connect a standard RCA cable from your power supply to the adapter.
6. Operating Instructions
6.1. Powering On/Off
- To Power On: Press and hold the power button (usually the center button) for a few seconds until the display illuminates.
- To Power Off: Press and hold the power button again until the display turns off.
6.2. Adjusting Voltage
- Use the '+' and '-' buttons on the touch screen to increase or decrease the voltage.
- The voltage can be adjusted in 0.1V increments within the 1V-12V range.
6.3. Using the Touch Screen Interface
The color touch screen provides access to various functions:
- Voltage Display: Shows the current operating voltage.
- Hertz (Hz): Displays the machine's operating frequency.
- Timer: Tracks the duration of your tattooing session.
- Billing Function: Allows for tracking usage for billing purposes (refer to on-screen instructions for details).
- Flashlight Page: Access additional settings or features.
- Lock Screen: Prevents accidental changes during operation.
Navigate through the interface by tapping or swiping as indicated on the screen.
7. Maintenance
7.1. Cleaning
- Always disconnect the machine from any power source before cleaning.
- Wipe down the exterior of the machine with a clean, damp cloth and a mild, non-abrasive disinfectant.
- Do not immerse the machine in liquid.
- Ensure no liquids enter the motor housing or charging port.
7.2. Storage
- Store the machine in its zipper box or a protective case to prevent damage.
- Keep in a cool, dry place away from direct sunlight and extreme temperatures.
8. Troubleshooting
If you encounter issues with your Ambition Wireless Tattoo Machine, refer to the table below for common problems and solutions.
| Problem | Possible Cause | Solution |
|---|---|---|
| Machine does not power on. | Battery is depleted. | Charge the battery fully. |
| Power button not pressed correctly. | Press and hold the power button for a few seconds. | |
| Machine stops during operation. | Battery is low. | Recharge the battery or switch to wired operation with the RCA adapter. |
| Loose connection. | Ensure battery pack or RCA adapter is securely attached. | |
| Voltage adjustment not working. | Screen is locked. | Unlock the screen via the touch interface. |
| Machine feels hot. | Prolonged continuous use. | Allow the machine to cool down. Ensure proper ventilation. |
9. Specifications
| Feature | Detail |
|---|---|
| Material | Aluminium alloy body, stainless steel drive bar |
| Product Dimensions | 7.48 x 5.1 x 2.3 inches (134 mm length, 42 mm/34 mm width) |
| Item Weight | 15.68 ounces (266 g / 212 g) |
| Motor Type | Brushless Motor |
| Motor Size | 20 x 10 mm |
| Motor Speed | 12V/10500 RPM |
| Torque | 180 g.cm |
| Needle Stroke | 4.0 mm |
| Battery Capacity | 2400 mAh |
| Charging Time | 2-3 hours |
| Operation Time | 8-10 hours (under normal 8V voltage) |
| Output Voltage | 1V-12V (adjustable) |
| Output Fixed Current | 2A |
| UPC | 810174734591 |
| ASIN | B0FM1RGZJ1 |
10. Warranty and Support
For detailed warranty information, product support, or service inquiries, please refer to the official Ambition website or contact Ambition customer support directly. Keep your purchase receipt as proof of purchase for any warranty claims.
Ambition Customer Support: Please visit Ambition Store on Amazon for contact information and additional resources.