1. Introduction
Thank you for purchasing the Generic 21V Lithium-Ion Electric Wrench Set. This powerful and versatile tool is designed for efficient tightening and loosening of bolts and nuts, as well as drilling tasks in various materials. This manual provides essential information for safe operation, maintenance, and troubleshooting to ensure optimal performance and longevity of your tool.
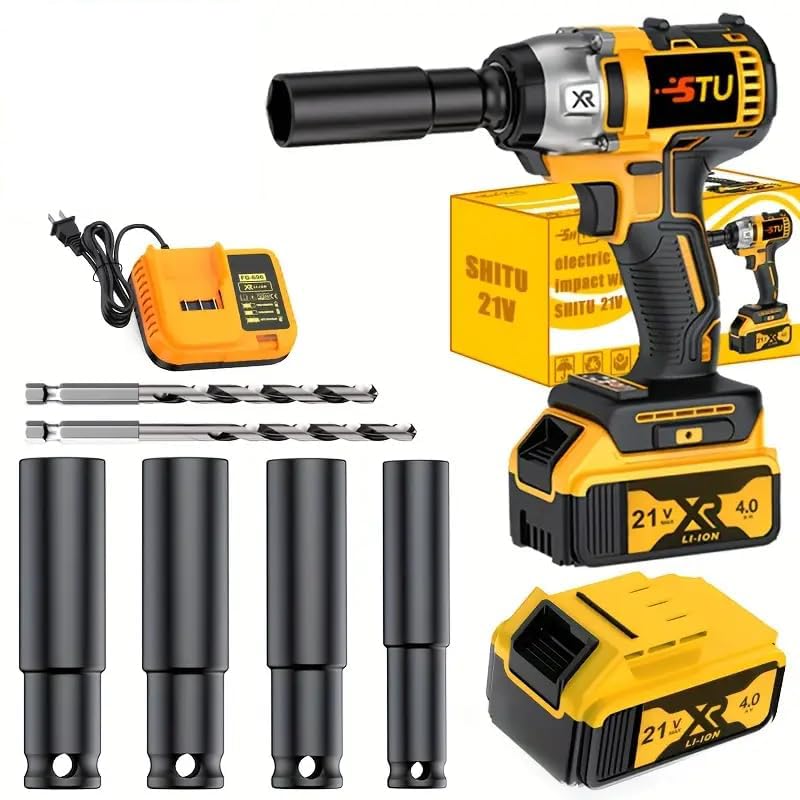
Image 1: The Generic 21V Lithium-Ion Electric Wrench Set. This image displays the main electric wrench unit, a lithium-ion battery, and various accessories, highlighting the compact and portable design of the tool.
2. Safety Instructions
Always follow basic safety precautions when using electric tools to reduce the risk of fire, electric shock, and personal injury.
- Work Area Safety: Keep your work area clean and well-lit. Cluttered or dark areas invite accidents. Do not operate power tools in explosive atmospheres, such as in the presence of flammable liquids, gases, or dust.
- Electrical Safety: Avoid body contact with earthed or grounded surfaces such as pipes, radiators, ranges, and refrigerators. Do not expose power tools to rain or wet conditions.
- Personal Safety: Always wear eye protection. Use hearing protection when operating the tool for extended periods. Dress properly; avoid loose clothing or jewelry that can get caught in moving parts.
- Tool Use and Care: Do not force the power tool. Use the correct power tool for your application. Disconnect the plug from the power source and/or the battery pack from the power tool before making any adjustments, changing accessories, or storing power tools.
- Battery Pack Use and Care: Recharge only with the charger specified by the manufacturer. Do not use a battery pack or tool that is damaged or modified.
3. Package Contents
Carefully unpack the box and ensure all items are present and in good condition. If any items are missing or damaged, contact your retailer.
- 21V Electric Wrench Unit
- Lithium-Ion Battery (1 unit)
- Battery Charger
- Assorted Drill Bits (including twist drills and impact drills)
- Storage Case/Paper Box
- Additional Accessories (specific items may vary, refer to product packaging)
4. Setup
4.1 Charging the Battery
- Connect the charger to a standard power outlet.
- Insert the battery into the charger. Ensure it is seated correctly.
- Allow the battery to charge fully. The charger typically has an indicator light that changes color or turns off when charging is complete. The fast-charging function allows for quick charging times.
- Once charged, disconnect the battery from the charger and unplug the charger from the outlet.
4.2 Installing the Battery
- Align the charged battery with the battery slot on the base of the electric wrench.
- Slide the battery into the slot until it clicks securely into place. Ensure it is firmly attached before operation.
4.3 Attaching Accessories
- Ensure the wrench is turned off and the battery is removed before attaching or changing accessories.
- Select the appropriate socket or drill bit for your task.
- Insert the accessory into the chuck or anvil of the wrench.
- Secure the accessory firmly. For chucks, tighten until the accessory is held securely. For anvils, ensure the pin or ring locks the socket in place.
5. Operating Instructions
5.1 General Operation
- Power On/Off: Press the trigger to start the wrench. Release the trigger to stop it.
- Direction Control: Use the forward/reverse switch, typically located near the trigger, to select the desired rotation direction (tightening or loosening).
- Speed Control: The wrench may feature variable speed control, allowing you to adjust the speed by varying the pressure on the trigger.
5.2 Tightening and Loosening Bolts/Nuts
- Select the correct size socket for the fastener.
- Attach the socket securely to the wrench.
- Set the direction switch to the desired mode (forward for tightening, reverse for loosening).
- Place the socket over the fastener, ensuring a snug fit.
- Press the trigger to operate the wrench. Apply steady pressure. The high-performance motor provides strong torque for efficient operation.
- Release the trigger once the fastener is tightened or loosened.
5.3 Drilling Operations
This set includes various drill bits suitable for wood, metal, and plastic.
- Select the appropriate drill bit for the material and hole size.
- Securely attach the drill bit to the wrench's chuck.
- Mark the drilling location on the workpiece.
- Hold the wrench firmly, ensuring a stable grip with the ergonomically designed anti-slip handle.
- Start drilling at a low speed, gradually increasing as the bit penetrates the material.
- Maintain steady pressure and keep the drill bit straight.
- Withdraw the drill bit slowly once the hole is complete.
6. Maintenance
6.1 Cleaning
- Always disconnect the battery before cleaning.
- Wipe the tool with a clean, damp cloth. Do not use harsh chemicals or abrasive cleaners.
- Keep ventilation openings clear of dust and debris to prevent overheating.
6.2 Storage
- Store the electric wrench and its accessories in the provided storage case. This keeps tools tidy and prevents loss of accessories.
- Store in a dry, cool place, away from direct sunlight and moisture.
- Keep out of reach of children.
6.3 Battery Care
- Do not store batteries in a discharged state for extended periods. Recharge them periodically if not in use.
- Avoid exposing batteries to extreme temperatures.
7. Troubleshooting
If you encounter issues with your electric wrench, refer to the following common problems and solutions:
| Problem | Possible Cause | Solution |
|---|---|---|
| Wrench does not turn on | Battery not charged or improperly installed | Ensure battery is fully charged and securely clicked into place. |
| Insufficient power/torque | Battery low or accessory not suitable | Recharge battery. Ensure the correct size and type of accessory is used for the task. |
| Battery not charging | Charger not connected or faulty battery | Check charger connection to power outlet and battery. If problem persists, battery or charger may need replacement. |
| Accessories not fitting | Incorrect accessory size or type | Verify that the accessory matches the wrench's chuck/anvil size and is designed for power tool use. |
8. Specifications
- Model: B0FLY6LF8C
- Brand: Generic
- Voltage: 21V
- Battery Type: Lithium-Ion
- Manufacturer: Wrench
- Country of Origin: China
- Included Components: Electric Wrench, Battery, Charger, Drill Bits, Storage Case
Note: Specific torque ratings and other detailed technical specifications may be found on the product packaging or manufacturer's official website.
9. Warranty and Support
For warranty information, product support, or to purchase replacement parts, please refer to the documentation included with your product or contact the retailer where the product was purchased. Specific warranty terms and conditions may vary.