1. Introduction
This manual provides comprehensive instructions for the installation, operation, and maintenance of your EPLO Smart Toilet Bidet, Model E18. Please read this manual thoroughly before installation and use to ensure proper function and safety. Keep this manual for future reference.

Image 1.1: EPLO Smart Toilet Bidet E18, a modern elongated one-piece bidet toilet.
2. Safety Information
Observe the following safety precautions to prevent injury or damage to the product:
- Ensure the toilet is installed by a qualified professional in accordance with local plumbing and electrical codes.
- Do not attempt to repair or modify the unit yourself. Contact qualified service personnel for assistance.
- Keep electrical components dry. Do not spray water directly onto the unit.
- Ensure the power outlet is properly grounded and rated for 110 Volts.
- Do not use abrasive cleaners or harsh chemicals on the toilet surface or bidet nozzle.
3. Product Overview
3.1 Key Features
- Powerful Flush System: Features a built-in tank and booster pump for consistent high-pressure flushing, independent of household water pressure. Includes an emergency power-off flushing function.
- Splash-Free Foam Dispenser: Generates a foam barrier to prevent splashback and reduce waste adhesion, contributing to a cleaner bowl.
- Multiple Flushing Methods: Offers off-seat auto flush, foot-sensor flush, remote control flush, and a manual knob flush for versatile operation.
- Personalized Bidet Functions: Provides front, rear, and pulsating wash modes with adjustable water temperature, pressure, and nozzle position.
- Comfort Features: Includes a heated seat with adjustable temperature, warm air dryer, and a nightlight.
- Energy-Saving Design: Equipped with a dual flush system (1.6 GPF Full / 1.1 GPF Half) and an ECO Mode to optimize power and water usage.
- Automatic Deodorization: Integrated system to maintain a fresh bathroom environment.
3.2 Components
The EPLO Smart Toilet Bidet E18 includes the following main components:
- Smart Toilet Unit
- Remote Control
- Sealing Flange
- Three Way Angle Valve
- Mounting Kits
- User Manual (this document)
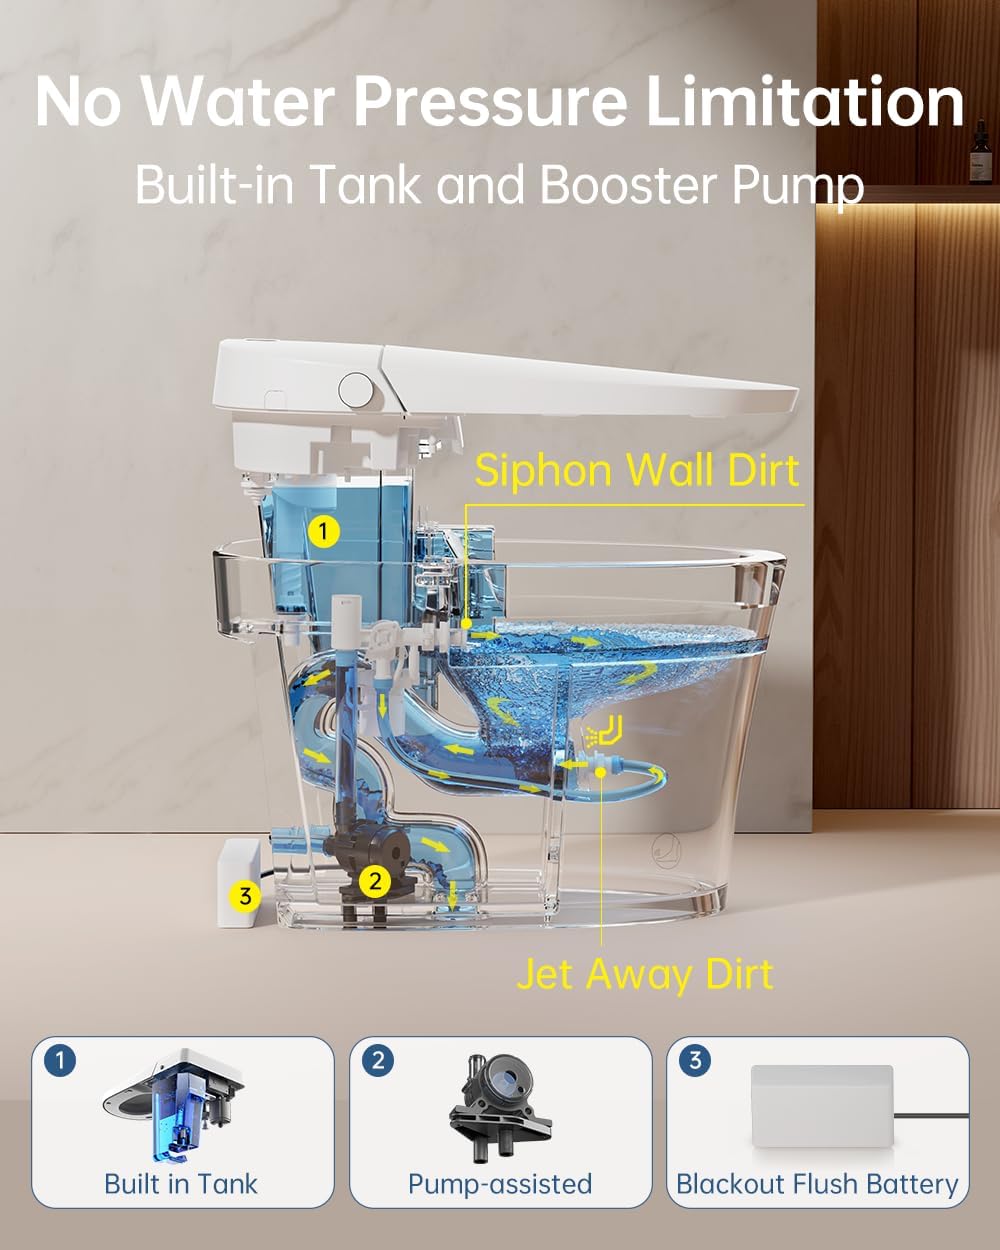
Image 3.1: Internal view illustrating the built-in tank and pump for consistent water pressure.

Image 3.2: The foam shield feature, demonstrating splash prevention, odor isolation, and anti-sticking properties.
4. Setup & Installation
Professional installation is recommended for this product. Ensure all local plumbing and electrical codes are followed. The toilet requires a 110 Volt power supply.
4.1 Pre-Installation Check
- Verify rough-in dimensions. The E18 model has a 12-inch rough-in.
- Confirm availability of a grounded 110V electrical outlet near the installation area.
- Ensure water supply line is accessible and can be connected to the provided three-way angle valve.
4.2 Installation Steps (Summary)
- Prepare the installation area by removing the old toilet and cleaning the flange.
- Install the sealing flange onto the drain pipe.
- Carefully position the EPLO Smart Toilet Bidet E18 over the flange, ensuring proper alignment.
- Secure the toilet to the floor using the provided mounting kits.
- Connect the water supply line to the three-way angle valve and then to the toilet's water inlet.
- Connect the power cord to a grounded 110V outlet.
- Perform a leak check and test all functions.

Image 4.1: Product dimensions and 12-inch rough-in measurement for installation planning.
5. Operating Instructions
5.1 Flushing Methods
- Off-Seat Auto Flush: The toilet automatically flushes after the user stands up and moves away from the seat.
- Foot-Sensor Flush: A sensor at the base of the toilet detects foot movement to activate flushing.
- Remote Control Flush: Use the provided remote control to initiate a flush.
- Manual Knob Flush: A side-mounted knob allows for manual flushing, including during power outages (blackout flush).
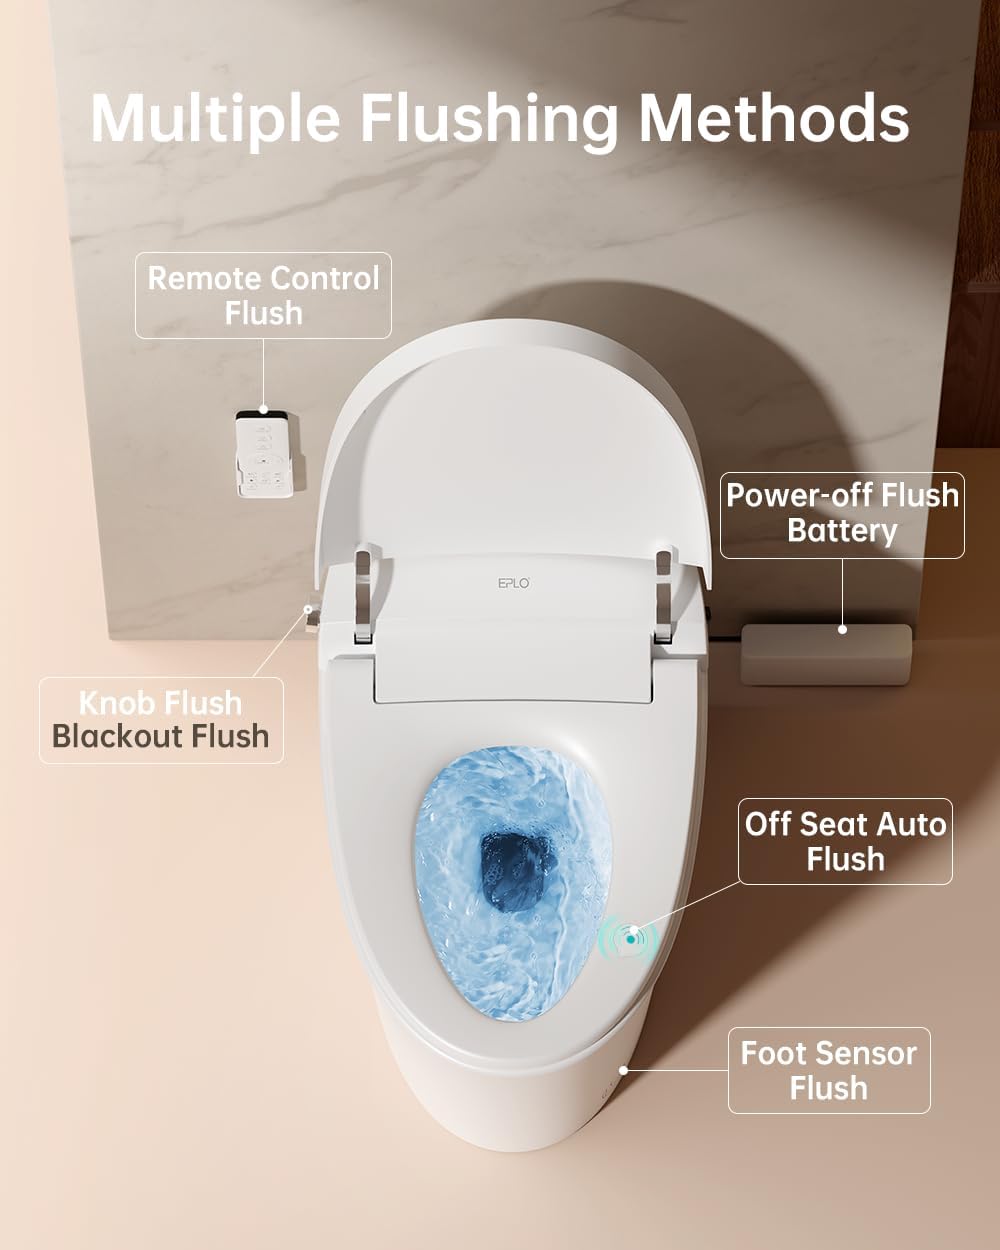
Image 5.1: Overview of the multiple flushing methods available on the E18 model.

Image 5.2: Illustration of foot sensor flush and off-seat auto flush activation.
5.2 Bidet Functions
The remote control allows for customization of bidet settings:
- Wash Modes: Select between Rear Wash, Front Wash (Feminine Wash), and Pulsating Wash.
- Water Temperature: Adjust water temperature from OFF to 99°F (86°F, 90°F, 93°F, 96°F, 99°F).
- Water Pressure: Adjust the intensity of the water spray.
- Nozzle Position: Adjust the spray wand's position for optimal cleansing.
- Self-Cleaning Nozzle: The nozzle performs a self-cleaning cycle before and after each use. The nozzle is also removable for manual cleaning.

Image 5.3: The arc-shape spray wand and its various cleansing modes.

Image 5.4: Water temperature adjustment settings for personalized comfort.
5.3 Comfort Features
- Heated Seat: Adjust the seat temperature for comfort, with multiple settings from 86°F to 99°F.
- Warm Air Dryer: After cleansing, use the warm air dryer to reduce toilet paper usage. Temperature is adjustable.
- Nightlight: A soft LED light illuminates the bowl for nighttime use.

Image 5.5: User-friendly design highlighting the heated seat, warm air dryer, and nightlight.
5.4 Energy Saving (ECO Mode)
Activate ECO Mode to optimize power consumption. The toilet will intelligently adjust seat heating and water temperature based on usage patterns to save energy.
6. Maintenance & Cleaning
Regular cleaning and maintenance ensure optimal performance and hygiene.
6.1 Exterior Cleaning
- Wipe the exterior surfaces with a soft, damp cloth and a mild, non-abrasive cleaner.
- Avoid using harsh chemicals, abrasive pads, or solvents, as these can damage the finish.
6.2 Bowl Cleaning
- The foam shield feature helps keep the bowl clean by preventing waste adhesion.
- For deeper cleaning, use a toilet brush and a standard toilet bowl cleaner. Ensure the cleaner is safe for ceramic surfaces.
6.3 Nozzle Cleaning
- The bidet nozzle performs an automatic self-cleaning cycle.
- For manual cleaning, the nozzle is removable. Gently pull the nozzle out and clean it with a soft brush and mild soap. Rinse thoroughly before reinserting.
7. Troubleshooting
If you encounter issues, refer to the following common problems and solutions. If the problem persists, contact customer support.
| Problem | Possible Cause | Solution |
|---|---|---|
| No power/Unit not responding | Power cord unplugged, circuit breaker tripped, remote control batteries low. | Check power connection, reset breaker, replace remote batteries. |
| Water leakage | Loose water connections, damaged sealing flange. | Tighten connections, inspect sealing flange. Contact professional if issue persists. |
| Bidet spray not working or weak | Water supply valve closed, nozzle clogged, water pressure setting too low. | Ensure water valve is open, clean nozzle, adjust water pressure via remote. |
| Heated seat not warming | Heated seat function off, temperature setting too low, ECO mode active. | Activate heated seat, increase temperature setting, disable ECO mode if desired. |
8. Specifications
| Feature | Detail |
|---|---|
| Model Number | EP-E18 |
| Product Dimensions | 27.16"D x 16.14"W x 19.01"H |
| Rough-in | 12 inches |
| Material | Ceramic (Toilet), Polypropylene (PP) (Seat) |
| Installation Type | Floor Mounted |
| Voltage | 110 Volts |
| Item Weight | 114.4 pounds |
| Flush Type | Dual Flush (1.6 GPF Full / 1.1 GPF Half) |
| Included Components | Smart Toilet, Remote Control, Sealing Flange, Three Way Angle Valve, Mounting Kits, User Manual |
| Certifications | ASME A112.4.2-2021/CSA B45.16-2021 (UPC), UL 1431 (NRTL, ETL), Meets California Regulations (CEC) |

Image 8.1: Quality certifications for the EPLO Smart Toilet.
9. Warranty & Support
EPLO is committed to providing excellent customer service and product reliability.
- Lifetime Support: EPLO offers lifetime support for its products.
- 24/7 Customer Support: Dedicated customer support is available to assist with any inquiries or issues.
- Parts Modularity: The design emphasizes parts modularity for easier maintenance and replacement.
For support, please refer to the contact information provided with your purchase or visit the official EPLO website.

Image 9.1: EPLO's commitment to customer support and product longevity.