Introduction
Thank you for choosing the NIFFPD 10000mAh Solar Power Bank. This device is designed to provide reliable portable power for your electronic devices, featuring solar charging capabilities, an LED flashlight, and a built-in compass. This manual provides essential information for safe and efficient use of your power bank.
Package Contents
Please check the box for the following items:
- 1 x NIFFPD 10000mAh Solar Power Bank
- 1 x USB-C Charging Cable
- 1 x Carabiner
- 1 x User Manual

Image: The NIFFPD 10000mAh Solar Power Bank, USB-C cable, and carabiner as included in the package.
Product Overview
Familiarize yourself with the components of your solar power bank:
- Solar Panel: Located on the front, for emergency solar charging.
- LED Indicators: Four blue LEDs indicate battery charge level (25% each). A green LED indicates solar charging activity.
- Output Ports: Two USB-A ports and one USB-C port for charging external devices.
- Input Ports: One Micro-USB and one USB-C port for charging the power bank.
- LED Flashlight: Dual bright LEDs for illumination.
- Compass: Built-in for navigation assistance.
- Power Button: Controls power and flashlight functions.
- Carabiner Loop: For attaching to backpacks or gear.
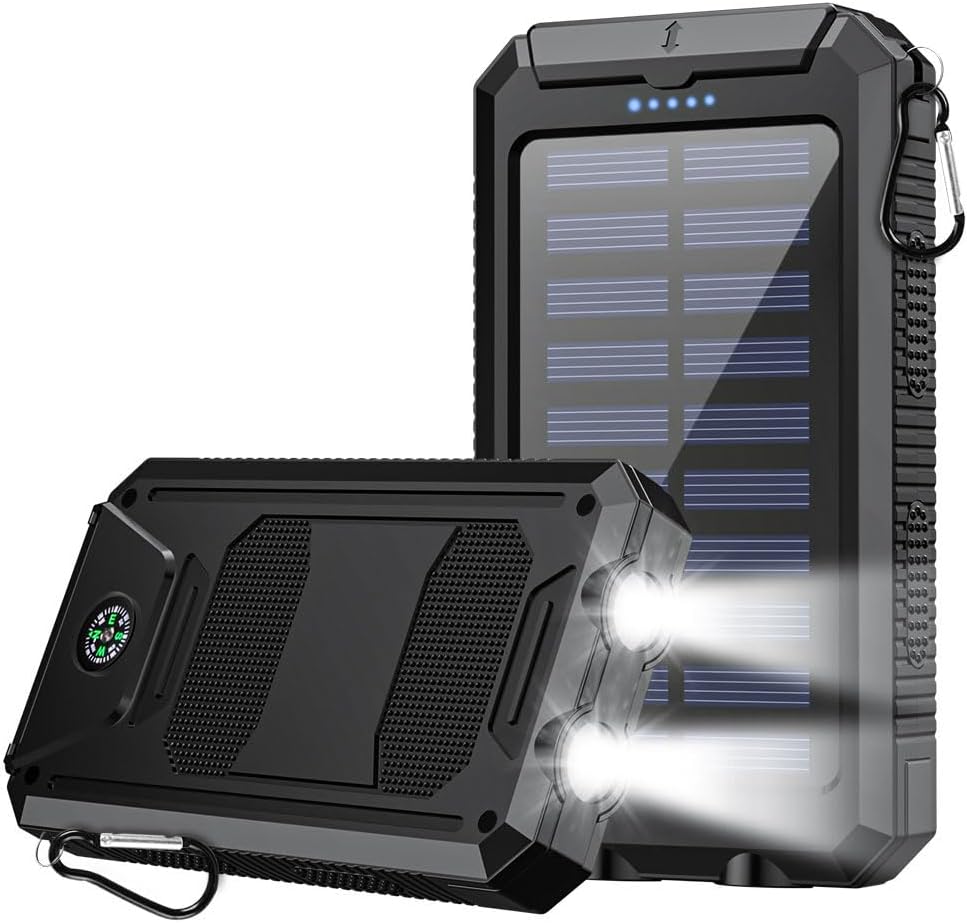
Image: The NIFFPD 10000mAh Solar Power Bank, highlighting its solar panel and overall design.
Setup
Initial Charging
Before first use, fully charge your power bank using a wall adapter. Solar charging is primarily for emergency use and maintaining charge, not for initial full charging.
- Connect the provided USB-C cable to the power bank's USB-C input port or use a Micro-USB cable with the Micro-USB input port.
- Plug the other end of the cable into a USB wall adapter (not included).
- The blue LED indicators will flash during charging and remain solid when fully charged.
Operating Instructions
Charging the Power Bank
Your power bank can be charged via two methods:
- Adapter Charging (Recommended):
For fastest and most efficient charging, connect the power bank to a wall adapter using the USB-C or Micro-USB input port. This method ensures a full charge in a reasonable timeframe. - Solar Charging (Emergency Use):
Place the solar panel directly under strong sunlight. The green LED indicator will illuminate, indicating that solar charging is active. Solar charging is slower and intended for emergency power replenishment or maintaining charge during outdoor activities, not as a primary charging method.

Image: Two charging modes for the power bank: traditional adapter charging and solar charging.
Charging External Devices
The power bank is equipped with two USB-A output ports and one USB-C output port, allowing you to charge multiple devices simultaneously.
- Connect your device's charging cable to one of the power bank's output ports (USB-A or USB-C).
- The power bank will automatically begin charging your device.
- The blue LED indicators will show the remaining battery level.

Image: Charging a smartphone using the power bank in an outdoor setting.
LED Flashlight Operation
The built-in LED flashlight offers multiple modes for various situations:
- Turn On/Off: Double-click the power button.
- Switch Modes: Once the flashlight is on, single-click the power button to cycle through modes: Steady Light > SOS > Strobe.
- Turn Off from any mode: Double-click the power button.

Image: The dual LED flashlight with SOS function, useful for outdoor enthusiasts.
Compass Usage
The integrated compass provides basic directional guidance. For accurate readings, ensure the power bank is held level and away from strong magnetic fields.

Image: The high-precision compass integrated into the power bank, assisting with navigation.
Care and Maintenance
Safety Precautions
The power bank is built with multiple safety protections:
- Overcharge Protection: Prevents battery damage from excessive charging.
- Short Circuit Protection: Safeguards against electrical shorts.
- Overcurrent Protection: Protects against excessive current flow.
- Overvoltage Protection: Shields against voltage spikes.
- Temperature Protection: Monitors and regulates internal temperature.
To ensure longevity and safe operation:
- Avoid extreme temperatures and direct heat sources.
- Do not expose to water or excessive moisture. While designed to be dustproof and shockproof, it is not fully waterproof. Ensure port covers are securely closed in dusty or damp environments.
- Do not disassemble, puncture, or modify the device.
- Keep out of reach of children.
Troubleshooting
- Power bank is not charging:
- Ensure the charging cable is securely connected to both the power bank's input port and the power source. Try a different cable or wall adapter. If using solar charging, ensure direct, strong sunlight and note that solar charging is slower and primarily for emergency use.
- Devices are not charging from the power bank:
- Check if the power bank has sufficient charge (indicated by blue LEDs). Ensure the device's charging cable is properly connected to the power bank's output port. Try a different output port or charging cable.
- Solar charging seems ineffective:
- Solar charging efficiency depends heavily on direct, intense sunlight. Cloudy conditions or indirect light will significantly reduce charging speed. The green LED indicates solar input, but a full charge from solar alone can take a very long time. It is intended as a supplementary or emergency charging method.
- Flashlight is not working:
- Double-click the power button to activate the flashlight. Ensure the power bank has sufficient battery charge.
Specifications
| Model Number | E05753 |
| Battery Capacity | 10000 mAh |
| Input Ports | Micro USB, USB Type-C |
| Output Ports | Dual USB-A, USB Type-C |
| Special Features | Solar Charging, LED Flashlight, Compass, Shockproof, Dustproof |
| Product Dimensions | 5.31 x 0.75 x 2.95 inches |
| Item Weight | 11.1 ounces |
Warranty and Support
For any issues or questions regarding your NIFFPD Solar Power Bank, please contact our customer support team. We are committed to providing prompt and friendly service to ensure your complete satisfaction.
Please refer to your purchase documentation for specific warranty details.