1. Introduction
This manual provides detailed instructions for the installation, operation, and maintenance of your EDUP Starlink Mini PoE Injector 150W and Isolated PoE Splitter Kit 100W. This kit is specifically designed to provide stable 48V Power over Ethernet (PoE) and Gigabit Ethernet connectivity for Starlink Mini satellite internet systems, ensuring optimal network performance.

Figure 1: EDUP Starlink Mini PoE Injector and Splitter Kit.
Package Contents:
- 1 x PoE Splitter
- 1 x 3-in-1 PoE Injector for Starlink Mini
2. Safety Information
CAUTION: Utilizing incorrect cables or PoE injectors may result in irreversible damage to equipment. Always ensure proper connections and compatible power sources.

Figure 2: Important safety caution and connection diagram.
This device is designed for specific Starlink Mini models. Refer to the compatibility section before installation.
3. Product Overview
The EDUP Starlink Mini PoE Injector and Splitter Kit consists of two main components: a PoE Injector and an Isolated PoE Splitter. These components work together to deliver power and data to your Starlink Mini dish.
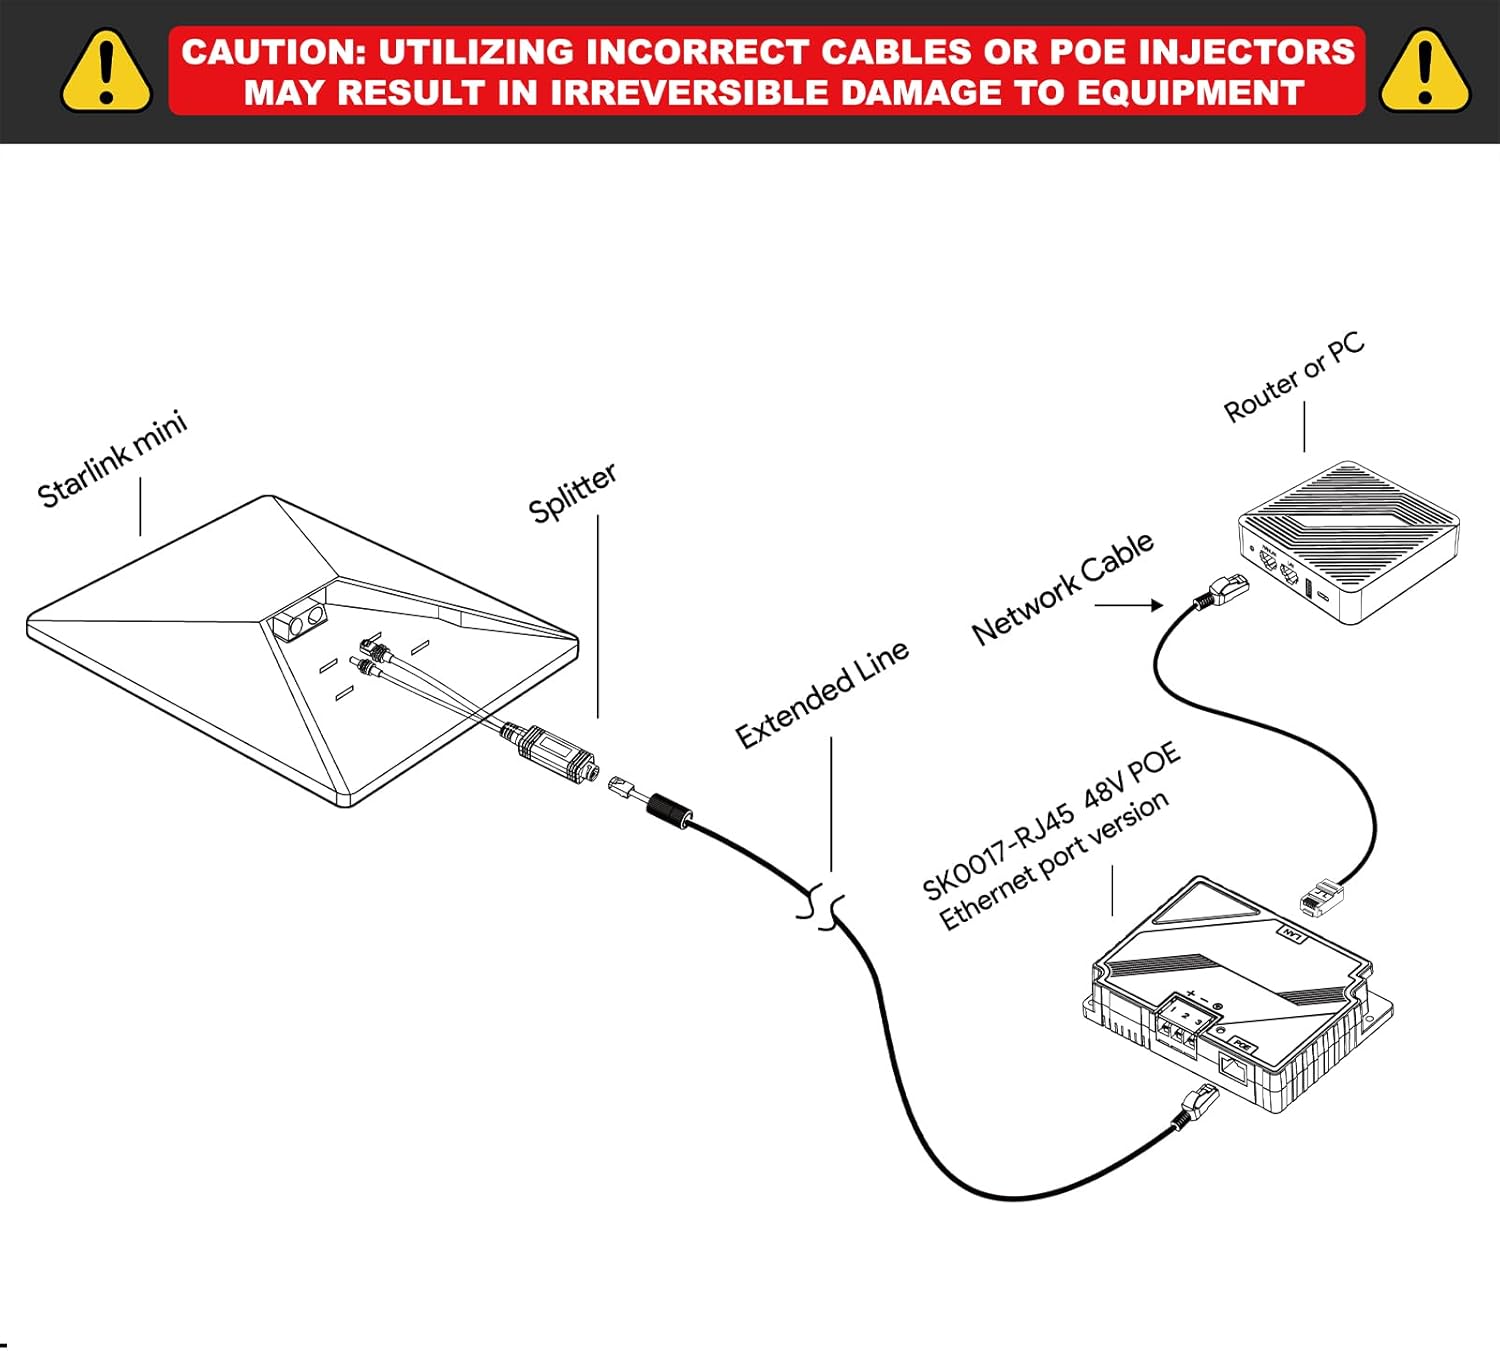
Figure 3: Detailed view of the PoE Injector and Splitter with dimensions and port labels. The splitter features a Starlink Mini DC Power Plug (Male) and an RJ45 Connector. The injector includes LAN, PoE, Positive Pole, Negative Pole, and Ground ports, along with an indicator light.
Key Features:
- 150W PoE Injector: DC 9-36V input, 48V/3A output (Max 150W).
- 100W Isolated PoE Splitter: DC 37-52V input, 48V/2.5A output (Max 100W).
- Gigabit Ethernet: Supports 10/100/1000Mbps data transfer up to 100 meters.
- Industrial-Grade Protection: ±8KV surge protection (differential mode) and ±15KV ESD air discharge protection (Class A).
4. Setup and Installation
Follow these steps to correctly install your EDUP Starlink Mini PoE Injector and Splitter Kit.
4.1 Compatibility Check
This kit is exclusively designed for the Starlink Mini Dishy (2024 & 2025 Version). It is not compatible with other Starlink terminal models.

Figure 4: Compatibility chart showing the EDUP kit is compatible only with Starlink Mini Dishy (2024 & 2025 Version).
4.2 Connection Steps
- Connect the Starlink Mini dish to the PoE Splitter. The splitter has a DC power plug and an RJ45 connector for this purpose.
- Connect an extended network cable (Cat5e or higher) from the PoE Splitter to the PoE Injector. This cable carries both power and data.
- Connect the LAN port of the PoE Injector to your router or PC using a standard network cable.
- Connect a 9-36V DC power source to the PoE Injector's power input terminals (Positive Pole, Negative Pole, Ground). Ensure correct polarity.
- Verify the indicator light on the PoE Injector illuminates, indicating power is supplied.
Figure 5: Visual guide for connecting the Starlink Mini, PoE Splitter, PoE Injector, and your network device.
4.3 Example Installation Scenarios
The compact design and robust protection features make this kit suitable for various environments, including RVs and outdoor setups.

Figure 6: Example of the kit installed within an RV, providing internet connectivity.

Figure 7: Example of the kit used for internet access during outdoor camping.

Figure 8: The kit providing internet connectivity in a low-light outdoor setting.
5. Operating Instructions
Once properly installed and powered, the EDUP Starlink Mini PoE Injector and Splitter Kit operates automatically to provide power and data to your Starlink Mini dish and connect it to your local network.
- Power On: Ensure the DC power source is connected to the PoE Injector. The indicator light on the injector will confirm power delivery.
- Network Connectivity: The kit facilitates Gigabit Ethernet speeds (10/100/1000Mbps) for stable and fast data transfer between your Starlink Mini and your connected router/PC.
- Optimal Performance: For best performance, use high-quality Cat5e or higher Ethernet cables, especially for runs approaching the maximum 100-meter distance.
6. Maintenance and Care
To ensure the longevity and reliable operation of your EDUP PoE Injector and Splitter Kit, follow these maintenance guidelines:
6.1 Environmental Considerations
The kit is designed for robust performance in various conditions:
- Operating Temperature: PoE Injector: -20°C to +55°C; PoE Splitter: -25°C to +70°C.
- Storage Temperature: -40°C to +80°C.
- Humidity: 10%-90% (non-condensing).
- Waterproof Rating: IP68 (for the splitter component, as indicated in product imagery).

Figure 9: The kit's resilience to various weather conditions, highlighting its IP68 waterproof rating.
6.2 Protection Features
The device incorporates industrial-grade surge and ESD protection to safeguard your equipment:
- Surge Protection: ±8KV (differential mode).
- ESD Protection: ±15KV air discharge (Class A).
6.3 Cleaning
Wipe the device with a soft, dry cloth. Do not use liquid or aerosol cleaners.
7. Troubleshooting
If you encounter issues with your EDUP Starlink Mini PoE Injector and Splitter Kit, refer to the following common problems and solutions:
| Problem | Possible Cause | Solution |
|---|---|---|
| No power to Starlink Mini / Injector indicator light off | Incorrect or no DC power input; faulty cable connection; incorrect polarity. | Verify the DC power source (9-36V) is connected and functional. Check all power cable connections and ensure correct polarity. Ensure the PoE Injector is receiving power. |
| No internet connection / Data not transmitting | Faulty Ethernet cable; incorrect connection order; incompatible Starlink model; issue with router/PC. | Ensure all Ethernet cables are securely connected and undamaged. Confirm the connection order as per Section 4.2. Verify your Starlink Mini is compatible (Figure 4). Test with a different router or PC if possible. |
| Slow network speeds | Low quality or damaged Ethernet cable; network congestion; Starlink service issue. | Replace Ethernet cables with Cat5e or higher quality. Check for other devices consuming bandwidth. Contact Starlink support if the issue persists and is not related to the kit. |
| Physical damage after electrical event | Severe power surge or lightning strike exceeding protection limits. | While the device has surge protection, extreme events can cause damage. Disconnect power immediately. Contact support for potential replacement under warranty. |
If the problem persists after attempting these solutions, please contact EDUP customer support.
8. Specifications
| Feature | Detail |
|---|---|
| Brand | EDUP |
| Model Number | EP-SK0091S |
| Hardware Interface | Ethernet |
| Compatible Devices | Starlink Mini Dishy |
| Data Link Protocol | Ethernet |
| Data Transfer Rate | 1000 Megabits Per Second (Gigabit) |
| PoE Injector Output | 48V/3A (150W Max) |
| PoE Splitter Output | 48V/2.5A (100W Max) |
| Surge Protection | ±8KV (differential mode) |
| ESD Protection | ±15KV air discharge (Class A) |
| Operating Temperature (Injector) | -20°C to +55°C |
| Operating Temperature (Splitter) | -25°C to +70°C |
| Humidity | 10%-90% (non-condensing) |
| Warranty | 2 years |
9. Warranty and Support
9.1 Warranty Information
The EDUP Starlink Mini PoE Injector and Splitter Kit comes with a 2-year warranty from the date of purchase. This warranty covers manufacturing defects and malfunctions under normal use. It does not cover damage caused by misuse, accidents, unauthorized modifications, or natural disasters.
9.2 Customer Support
For technical assistance, troubleshooting, or warranty claims, please contact EDUP customer support. Refer to the product packaging or the official EDUP website for the most current contact information.
When contacting support, please have your product model number (EP-SK0091S) and proof of purchase readily available.


