1. Introduction
This manual provides essential instructions for the safe and efficient operation, maintenance, and troubleshooting of your FOTING Pressure Power Washer. Please read this manual thoroughly before first use and retain it for future reference.
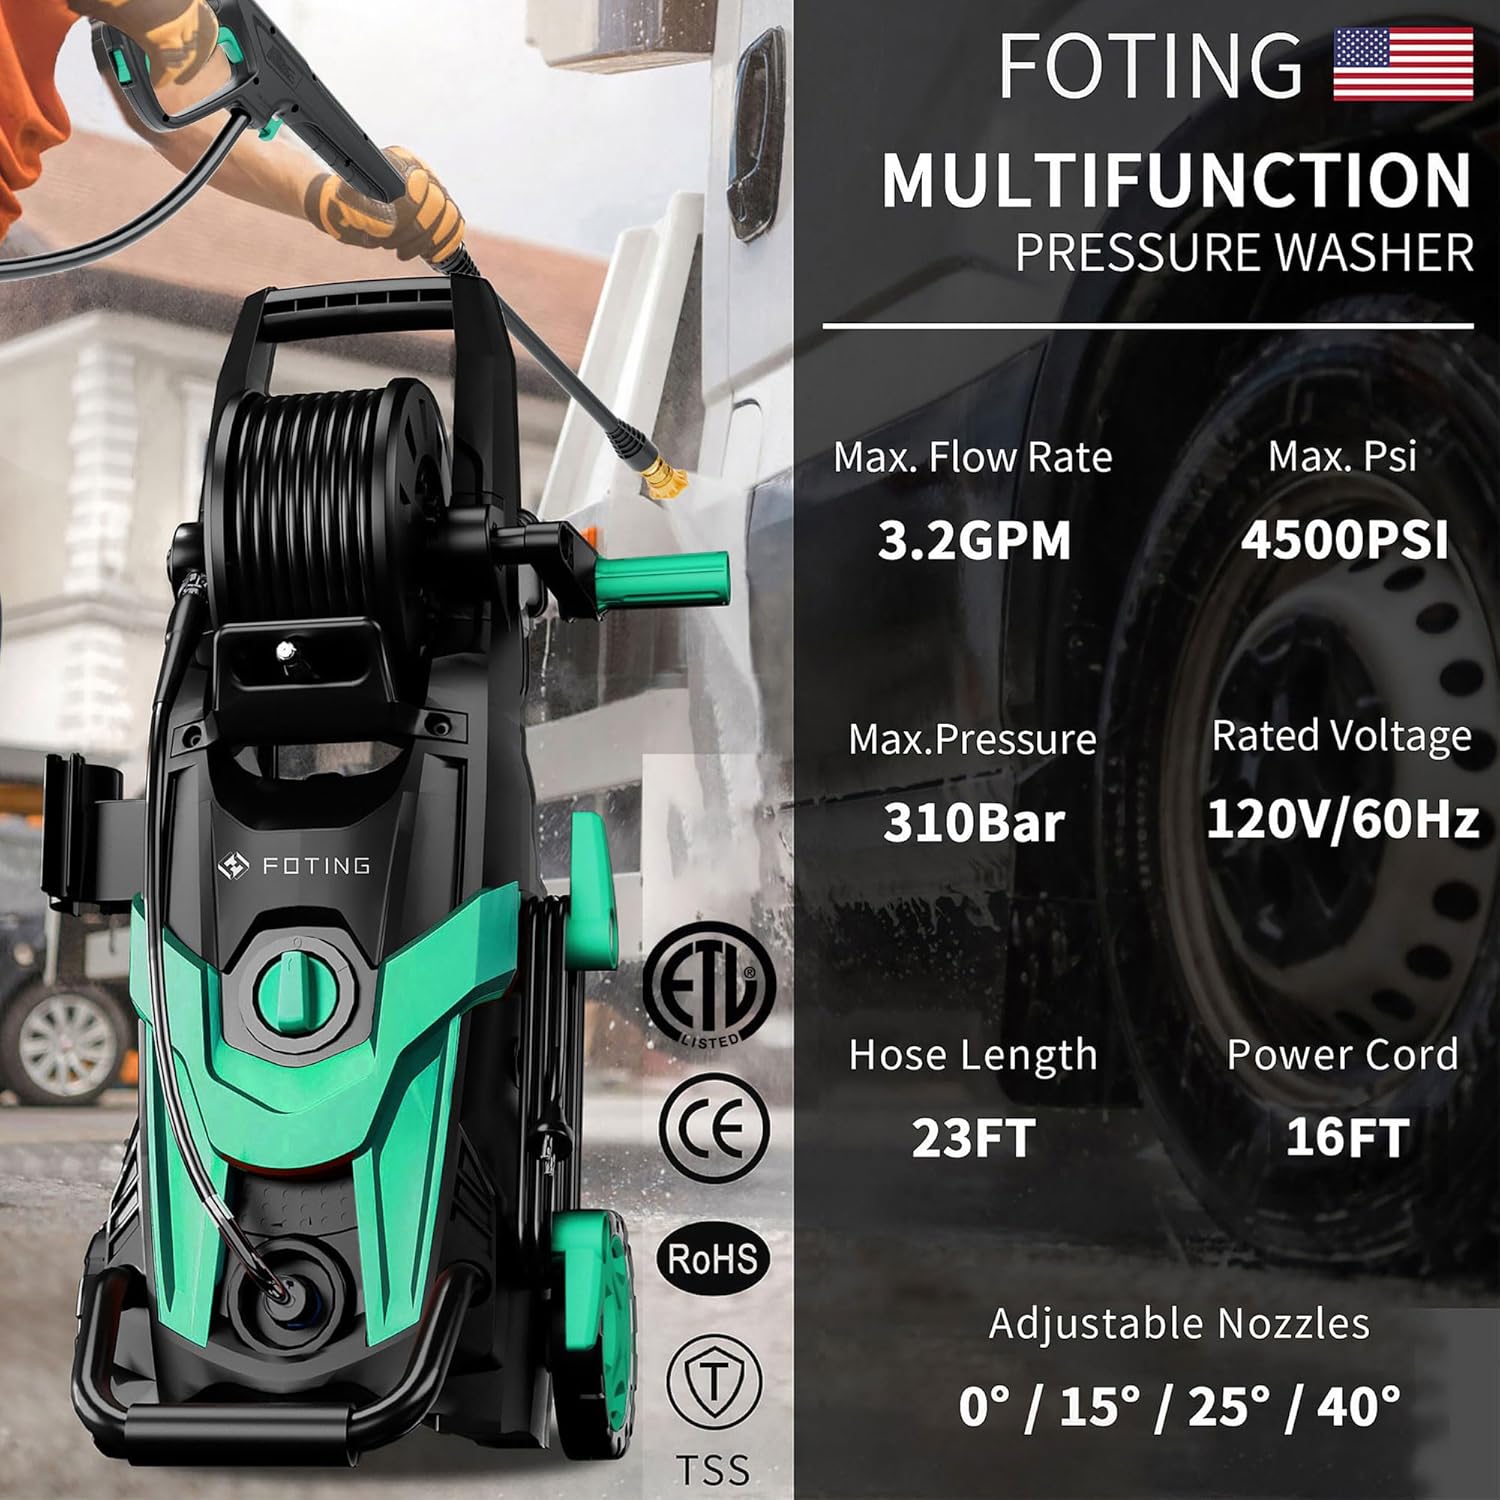
Image: The FOTING Pressure Power Washer, showcasing its compact design, hose reel, and various attachments.
2. Safety Information
Always wear appropriate personal protective equipment (PPE) such as safety glasses, gloves, and hearing protection when operating the pressure washer. Ensure all connections are secure before starting the unit. Do not point the spray gun at people, animals, or electrical equipment. Keep children and pets away from the operating area.
The unit features a Smart Safety System (TTS) for auto-shutoff when idle, conserving energy and extending pump life. Always ensure proper water supply to prevent damage to the pump.
3. Package Contents
Verify that all items are present in the package:
- FOTING Pressure Power Washer Unit
- High-Pressure Spray Gun
- High-Pressure Water Pipe (23FT)
- Inlet Hose & Filter (5FT)
- 4 Quick Connect Nozzles (0°, 15°, 25°, 40°)
- Foam Cannon / Detergent Tank
- Power Cord (16FT)
- Mounting Handle and Brackets
- User Manual

Image: A visual representation of all included product accessories, such as the high-pressure spray gun, various nozzles, foam cannon, and hoses.
4. Setup Instructions
Follow these steps to assemble and prepare your pressure washer for use:
- Mounting Handle: Secure the mounting handle to the main unit using the provided swivel screw.
- Mounting Brackets: Attach the mounting brackets for accessory storage to the side of the unit.
- Connect Nozzle: Insert the desired quick-connect nozzle into the spray gun.
- Install Water Outlet Pipe: Connect the high-pressure water pipe to the water outlet on the pressure washer.
- Install Water Inlet Pipe: Connect the inlet hose and filter to the water inlet on the pressure washer. Ensure a tight, leak-free connection.
- Rotary Switch: Ensure the power switch is in the OFF position before connecting to power.

Image: Visual guide showing the 6 key steps for assembling the pressure washer, including handle mounting, bracket attachment, nozzle connection, and hose installations.
For a visual guide on unpacking and assembly, please refer to the video below:
Video: This video demonstrates the unpacking process and step-by-step assembly of the FOTING Pressure Power Washer, including attaching components and connecting hoses.
5. Operating Instructions
5.1 Nozzle Selection
The FOTING Pressure Power Washer includes 4 quick-connect nozzles (0°, 15°, 25°, 40°) and a foam cannon for various cleaning tasks:
- 0° (Red): Pin-point jet for intense cleaning of stubborn stains and hard-to-reach areas. Use with extreme caution.
- 15° (Yellow): Narrow, powerful spray for concrete, brick, and other hard surfaces.
- 25° (Green): Wider spray for general cleaning of fences, wood decks, and patios.
- 40° (White): Broad, gentle spray for vehicles, windows, and delicate surfaces.

Image: This image illustrates the five different spray modes (0°, 15°, 25°, 40°, and detergent bottle) and their recommended uses for various surfaces like cracks, concrete, fences, and windows.

Image: A detailed view of the four quick-connect nozzles (0°, 15°, 25°, 40°) demonstrating their respective spray patterns and suggested applications for tailored cleaning.
5.2 Using the Foam Cannon
Attach the foam cannon to the spray gun for applying detergent. Fill the detergent tank with appropriate pressure washer soap. The foam cannon creates a rich foam for effective cleaning of cars, siding, and other surfaces.

Image: The pressure washer applying a rich foam spray, ideal for pre-soaking and deep cleaning.
5.3 General Operation
Connect the power cord to a grounded outlet. Turn on the water supply completely before turning on the pressure washer. Squeeze the trigger on the spray gun to release water and begin cleaning. The Total Stop System (TTS) automatically shuts off the pump when the trigger is released, prolonging pump life and saving energy.

Image: Examples of various cleaning jobs around the house, including cars, fences, roofs, windows, and furniture, demonstrating the versatility of the pressure washer.

Image: A visual comparison of a paved surface before and after cleaning with the pressure washer, highlighting its effectiveness.
6. Maintenance
Regular maintenance ensures optimal performance and extends the life of your pressure washer.
- Clean Nozzles: Regularly check and clean nozzles to prevent blockages.
- Inspect Hoses: Check high-pressure and inlet hoses for kinks, cuts, or leaks before each use.
- Store Properly: After use, drain all water from the unit and hoses. Store the pressure washer in a dry, frost-free area. Utilize the integrated hose reel and accessory storage for tidy organization.

Image: This image highlights features such as cable storage space, a child safety switch, the extra pressure washer siphon hose and filter, stable foot support, and the Total Stop System.

Image: An overview of the FOTING Pressure Power Washer's features, including organized storage, quick insertion for nozzles, rated voltage, IPX5 protection, and the 23FT hose and 16FT cord.
7. Troubleshooting
If you encounter issues with your pressure washer, refer to the following common problems and solutions:
7.1 Machine Tripping Problem
- The machine may have an overheating protection function. Allow it to rest for a period before resuming use.
- If the issue persists, check if the spray gun is clogged.
7.2 No Water Flow or Low Pressure
- Ensure the water inlet hose is fully fed and that no air or other impurities are entering the system.
- Verify that the water inlet pipe and the black adapter at the bottom of the machine are completely fastened to prevent air entry.
- Check if the black adapter comes with the water inlet hole at the bottom of the back of the machine and is correctly connected.
For a visual guide on troubleshooting water connection issues, please refer to the video below:
Video: This video provides troubleshooting steps for common pressure washer issues, including how to check for clogs in the nozzle and ensure proper water inlet connection to prevent tripping or low pressure.
8. Specifications
| Feature | Specification |
|---|---|
| Brand | FOTING |
| Model Number | CBK-KLC-T2-BL001 |
| Power Source | AC |
| Color | Blue |
| Product Dimensions (L x W x H) | 8" x 15" x 27" |
| Maximum Pressure | 4500 PSI |
| Maximum Flow Rate | 3.2 GPM |
| High-Pressure Hose Length | 23 FT |
| Power Cord Length | 16 FT |
| Safety System | Total Stop System (TTS) |
9. Warranty and Support
For warranty information, technical support, or to purchase replacement parts, please contact FOTING customer service. Refer to the product packaging or the official FOTING website for contact details.