1. Introduction
Thank you for choosing the Himarine Jebao MOW-9 Smart Wave Maker. This device is designed to create optimal water flow patterns in saltwater aquariums, promoting a healthy environment for your aquatic life. Please read this manual thoroughly before installation and operation to ensure proper use and longevity of your product.
Product Overview
The MOW-9 features smart WiFi connectivity, an LCD display controller for precise adjustments, and a powerful yet quiet motor. Its compact design and 3D wide rotation angle allow for versatile placement and customizable flow direction.
What's in the Box
- Jebao MOW-9 Wave Maker Unit
- LCD Display Controller
- Power Adapter
- User Manual

Image: Contents of the Jebao MOW-9 Smart Wave Maker package.
2. Safety Information
Please observe the following safety precautions to prevent injury or damage to the product and your aquarium:
- Always disconnect power before performing any maintenance or installation.
- Ensure your hands are dry when handling the power adapter and controller.
- Do not operate the wave maker if the power cord or plug is damaged.
- The wave maker is designed for indoor use in saltwater aquariums only.
- Keep the controller and power adapter away from water.
- Ensure a drip loop is formed with the power cord to prevent water from traveling along the cord to the electrical outlet.
- This appliance is not intended for use by persons (including children) with reduced physical, sensory or mental capabilities, or lack of experience and knowledge, unless they have been given supervision or instruction concerning use of the appliance by a person responsible for their safety.
3. Setup and Installation
Mounting the Wave Maker
The MOW-9 uses a magnetic mounting system for easy and secure installation. It is compatible with glass thickness up to 12mm.
- Identify the inner and outer magnetic parts. The wave maker unit attaches to the inner magnet.
- Place the wave maker unit with its attached inner magnet inside the aquarium at your desired location.
- Align the outer magnet on the exterior of the aquarium glass, directly opposite the inner magnet. The strong magnetic force will secure the wave maker in place.
- Adjust the position and angle of the wave maker as needed. The 3D wide rotation angle allows for flexible water flow direction.

Image: Different perspectives of the MOW-9 wave maker unit.
Power Connection
- Connect the wave maker unit cable to the LCD display controller.
- Connect the power adapter to the LCD display controller.
- Plug the power adapter into a suitable electrical outlet. Ensure a drip loop is created.
App Installation (Optional)
For advanced control and smart features, download the Jebao Aqua app on your smartphone.
- Scan the QR code provided in the manual or search for "Jebao Aqua" on the App Store (iOS) or Google Play Store (Android).
- Install the app and follow the in-app instructions to connect your MOW-9 wave maker to your home WiFi network.

Image: Jebao Aqua app interface and available control modes.
4. Operating Instructions
The MOW-9 can be operated via its LCD display controller or through the Jebao Aqua smartphone app.
LCD Display Controller
The LCD display provides visual feedback and allows direct control over the wave maker's functions. Refer to the controller's specific button layout for navigation and selection.
- Mode Button: Cycles through different wave patterns (e.g., Constant Current, Wave Maker, SINE Wave, Random).
- Up/Down Arrows: Adjusts flow intensity or duration depending on the selected mode.
- Feed Mode: Temporarily pauses the wave maker for feeding.
- Night Mode: Reduces flow during nighttime hours.
Jebao Aqua App Control
The smartphone app offers comprehensive control and scheduling capabilities:
- Wave Patterns: Select from various pre-programmed wave patterns including Constant Current, Wave Maker, SINE Wave Technology, and Random flow.
- Flow Adjustment: Precisely adjust the flow rate (L/H) to suit your aquarium's needs.
- Scheduling: Set custom schedules for different modes and intensities throughout the day.
- Feed Mode: Activate a temporary pause for feeding.
- Night Mode: Program reduced flow for nighttime.
- Wireless Control: Manage multiple Jebao devices from a single app.
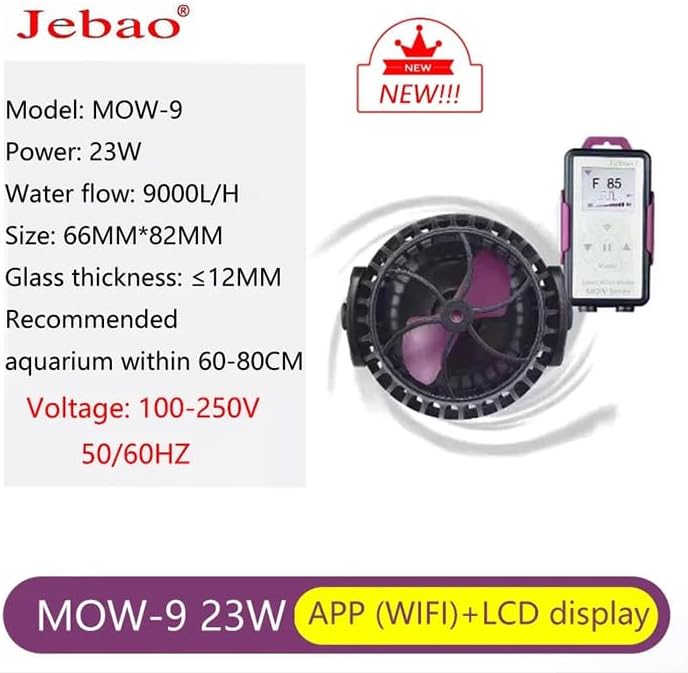
Image: Key features of the MOW-9 wave maker.
5. Maintenance
Regular maintenance ensures optimal performance and extends the lifespan of your wave maker.
- Disconnect Power: Always unplug the power adapter before cleaning.
- Remove from Aquarium: Carefully detach the wave maker from the aquarium glass.
- Disassemble: Gently twist and pull apart the wave maker housing to access the impeller.
- Clean Impeller and Housing: Use a soft brush or sponge to remove algae, detritus, and calcium buildup from the impeller, impeller shaft, and inside the housing. A solution of vinegar and water can help dissolve stubborn calcium deposits.
- Rinse Thoroughly: Rinse all components with clean, dechlorinated water.
- Reassemble: Carefully reassemble the wave maker, ensuring all parts fit correctly.
- Reinstall: Mount the wave maker back in the aquarium and reconnect power.
6. Troubleshooting
If you encounter issues with your MOW-9 wave maker, refer to the following common problems and solutions:
- No Power/Wave Maker Not Running:
- Check if the power adapter is securely plugged into both the controller and the electrical outlet.
- Ensure the controller cable is properly connected to the wave maker unit.
- Verify the electrical outlet is functional by plugging in another device.
- Weak or Intermittent Flow:
- The impeller may be obstructed by debris or algae. Perform maintenance as described in Section 5.
- Check the flow settings on the LCD controller or app to ensure it's not set to a low intensity.
- Ensure the wave maker is fully submerged in water.
- Unusual Noise:
- Noise can be caused by debris in the impeller. Clean the impeller thoroughly (Section 5).
- Ensure the wave maker is securely mounted and not vibrating against the aquarium glass.
- Check for air bubbles trapped inside the wave maker. Gently tilt the unit to release them.
- WiFi Connection Issues:
- Ensure your smartphone is connected to a 2.4GHz WiFi network (5GHz networks are often not supported by smart devices).
- Restart your home router and the wave maker controller.
- Ensure the wave maker is within range of your WiFi router.
- Follow the app's instructions for re-pairing the device.
7. Specifications
Technical specifications for the Jebao MOW-9 Smart Wave Maker:
- Model: MOW-9
- Power: 23W
- Flow Rate (Q max): 9000 L/H
- Voltage: 100-250V, 50/60HZ (Universal)
- Product Dimensions: 66mm (L) x 82mm (W) x 82mm (H) (approx. 2.6"L x 2.6"W x 3.2"H)
- Recommended Aquarium Size: 60-80 cm
- Max. Glass Thickness: ≤12mm
- Material: Plastic
- Item Weight: 2.6 Pounds
MOW Series Comparison
| Model | Voltage | Power | Q max | Dimension | For Tank Size | Glass Thickness |
|---|---|---|---|---|---|---|
| MOW-3 | DC 12V | 6W | 3000 L/H | Φ52x70 mm | ≤60 cm | ≤8 mm |
| MOW-5 | DC 24V | 12W | 5000 L/H | Φ52x70 mm | ≤60 cm | ≤8 mm |
| MOW-9 | DC 24V | 23W | 9000 L/H | Φ66x82 mm | 60-100 cm | ≤12 mm |
| MOW-16 | DC 24V | 35W | 16000 L/H | Φ80x97 mm | 100-150 cm | ≤15 mm |
| MOW-22 | DC 24V | 50W | 22000 L/H | Φ94x120 mm | 100-150 cm | ≤19 mm |
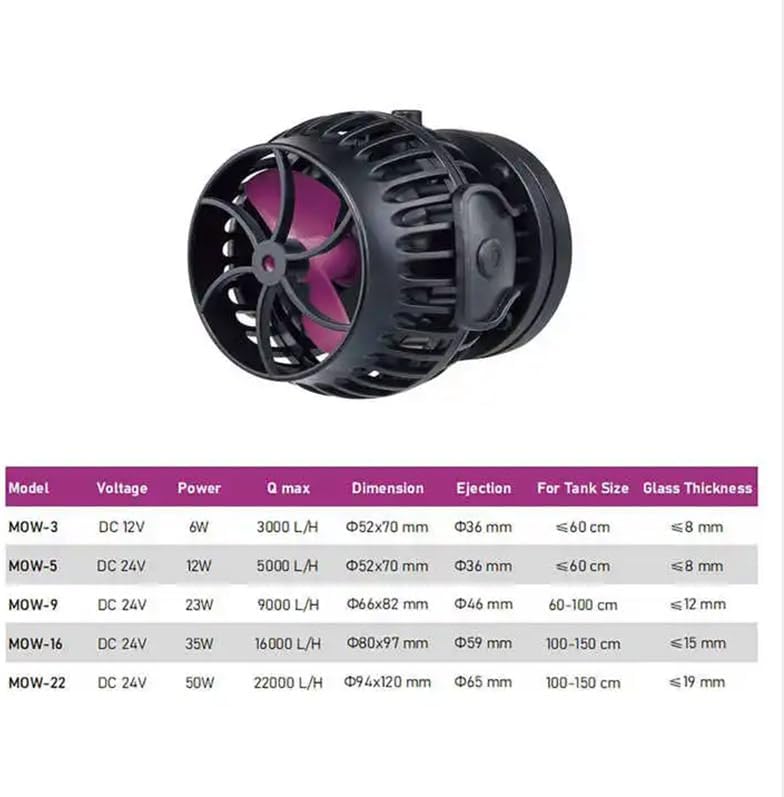
Image: Comparison table for Jebao MOW series wave makers.
8. Warranty and Support
For warranty information and technical support, please refer to the documentation provided with your purchase or contact Himarine customer service directly. Keep your purchase receipt as proof of purchase.
For further assistance, please visit the Himarine Store: Himarine Store on Amazon