Introduction
Thank you for choosing the QJA Burr Coffee Grinder Electric, Model CG-T. This manual provides essential information for the safe and efficient operation, maintenance, and care of your new coffee grinder. Please read these instructions thoroughly before first use and retain them for future reference.

The QJA Burr Coffee Grinder Electric, Model CG-T, is designed to provide precise and consistent coffee grinding for various brewing methods.
Important Safety Instructions
When using electrical appliances, basic safety precautions should always be followed to reduce the risk of fire, electric shock, and/or injury to persons, including the following:
- Read all instructions.
- Do not touch hot surfaces. Use handles or knobs.
- To protect against fire, electric shock, and injury to persons, do not immerse cord, plugs, or the appliance in water or other liquid.
- Close supervision is necessary when any appliance is used by or near children.
- Unplug from outlet when not in use and before cleaning. Allow to cool before putting on or taking off parts, and before cleaning the appliance.
- Do not operate any appliance with a damaged cord or plug or after the appliance malfunctions, or has been damaged in any manner. Return appliance to the nearest authorized service facility for examination, repair, or adjustment.
- The use of accessory attachments not recommended by the appliance manufacturer may result in fire, electric shock, or injury to persons.
- Do not use outdoors.
- Do not let cord hang over edge of table or counter, or touch hot surfaces.
- Do not place on or near a hot gas or electric burner, or in a heated oven.
- Always attach plug to appliance first, then plug cord into the wall outlet. To disconnect, turn any control to 'off', then remove plug from wall outlet.
- Do not use appliance for other than intended use.
- Ensure the bean hopper lid is securely in place before operating.
- This appliance has overheating protection. If the motor stops, allow it to cool down before restarting.
Product Components
Familiarize yourself with the main components of your QJA Burr Coffee Grinder:
- Bean Hopper with Lid
- Upper Conical Burr
- Lower Conical Burr
- Grind Setting Collar
- Grinder Base with Motor
- Coffee Grounds Container
- Control Panel with LCD Touch Screen
- Cleaning Brush

Exploded view of the QJA Burr Coffee Grinder Electric, showing the bean hopper, upper burr, lower burr, grinding chamber, and coffee grounds container, along with the cleaning brush.
Setup and First Use
Follow these steps to prepare your grinder for its first use:
- Unpack: Carefully remove all components from the packaging.
- Initial Cleaning: Before first use, wash the bean hopper, grounds container, and their lids in warm, soapy water. Rinse thoroughly and dry completely. Wipe the grinder base with a damp cloth.
- Assemble Bean Hopper: Align the bean hopper with the arrows on the grinder base. Press down and rotate clockwise until it locks into place.
- Insert Grounds Container: Slide the coffee grounds container into its designated slot at the front of the grinder base.
- Plug In: Connect the power cord to a suitable electrical outlet.

The bean hopper securely attached to the grinder, ready for coffee beans, with grind settings clearly visible.
Operating Instructions
1. Adding Coffee Beans
Open the bean hopper lid and pour whole roasted coffee beans into the hopper. The hopper has an 8.9-ounce capacity. Ensure the lid is securely closed before operation.
2. Adjusting Grind Settings
Your QJA Burr Coffee Grinder offers 60 precise grind settings, allowing you to customize the fineness for various brewing methods. Rotate the grind setting collar located below the bean hopper to select your desired setting. The settings range from 1 (finest, for espresso) to 60 (coarsest, for French press).
- Espresso: Settings 1-10
- Mocca: Settings 10-20
- Siphon: Settings 20-30
- Pour Over: Settings 30-40
- Filter: Settings 40-50
- French Press: Settings 50-60
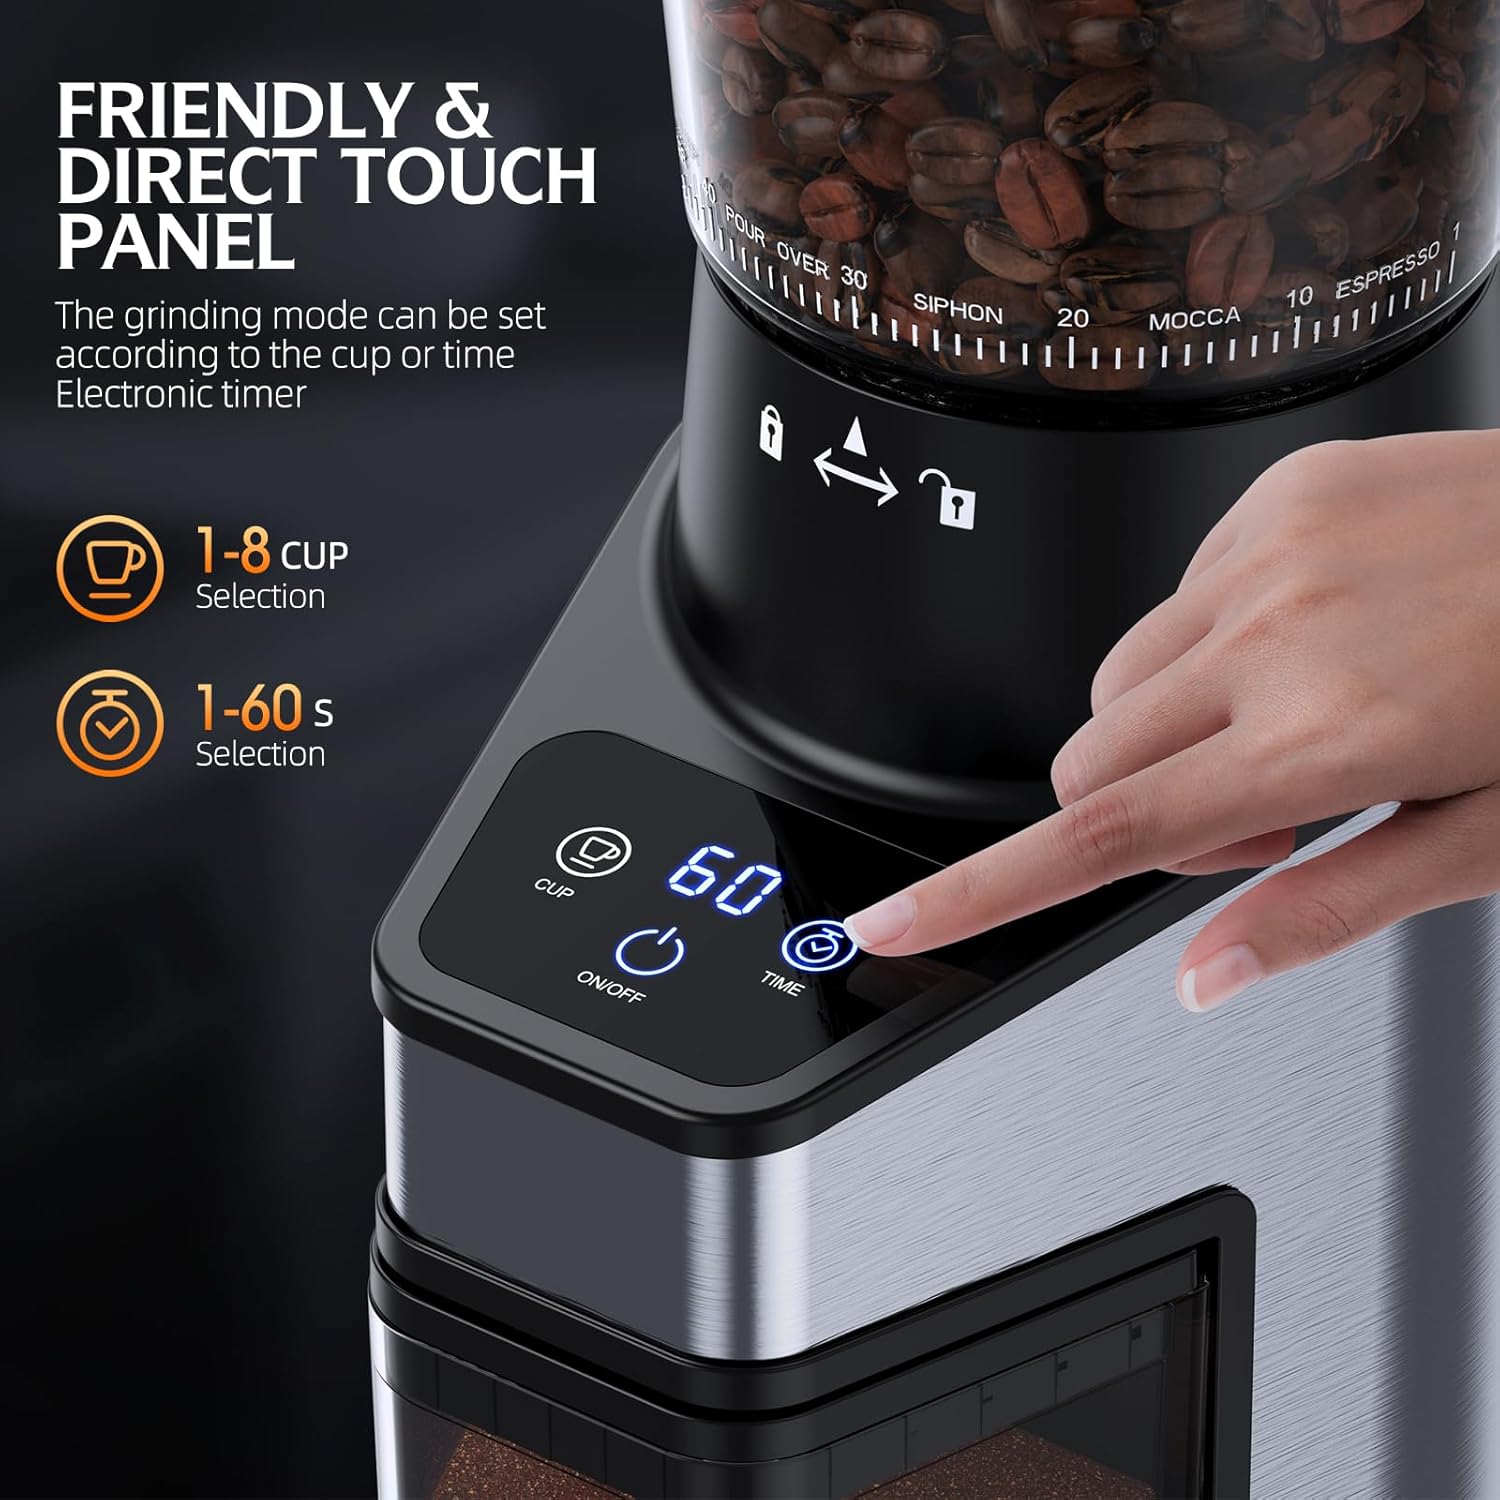
The intuitive LCD touch screen allows for easy selection of grinding parameters.
3. Using the Timer & Cup Quantification
The grinder features an LCD touch screen for precise control over grinding duration or quantity:
- Time Selection: Press the 'TIME' button to adjust the grinding duration in 1-second increments, up to 60 seconds.
- Cup Selection: Press the 'CUP' button to select the number of cups you wish to grind for, ranging from 1 to 8 cups. The grinder will automatically adjust the grinding time based on the selected cup quantity.
4. Starting and Stopping Grinding
After selecting your grind setting and desired quantity/time:
- Ensure the coffee grounds container is properly inserted.
- Double-click the 'ON/OFF' button on the control panel to start the grinding process.
- The grinder will automatically stop once the selected time or cup quantity is reached.
- To manually stop grinding at any time, double-click the 'ON/OFF' button again.

The durable conical burrs ensure efficient and uniform grinding, preserving coffee flavor.
Maintenance and Cleaning
Regular cleaning ensures optimal performance and extends the lifespan of your grinder. Always unplug the grinder before cleaning.
- Empty Hopper: Remove any remaining coffee beans from the bean hopper.
- Remove Components: Remove the bean hopper by rotating it counter-clockwise and lifting it off. Remove the coffee grounds container.
- Clean Burrs: The upper burr is removable for easy cleaning. Lift the handle on the upper burr and pull it out. Use the provided cleaning brush to remove any coffee grounds from both the upper and lower burrs.
- Wash Containers: Wash the bean hopper, grounds container, and their lids in warm, soapy water. Rinse thoroughly and dry completely. These parts are not dishwasher safe.
- Clean Grinder Base: Wipe the exterior of the grinder base with a damp cloth. Do not immerse the base in water.
- Reassemble: Once all parts are dry, reassemble the grinder by placing the lower burr back into position (if removed), then inserting the upper burr and locking it. Reattach the bean hopper and insert the grounds container.
A hand using the provided cleaning brush to clean the internal burr mechanism of the grinder, with other removable parts laid out for thorough cleaning.
Troubleshooting
Refer to the table below for common issues and their solutions:
| Problem | Possible Cause | Solution |
|---|---|---|
| Grinder does not start. | Not plugged in; Bean hopper not locked; Overheating protection activated. | Ensure power cord is securely plugged in. Rotate bean hopper clockwise until locked. If overheated, unplug and let cool for 30 minutes before restarting. |
| Inconsistent grind. | Burrs are dirty or clogged; Incorrect grind setting for bean type. | Clean burrs thoroughly with the provided brush. Adjust grind setting to a finer or coarser level as needed for your coffee beans and brewing method. |
| Coffee grounds static cling. | Environmental factors; Very dry beans. | The grinder features an anti-static design. If static persists, lightly mist beans with water before grinding (ensure they are dry before adding to hopper). |
| Grinder is unusually loud. | Foreign object in burrs; Burrs are loose. | Unplug and inspect burrs for any foreign objects. Ensure burrs are properly seated and locked. |
Product Specifications
- Model: CG-T
- Brand: QJA
- Color: Black
- Grind Settings: 60 (Adjustable)
- Bean Hopper Capacity: 8.9 ounces
- Voltage: 120 Volts
- Product Dimensions: 4.7"L x 6.8"W x 12.2"H
- Item Weight: 5.33 pounds
- Features: LCD Touch Screen, Precision Timer, Cup Quantification, Anti-static Design, Overheat Protection, Low-Speed Conical Burr

The compact and stylish design of the QJA Burr Coffee Grinder fits well in any kitchen.
Warranty and Customer Support
Your QJA Burr Coffee Grinder Electric Model CG-T comes with a manufacturer's warranty. Please refer to the warranty card included in your product packaging for specific terms and conditions. For technical assistance, troubleshooting not covered in this manual, or warranty claims, please contact QJA customer support through the retailer where the product was purchased.
We are committed to providing high-quality products and excellent customer service.


