Introduction
This manual provides detailed instructions for the safe operation, setup, and maintenance of your Velcase JY017 Foldable Drone. Please read this manual thoroughly before operating the drone to ensure proper function and to prevent damage or injury. This drone features a 1080P HD camera, FPV real-time transmission, optical flow positioning, and multiple flight modes designed for both beginners and experienced users.
Package Contents
Verify that all items listed below are included in your package:
- Drone (JY017)
- Remote Control
- Drone Battery (x2)
- USB Charging Cable
- A, B Fan Blades (x4)
- Screwdriver
- Protective Frame (x4)
- User Manual
- Carrying Case
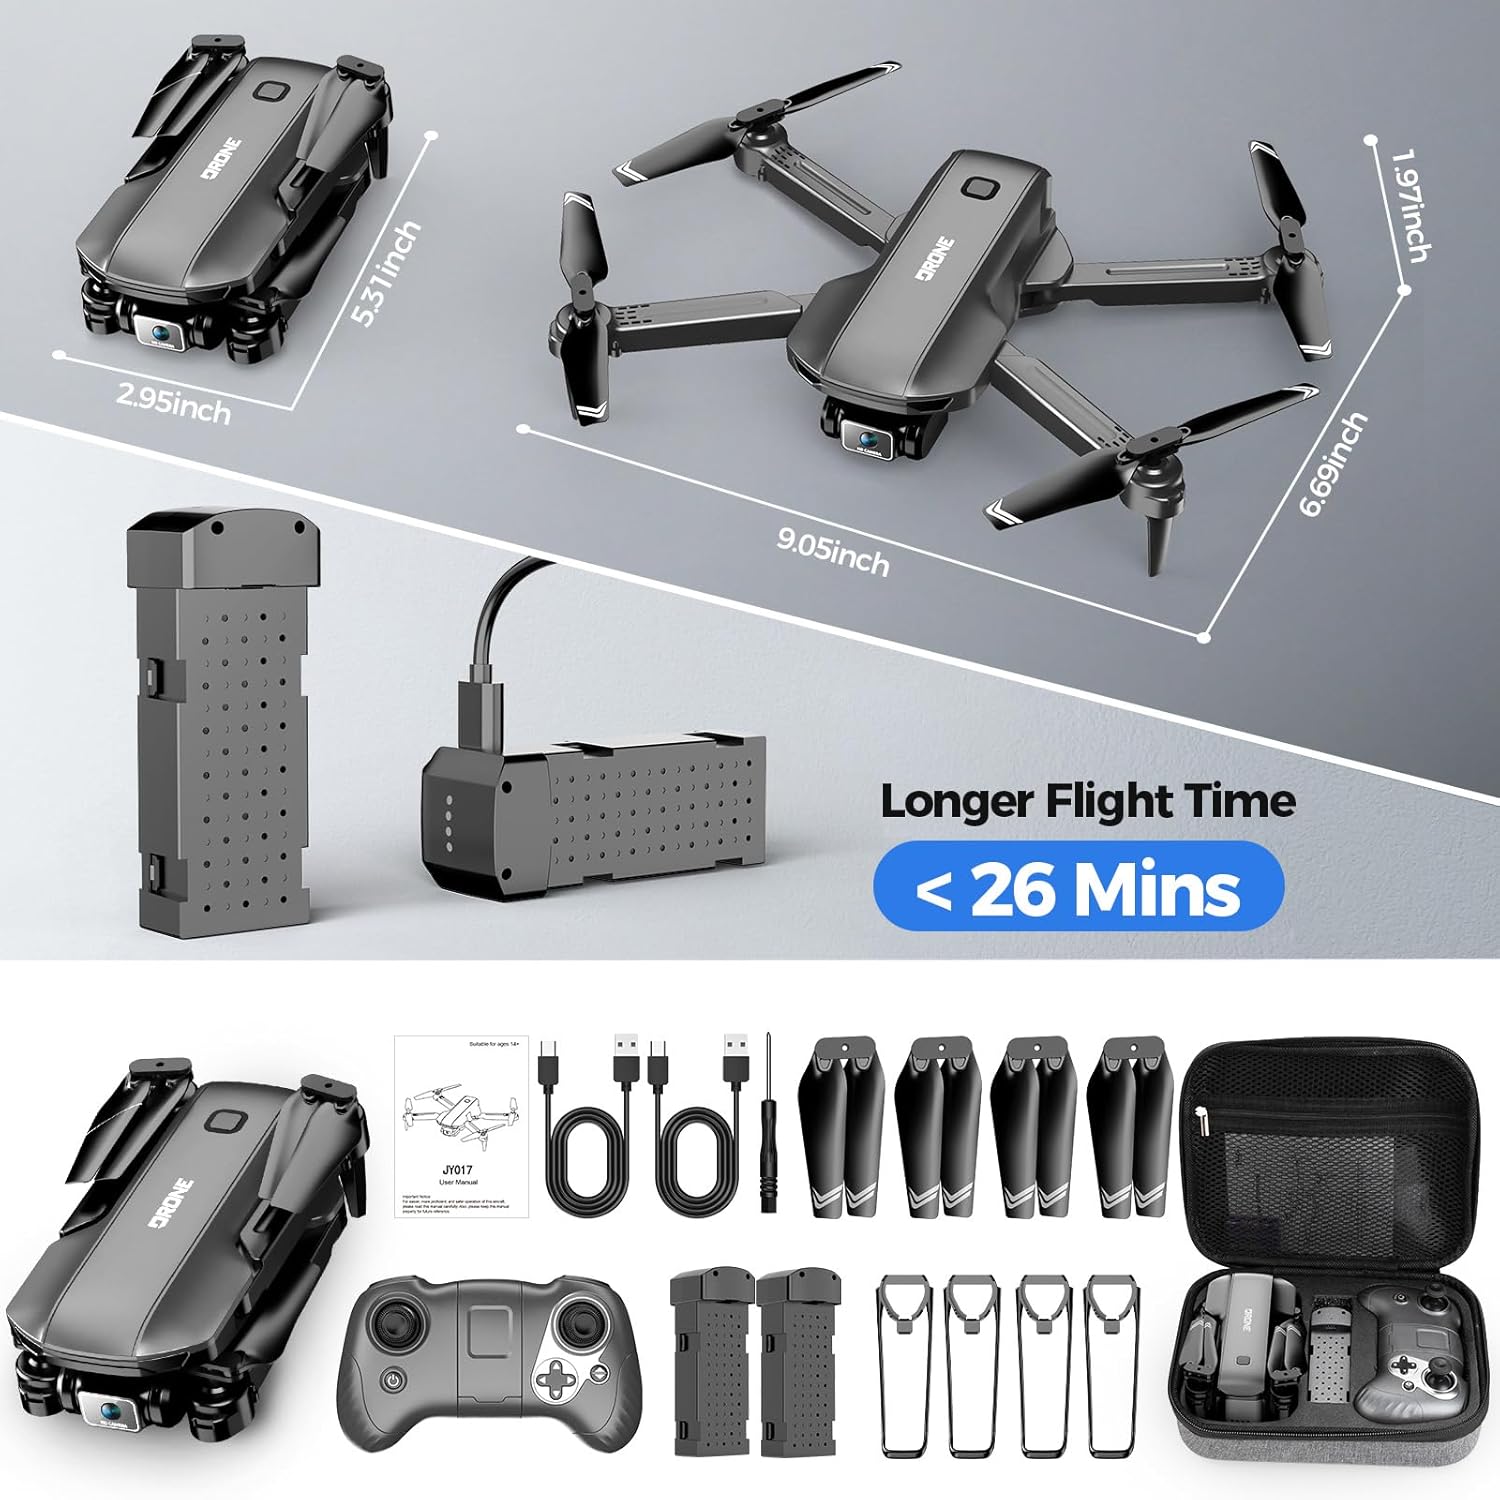
Image: All components included in the Velcase JY017 drone package.
Setup Guide
Follow these steps to prepare your drone for flight:
1. Watch the Setup and Operation Video
Video: A detailed guide on setting up and operating the Velcase JY017 Drone, including charging, assembly, pairing, and basic flight functions.
2. Charging the Drone Battery
- Connect one end of the USB charging cable to the drone's battery.
- Connect the other end of the USB charging cable to a power source (e.g., USB adapter, computer USB port).
- During charging, the indicator light on the battery will remain on.
- Once fully charged, the indicator light will turn off.
3. Deploying Drone Arms
Gently unfold the drone arms until they lock into position. Ensure all four arms are fully extended before flight.
4. Installing the Drone Battery
Insert the charged drone battery into the battery compartment on the drone until it clicks securely into place.
5. Installing Propeller Guards
For added safety, especially for beginners or indoor flights, align each protective frame with the arm buckle and fasten it tightly. Ensure they are securely attached to prevent detachment during flight.
Image: Propeller guards installed on the drone for enhanced protection.
6. Installing Remote Control Battery
Open the battery compartment on the remote control and insert the required batteries (1 9V battery included). Close the compartment securely.
7. Powering On and Pairing
- Place the drone on a level ground.
- Long press the power switch on the drone to turn it on.
- Long press the power button on the remote control to turn it on.
- The drone's lights will change from slow flashing to constant lighting, indicating successful frequency alignment (pairing).
8. Gyroscope Calibration
Calibrate the gyroscope by moving both joysticks on the remote control to the bottom-right corner simultaneously. The drone's lights will flash rapidly and then turn constantly on, indicating successful calibration.
9. App Connection (FPV)
- Download and install the "JY017 FLY" app on your mobile device.
- Turn on your phone's Wi-Fi and find the corresponding Wi-Fi network name, typically starting with "JY017-". Connect to it.
- After connecting, open the mobile phone app to enter the real-time transmission screen and view the drone's camera feed.

Image: FPV real-time transmission allows viewing the drone's camera feed on your mobile device.
Operating Instructions
1. One-Key Takeoff and Landing
After unlocking the motor, press the one-click takeoff button on the remote control to automatically launch the drone. Press it again for one-key landing.

Image: One-key takeoff and landing feature for simplified flight control.
2. Basic Flight Controls
- Rise/Decline: Use the left joystick to move up or down.
- Rotate Left/Right: Use the left joystick to rotate the drone horizontally.
- Move Forward/Backward: Use the right joystick to move the drone forward or backward.
- Fly Left/Right: Use the right joystick to move the drone sideways (strafe).
3. Speed Modes
The drone has three speed modes: low, medium, and high. The default setting is low speed. Press the speed button on the remote control once for medium speed (two beeps) and twice for high speed (three beeps).

Image: Visual representation of the drone's three adjustable speed modes.
4. Camera Adjustment
The drone features a remotely adjustable 1080P HD camera. Use the left joystick to adjust the camera downwards and the right joystick to adjust it upwards, allowing you to capture various angles.

Image: The drone's 90-degree electric adjustable camera for versatile aerial photography.
5. 360° Flip
Press the roll button on the remote control and then move the right joystick in the desired direction to perform a 360-degree flip.

Image: The drone executing a 3D flip maneuver.
6. Gravity Control
Activate the gravity sensing function in the app. Tilt your mobile device to control the drone's flight direction, allowing for intuitive control.

Image: Gravity control feature, enabling drone flight by tilting your smartphone.
7. Trajectory Flight (Waypoint Fly)
In the app, click on the trajectory flight icon. Draw a desired flight path on your screen, and the drone will automatically follow this path.

Image: The drone executing a pre-drawn trajectory flight path.
8. Photo and Video Capture (Gesture Control)
In the app, activate gesture control. Make a 'V' gesture with your hand to take a photo. Make a palm gesture to start video recording; make the palm gesture again to stop recording.

Image: Gesture recognition for hands-free photo and video capture.
9. Headless Mode
In headless mode, the drone's orientation is relative to the pilot, making it easier to control without worrying about the drone's front direction.
Image: Headless mode simplifies flight by maintaining consistent control orientation relative to the pilot.
10. Optical Flow Positioning & Altitude Hold
The optical flow positioning system helps the drone maintain a stable hover at a certain height, ensuring steadier flight and clearer photos and videos. Altitude hold automatically keeps the drone at a set altitude.

Image: Optical flow positioning provides stable hovering and improved wind resistance.
Maintenance
1. Replacing Fan Blades (Propellers)
- Use the provided screwdriver to unscrew the screws of the old fan blade and remove it.
- Pay attention to distinguishing between 'A' and 'B' arms and 'A' and 'B' fan blades. Each blade is marked (e.g., A1, B1).
- Install the corresponding new fan blades on the correct arms and fasten them tightly with the screws.

Image: Correct identification and installation of 'A' and 'B' fan blades.
Troubleshooting
- Drone not responding to remote: Ensure both the drone and remote control are powered on and successfully paired. Recalibrate the gyroscope if necessary. Check battery levels for both devices.
- Unstable flight/Drifting: Perform a gyroscope calibration on a flat surface. Check for any damaged propellers and replace them if found. Ensure propeller guards are installed correctly and not interfering with blade rotation.
- Camera feed issues: Verify that your mobile device is connected to the drone's Wi-Fi network. Restart the app and the drone if the feed is not appearing or is lagging. Ensure sufficient signal strength.
- Short flight time: Ensure batteries are fully charged before each flight. Flight time can be affected by aggressive flying, wind conditions, and continuous video recording.
- Drone not taking off: Ensure the motors are unlocked (usually by pushing both joysticks outwards and downwards). Check for any obstructions to the propellers.
Specifications
| Feature | Detail |
|---|---|
| Brand | Velcase |
| Model Name | JY017 |
| Special Feature | Foldable, Lightweight, Portable |
| Age Range (Description) | Adult |
| Color | Dark Grey |
| Video Capture Resolution | 1080p |
| Connectivity Technology | Wi-Fi |
| Item Weight | 16 ounces (1 pound) |
| Battery Capacity | 1050 Milliamp Hours (x2 included) |
| Control Type | App Control, Remote Control |
| Wireless Communication Technology | Bluetooth, Wi-Fi |
| Product Dimensions | 5"L x 2"W x 6"H (folded) |
Warranty and Support
Your Velcase JY017 Drone comes with dedicated customer support. We provide 24-hour technical support and refund services to all customers. For any inquiries, technical assistance, or warranty claims, please contact our customer service team through the platform where you purchased the product.
We recommend registering your product on our official website (if available) to receive updates and access additional support resources.