1. Introduction
Thank you for choosing the Thermalright Frozen Vision 240 Black Liquid CPU Cooler. This all-in-one (AIO) liquid cooler is designed to provide efficient and quiet cooling for your CPU, featuring a 2.88-inch IPS LCD display for real-time system monitoring and customization. This manual provides essential information for proper installation, operation, and maintenance to ensure optimal performance and longevity of your cooler.

Figure 1: Overview of the Thermalright Frozen Vision 240 Black Liquid CPU Cooler.
2. Package Contents
Please verify that all components are present before proceeding with installation:
- Thermalright Frozen Vision 240 Black Liquid CPU Cooler (Radiator, Pump/Water Block with LCD, and pre-installed fans)
- 2 x TL-K12 120mm PWM Fans (if not pre-installed)
- Intel Mounting Bracket Kit (LGA 1150/1151/1155/1156/1200/2011/2066/1700/1851)
- AMD Mounting Bracket Kit (AM4/AM5)
- Mounting Screws and Hardware
- Thermal Paste
- Water Guide Clips
- USB Cable for LCD Display
- User Manual (this document)
3. Specifications
| Component | Specification |
|---|---|
| Water Block Dimensions | 67.5mm * 67mm * 58mm |
| Radiator Dimensions | 277mm * 120mm * 27mm |
| Water Pump Noise | ≤23dBA |
| Water Pump Speed | 3000RPM ±10% |
| Water Pump Voltage | DC 12V |
| Fan Model | TL-K12 |
| Fan Dimensions | 120mm * 120mm * 25mm |
| Fan Rated Speed | 2150RPM ±10% |
| Fan Rated Noise | ≤27dBA |
| Fan Air Flow | 69CFM (MAX) |
| Fan Static Pressure | 2.87mm/H2O (MAX) |
| Fan Connector | 4-Pin PWM |
| Compatible Sockets | Intel: LGA 1150/1151/1155/1156/1200/2011/2066/1700/1851 AMD: AM4/AM5 |
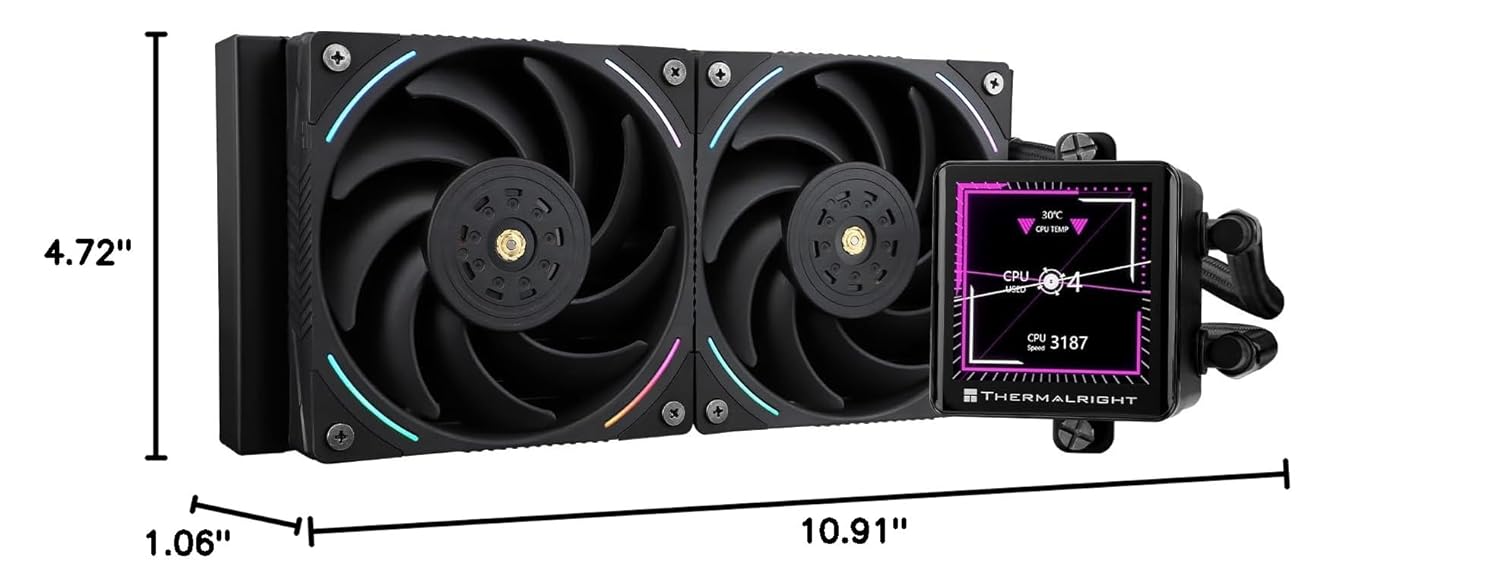
Figure 2: Product Dimensions.
4. Setup and Installation
Before installation, ensure your system is powered off and disconnected from the power source. Refer to your motherboard and PC case manuals for specific guidance on component placement and cable management.
4.1. Compatibility
This cooler supports a wide range of Intel and AMD sockets:
- Intel: LGA 1150, 1151, 1155, 1156, 1200, 2011, 2066, 1700, 1851
- AMD: AM4, AM5

Figure 3: Radiator and Water Tubes.
4.2. Installation Steps (General)
- Prepare Motherboard: Install the appropriate backplate and standoffs for your CPU socket (Intel or AMD) onto the motherboard.
- Mount Radiator: Secure the 240mm radiator to an available fan mount in your PC case (typically top or front). Ensure adequate airflow.
- Apply Thermal Paste: Clean the CPU surface. Apply a small amount of thermal paste to the center of the CPU's integrated heat spreader (IHS).
- Install Water Block: Carefully place the water block onto the CPU, aligning it with the standoffs. Secure it with the provided thumb screws, tightening in a diagonal pattern until snug.
- Connect Fans: Connect the PWM fan cables to the CPU_FAN or AIO_PUMP headers on your motherboard. If using a fan hub, connect them there.
- Connect Pump/LCD: Connect the pump's power cable to an appropriate header (e.g., AIO_PUMP or CPU_OPT). Connect the USB cable from the water block to an available internal USB 2.0 header on your motherboard for LCD display functionality.
- Cable Management: Use the included water guide clips and other cable ties to manage the tubing and cables for a clean build and unobstructed airflow.

Figure 4: Easy SS2 Install System.
5. Operating Instructions
5.1. LCD Display Functionality
The 2.88-inch IPS LCD display on the water block provides real-time information and customization options:
- System Monitoring: Displays CPU temperature, clock frequencies, usage, and other vital system parameters.
- Customization: Allows users to upload custom images (JPEG, PNG, GIF) or short video files to personalize the display.

Figure 5: Water Block with LCD Display.

Figure 6: LCD Display Features.
5.2. Software Installation and Usage
To fully utilize the LCD display and customize its content, you need to install the appropriate software from the Thermalright website. Important: Based on user feedback, the correct software for this model is typically TRCC, not TR-VISION HOME. Please ensure you download and install the TRCC software for water-cooling LED screen control.
- Download the latest TRCC software from the official Thermalright support page.
- Install the software following the on-screen instructions.
- Launch the TRCC application to configure display settings, monitor system parameters, and upload custom media.

Figure 7: Live System Monitoring Software Interface.

Figure 8: Custom Wallpaper on LCD Display.
6. Maintenance
Regular maintenance helps ensure the longevity and optimal performance of your liquid CPU cooler.
- Dust Cleaning: Periodically clean the radiator fins and fan blades with compressed air to remove dust buildup. Dust can impede airflow and reduce cooling efficiency.
- Check Connections: Ensure all cables (fan, pump, USB) are securely connected to the motherboard and cooler components.
- Inspect Tubing: Visually inspect the polymer-protected water pipes for any signs of kinks, leaks, or damage.
- Software Updates: Keep the TRCC software updated to the latest version for improved functionality and bug fixes.
7. Troubleshooting
If you encounter issues with your Thermalright Frozen Vision 240 Black, refer to the following common troubleshooting steps:
7.1. LCD Display Not Detected or Blank
- Check USB Connection: Ensure the USB cable from the water block is securely connected to an internal USB 2.0 header on your motherboard. Try a different USB header if available.
- Verify Software: Confirm that the correct software (TRCC) is installed and running. Close and restart the application.
- Power Cycle: Power off your PC, unplug it from the wall, wait 30 seconds, then plug it back in and restart.
- Re-plug USB: If the issue persists, try unplugging and re-plugging the USB cable from the water block while the PC is off.
7.2. Poor Cooling Performance
- Thermal Paste: Ensure thermal paste was applied correctly and evenly between the CPU and water block. Reapply if necessary.
- Water Block Contact: Verify that the water block is securely mounted and making full contact with the CPU. Tighten mounting screws diagonally.
- Fan Speed: Check fan speeds in your motherboard's BIOS/UEFI or monitoring software. Ensure fans are spinning at appropriate RPMs.
- Radiator Airflow: Ensure the radiator is free of dust and that case fans provide adequate airflow through the radiator.
- Pump Operation: Listen for the pump operating. If no sound or unusual noises, check pump power connection.
7.3. Excessive Noise
- Fan Noise: Adjust fan curves in your motherboard's BIOS/UEFI or software to reduce fan speed at lower temperatures. Ensure fans are not obstructed.
- Pump Noise: Some pump noise is normal. If it's excessively loud or gurgling, it might indicate air bubbles. Gently tilt your PC case to help move air bubbles to the radiator.
8. Warranty and Support
Thermalright products are manufactured to high standards and come with a standard warranty. For specific warranty terms and conditions, please refer to the warranty card included with your product or visit the official Thermalright website.
If you require technical assistance or have questions not covered in this manual, please contact Thermalright customer support through their official website or the retailer where you purchased the product. When contacting support, please have your product model and purchase information ready.