VEVOR RO1
VEVOR 22QT Electric Roaster Oven User Manual
Model: RO1
Brand: VEVOR
1. Introduction
Thank you for choosing the VEVOR 22QT Electric Roaster Oven. This manual provides essential information for the safe and efficient operation, maintenance, and troubleshooting of your new appliance. Please read this manual thoroughly before first use and retain it for future reference.

Image: The VEVOR 22QT Electric Roaster Oven, silver in color, with its lid open, revealing a perfectly roasted turkey surrounded by vegetables and herbs. The control knob is visible on the front panel.
2. Important Safety Instructions
When using electrical appliances, basic safety precautions should always be followed to reduce the risk of fire, electric shock, and injury to persons, including the following:
- Read all instructions before using the roaster oven.
- Do not touch hot surfaces. Use handles or knobs. Always use oven mitts or pot holders when handling hot materials.
- To protect against electrical shock, do not immerse the main unit (housing with electrical components) in water or other liquid.
- Close supervision is necessary when any appliance is used by or near children.
- Unplug from outlet when not in use and before cleaning. Allow to cool before putting on or taking off parts.
- Do not operate any appliance with a damaged cord or plug, or after the appliance malfunctions or has been damaged in any manner.
- The use of accessory attachments not recommended by the appliance manufacturer may cause injuries.
- Do not use outdoors.
- Do not let cord hang over edge of table or counter, or touch hot surfaces.
- Do not place on or near a hot gas or electric burner, or in a heated oven.
- Extreme caution must be used when moving an appliance containing hot oil or other hot liquids.
- Always attach plug to appliance first, then plug cord into the wall outlet. To disconnect, turn any control to "off", then remove plug from wall outlet.
- Do not use appliance for other than intended use.
- This roaster oven is not suitable for soup cooking.
3. Product Overview
3.1 Components
- Self-Basting Lid: Designed to circulate steam back into the pot, ensuring moisture and flavor.
- Roasting Lift-Out Rack: A durable rack with handles for easy transfer of roasted items.
- Non-Stick Enamel Pan: The inner cooking pan, designed for even heat distribution and easy cleaning.
- Stainless Steel Shell: The outer housing of the roaster oven.
- Control Knob: For adjusting temperature and selecting functions (Min, Keep Warm, Defrost, Roast).
- Cool-Touch Handles: Side grips on the main unit for safe carrying.

Image: An exploded diagram showing the main components of the VEVOR Roaster Oven: the self-basting lid, the roasting lift-out rack, the non-stick enamel pan, and the stainless steel main housing.
3.2 Key Features
- Large 22QT Capacity: Easily accommodates an entire turkey up to 26 lbs, ideal for large meals and gatherings.
- Powerful & Precise Cooking: Features a 1450W heating element with an adjustable temperature range from 150°F to 450°F (65.6°C to 232.2°C).
- Defrost & Warm Functions: Dedicated settings for quick defrosting and keeping food warm.
- Self-Basting Lid: Ensures a crispy exterior and tender, juicy interior by circulating moisture.
- Easy to Use & Clean: Detachable parts (lid, rack, pan) are dishwasher-safe, and the exterior wipes clean easily.
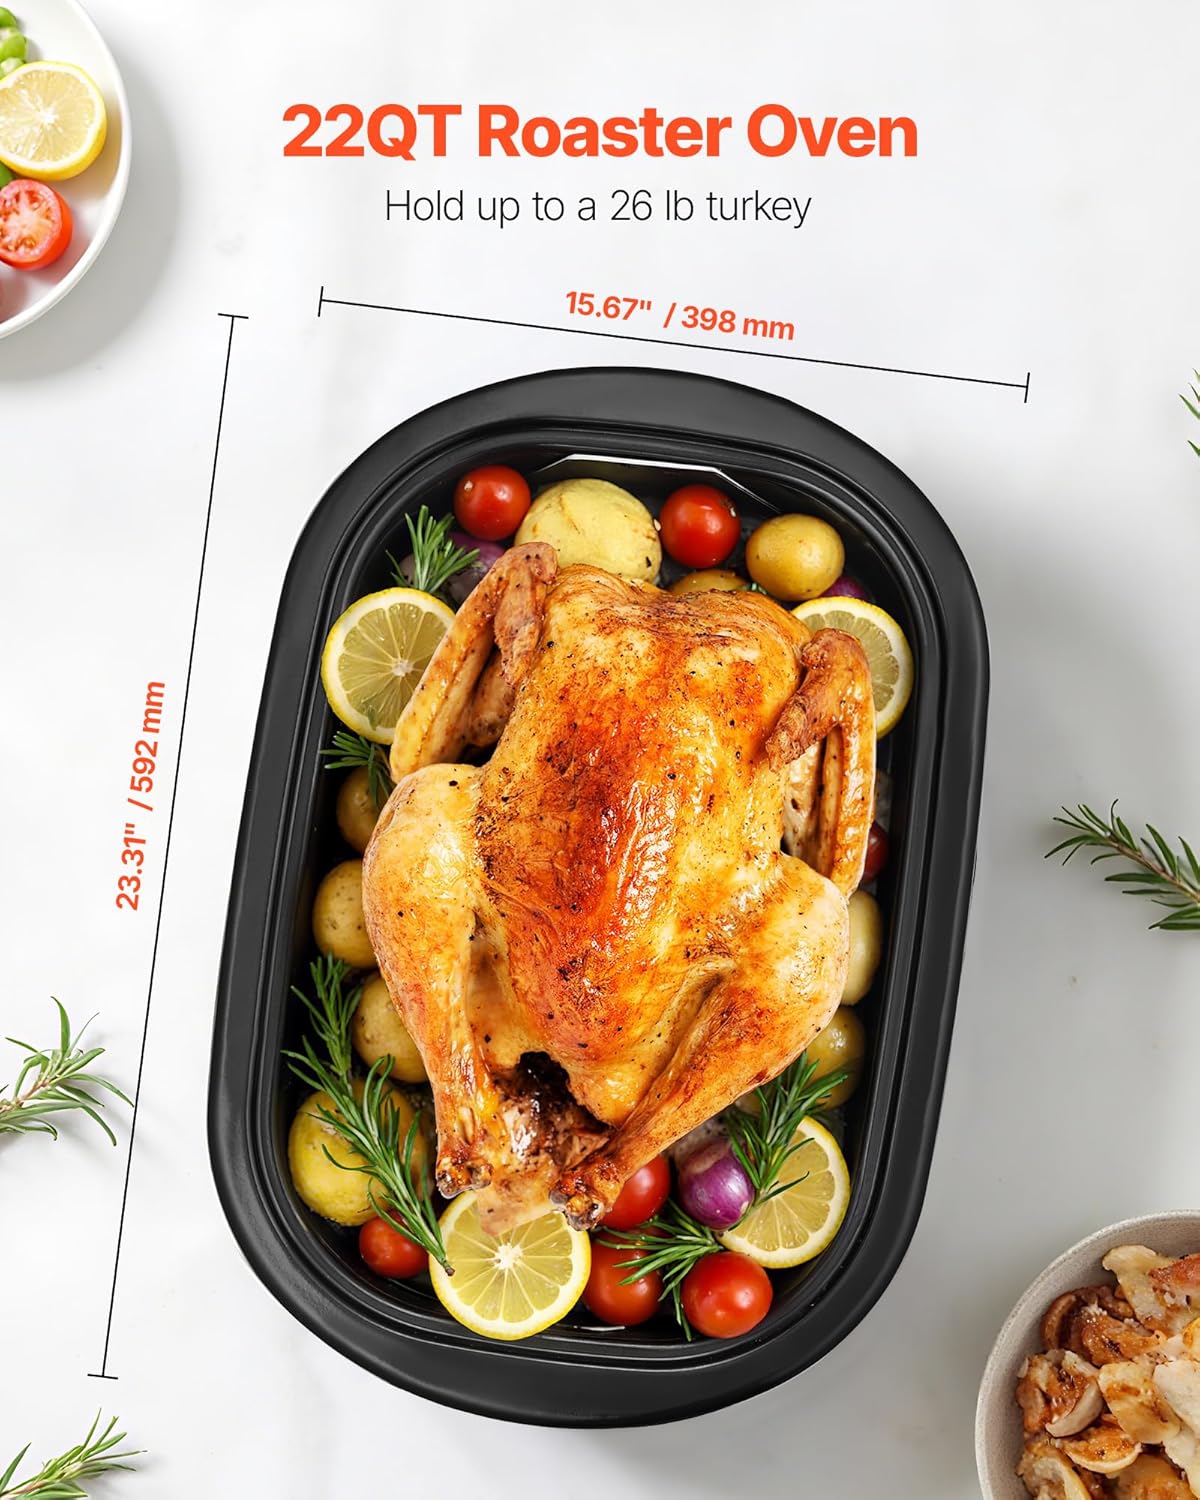
Image: A top-down view of the VEVOR 22QT Roaster Oven, showing its internal capacity with a roasted turkey and indicating its overall dimensions: 23.31 inches (592 mm) in length and 15.67 inches (398 mm) in width.

Image: A graphic illustrating the VEVOR Roaster Oven's powerful heating and temperature range from 150°F to 450°F, with smaller images showing the defrost (275°F), roast (325°F-450°F), and keep warm (150°F) functions.
4. Setup
- Unpack: Carefully remove all packaging materials and accessories from the box.
- Initial Cleaning: Before first use, wash the non-stick enamel pan, roasting rack, and lid in warm, soapy water. Rinse thoroughly and dry completely. Wipe the exterior of the main unit with a damp cloth. Do not immerse the main unit in water.
- Placement: Place the roaster oven on a stable, flat, heat-resistant surface. Ensure there is adequate ventilation around the appliance, keeping it away from walls and other heat-sensitive objects.
- Assemble: Place the non-stick enamel pan inside the stainless steel housing. Insert the roasting rack into the pan. Place the self-basting lid on top.
- Power Connection: Ensure the control knob is set to 'OFF' or 'Min' before plugging the power cord into a standard electrical outlet.
5. Operating Instructions
5.1 Temperature and Function Control
The roaster oven features a single control knob for selecting temperature and functions:
- Min: Minimum setting, typically for turning off or very low heat.
- Keep Warm: Maintains food at a serving temperature (approximately 150°F / 65.6°C).
- Defrost: A specific setting for thawing frozen items (approximately 275°F / 135°C).
- 150°F - 450°F (65.6°C - 232.2°C): Adjustable temperature range for roasting and baking.
5.2 General Usage
- Preheating: For best results, preheat the roaster oven to the desired temperature before adding food. Turn the control knob to the desired temperature setting. The indicator light will illuminate, indicating the oven is heating. It will turn off once the set temperature is reached.
- Roasting: Place food on the roasting rack inside the non-stick pan. Ensure the self-basting lid is securely placed. Set the temperature according to your recipe. The self-basting lid will help keep your food moist and flavorful.
- Defrosting: Place frozen food on the roasting rack. Turn the knob to the 'Defrost' setting. Monitor the food to ensure even thawing.
- Keeping Warm: Once cooking is complete, turn the knob to the 'Keep Warm' setting to maintain the food's temperature until serving.

Image: The VEVOR Roaster Oven with its self-basting lid slightly ajar, showing steam rising from a roasted turkey, illustrating the lid's function in keeping food juicy.

Image: A person wearing oven mitts is carefully lifting a roasted turkey out of the VEVOR Roaster Oven using the handles of the roasting lift-out rack, demonstrating the ease of removal and the cool-touch handles on the oven.
5.3 Multi-Purpose Cooking
The VEVOR Roaster Oven is versatile and can be used for various cooking tasks:
- Roasting: Perfect for turkeys, chickens, roasts, and other large cuts of meat.
- Baking: Suitable for casseroles, breads, and desserts.
- Slow-Cooking: Ideal for stews and tenderizing meats over longer periods.
- Warning: This appliance is not suitable for soup cooking.

Image: A collage showcasing the multi-purpose cooking capabilities of the roaster oven, featuring images of pizza, beef, cake, potatoes, and BBQ, with a clear warning: "Not Suitable for Soup Cooking."
6. Maintenance
6.1 Cleaning
Regular cleaning will ensure the longevity and optimal performance of your roaster oven.
- Unplug and Cool: Always unplug the roaster oven from the power outlet and allow it to cool completely before cleaning.
- Detachable Parts: The self-basting lid, roasting lift-out rack, and non-stick enamel pan are dishwasher-safe for convenient cleaning. Alternatively, wash them by hand with warm, soapy water, rinse thoroughly, and dry completely.
- Main Unit: Wipe the exterior of the stainless steel housing with a damp cloth. For stubborn stains, use a mild non-abrasive cleaner. Do not immerse the main unit in water or any other liquid.
- Avoid Abrasives: Do not use abrasive cleaners, scouring pads, or steel wool, as they can damage the surfaces.

Image: The non-stick enamel pan and self-basting lid of the VEVOR Roaster Oven are shown placed inside a dishwasher, highlighting their dishwasher-safe design for easy cleaning.
6.2 Storage
Store the clean and dry roaster oven in a cool, dry place. Ensure all components are properly assembled or stored together to prevent loss.
7. Troubleshooting
If you encounter issues with your VEVOR Roaster Oven, please refer to the following common problems and solutions:
| Problem | Possible Cause | Solution |
|---|---|---|
| Oven does not heat up. | Not plugged in; power outlet malfunction; temperature knob not set. | Ensure the power cord is securely plugged into a working outlet. Check the circuit breaker. Turn the temperature knob to a desired setting. |
| Food cooks unevenly. | Lid not properly sealed; overcrowding; incorrect temperature setting. | Ensure the lid is seated correctly. Avoid overcrowding the pan; cook in batches if necessary. Verify the temperature setting matches the recipe. |
| Food is drying out. | Lid not properly sealed; cooking too long or at too high a temperature. | Ensure the self-basting lid is securely in place. Adjust cooking time or temperature as needed. |
| Smoke or unusual odor during first use. | Protective coatings burning off. | This is normal for first use. Ensure good ventilation. If it persists after initial use, contact support. |
If the problem persists after attempting these solutions, please contact VEVOR customer support for assistance.
8. Specifications
| Attribute | Specification |
|---|---|
| Brand | VEVOR |
| Model Name | Roaster Oven |
| Item Model Number | RO1 |
| Power | 1450W |
| Roaster Oven Capacity | 22QT |
| Temperature Range | 150°F - 450°F (65.6°C - 232.2°C) |
| Main Material | Stainless Steel Metal Housing |
| Net Weight | 12.79 pounds (approx. 5.8 kg) |
| Product Dimensions (D x W x H) | 15.67" x 23.31" x 12.8" (398 x 592 x 325 mm) |
| Included Components | 1 x Roaster Oven, 1 x Self-Basting Lid, 1 x Roasting Lift-Out Rack, 1 x Non-Stick Enamel Pan |
| UPC | 197988704560 |
| ASIN | B0FLMF9R62 |
| Date First Available | August 7, 2025 |

Image: A detailed diagram showing the dimensions of the VEVOR Roaster Oven and its individual components (lid, pan, main unit), along with a summary of key specifications like model number, power, capacity, temperature range, and materials.
9. Warranty and Support
VEVOR products are designed for durability and performance. While specific warranty details may vary, VEVOR typically offers support for its products. For any questions, technical assistance, or warranty claims, please contact VEVOR customer support through their official website or the retailer where the product was purchased.
You can also refer to the official User Manual PDF for additional details: Download User Manual (PDF)
Ask a question about this manual
Ask about setup, troubleshooting, compatibility, parts, safety, or missing instructions. Manuals+ will review the question and use this page’s manual context to help answer it.