Introduction
This manual provides essential information for the safe and efficient operation of your InoKraft 7,500W Electric Garage Heater. Please read all instructions carefully before installation and use. Retain this manual for future reference.
Important Safety Information
WARNING: Improper installation, adjustment, alteration, service, or maintenance can cause injury or property damage. Refer to this manual. For assistance or additional information, consult a qualified installer, service agency, or the gas supplier.
- Always ensure the heater is properly grounded.
- Do not operate the heater with a damaged cord or plug.
- Keep combustible materials at least 3 feet (0.9 meters) away from the front, sides, and rear of the heater.
- Do not use in areas where gasoline, paint, or flammable liquids are stored.
- Installation must be performed by a qualified electrician to ensure safe operation and optimal performance.
- This heater is hot when in use. To avoid burns, do not let bare skin touch hot surfaces.
- Extreme caution is necessary when any heater is used by or near children or invalids and whenever the heater is left operating and unattended.
- Do not insert or allow foreign objects to enter any ventilation or exhaust opening as this may cause an electric shock or fire, or damage the heater.
- To prevent a possible fire, do not block air intakes or exhaust in any manner.
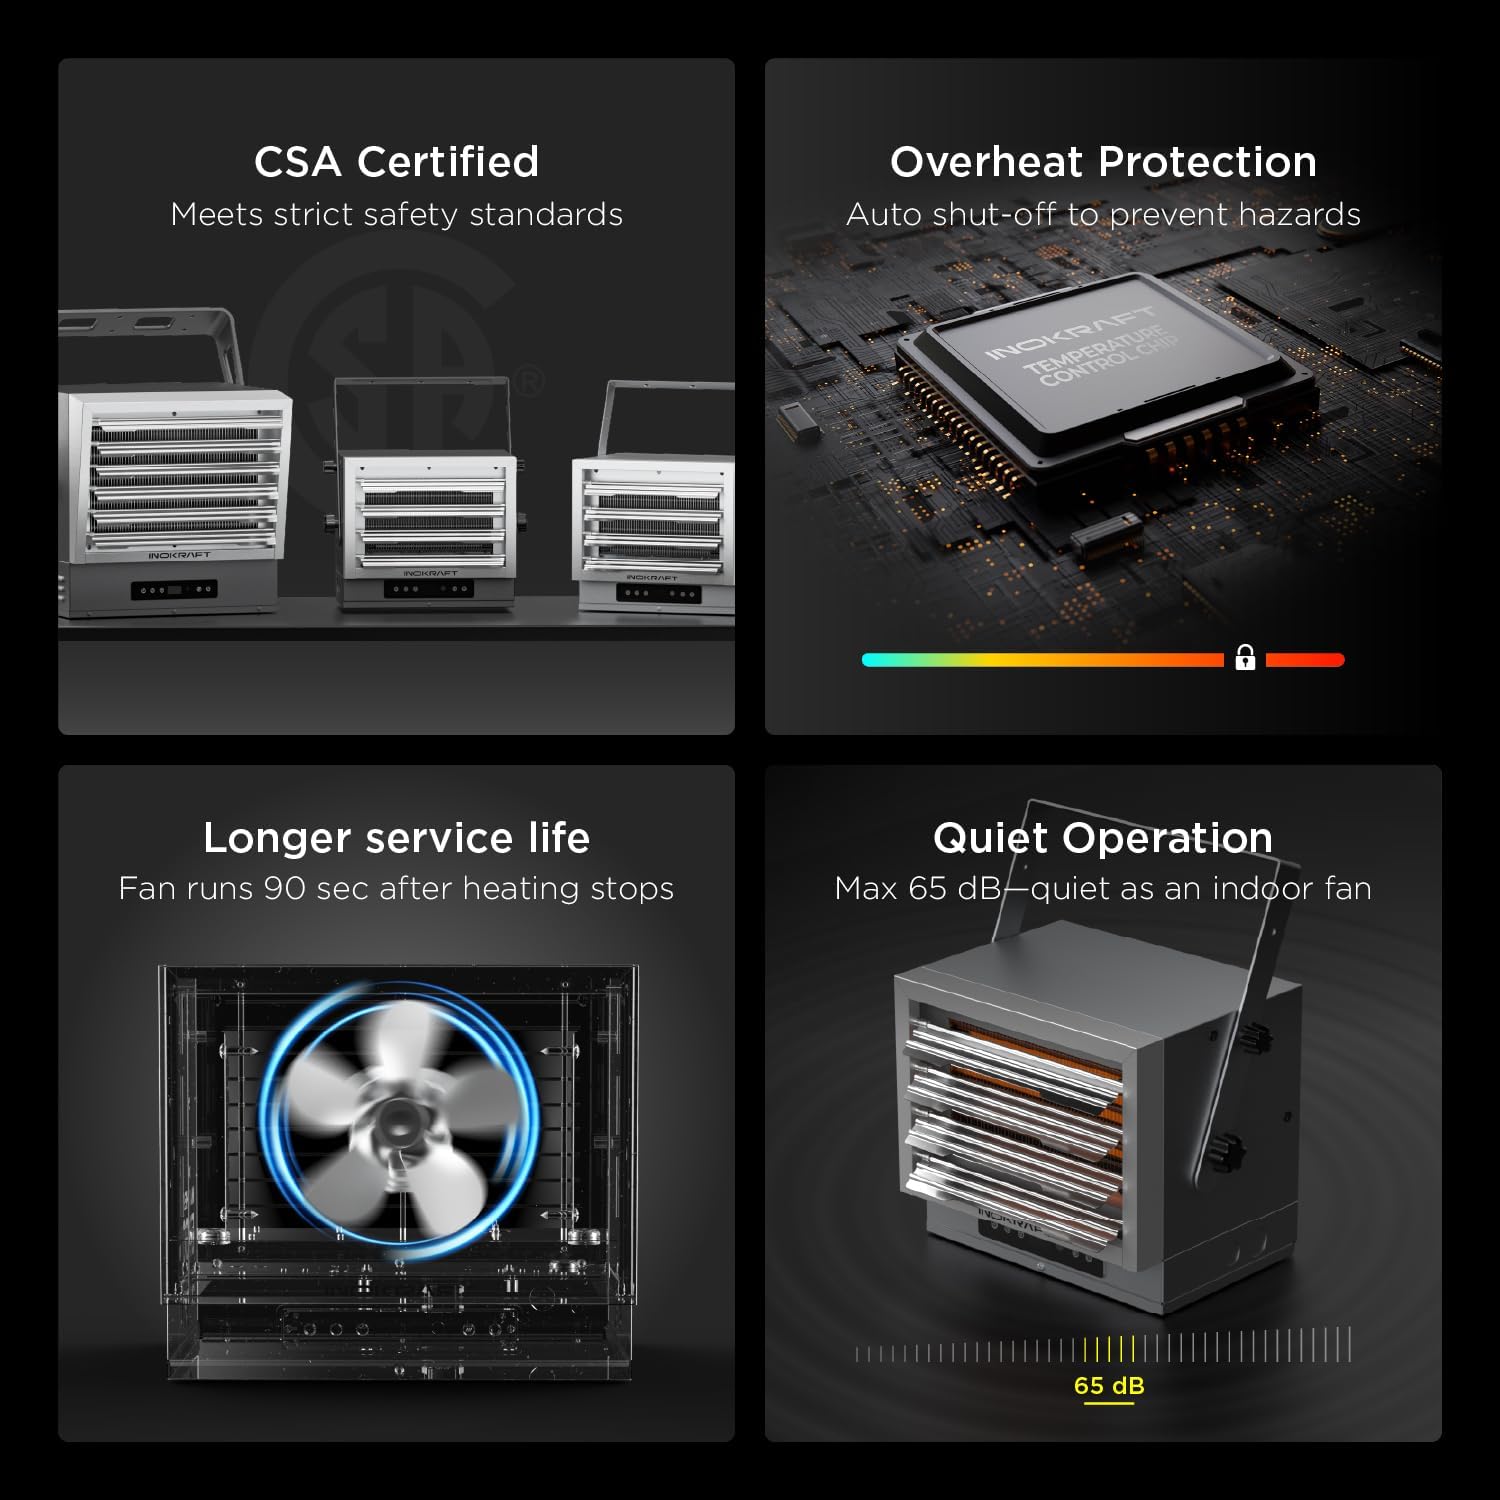
- The heater features overheat protection and an automatic shut-off function for safe use.
Package Contents
Before installation, verify all components are present and undamaged:
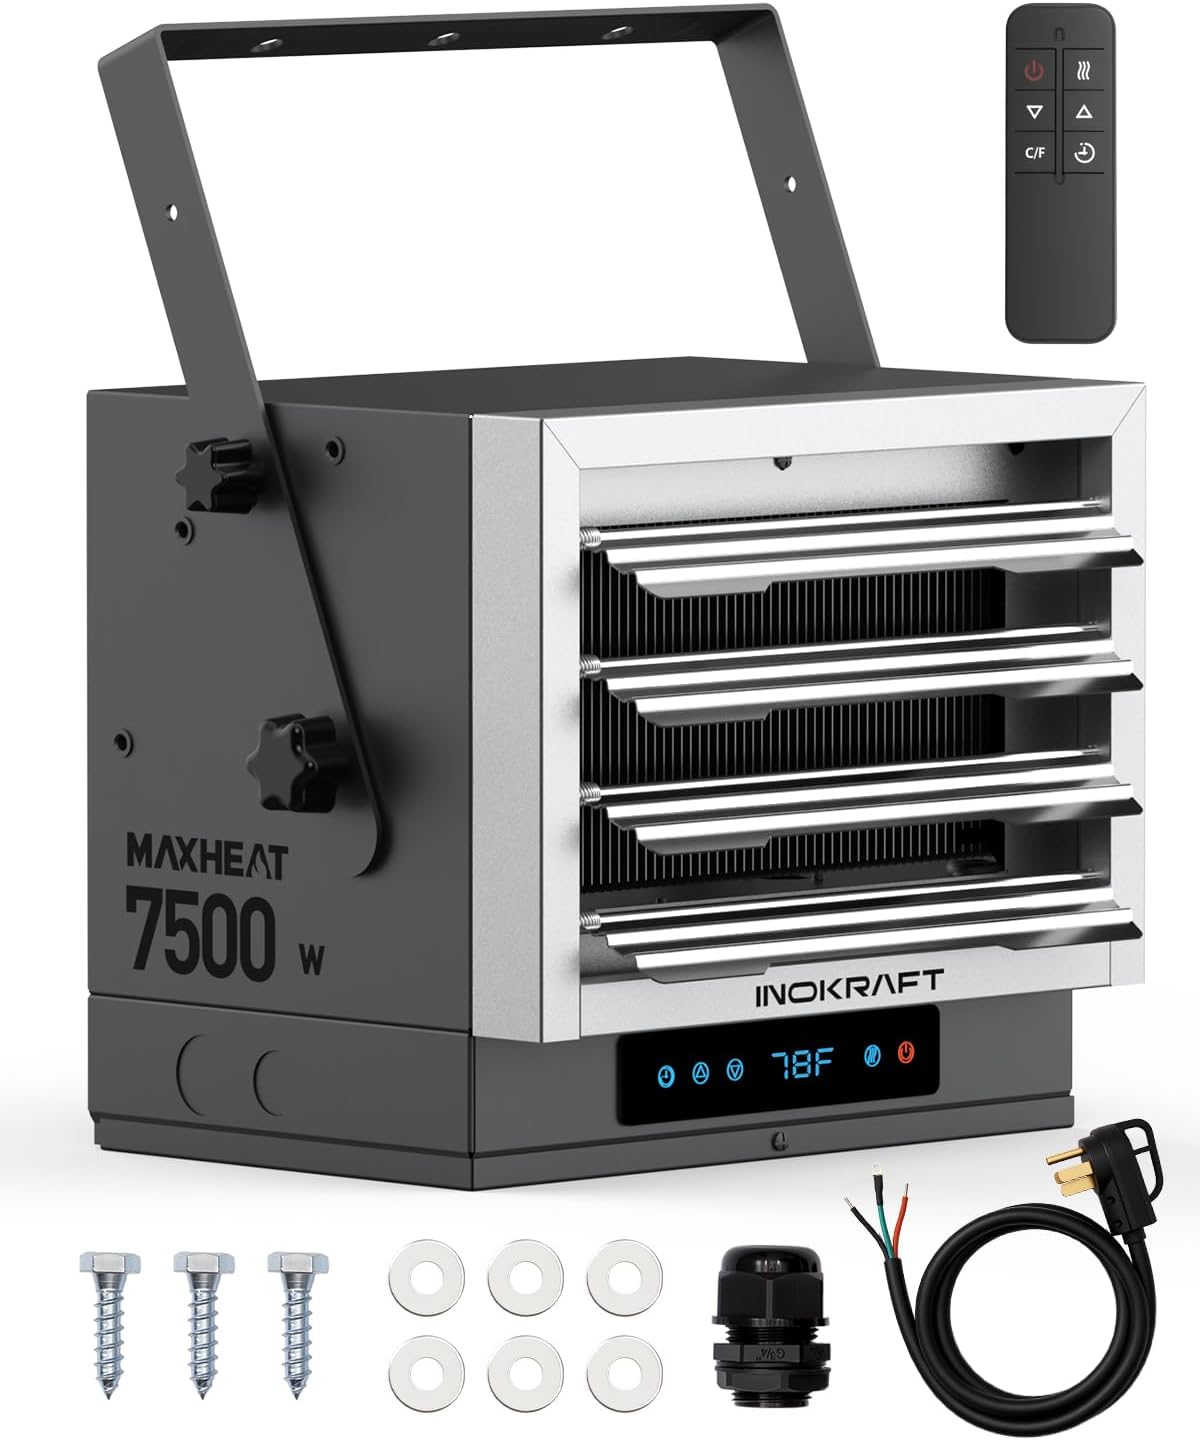
- InoKraft 7,500W Electric Garage Heater Unit
- Mounting Bracket
- Infrared Remote Control (requires 2x AAA batteries, not included)
- 8.2 ft Power Cord with NEMA 14-50P Plug (8 AWG wire)
- Cable Gland
- Mounting Screws (x3)
- Washers (x6)
- Quick User Guide

Product Specifications
| Feature | Specification |
|---|---|
| Brand | InoKraft |
| Model | MH-E7500 |
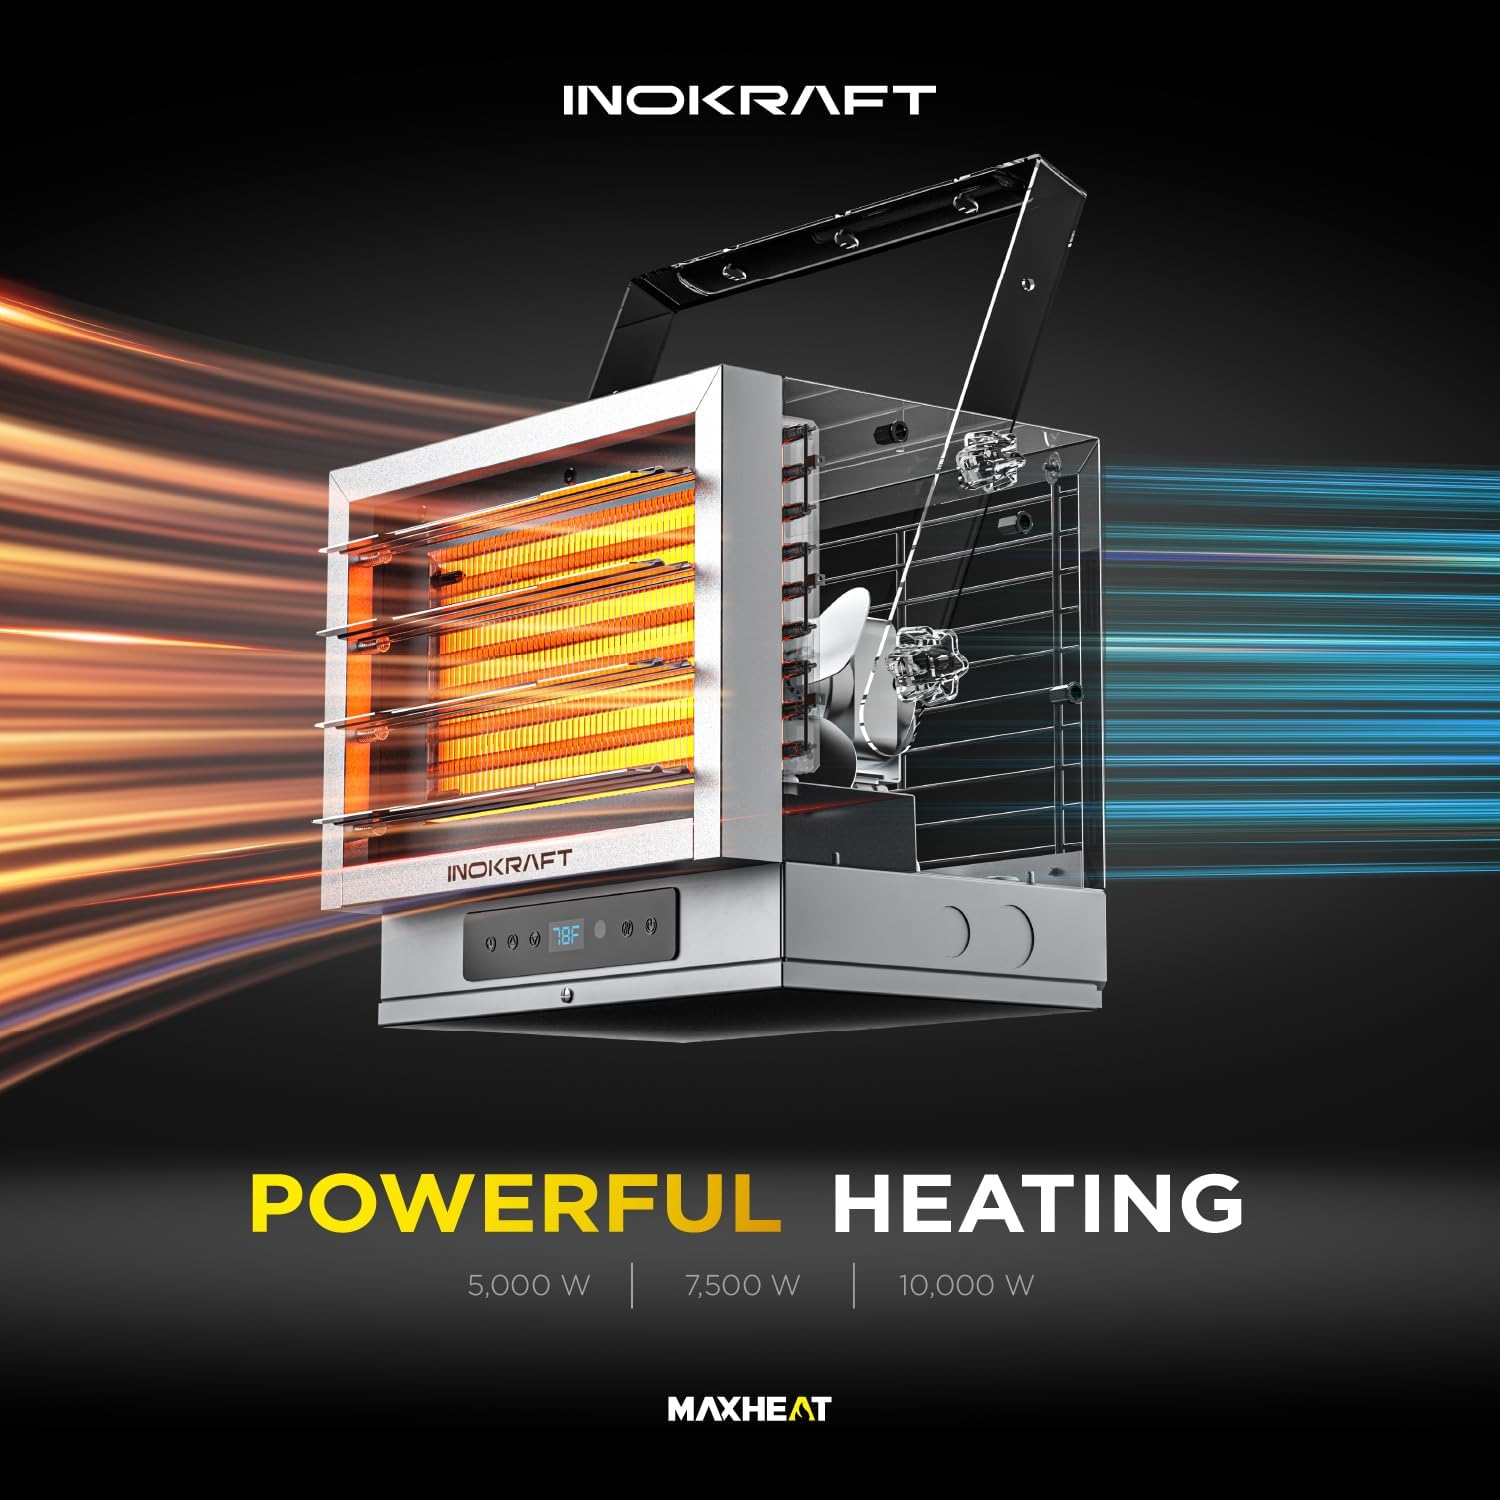
| Power Output | 7,500W |
| Voltage | 240V |
| Amperage | 31.25 Amps |
| Form Factor | Wall-Mounted / Ceiling-Mounted |
| Indoor/Outdoor Usage | Indoor (Garage, Workshop) |
| Heating Coverage | Up to 750 sq ft |
| Fuel Type | Electric |
| Number of Speeds | 2 (High/Low) |
| Temperature Control | Digital Thermostat (40°F to 99°F) |
| Timer | 1-24 Hour |
| Safety Features | Overheat Protection, Automatic Shut-off |
| Noise Level | Max 65 dB |
| Power Cord | 8.2 ft, 8 AWG, NEMA 14-50P Plug |
| Item Weight | 24.9 pounds |
| Package Dimensions | 16 x 14 x 14 inches |
Setup and Installation
Important: Installation must be performed by a qualified electrician to ensure safe operation and optimal performance. All wiring must be performed by a certified electrician and must comply with national and local electrical codes in the United States.
1. Connecting the Wire
- Remove the screw from the bottom panel of the heater.
- Choose a side for the power cord and open the corresponding cutout.
- Install the cable gland into the cutout.
- Run the power cord wire through the cable gland and into the heater's interior.
- Tighten the wires securely to the L1, L2, and ground terminals as indicated in the wiring diagram.
- Ensure all wires and the cable gland are securely tightened.
- Close the bottom panel and tighten the screw.
2. Locating the Heater
Install the heater away from traffic areas and maintain the required clearances:
- Minimum distance from sides: 13 inches (33 cm)
- Minimum distance from rear: 8 inches (20 cm)
3. Hanging the Heater
- Locate a wood stud in the desired mounting location.
- Place washers on the mounting screws and tighten them securely into the wall, ensuring the bracket is firmly attached.
- Carefully lift the heater unit onto the installed bracket. Align the holes and tighten the larger bolts to secure the heater to the bracket.
- Align and secure the bracket with the small bolts for either horizontal or tilted mounting, providing five angle adjustments.
Tips: Please handle the heater with care when lifting it for installation.
4. Connecting the Power
Plug the NEMA 14-50P power cord into a compatible 240V NEMA 14-50 outlet. The power cord length is 8.2 feet.
Operating Instructions
Your InoKraft garage heater offers versatile control options and heating modes.
Control Options:
- Panel Touch Control: Directly operate the heater using the buttons on the unit's control panel.
- Remote Control: Use the infrared remote for convenient operation from a distance. Ensure AAA batteries are installed.
- Sensor Control: The built-in digital thermostat allows for precise temperature management.
Heating Modes:
- High Mode (H): Provides maximum power for rapid heating to reach the set temperature.
- Low Mode (L): Uses reduced power to maintain the set temperature, suitable for smaller spaces or less intense heating needs.
- ECO Mode (E): Automatically adjusts heating output based on ambient temperature to optimize energy consumption without sacrificing comfort. The heater will cycle between high and low power as needed and may shut off when the desired temperature is reached, reactivating when the temperature drops.
- Fan Only Mode (FAN): Circulates air without engaging the heating elements, useful for ventilation.
To switch between modes, press the Mode Selection button on the control panel or remote.
Temperature Control:
The built-in digital thermostat allows you to set the desired temperature between 40°F and 99°F. Use the Up/Down buttons on the control panel or remote to adjust the temperature. The heater will operate until the set temperature is reached, then cycle on and off to maintain it.
Timer Function:
Set a 1-24 hour timer for worry-free operation. The heater will automatically shut off after the set time has elapsed.
External Thermostat Option:
The heater supports two thermostat control options: built-in thermostat or external thermostat. A selector switch on the unit allows you to choose between these options. If using an external thermostat, ensure the switch is set to the appropriate position.
Maintenance
Regular maintenance ensures optimal performance and longevity of your heater.
- Cleaning: Disconnect power before cleaning. Use a soft, damp cloth to wipe the exterior. Do not use abrasive cleaners or solvents.
- Fan Delay Function: The automatic fan delay function ensures effective heat distribution and helps cool down internal components after heating stops, contributing to a longer service life.
- Storage: If storing the heater for an extended period, ensure it is clean, dry, and stored in a safe, protected location.
Troubleshooting
If you encounter issues with your heater, refer to the following common problems and solutions:
| Problem | Possible Cause | Solution |
|---|---|---|
| Heater does not turn on. | No power, tripped circuit breaker, incorrect thermostat setting. | Check power connection and circuit breaker. Ensure thermostat is set above ambient temperature. |
| Heater has power but won't adjust settings. | Thermostat selector switch is in the wrong position (external thermostat selected). | Set the switch to position 'I' for built-in thermostat control. Refer to the installation video for switch location. |
| Heater is not producing enough heat. | Incorrect mode selected, room size exceeds coverage, poor insulation. | Select High mode. Ensure room size is within 750 sq ft. Improve room insulation if necessary. |
| Heater shuts off unexpectedly. | Overheat protection activated, timer expired, desired temperature reached in ECO mode. | Check for obstructions around the heater. Reset timer if applicable. Heater may be operating normally in ECO mode. |
Warranty and Support
InoKraft is committed to providing user-friendly, durable, and cost-effective tools.
- Warranty: 1-Year Hassle-Free Warranty for InoKraft HVAC products.
- Customer Support: For questions or assistance, please contact support@inokraft.com.
- Online Resources: Access abundant printed guides and online resources (videos on Amazon and YouTube) for solutions.
- Kraftsman Club: Register your InoKraft product for priority customer support, how-to guides, and exclusive product trial opportunities. Visit toolant.com/pages/inokraft-kraftsman-club for more details.
