1. Introduction
This manual provides comprehensive instructions for the installation, operation, and maintenance of your KETOTEK WiFi Boiler Thermostat, Model KTF017802. This intelligent thermostat is designed to offer efficient and convenient control over your boiler heating system, integrating seamlessly with smart home platforms like Alexa and Google Assistant via the Smart Life/Tuya App. Please read this manual thoroughly before installation and use to ensure proper function and safety.
2. Safety Information
- Electrical Hazard: Installation must be performed by a qualified electrician or trained personnel. Always disconnect power at the circuit breaker before installing or servicing the thermostat.
- Voltage: This thermostat operates on AC 90-240V 50/60Hz. Ensure your power supply matches these requirements.
- Compatibility: This thermostat is designed for boiler systems and water-based underfloor heating systems that utilize dry contact (NO and COM) control. It is not compatible with electric underfloor heating systems or battery-powered thermostats.
- Environment: Do not install in areas with excessive moisture, dust, or direct sunlight.
3. Package Contents
Please check the package for the following items:
- 1 x KETOTEK WiFi Boiler Thermostat
- 2 x Mounting Screws
- 1 x User Manual
4. Product Overview
The KETOTEK WiFi Boiler Thermostat features a clear digital display and intuitive touch controls. It allows for precise temperature management and smart connectivity.


4.1 Display and Controls

The display shows current temperature, set temperature, time, day of the week, and various mode indicators. Touch buttons allow for easy navigation and setting adjustments.
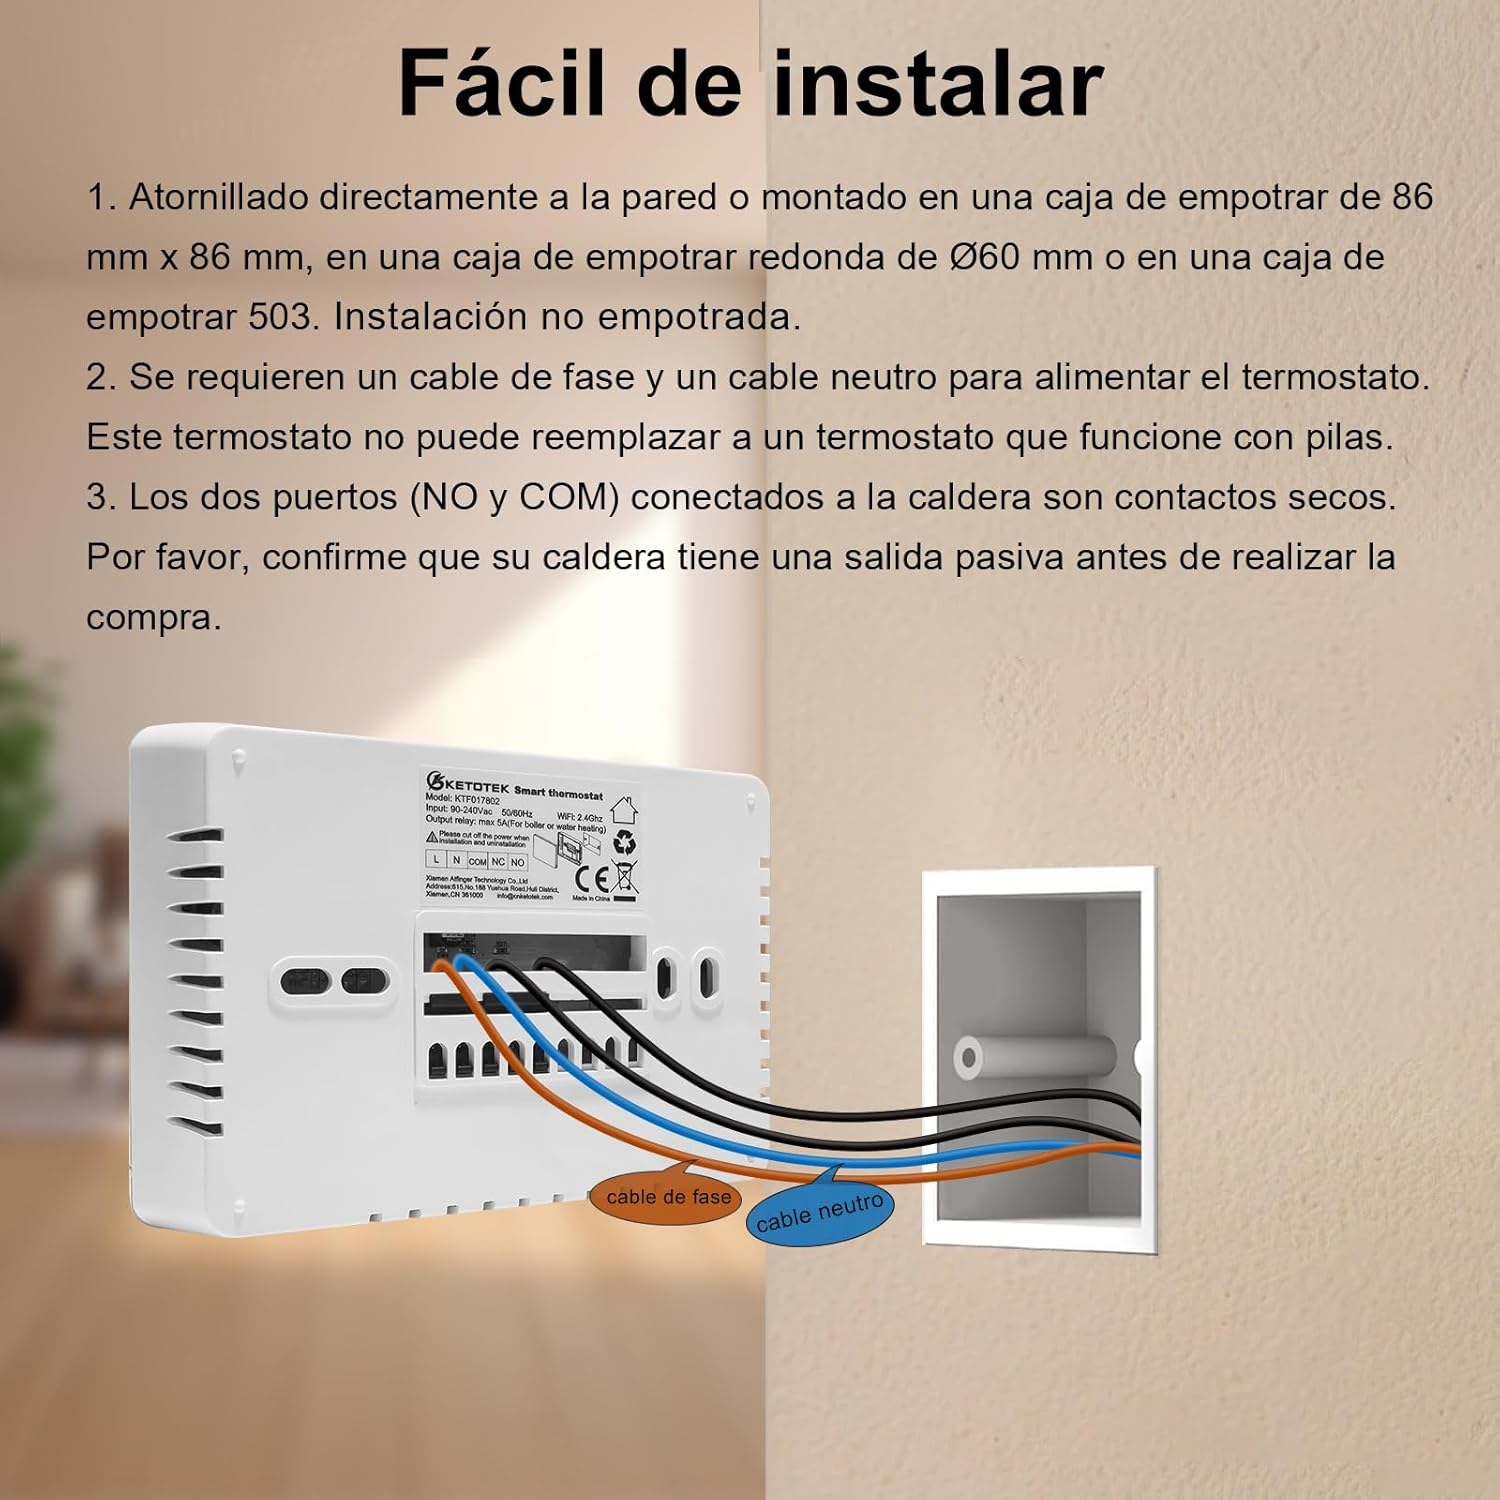
5. Installation
Important: Ensure power is disconnected before beginning installation.
5.1 Mounting Options
The thermostat can be mounted in the following ways:
- Directly screwed to the wall.
- Mounted in an 86x86 mm flush-mounted box.
- Mounted in a Ø60 mm round flush-mounted box.
- Mounted in a 503 type box.
This thermostat is not designed for recessed installation.
5.2 Wiring Requirements
The thermostat requires a phase (L) cable and a neutral (N) cable for power. It controls the boiler using dry contacts (Normally Open - NO and Common - COM). Confirm that your boiler supports dry contact control before proceeding.
6. Wiring Diagrams
6.1 Boiler Connection

6.2 Actuator Connection (Optional)

7. Initial Setup
After successful installation and power-up, the thermostat will display the current time and temperature. You may need to set the correct time and date manually or through the app.
8. Smart Life/Tuya App Integration
To unlock the full potential of your KETOTEK thermostat, connect it to the Smart Life or Tuya App.
- Download the Smart Life or Tuya App from your smartphone's app store.
- Register or log in to your account.
- Ensure your home WiFi network is 2.4GHz (5GHz networks are not supported).
- Follow the in-app instructions to add your thermostat. This typically involves putting the thermostat into pairing mode (refer to the thermostat's display for pairing indicators) and confirming the WiFi network.
Once connected, you can monitor and adjust the room temperature, create schedules, and access various settings remotely from anywhere.

9. Operating Modes
The thermostat offers several operating modes to suit your needs:
- Program Mode: Follows a pre-set weekly schedule.
- Manual Mode: Maintains a constant temperature set by the user until changed.
- Holiday Mode: Sets a specific temperature for a defined period, ideal for when you are away.
You can switch between these modes using the thermostat's buttons or through the Smart Life/Tuya App.
10. Weekly Programming
The Program Mode allows for flexible weekly scheduling to optimize energy consumption and comfort. You can choose from:
- 5-2 Day Schedule: Weekdays (Monday-Friday) and weekends (Saturday-Sunday) have separate programs.
- 6-1 Day Schedule: Monday-Saturday have one program, and Sunday has a different one.
- 7 Day Schedule: Each day of the week can be programmed individually.
Each day can have up to 6 time and temperature settings. Configure these settings via the Smart Life/Tuya App for ease of use.

11. Smart Features
11.1 Voice Control (Alexa/Google Assistant)
The thermostat is compatible with Amazon Alexa and Google Assistant. Link your Smart Life/Tuya account to your voice assistant app to control your heating with simple voice commands, such as "Alexa, set the thermostat to 22 degrees" or "Hey Google, turn off the heating."
11.2 Open Window Detection
This intelligent feature automatically pauses heating if a sudden drop in room temperature is detected, indicating an open window or door. This helps prevent energy waste. Heating resumes once the temperature stabilizes or after a set period.

11.3 Child Lock
Activate the child lock feature to prevent unauthorized changes to the thermostat settings directly from the device. This can be enabled or disabled via the app or by holding specific buttons on the thermostat.
11.4 Backlight Adjustment
Adjust the brightness of the thermostat's display backlight to suit your preference, especially useful in bedrooms or low-light environments. Options typically include medium, low, or off.

11.5 Heating History Tracking
The Smart Life/Tuya App provides a history of your heating patterns, allowing you to view average temperatures by hour, day, or month. This data can help you understand and optimize your energy usage.

12. Specifications
| Feature | Specification |
|---|---|
| Brand | KETOTEK |
| Model Number | KTF017802 |
| Color | White |
| Product Dimensions | 2.7 x 13 x 9 cm |
| Product Weight | 210 g |
| Voltage | 220 Volts (AC) |
| Power Supply | Wired Electric |
| Output | Max 5A |
| Temperature Range | 5℃~35℃ |
| Connectivity Technology | Bluetooth, WiFi (2.4GHz only) |
| Controller Type | Amazon Alexa, Android, Google Assistant, Manual Control, iOS |
| Special Features | Temperature Indicator, Holiday Mode, Programmable, Open Window Detection, Backlight Adjustment, Child Lock, Temperature Calibration, Reset Function, Memory Function |
| Specific Uses | Boiler |
| Temperature Control Type | Heating |
13. Troubleshooting
- Thermostat not powering on: Check the circuit breaker and ensure the L and N wires are correctly connected and receiving 220V AC power.
- No heating: Verify that the boiler is powered on and functioning. Check the thermostat's mode (ensure it's not in Holiday mode or set to a very low temperature). Confirm the NO and COM dry contacts are correctly wired to the boiler.
- WiFi connection issues: Ensure your router is broadcasting a 2.4GHz WiFi signal. Move the thermostat closer to the router if necessary. Restart the thermostat and attempt pairing again.
- App not responding: Check your phone's internet connection. Ensure the Smart Life/Tuya App is updated to the latest version. Restart the app.
- Inaccurate temperature reading: The thermostat has a temperature calibration function. Refer to the app or advanced settings on the device to adjust if needed.
14. Maintenance
To maintain your thermostat, simply wipe the screen and casing with a soft, dry cloth. Avoid using abrasive cleaners or solvents, as these can damage the device. Ensure no liquids enter the thermostat's internal components.
15. Warranty and Support
For warranty information or technical support, please refer to the documentation provided with your purchase or contact KETOTEK customer service directly. Contact details can typically be found on the manufacturer's website or on the product packaging.