
1. Product Overview
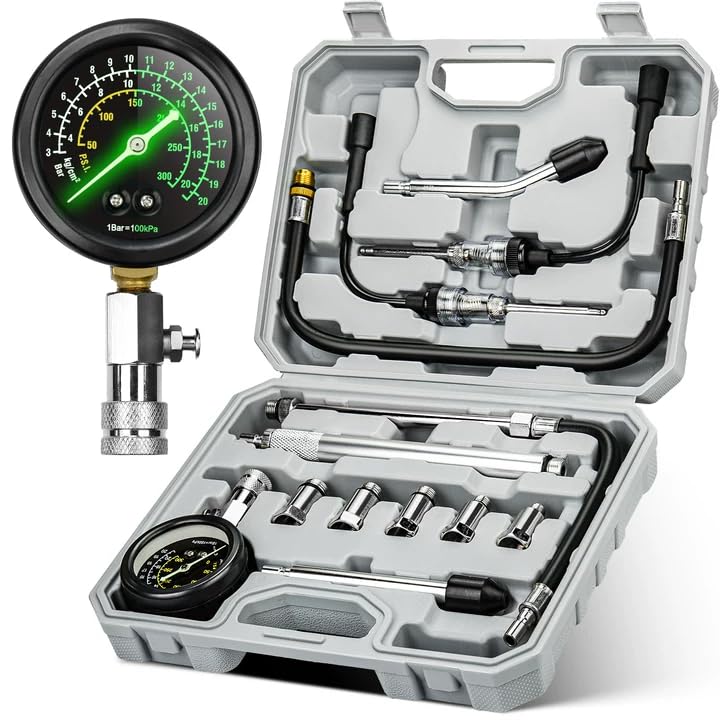
Image 1.1: The AUTOWN Professional Compression Tester Kit, neatly organized within its durable protective carrying case.
The AUTOWN Professional Compression Tester Kit (Model ECG-CT02) is a 13-piece diagnostic tool designed for accurately measuring engine compression in gasoline engines. This kit features a high-visibility fluorescent gauge with triple-scale readings (PSI, Bar, kg/cm²), a quick-release safety valve, and a comprehensive set of adapters and spark plug testers. It is suitable for use with cars, trucks, ATVs, and small gas engines.
Important Note: This kit is designed exclusively for gasoline engines and is not compatible with diesel or crude oil engines.

Image 1.2: Visual representation of engine types compatible with the AUTOWN Compression Tester, highlighting its use for gasoline engines in cars, trucks, ATVs, and small engines, while explicitly stating incompatibility with diesel or direct injection systems.
2. Safety Information
Always prioritize safety when working with automotive tools and engines. Failure to follow safety precautions can result in injury or damage to equipment.
- Wear appropriate personal protective equipment (PPE), including safety glasses and gloves.
- Ensure the engine is cool before performing any tests to avoid burns.
- Work in a well-ventilated area to prevent inhalation of exhaust fumes.
- Keep hands, hair, and loose clothing away from moving engine parts.
- Disconnect the battery's negative terminal before working on electrical components, unless specifically instructed otherwise for testing.
- Do not use this kit on diesel or crude oil engines.
- Handle the gauge and adapters with care to prevent damage.
3. Kit Components
The AUTOWN Professional Compression Tester Kit includes the following items, neatly organized in a protective carrying case:
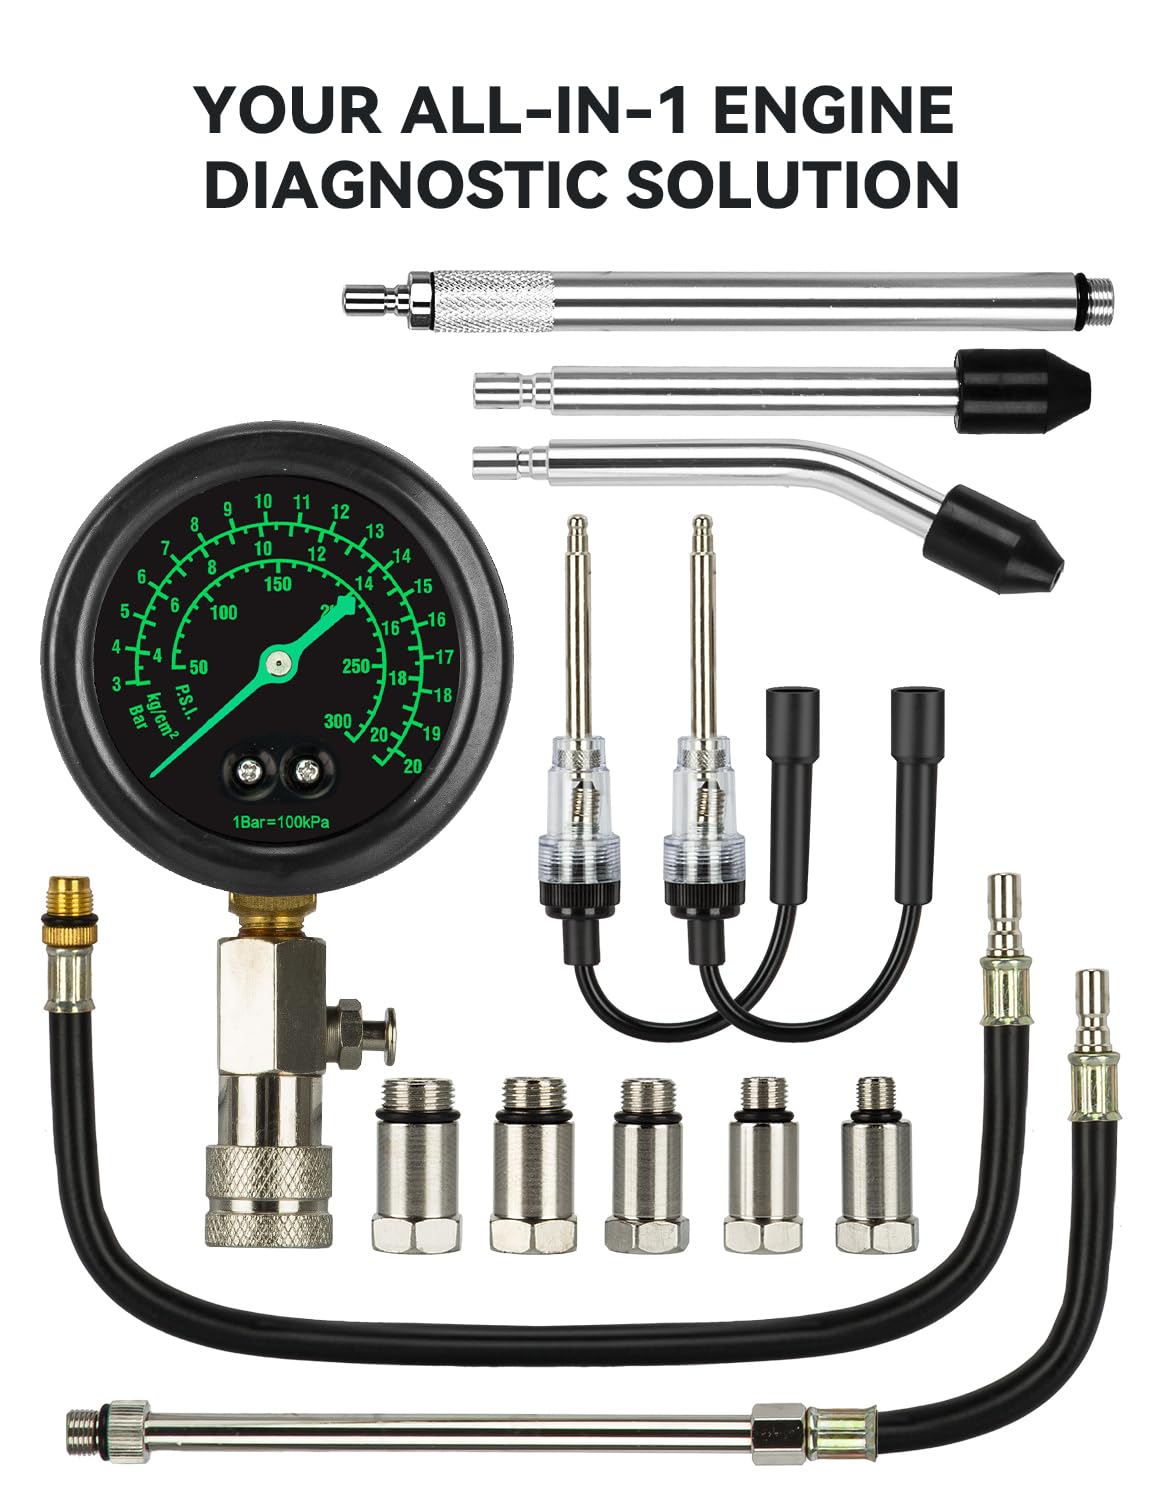
Image 3.1: All components of the AUTOWN Professional Compression Tester Kit, including the gauge, hoses, adapters, and spark plug testers, arranged outside the carrying case.
- Fluorescent Compression Gauge: Features a triple-scale display (0-300 PSI, 0-20 Bar, 0-21 kg/cm²) for clear readings.
- Quick-Release Valve: Integrated into the gauge assembly for safe and easy pressure release.
- Flexible Hoses: Two durable hoses for connecting the gauge to spark plug ports.
- Spark Plug Testers: Two units designed to check spark plug functionality.
- Metal Adapters (M10-M18): Five corrosion-resistant adapters to fit various spark plug thread sizes:
- M10 adapter
- M12 adapter
- M14 adapter
- M16 adapter
- M18 adapter
- Extension Rods: Various lengths for reaching recessed spark plug ports.
- Protective Carrying Case: For organized storage and transport of all kit components.

Image 3.2: A detailed view of the five corrosion-resistant metal adapters (M10, M12, M14, M16, M18) provided with the compression tester kit.
4. Setup
Before performing a compression test, ensure the engine is prepared correctly.
- Engine Preparation:
- Ensure the engine is at normal operating temperature, then turn it off.
- Disconnect the ignition system (e.g., remove the ignition coil fuse or disconnect the coil packs) to prevent accidental starting and spark.
- Disable the fuel system (e.g., remove the fuel pump fuse or relay) to prevent fuel injection during the test.
- Remove all spark plugs from the engine. Keep them organized by cylinder.
- Select Adapter: Identify the correct adapter from the kit that matches the thread size of the spark plug holes in your engine.
- Assemble Tester:
- Thread the selected adapter onto one of the flexible hoses.
- Connect the other end of the hose to the compression gauge. Ensure all connections are secure to prevent pressure leaks.
5. Operating Instructions: Performing a Compression Test
Follow these steps to accurately measure engine compression:
- Install Tester: Carefully thread the assembled compression tester (gauge, hose, and adapter) into the spark plug hole of the cylinder you wish to test. Hand-tighten only; do not overtighten.
- Open Throttle: Fully open the throttle body (e.g., by depressing the accelerator pedal to the floor) to allow maximum airflow into the engine.
- Crank Engine: Have an assistant crank the engine for 5-7 compression strokes (typically 3-5 seconds) or until the gauge needle stops rising.
- Record Reading: Note the peak pressure reading displayed on the fluorescent gauge. The gauge provides readings in PSI, Bar, and kg/cm².

Image 5.1: A close-up view of the high-visibility fluorescent gauge, illustrating its triple-scale display and clear readability in various lighting conditions.
- Release Pressure: Press the quick-release safety valve on the gauge assembly to depressurize the system.

Image 5.2: A hand demonstrating the use of the quick-release safety valve for instant depressurization after a compression test.
- Repeat for all Cylinders: Remove the tester and repeat steps 1-5 for each remaining cylinder. Consistency in the number of engine cranks is important for accurate comparison.
- Analyze Results: Compare the compression readings across all cylinders. Significant variations (typically more than 10-15% difference between the highest and lowest cylinder) can indicate engine issues. Consult your vehicle's service manual for specific compression specifications.
5.1. Using the Spark Plug Tester
The kit includes two spark plug testers to quickly check if a spark plug is firing correctly.
- Connect Tester: Remove the spark plug wire from the spark plug. Connect the spark plug tester between the spark plug wire and the spark plug.
- Observe Indicator: Crank the engine. If the spark plug is functioning, the bright indicator light on the tester will flash.

Image 5.3: An illustration detailing the components of the spark plug tester, including the heavy-duty cable, all-metal threaded tip, and the bright indicator light that illuminates when the plug is good.
- Safety Precaution: Ensure proper grounding and avoid touching the tester or spark plug wires while the engine is cranking to prevent electrical shock.
6. Maintenance
Proper maintenance ensures the longevity and accuracy of your compression tester kit.
- Cleaning: After each use, wipe down all components with a clean, dry cloth to remove any oil, fuel, or debris. Do not use harsh chemicals that could damage the gauge or hoses.
- Storage: Store all components in the provided protective carrying case. Ensure the case is kept in a dry, clean environment away from extreme temperatures.
- Inspection: Periodically inspect hoses for cracks or wear, and check adapters for thread damage. Replace any damaged components immediately.
- Gauge Care: Avoid dropping or subjecting the gauge to impact, as this can affect its accuracy.
7. Troubleshooting
| Problem | Possible Cause | Solution |
|---|---|---|
| Low or Zero Compression Reading |
|
|
| Inconsistent Readings Between Cylinders |
|
|
| Spark Plug Tester Light Does Not Flash |
|
|
8. Specifications
- Model Number: ECG-CT02
- Brand: AUTOWN
- Material: Alloy Steel
- Gauge Reading: Triple-scale (0-300 PSI, 0-20 Bar, 0-21 kg/cm²)
- Engine Compatibility: Gasoline engines only (Cars, Trucks, ATVs, Small Engines)
- Adapter Sizes: M10, M12, M14, M16, M18
- Package Dimensions: 11.27 x 9.3 x 3 inches
- Item Weight: 1.59 Kilograms (3.5 Pounds)
9. Warranty & Support
AUTOWN products are manufactured to high-quality standards. For specific warranty details, please refer to the warranty card included with your product or visit the official AUTOWN website. If you encounter any issues or require technical assistance, please contact AUTOWN customer support.
AUTOWN Customer Support:
- Website: Visit the AUTOWN Store on Amazon (for general inquiries and product information)
- Refer to product packaging for direct contact information or support channels.