1. Introduction
This manual provides essential information for the proper setup, operation, and maintenance of your Genérico H50 PRO Retro Portable Console. Please read this guide thoroughly before using the device to ensure optimal performance and longevity.
2. Product Overview
The Genérico H50 PRO is a portable retro gaming console designed for playing classic video games. It features a 4-inch IPS display, a powerful RK3326 processor, and a 3800mAh battery for extended gameplay.
2.1 Package Contents
- Genérico H50 PRO Retro Portable Console
- USB Charging Cable
- User Manual (this document)
- MicroSD Card (pre-installed with games and system software)
- Carrying Case (may vary by package)

Figure 2.1: Typical package contents for the H50 PRO console, including the device, charging cable, manual, and a protective case.
2.2 Console Layout and Dimensions
The console features a compact design with a 4-inch IPS screen, D-pad, action buttons (A, B, X, Y), dual analog joysticks, and shoulder buttons (L1, L2, R1, R2). It also includes dedicated Start, Select, and Function (FN) buttons.

Figure 2.2: Front, side, and bottom views of the H50 PRO console, illustrating its physical dimensions: approximately 14.80 cm (5.83 inches) in height, 8.26 cm (3.25 inches) in width, and 1.39 cm (0.55 inches) in thickness.
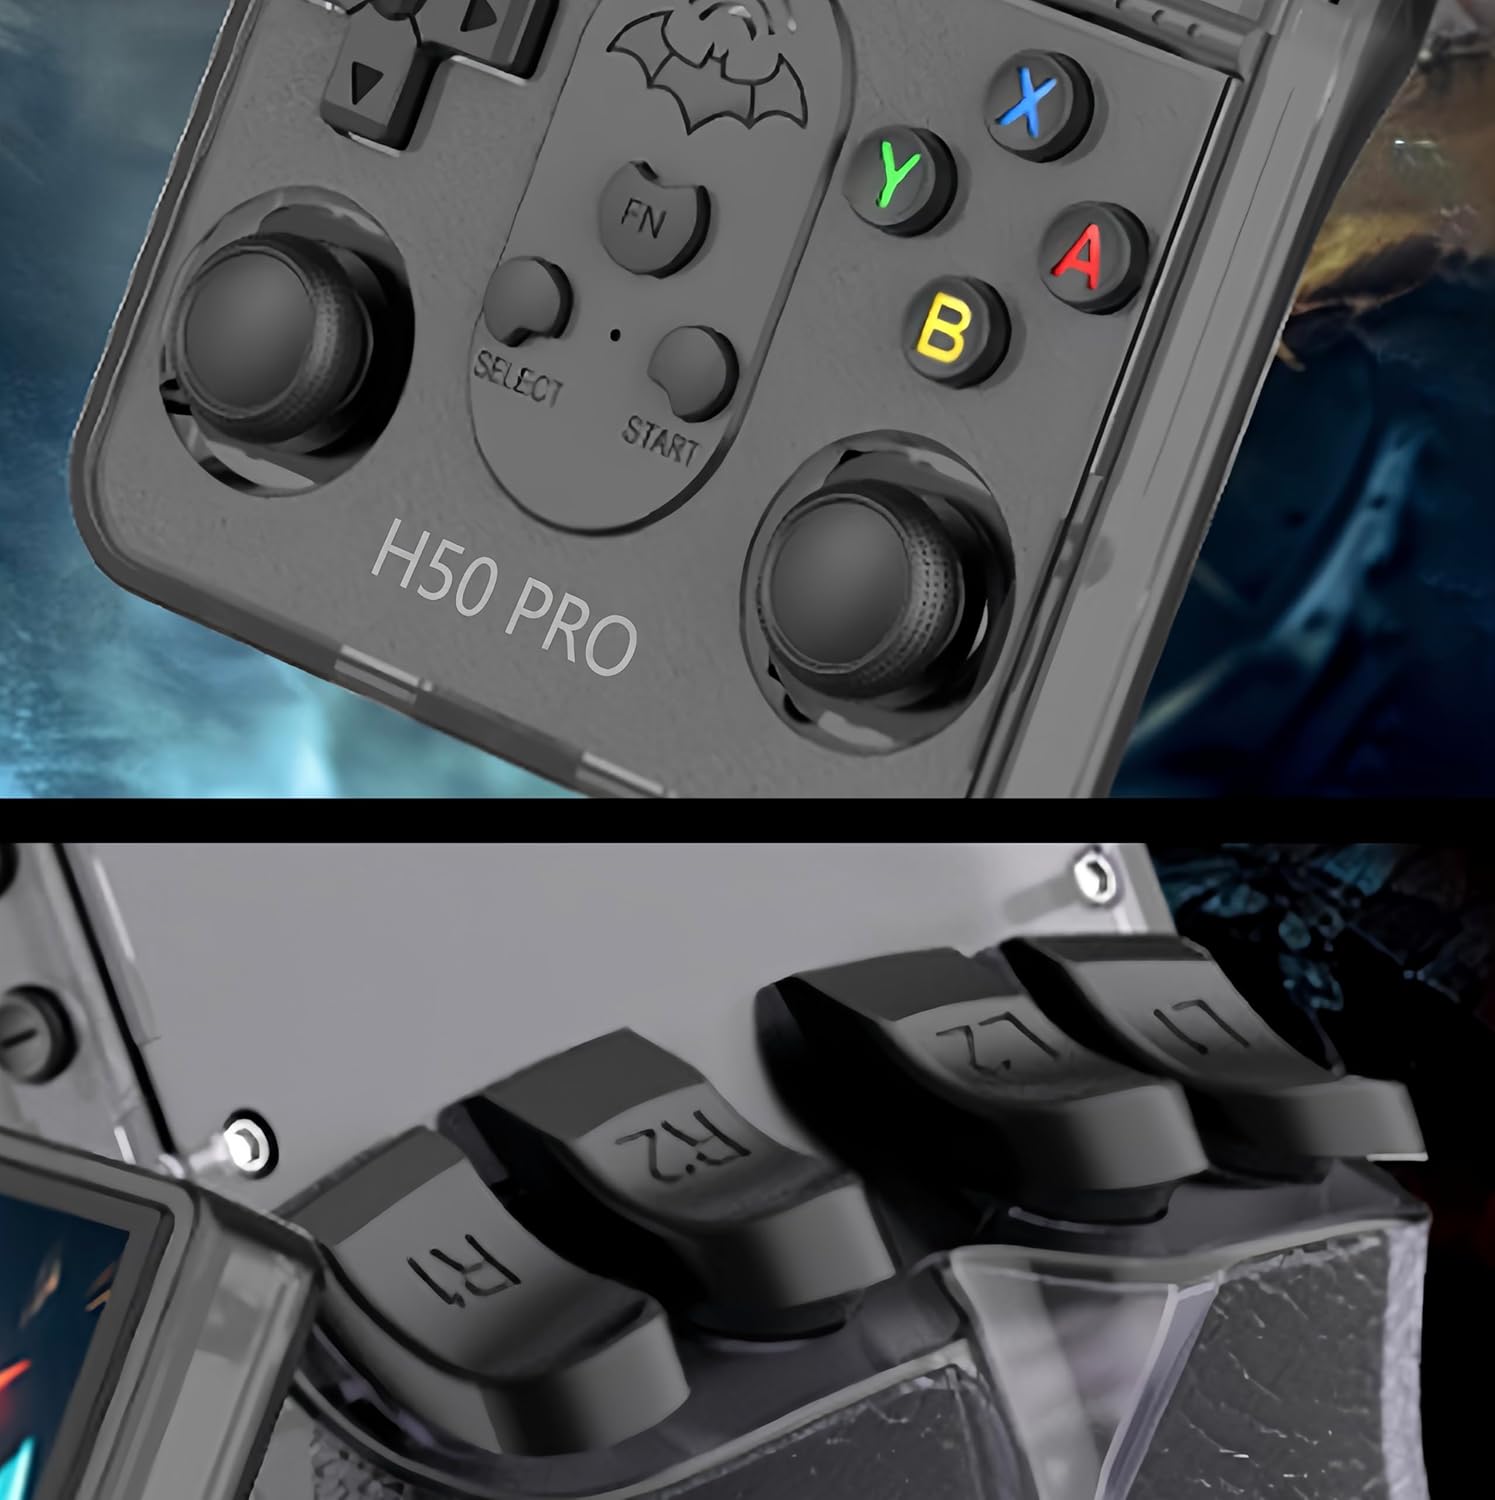
Figure 2.3: Detailed view of the console's controls, including the D-pad, analog joysticks, A/B/X/Y buttons, Start/Select/FN buttons, and the L1/L2/R1/R2 shoulder triggers.

Figure 2.4: Side and bottom views highlighting the console's ports, which typically include USB-C for charging and data transfer, and a 3.5mm audio jack.
3. Setup
3.1 Initial Charging
- Connect the provided USB charging cable to the console's USB-C port.
- Connect the other end of the cable to a compatible USB power adapter (5V/1A recommended, not included) or a computer's USB port.
- Allow the console to charge fully before first use. The charging indicator light will typically change color or turn off when charging is complete.
The console is equipped with a 3800mAh battery, providing several hours of gameplay on a full charge.
3.2 MicroSD Card Installation
The console comes with a pre-installed MicroSD card containing the operating system (ARKOS 2.0) and a library of games. If you need to access or replace the card:
- Locate the MicroSD card slot on the side of the console.
- To remove, gently push the card inward until it clicks, then release. The card will spring out.
- To insert, align the card correctly and push it into the slot until it clicks into place. Ensure it is fully seated.
3.3 Powering On/Off
- To Power On: Press and hold the Power button (usually located on the side or top) for a few seconds until the screen illuminates.
- To Power Off: Press and hold the Power button until a power-off menu appears on the screen. Select 'Shutdown' or 'Power Off'. Alternatively, a quick press of the Power button may put the device into sleep mode.
4. Operating Instructions
The Genérico H50 PRO runs on ARKOS 2.0, a custom firmware optimized for retro gaming.
4.1 Basic Navigation
- Use the D-pad or Left Analog Joystick to navigate through menus and game lists.
- Press the A button to confirm selections.
- Press the B button to go back or cancel.
- The Start and Select buttons are used for in-game functions and some menu shortcuts.
- The FN (Function) button may provide additional shortcuts depending on the emulator or system menu.
4.2 Launching Games
- From the main menu, navigate to the desired emulator system (e.g., NES, SNES, PS1).
- Select the system to view the list of available games.
- Choose a game from the list and press the A button to launch it.
4.3 In-Game Menu and Saving/Loading
Most emulators allow access to an in-game menu for options like saving, loading, and exiting. This is typically accessed by pressing a combination of buttons (e.g., FN + Start or Select + X). Refer to specific emulator documentation for exact button combinations.
- Save States: Allows you to save your game progress at any point, regardless of the game's built-in save system.
- Load States: Allows you to load a previously saved state.
- Exit Game: Returns you to the system menu.
4.4 System Settings
ARKOS 2.0 provides various system settings for customization. These can usually be accessed from the main menu or by pressing a specific button combination (e.g., Start button on the main menu).
- Display Settings: Adjust brightness, screen filters.
- Audio Settings: Adjust volume, audio output.
- Controller Settings: Remap buttons (advanced users).
- Network Settings: If Wi-Fi is supported, configure network connections.
- System Information: View firmware version and storage details.
5. Maintenance
5.1 Cleaning
- Use a soft, dry, lint-free cloth to clean the console's screen and body.
- For stubborn smudges, lightly dampen the cloth with water or a screen cleaner. Avoid harsh chemicals.
- Do not spray liquids directly onto the console.
5.2 Battery Care
- Avoid fully discharging the battery frequently.
- Charge the console regularly, even if not in use for extended periods, to maintain battery health.
- Do not expose the console to extreme temperatures, as this can degrade battery performance.
5.3 Storage
- Store the console in a cool, dry place away from direct sunlight.
- Use the provided carrying case to protect the console from dust and physical damage when not in use or during travel.
6. Troubleshooting
6.1 Console Does Not Turn On
- Ensure the battery is charged. Connect the console to a power source and allow it to charge for at least 30 minutes before attempting to power on again.
- Verify the power button is being pressed and held correctly.
- Try a different charging cable or power adapter.
6.2 Games Are Not Loading or Crashing
- Ensure the MicroSD card is properly inserted.
- Some games or emulators may require specific settings or may not be fully compatible. Try other games to isolate the issue.
- Verify the game file is not corrupted.
6.3 Screen Issues (No Display, Flickering)
- Restart the console.
- Check if the brightness setting is too low.
- If the issue persists, contact customer support.
6.4 Controls Unresponsive
- Restart the console.
- Ensure no debris is obstructing the buttons or joysticks.
- If only specific controls are affected, it might indicate a hardware issue.
7. Specifications
| Feature | Detail |
|---|---|
| Model Number | HI-H50 Pro |
| Display | 4-inch IPS, 720x720 resolution |
| Operating System | ARKOS 2.0 |
| Processor | RK3326 Quad-Core |
| GPU | Mali-G31 MP2 |
| Storage | MicroSD card (up to 256GB, typically included) |
| Battery | 3800mAh Lithium Polymer (included) |
| Connectivity | USB-C, 3.5mm Audio Jack |
| Dimensions | Approx. 14.8 x 8.3 x 1.4 cm |
| Weight | Approx. 288 g |
| Country of Origin | China |
8. Warranty and Support
Specific warranty terms and customer support contact information are not provided within the available product data. Please refer to your purchase documentation or contact the retailer for details regarding warranty coverage and technical assistance.
For general inquiries or community support related to ARKOS 2.0, you may find resources online through dedicated retro gaming forums and communities.