FIOCCO WASHERBL
FIOCCO Electric Pressure Washer
User Manual
Model: WASHERBL
1. Important Safety Information
Please read and understand all safety warnings and instructions before operating the FIOCCO Electric Pressure Washer. Failure to follow these instructions may result in electric shock, fire, and/or serious injury.
- Electrical Safety: Always connect to a grounded outlet. Do not operate in wet conditions or with damaged cords. Keep all connections dry and off the ground.
- Water Safety: Ensure water supply is clean and free of debris. Do not use with hot water. Always turn off the water supply and release pressure before disconnecting hoses.
- Personal Safety: Wear appropriate eye protection (safety goggles) and protective clothing. Do not direct the spray at people, pets, or electrical devices. Keep children and bystanders away from the operating area.
- Total Stop System (TSS): This unit is equipped with TSS, which automatically shuts off the motor when the trigger is released. This extends pump life and saves energy.
- Safety Lock: The spray gun features a safety lock to prevent accidental activation. Always engage the safety lock when the unit is not in use or when changing nozzles.
2. Product Overview and Components
The FIOCCO Electric Pressure Washer is designed for efficient cleaning tasks around your home, garden, and vehicles. Familiarize yourself with its components for proper assembly and operation.

Figure 2.1: Labeled components of the pressure washer, including spray gun, nozzles, stainless steel wand, switch, gun holder, handle, hook for power cord, 35FT power cord, 450ML soap tank, and 20FT pressure hose.
Key Components:
- Main Unit: Houses the 1600W motor and pump, with integrated wheels for portability.
- Spray Gun: Ergonomic handle with trigger and safety lock.
- Stainless Steel Wand: Connects to the spray gun and holds the quick-connect nozzles.
- Nozzles (4 Quick-Connect): Includes 0° (red), 15° (yellow), 25° (green), and 40° (white) for various cleaning intensities.
- Foam Cannon (450ML Soap Tank): For applying detergent.
- High-Pressure Hose (20FT): Connects the main unit to the spray gun.
- Power Cord (35FT): Provides ample reach for power connection.
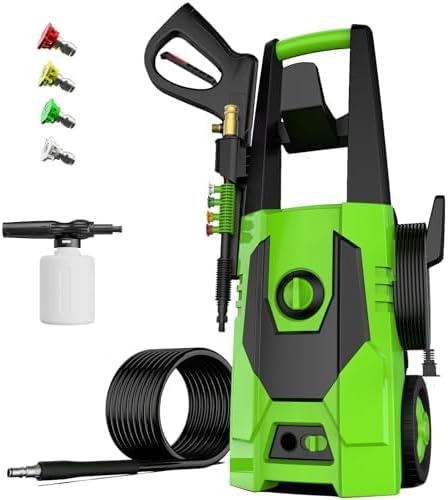
Figure 2.2: The FIOCCO Electric Pressure Washer with its included accessories.
3. Setup Instructions
Follow these steps to set up your pressure washer before first use.
- Unpack: Carefully remove all components from the packaging.
- Assemble Spray Gun and Wand: Connect the stainless steel wand to the spray gun. Ensure it clicks securely into place.
- Connect High-Pressure Hose: Attach one end of the 20FT high-pressure hose to the outlet on the main unit and the other end to the spray gun. Tighten connections firmly by hand.
- Connect Water Supply: Attach a standard garden hose (not included) to the water inlet on the pressure washer. Ensure the garden hose is free of kinks and has a minimum diameter of 1/2 inch. Turn on the water supply fully.
- Purge Air from System: Before connecting power, squeeze the spray gun trigger to allow water to flow through the system until all air is purged and a steady stream of water emerges. This protects the pump.
- Connect Power: Plug the 35FT power cord into a grounded electrical outlet. Ensure the outlet meets the electrical requirements specified in the 'Specifications' section.
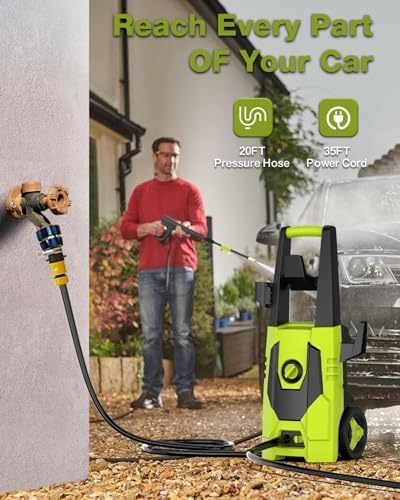
Figure 3.1: Proper connection of water supply and power cord for extended reach.
4. Operating Instructions
Once set up, your FIOCCO Electric Pressure Washer is ready for use.
- Start the Unit: Turn the power switch on the main unit to the 'ON' position. The motor will start when the trigger is squeezed and stop when released (TSS).
- Select Nozzle: Choose the appropriate quick-connect nozzle for your cleaning task. Pull back the collar on the wand, insert the desired nozzle, and release the collar to lock it in place.
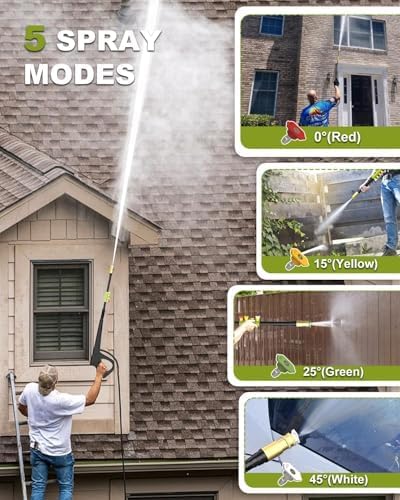
Figure 4.1: Overview of the 5 spray modes provided by the quick-connect nozzles.
- 0° (Red) Nozzle: Provides a concentrated, high-impact stream for tough stains and hard-to-reach areas. Use with extreme caution.
- 15° (Yellow) Nozzle: A powerful, narrow spray for concrete, brick, and other hard surfaces.
- 25° (Green) Nozzle: A moderate, fan-shaped spray suitable for general cleaning of fences, decks, and lawn furniture.
- 40° (White) Nozzle: A wide, gentle spray for large area cleaning, vehicles, windows, and boats.
- Foam Cannon: For applying soap or detergent. Fill the 450ML soap tank with appropriate pressure washer detergent, then attach it to the spray gun.

Figure 4.2: Applying detergent using the foam cannon for effective car cleaning.
5. Maintenance
Regular maintenance ensures the longevity and optimal performance of your pressure washer.
- After Each Use:
- Disconnect water and power.
- Drain all water from the pump, hose, and spray gun by running the unit for a few seconds with the water supply off and the trigger squeezed until no more water comes out.
- Clean any debris from the nozzles and water inlet filter.
- Storage: Store the pressure washer in a dry, frost-free environment. Do not store the unit or accessories in temperatures below 32°F (0°C) to prevent damage from freezing water.
- Hose and Cord Management: Utilize the integrated hose hook and power cord hook for neat storage.

Figure 5.1: The compact design includes a hose hook for convenient storage.
6. Troubleshooting
Refer to this section for common issues and their solutions.
| Problem | Possible Cause | Solution |
|---|---|---|
| Motor does not start | No power supply; Power switch off; Thermal overload activated | Check power connection/outlet; Turn power switch ON; Allow unit to cool down |
| No water pressure | Water supply off; Kinked hose; Clogged nozzle; Air in pump | Turn on water supply; Straighten hose; Clean nozzle; Purge air from system (see Setup) |
| Pulsating pressure | Air in pump; Insufficient water supply; Clogged nozzle | Purge air; Ensure adequate water flow; Clean nozzle |
If you encounter issues not listed here or require further assistance, please contact customer service.
7. Specifications
| Feature | Detail |
|---|---|
| Brand | FIOCCO |
| Model Number | WASHERBL |
| Power Source | Corded Electric |
| Motor Power | 1600W |
| Maximum Pressure | 5000 PSI |
| Maximum Flow Rate | 3.4 GPM |
| High-Pressure Hose Length | 20 Feet |
| Power Cord Length | 35 Feet |
| Product Dimensions (L x W x H) | 20" x 11" x 12" |
| Item Weight | 6 pounds |

Figure 7.1: Key performance specifications of the FIOCCO Electric Pressure Washer.
8. Warranty and Customer Support
FIOCCO is committed to providing high-quality products and excellent customer service. If you have any questions or encounter difficulties while using this product, our professional team is ready to assist you.
Contact Support: Please leave a message in the Amazon message center. Our team aims to respond quickly within 24 hours.
Specific warranty details may vary. Please refer to your purchase documentation or contact customer service for precise warranty terms.
Ask a question about this manual
Ask about setup, troubleshooting, compatibility, parts, safety, or missing instructions. Manuals+ will review the question and use this page’s manual context to help answer it.