Wengart WG01RF Wireless Thermostat and Receiver User Manual
Model: WG01RF
1. Introduction
The Wengart WG01RF Wireless Thermostat and Receiver system provides convenient and efficient temperature control for your home. Utilizing RF technology, it offers stable and reliable signal transmission without the need for extensive wiring. This system is compatible with radiant floor heating systems and gas boilers, offering a flexible solution for various heating setups. The thermostat features an LCD display and programmable functions for personalized comfort.
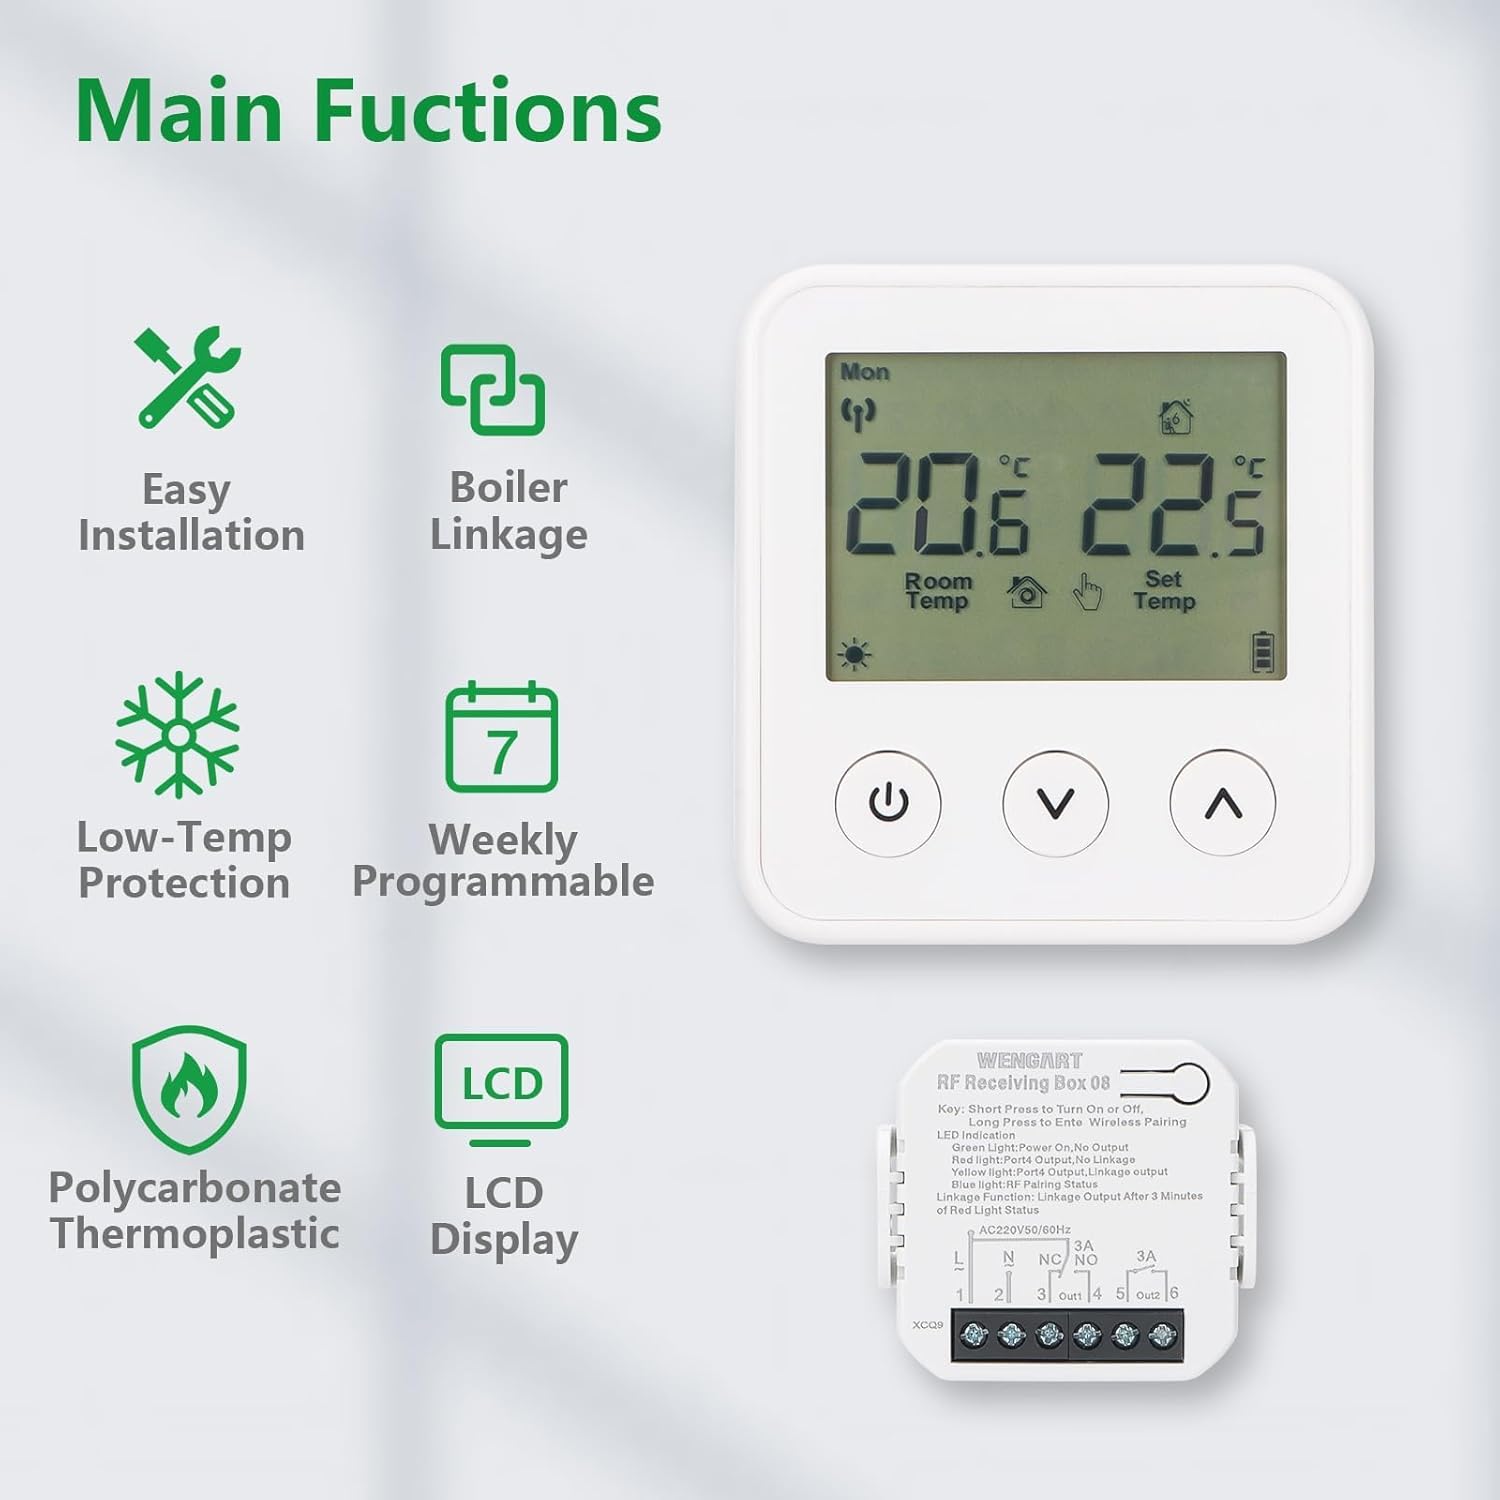
2. Product Features
Wireless Installation: Uses RF technology for easy setup without wall damage.
Boiler Linkage: Compatible with gas boilers and radiant floor heating systems.
Low-Temperature Protection: Helps prevent pipes from freezing.
Weekly Programmable: Set custom temperature schedules for different times of the day and week.
LCD Display: Clear screen for viewing room temperature, set temperature, and operating modes.
Battery-Powered Thermostat: The thermostat unit is battery-operated for flexible placement.
Durable Material: Constructed from Polycarbonate Thermoplastic for longevity.
Image 1: Main Functions Overview. This image illustrates the key features of the Wengart WG01RF thermostat, including easy installation, boiler linkage, low-temp protection, weekly programmability, LCD display, and polycarbonate thermoplastic construction.
3. Setup and Installation
The Wengart WG01RF system consists of two main components: the wireless thermostat panel and the receiver box. Installation is designed to be straightforward.
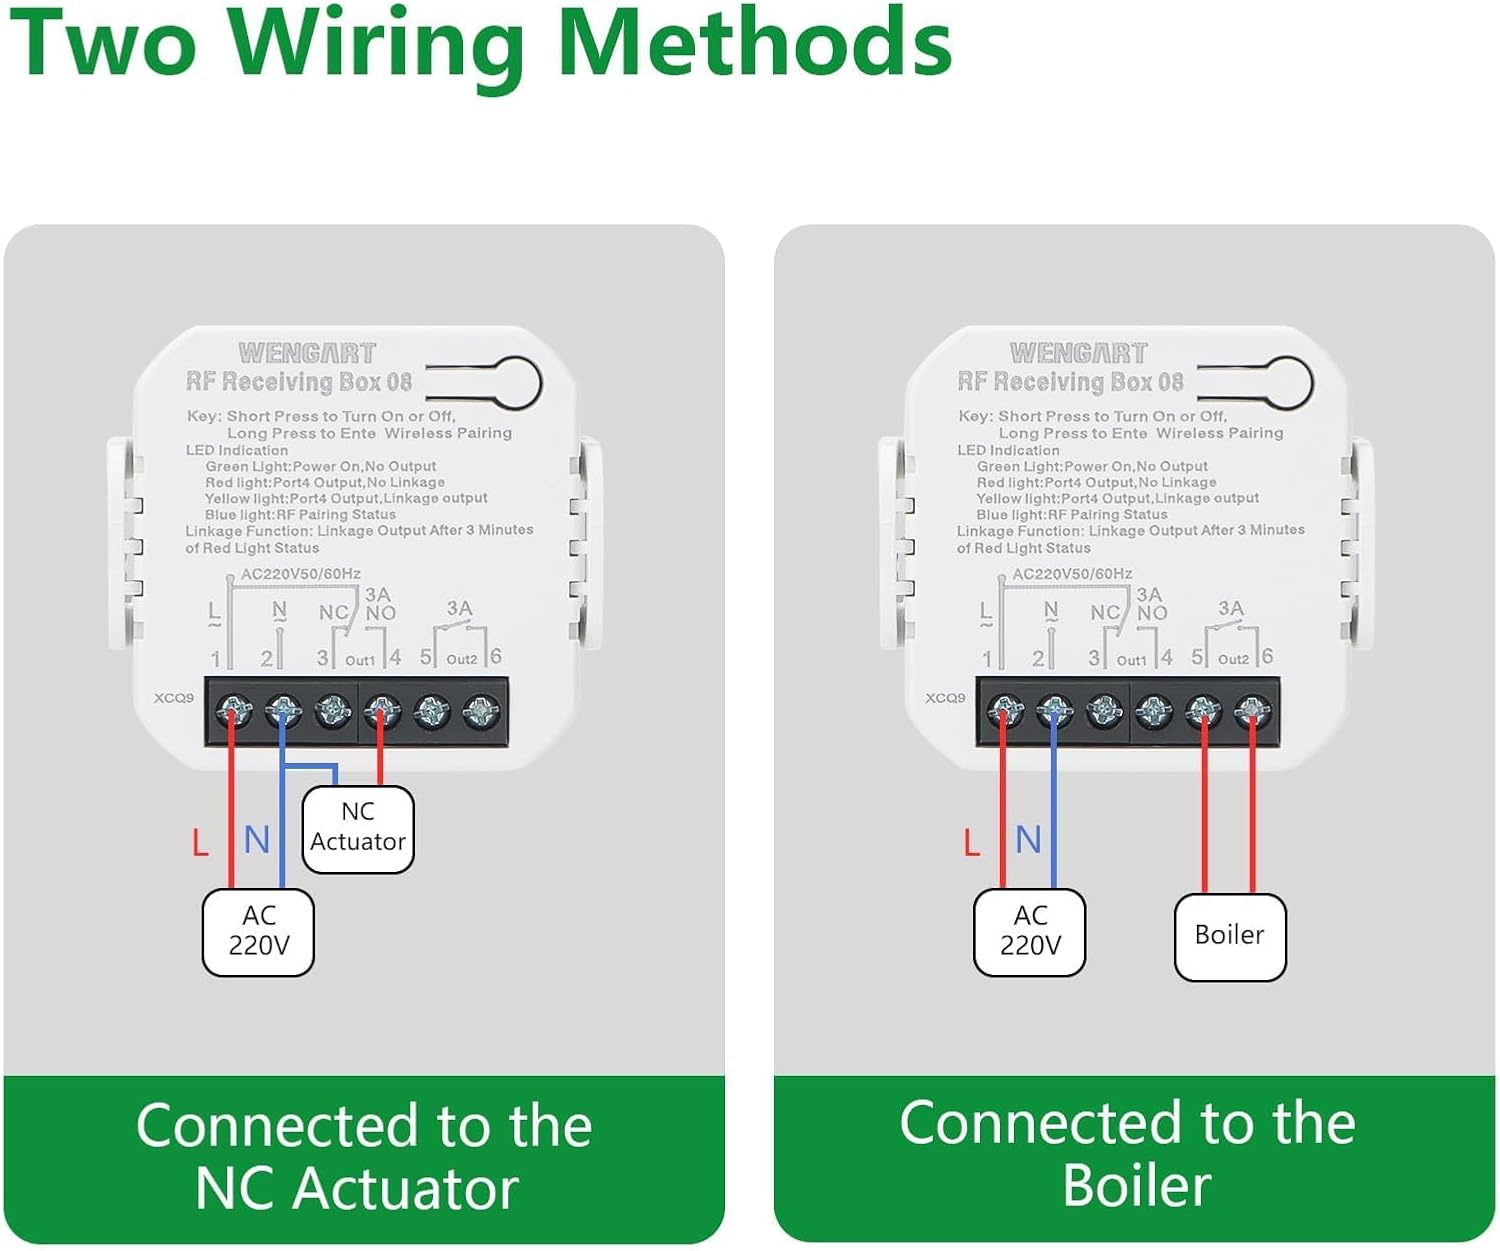
3.1 Receiver Installation
Mounting: Choose a suitable location for the receiver box near your heating system (boiler or floor heating manifold). Ensure it is accessible for wiring.
Wiring: Connect the receiver to your heating system. The receiver supports two main wiring methods:
Connected to NC Actuator: For normally closed actuators in floor heating systems. Connect the Live (L) and Neutral (N) power supply to terminals 1 and 2. Connect the NC Actuator to terminals 3 (NC) and 4 (NO).
Connected to Boiler: For gas boilers. Connect the Live (L) and Neutral (N) power supply to terminals 1 and 2. Connect the boiler control wires to terminals 3 (NC) and 4 (NO).
Important: All wiring should be performed by a qualified electrician and with the main power supply turned off to prevent electric shock.
Power On: Once wiring is complete and secure, restore power to the receiver.
Image 2: Two Wiring Methods. This image displays diagrams for connecting the Wengart RF Receiving Box 08 to either an NC Actuator (for floor heating) or a Gas Boiler. It shows the Live (L), Neutral (N), NC (Normally Closed), and NO (Normally Open) terminals.
3.2 Thermostat Panel Placement
Insert Batteries: Open the battery compartment on the back of the thermostat panel and insert 2 AAA 1.5V alkaline batteries (not included).
Placement: Place the thermostat panel in a central location in the room where you want to measure and control the temperature. Avoid direct sunlight, drafts, or areas near heat sources (e.g., radiators, lamps) that could affect temperature readings.
Pairing (Automatic): The thermostat and receiver are typically pre-paired from the factory. If pairing is required, refer to the "Troubleshooting" section for instructions.
Image 3: Application Example. This image shows the Wengart WG01RF thermostat and receiver installed in a home environment, demonstrating its use with a radiant floor heating system.
4. Operation
The thermostat features an intuitive LCD display and three control buttons.
4.1 Display Overview
Image 4: Product Analysis Display. This diagram labels the various indicators on the thermostat's LCD screen, including Week, Wireless Signal, Indoor Temperature, Set Temperature, Programming Mode, Manual Mode, Key Lock, Battery Level Indicator, Boiler Linkage, and Valve Body Opened.
Week Indicator: Displays the current day of the week (Mon-Sun).
Wireless Signal: Indicates the connection status between the thermostat and receiver.
Indoor Temperature: Shows the current room temperature.
Set Temperature: Displays the desired temperature.
Programming Mode: Indicates if the thermostat is operating in a programmed schedule.
Manual Mode: Indicates manual temperature control.
Key Lock: Shows if the buttons are locked to prevent accidental changes.
Battery Level Indicator: Displays the remaining battery life.
Boiler Linkage: Indicates if the heating system is active.
Valve Body Opened: Specific to floor heating systems, indicates valve status.
4.2 Button Functions
Power Button (⏻): Short press to turn the thermostat ON/OFF. Long press may enter settings or pairing mode (refer to specific instructions for advanced functions).
Down Button (⌄): Decreases the set temperature or navigates menu options.
Up Button (⌃): Increases the set temperature or navigates menu options.
4.3 Basic Temperature Adjustment
When the thermostat is ON, use the ⌄ (Down) and ⌃ (Up) buttons to adjust the desired set temperature. The new setting will override the current program until the next scheduled change or until manually reset.
5. Weekly Programming
The Wengart WG01RF thermostat allows you to set a weekly schedule to automatically adjust the temperature according to your lifestyle. This feature helps optimize energy consumption and comfort.
5.1 Setting a Custom Program
To enter programming mode, typically a long press on a specific button (often the power button or a dedicated 'M' or 'Menu' button, though not explicitly shown on the provided images for this model, consult the included paper manual for exact button sequence). Once in programming mode, you can define temperature settings for different time periods throughout the week.
Image 5: Custom Programming. This image shows an example of a weekly programming schedule for the Wengart WG01RF thermostat, detailing different time periods (Morning, Go out, Go home, Night) with corresponding default temperatures for working days and weekends.
An example programming schedule might include:
Time Period
Start Time
Default Temperature
Working Day - Morning
06:00
24°C
Working Day - Go out
08:00
16°C
Working Day - Go home
17:00
24°C
Working Day - Night
22:00
16°C
Weekend - Morning
06:00
24°C
Weekend - Night
20:00
16°C
Follow the on-screen prompts and use the Up/Down buttons to adjust times and temperatures for each period. Confirm your settings to save the program.
6. Maintenance
Cleaning: Wipe the thermostat and receiver surfaces with a soft, dry cloth. Do not use abrasive cleaners, solvents, or chemical sprays.
Battery Replacement: When the battery level indicator shows low battery, replace the 2 AAA 1.5V alkaline batteries in the thermostat panel promptly to ensure continuous operation.
Avoid Obstructions: Ensure the thermostat is not covered by curtains, furniture, or other objects that could block airflow and affect temperature readings.
7. Troubleshooting
Problem
Possible Cause
Solution
Thermostat not turning ON/OFF heating.
No power to receiver, receiver not wired correctly, thermostat batteries low/dead, thermostat not paired with receiver, heating system issue.
Check power supply to the receiver.
Verify receiver wiring according to Section 3.1.
Replace thermostat batteries.
Re-pair thermostat and receiver (see below).
Ensure your boiler/heating system is functioning correctly.
Thermostat display is blank or dim.
Low or dead batteries in the thermostat.
Replace the 2 AAA 1.5V alkaline batteries.
Difficulty programming the schedule.
Incorrect button sequence, misunderstanding of programming steps.
Refer to Section 5.1 and the detailed instructions in the physical user manual for the exact programming steps. Ensure you are pressing buttons for the correct duration (short vs. long press).
Thermostat and receiver not communicating (no wireless signal icon).
Out of range, interference, pairing lost.
Move thermostat closer to the receiver.
Avoid placing near large metal objects or other strong RF sources.
Re-pairing Procedure:
On the receiver, long press the pairing button (often labeled "Key" or "Pair") until the LED indicator flashes.
On the thermostat, with the unit OFF, long press the power button (or a designated pairing button if available) until a pairing symbol appears or the display indicates pairing mode.
The devices should pair within a few seconds. The wireless signal icon on the thermostat should become solid.
Inaccurate temperature readings.
Thermostat placed in an unsuitable location.
Relocate the thermostat away from direct sunlight, drafts, or heat sources.
8. Specifications
Feature
Detail
Power Supply (Thermostat)
2 x AAA 1.5V Alkaline Batteries (not included)
Power Supply (Receiver)
230V 50/60Hz
Power Consumption
0.3W
Setting Range
5 ~ 35 °C
Switch Differential
0.5 ~ 5 °C adjustable (factory setting ±1 °C)
Ambient Temperature
-5 ~ 50 °C
Temperature Display Accuracy
±0.5 °C
Temperature Control Accuracy
±0.5 °C
Measurement Range
1 ~ 40 °C
Internal Sensor
NTC 10k @ 25 °C
Max Resistance Load
3A
Protection Housing
IP20
Housing Material
Anti-flammable PC (Polycarbonate)
Wiring Clamp
1 clamp for 2 x 1.5mm² wires or 1 x 2.5mm² wire
Connectivity Technology
RF (Radio Frequency)
Display Type
LCD
Mounting Type
Wall Mount
Product Dimensions (Thermostat)
Approx. 84.5mm (W) x 90.7mm (H) x 20mm (D)
Product Dimensions (Receiver)
Approx. 46mm (W) x 46mm (H) x 18.9mm (D)
Weight
114.8 Grams (total package weight)
Image 6: Product Size. This image provides detailed dimensions for both the Wengart WG01RF thermostat and the RF receiving box, showing measurements in millimeters and inches.
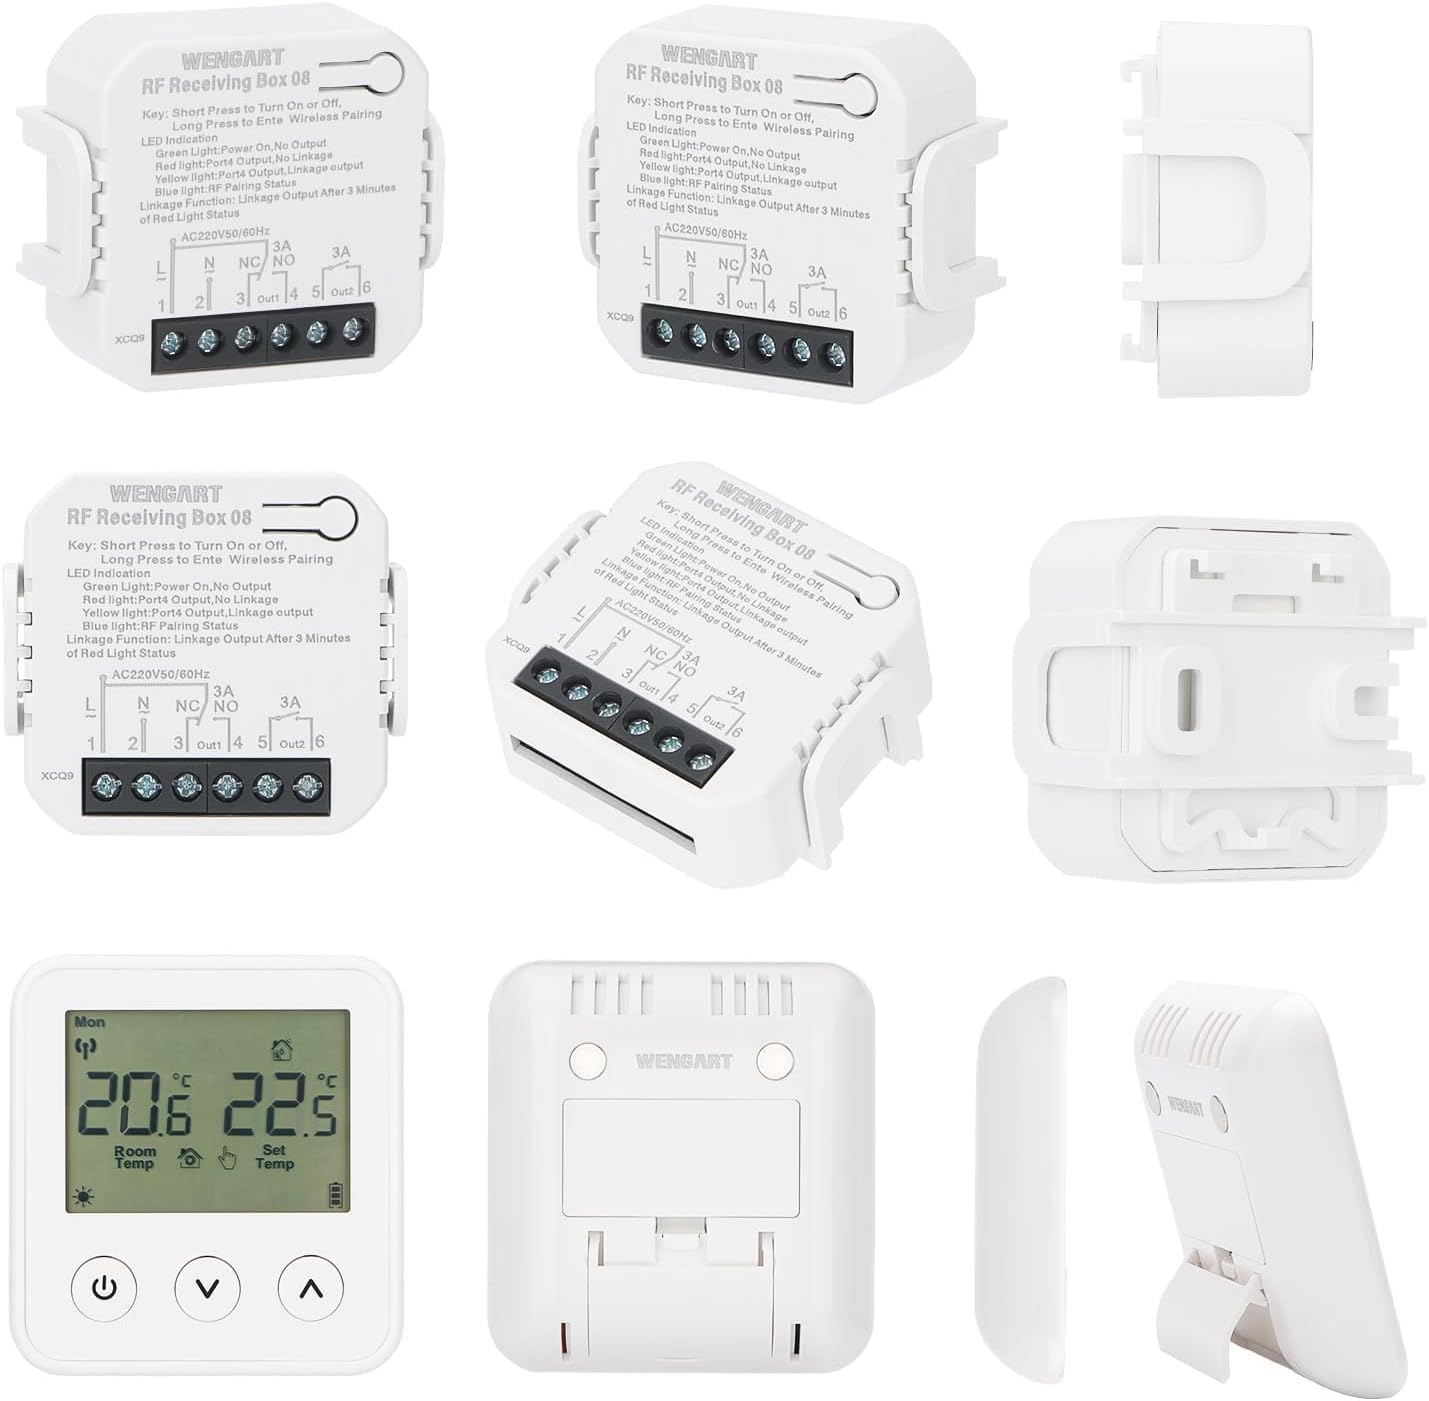
Image 7: Multiple Product Views. This image displays various angles and components of the Wengart WG01RF wireless thermostat and receiver, including front, back, side, and disassembled views of the receiver.
9. Warranty Information
Specific warranty details for the Wengart WG01RF Wireless Thermostat and Receiver are not provided in the available product data. Please refer to the warranty card included with your product or contact the manufacturer directly for warranty terms and conditions.
10. Customer Support
For technical assistance, troubleshooting beyond this manual, or inquiries regarding your Wengart WG01RF Wireless Thermostat and Receiver, please contact Wengart customer support. Contact information is typically found in the product packaging or on the manufacturer's official website.
Ask a question about this manual
Ask about setup, troubleshooting, compatibility, parts, safety, or missing instructions. Manuals+ will review the question and use this page’s manual context to help answer it.