1. Introduction
Thank you for choosing the VEVOR 4KW Steam Generator. This manual provides essential information for the safe installation, operation, and maintenance of your steam generator. Please read it thoroughly before use and retain it for future reference.
This 4KW steam generator is designed for steam showers, home saunas, and bathrooms, suitable for spaces ranging from 95-141 ft³ (2.7-4 m³). It features a compact design, fast steam production, and intelligent temperature and timer controls.

Image 1.1: VEVOR 4KW Steam Generator and included accessories.
2. Safety Instructions
- Electrical Safety: Installation must be performed by a qualified electrician in accordance with all local and national electrical codes. Ensure proper grounding.
- Water Supply: Connect to a clean, potable water supply. Do not operate the unit without water.
- Temperature: Steam is hot. Avoid direct contact with the steam outlet. Set appropriate temperatures to prevent scalding.
- Ventilation: Ensure adequate ventilation in the steam room.
- Children and Pets: Keep children and pets away from the steam generator and steam room during operation.
- Maintenance: Disconnect power before performing any maintenance or cleaning.
- Overheat, Dry-Run, Overpressure Protection: The unit is equipped with triple security protections. Do not bypass these safety features.
3. Product Overview
3.1 Key Features
- Space Suitability: Designed for 95-141 ft³ (2.7-4 m³) steam showers, home saunas, and bathrooms.
- Rapid Steam Production: Generates steam in under 5 minutes.
- Adjustable Operation: Continuous output with a timer from 10 minutes to 24 hours.
- Automatic Drain: Features an auto-drain function after use for convenience and longevity.
- Digital Control: User-friendly controller for setting temperature (77-131°F / 25-55°C) and time.
- Safety Protections: Includes overheat, dry-run, and overpressure protection.
- Durable Construction: Carbon steel exterior with a SUS304 stainless steel inner tank for corrosion resistance.
3.2 Components
The VEVOR 4KW Steam Generator system includes the main generator unit, a digital controller, a steam nozzle, a temperature sensor, connection cables, and an installation tool kit.

Image 3.1: Rear view of the steam generator showing connection points.
- Automatic Drain Valve Power Connector: Connects to the automatic drain valve.
- Steam Outlet: Connects to the steam pipe leading to the steam nozzle.
- Pressure Relief Valve: Safety mechanism to release excess pressure.
- Drain Outlet Install Valve: Point for connecting the automatic drain valve.
- Water Inlet: Connects to the water supply pipe.
4. Specifications
| Attribute | Value |
|---|---|
| Model Number | DO-40 |
| Power | 4KW |
| Material | Carbon Steel (Exterior), SUS304 Stainless Steel (Inner Tank) |
| Product Dimensions (L x W x H) | 19.09 x 7.28 x 14.96 inches (485 x 185 x 380 mm) |
| Product Net Weight | 26.24 lbs (11.9 kg) |
| Temperature Range | 77-131°F (25-55°C) |
| Operating Time | 10 minutes - 24 hours |
| Applicable Room Size | 95-141 ft³ (2.7-4 m³) |

Image 4.1: Detailed dimensions and included components.

Image 4.2: Guide for selecting the appropriate steam generator based on room size and material.
Note: To achieve optimal performance, the ceiling height should be less than 2.4 meters. The data in the table is for reference only.
5. Installation
Proper installation is crucial for the safe and efficient operation of your steam generator. It is recommended that installation be performed by a qualified professional.
5.1 Recommended Installation Location
The steam generator should be installed as close as possible to the steam shower or sauna room to minimize heat loss and ensure efficient steam delivery. Common locations include:
- Attic
- Basement
- Closet
- Near the stairs
- Under the bathroom sink

Image 5.1: Recommended installation locations.
5.2 Pipe Installation Guide
The steam generator must be installed horizontally. Ensure all pipe connections are secure and leak-free.

Image 5.2: Pipe installation diagram.
- Water Inlet: Connect the water inlet pipe to a cold water supply. Install a shut-off valve on the water inlet line for maintenance.
- Steam Outlet: Connect the steam pipe from the generator's steam outlet to the steam nozzle inside the steam room. Ensure the steam pipe is insulated to prevent heat loss.
- Automatic Drain Valve: Connect the automatic drain valve to the drain outlet on the generator and route the drain line to a suitable waste drain.
- Safety Valve: The pressure relief valve is pre-installed. Ensure it is not obstructed.
5.3 Electrical Wiring Connection Guide
All electrical connections must comply with local electrical codes and be performed by a licensed electrician.

Image 5.3: Wiring terminal block.
- For wiring in 110V countries (e.g., USA, Canada, Mexico), connect the wires to 2 hot lines (L1 and L2). No neutral is needed.
- For wiring in 220V countries, simply connect the wires to the hot line (L) and neutral line (N).
- Important: Ensure the voltage difference between L1(L) and L2(N) is 200-240V.
- Connect the controller line and the temperature probe line to the controller.
- Fix the controller to the wall using the adhesive tape on its back. Seal the controller with silicone caulk to prevent moisture ingress over time.
- The temperature probe must be installed inside the steam room at a height of 5 feet (1.5 meters) from the ground.

Image 5.4: Controller and temperature sensor installation.
6. Operation
6.1 Control Panel Overview
The digital controller allows for easy adjustment of temperature and operating time. It displays real-time indicators for heating, water shortage, and draining status.

Image 6.1: Digital control panel.
6.2 Setting Temperature and Time
- Power On: Press the power button to turn on the steam generator.
- Temperature Adjustment: Use the temperature adjustment buttons to set your desired steam room temperature between 77°F (25°C) and 131°F (55°C).
- Time Adjustment: Use the time adjustment buttons to set the operating duration from 10 minutes to 24 hours.
- The unit will begin heating and producing steam within 5 minutes.

Image 6.2: Steam nozzle placement and rapid steam production.
Note: The steam nozzle should be installed approximately 45 cm (17.7 inches) above the ground or 15 cm (5.9 inches) above the edge of a bathtub.
7. Maintenance
Regular maintenance ensures the longevity and optimal performance of your VEVOR Steam Generator.
- Automatic Draining: The unit automatically drains wastewater after each use. This feature helps prevent mineral buildup.
- Descaling: Depending on water hardness, periodic descaling may be required. Consult a professional for descaling procedures if mineral buildup is observed.
- Cleaning: Wipe the exterior of the generator and controller with a damp cloth. Do not use abrasive cleaners.
- Inspection: Periodically inspect all connections for leaks and ensure the steam nozzle is clear of obstructions.
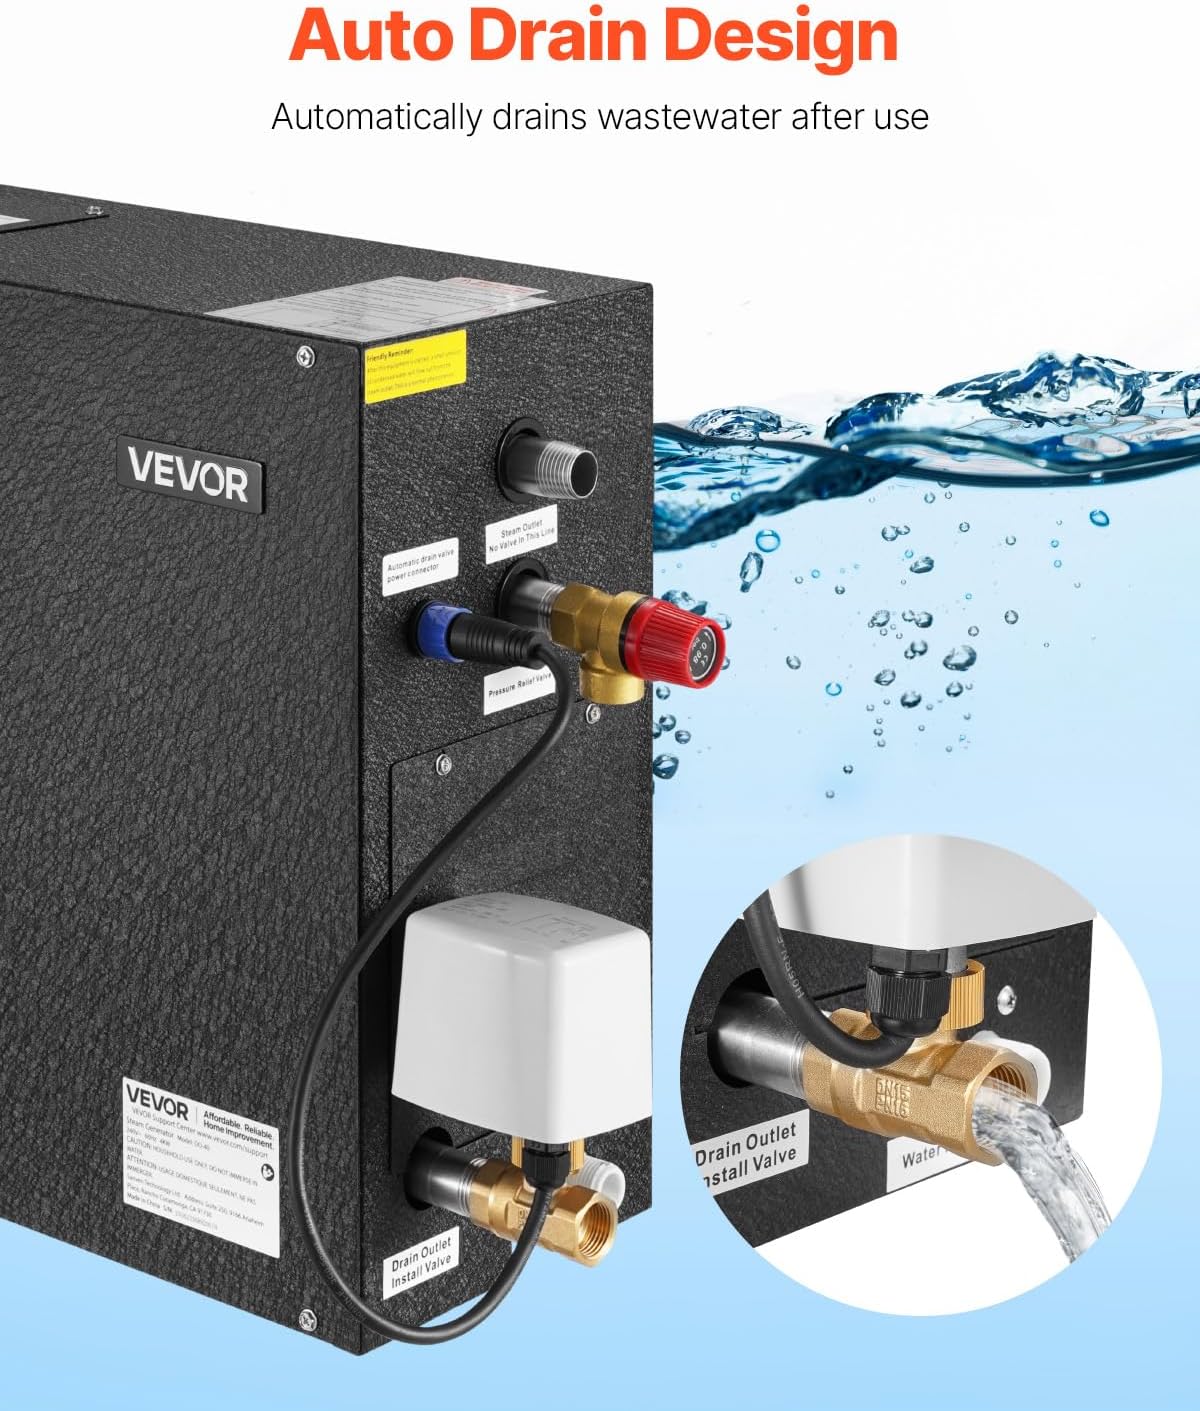
Image 7.1: Automatic drain function.
8. Troubleshooting
This section addresses common issues you might encounter. For problems not listed here, please contact VEVOR customer support.
| Problem | Possible Cause | Solution |
|---|---|---|
| No steam production | No power; Water supply off; Water shortage; Heating element failure. | Check power connection and circuit breaker; Ensure water supply valve is open; Check for water shortage indicator on controller; Contact support if heating element is suspected. |
| Insufficient steam | Room size too large for generator; Steam nozzle obstructed; Low water pressure. | Verify generator capacity matches room size (refer to specifications); Clean steam nozzle; Check water pressure. |
| Water leakage | Loose pipe connections; Damaged seals. | Tighten all pipe connections; Inspect and replace any damaged seals. |
| Controller not responding | Loose connection; Controller malfunction. | Check controller cable connection; Contact support for replacement if malfunction is confirmed. |
| Loud noise during draining | Normal operation; Mineral buildup. | Some noise during draining is normal. If excessively loud, consider descaling. |
9. Warranty and Support
VEVOR products come with a standard warranty. For specific warranty terms and conditions, please refer to the warranty card included with your product or visit the official VEVOR website.
For technical support, parts, or service inquiries, please contact VEVOR customer service:
- Website: www.vevor.com
- Email: Refer to your product documentation for specific support email.
- Phone: Refer to your product documentation for specific support phone number.
Please have your model number (DO-40) and purchase date available when contacting support.


