1. Introduction
This manual provides essential instructions for the safe and efficient operation, setup, maintenance, and troubleshooting of your GarveeLife Portable Electric Cow Milking Machine. Please read this manual thoroughly before using the machine to ensure proper function and longevity of the product.

Image 1.1: The GarveeLife Portable Electric Cow Milking Machine, designed for efficient and gentle milking.
2. Safety Information
Always observe the following safety precautions to prevent injury or damage to the equipment:
- Ensure the machine is placed on a stable, level surface during operation.
- Keep electrical components dry and away from water to prevent electric shock.
- Do not operate the machine with damaged cords or plugs.
- Keep children and unauthorized personnel away from the operating machine.
- Disconnect power before performing any maintenance or cleaning.
- Use only genuine GarveeLife replacement parts.
3. Product Components
Familiarize yourself with the main components of your milking machine:

Image 3.1: Labeled diagram of the GarveeLife Milking Machine's key components.
- Vacuum Gauge: Displays the vacuum pressure.
- Handle: For maneuvering the machine.
- Pulsator: Regulates the pulsation rate for gentle milking.
- Motor: Powers the vacuum pump.
- 25L Stainless Steel Barrel: Food-grade milk collection bucket.
- Rubber Wheels & Casters: For portability and stability.
- Milk Suction Head (Teat Cups): Designed to simulate natural calf-sucking.
- Silicone Hoses: Connects components for milk and vacuum transfer.
- One-Touch Operation Buttons: For starting and stopping the machine.

Image 3.2: Detailed view of the stainless steel teat cups with silicone liners.

Image 3.3: The 25L food-grade 304 stainless steel milk bucket.
4. Setup Instructions
Follow these steps to set up your GarveeLife Milking Machine:
- Unpack Components: Carefully remove all parts from the packaging and verify against the component list in Section 3.
- Assemble Frame (if necessary): Ensure the main frame with wheels and handle is securely assembled.
- Connect Milk Bucket: Place the 25L stainless steel milk bucket securely onto its designated spot on the frame.
- Attach Hoses: Connect the silicone milk hoses and vacuum lines to their respective ports on the pulsator, vacuum pump, and milk suction heads. Ensure all connections are tight to prevent vacuum leaks.
- Install Teat Cups: Attach the silicone-lined teat cups to the milk suction heads.
- Power Connection: Plug the machine into a standard AC 120V/60Hz power outlet.

Image 4.1: The machine's operational components and power requirements.
5. Operating Instructions
Follow these steps for effective and animal-friendly milking:
- Prepare the Animal: Clean the cow's udder and teats thoroughly before milking.
- Start the Machine: Press the "One-Touch Operation" start button (usually green) to activate the vacuum pump and pulsator.
- Check Vacuum Pressure: Monitor the vacuum gauge to ensure it reaches the optimal range of 45-50 kPa.
- Attach Teat Cups: Gently apply the milk suction heads to each teat. The vacuum will hold them in place. Ensure a proper seal to prevent air leaks.
- Monitor Milking: Observe the milk flow into the bucket. The machine's pulsation system mimics natural calf-sucking for comfort and efficiency.
- Remove Teat Cups: Once milk flow significantly reduces or stops, gently break the vacuum seal by pressing the release valve (if present) or carefully pulling the cups downwards. Do not pull forcefully.
- Stop the Machine: Press the "One-Touch Operation" stop button (usually red).
- Transfer Milk: Carefully transport the milk bucket to your storage area.

Image 5.1: The milking machine in operation.
6. Maintenance and Cleaning
Regular cleaning and maintenance are crucial for hygiene and the longevity of your machine:
- Daily Cleaning: Immediately after each milking session, rinse all milk-contacting parts (teat cups, hoses, milk bucket) with cold water to remove milk residue.
- Sanitization: Wash all milk-contacting parts with a suitable dairy detergent and warm water, using the provided brush cleaners for hoses and cups. Follow with a sanitizing rinse.
- Hose Care: The silicone hoses (Inner Dia.: 0.47" / 1.2 cm, Outer Dia.: 0.67" / 1.7 cm, Length: 8.2 ft / 250 cm) should be thoroughly cleaned to prevent bacterial growth.
- Bucket Cleaning: The 25L food-grade 304 stainless steel bucket should be cleaned and sanitized after each use. The anti-spill protection lid should also be cleaned.
- Motor and Pump: Keep the motor and vacuum pump area clean and dry. Do not immerse electrical components in water.
- Storage: Store the machine in a clean, dry place away from direct sunlight and extreme temperatures.

Image 6.1: Details of the silicone hose and cleaning tools.

Image 6.2: The anti-spill protection mechanism of the milk bucket.
7. Troubleshooting
Refer to this section for common issues and their potential solutions:
| Problem | Possible Cause | Solution |
|---|---|---|
| Machine does not start. | No power, loose connection, faulty switch. | Check power cord, outlet, and ensure the switch is pressed correctly. |
| Low or no vacuum pressure. | Air leak in hoses or teat cups, clogged filter, faulty pump. | Check all hose connections and seals. Clean or replace filters. Inspect pump for damage. |
| Milk flow is slow or stops prematurely. | Insufficient vacuum, blocked milk line, animal discomfort. | Verify vacuum pressure. Check milk lines for blockages. Ensure animal is calm and comfortable. |
| Teat cups fall off. | Insufficient vacuum, improper attachment, worn liners. | Check vacuum pressure. Re-attach cups firmly. Inspect and replace worn silicone liners. |
8. Specifications
Technical details for the GarveeLife Portable Electric Cow Milking Machine:
- Model: B0FL841Y69
- Brand: GarveeLife
- Bucket Capacity: 25 Liters (6.6 Gallons)
- Power: 550W
- Pulsation Rate: 60-80 pulsations per minute
- Vacuum Pump Speed: 1680 RPM
- Adjustable Vacuum System: 45-50 kPa
- Milk Bucket Material: Food-grade 304 Stainless Steel
- Hose Material: Food Grade Silicone and PVC
- Hose Inner Diameter: 0.47 inches (1.2 cm)
- Hose Outer Diameter: 0.67 inches (1.7 cm)
- Hose Length: 8.2 feet (250 cm)
- Product Dimensions: 31.5 x 14.2 x 35.8 inches (80 x 36 x 91 cm)
- Item Weight: 64.4 pounds (29.2 kg)
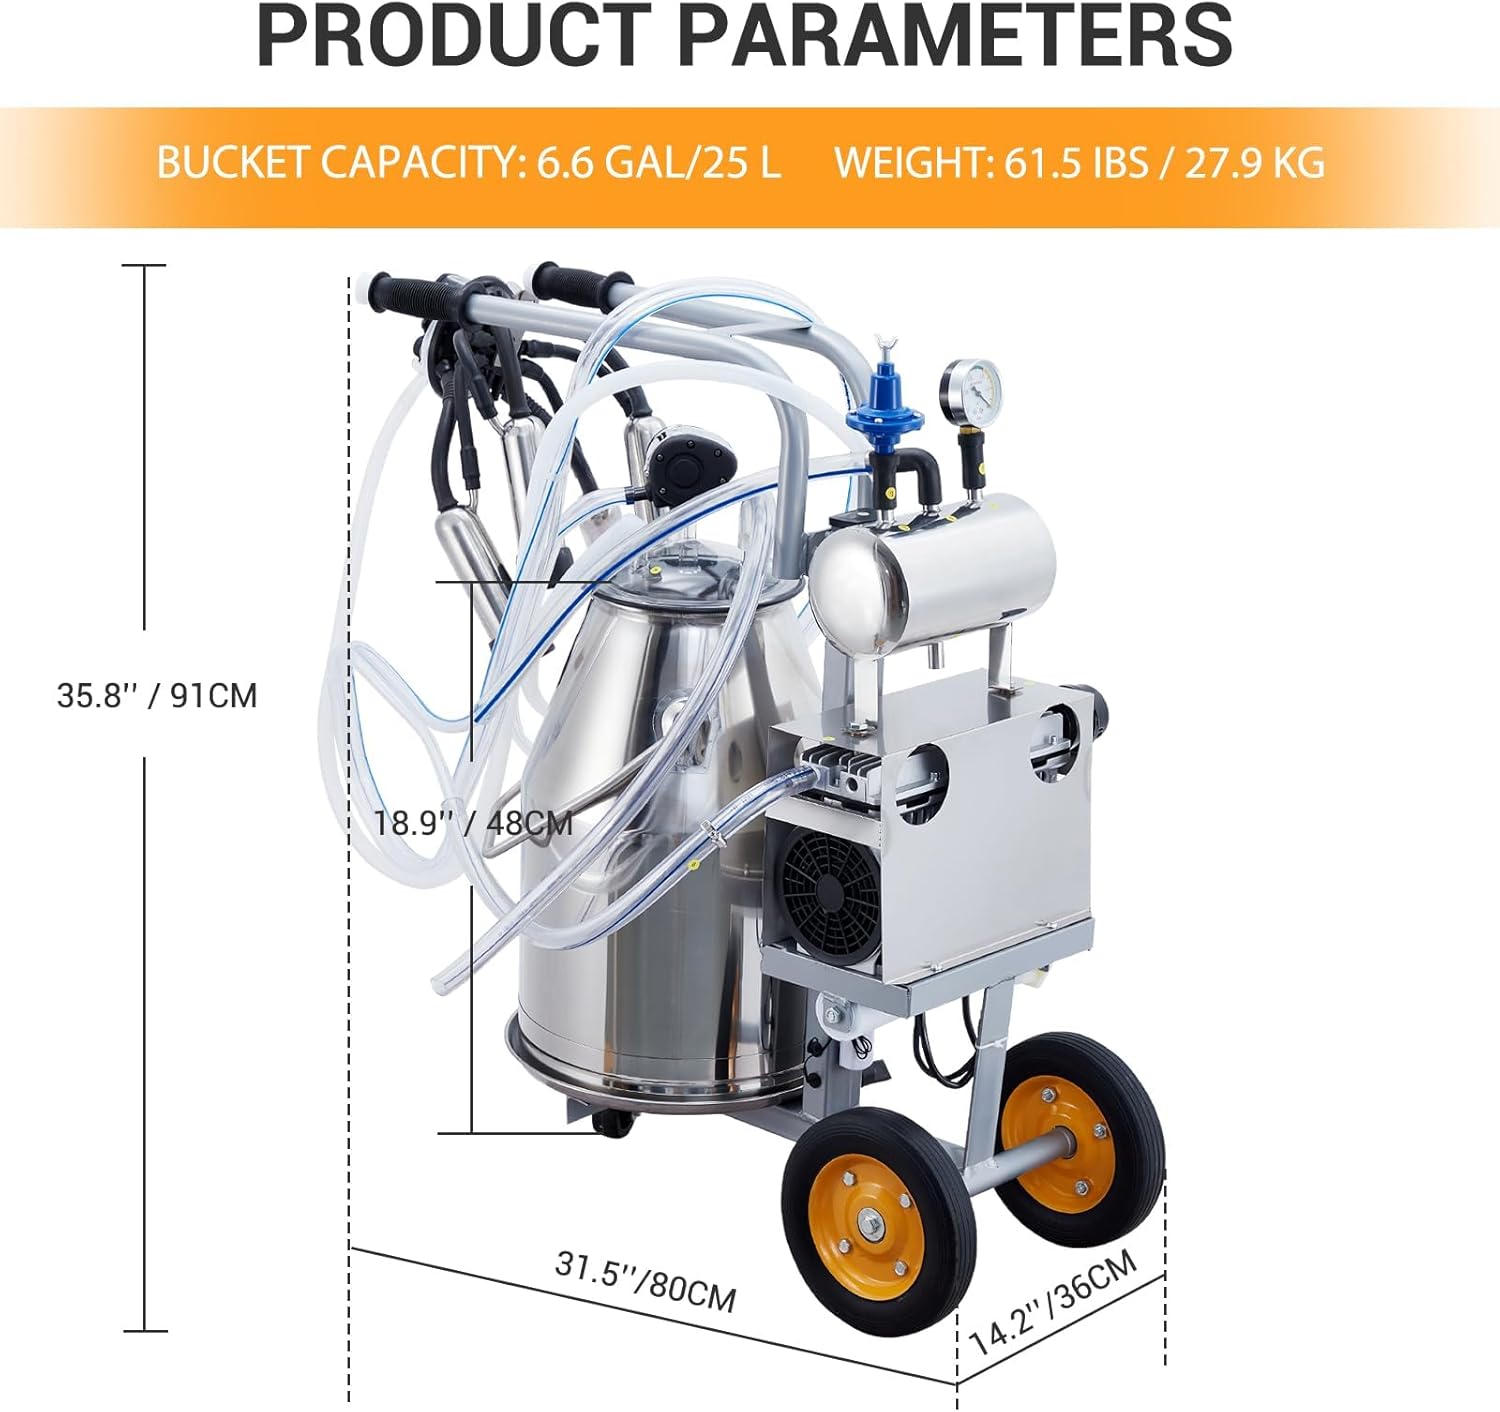
Image 8.1: Key product parameters including dimensions and weight.
9. Warranty and Support
For warranty information, technical support, or to purchase replacement parts, please contact GarveeLife customer service. Refer to your purchase documentation for specific warranty terms and contact details.