1. Introduction
The KZYEE KT80 Digital Timing Light is an advanced diagnostic tool designed for precise engine timing adjustments and various electrical tests. It features a long-life LED strobe, USB-C rechargeable battery with 12V backup, and supports 6V and 12V gas engines (2-stroke and 4-stroke). This manual provides detailed instructions for its proper use and maintenance.

Image 1.1: The KZYEE KT80 Digital Timing Light and its components, including the main unit, inductive pickup, and power cables.
2. Product Overview
Key Features:
- Advanced LED Strobe: Equipped with a long-life LED light source for bright, stable flashes, ensuring clear visibility of timing marks. The lamp head is adjustable by 60 degrees for access in tight spaces.
- Dual Power Options: Features a built-in rechargeable lithium battery (USB-C charging) for cordless operation and includes clips for 12V car battery backup power for extended use.
- Multi-Functionality: Performs timing checks (0-90° advance adjustment), RPM testing (200-9,999 RPM), dwell angle measurement (displayed as percentage), and voltage testing (0-35V).
- Wide Engine Compatibility: Works with both 6V and 12V gasoline engines, supporting 2-stroke and 4-stroke systems.
- Clear Digital Display: A large LCD shows RPM, advance angle, dwell percentage, voltage, and stroke mode simultaneously for easy diagnosis.
What's in the Box:
- KZYEE KT80 Digital Timing Light (1 unit)
- USB-C Charging Cable (5V AC Power Module NOT included)
- 12V Backup Power Cable with Battery Clips
- Inductive Pickup Clip
- User Manual (this document)

Image 2.1: Overview of the KT80's primary functions and capabilities.
3. Setup
3.1 Charging the Device
The KT80 features a built-in rechargeable lithium battery. Before first use, fully charge the device using the provided USB-C cable and a standard 5V USB power adapter (not included).
- Connect the USB-C cable to the charging port on the KT80.
- Connect the other end of the USB-C cable to a 5V USB power adapter.
- The battery level indicator on the LCD will show charging status.
Note: The 12V backup clips are for power during operation, not for charging the internal battery.

Image 3.1: The KT80 can be charged via USB-C for cordless operation, or powered by a 12V car battery using the included clips.
3.2 Connecting to the Engine
Ensure the engine is off and cool before making connections.
- For 12V Backup Power (Optional): If the internal battery is low or for extended use, connect the red clamp of the backup power cable to the positive (+) terminal of a 12V vehicle battery and the black clamp to the negative (-) terminal.
- Attach Inductive Pickup: Locate the spark plug wire for cylinder #1. Open the sliding sensor clip and securely attach it around the spark plug wire. Ensure the arrow on the clip points towards the spark plug. Improper placement may result in no signal or inaccurate readings.

Image 3.2: Correct placement of the inductive pickup clip on the spark plug wire.
4. Operating Instructions
4.1 Device Controls and Display

Image 4.1: KT80 button layout and LCD display indicators.
- Power On/Off & Stroke Switch: Press and hold the 4/2 button to power on/off. Tap the 4/2 button to switch between 2-stroke and 4-stroke modes.
- Function (FUN) Button: Tap to cycle through measurement modes: RPM, Advance Angle, Dwell, and Voltage.
- '+' and '-' Buttons: Used to adjust the advance angle in timing mode. Tap for 0.1° increments, hold for 1° increments.
- LCD Display: Shows current mode, measurement values, units, and real-time battery level.
4.2 Engine Timing Adjustment
This function allows you to check and adjust your engine's ignition timing.
- Warm up the engine to its normal operating temperature.
- Ensure the inductive pickup is correctly clamped to cylinder #1 spark plug wire.
- Start the engine.
- Press the FUN button until 'ADVANCE' or 'TIMING' is displayed.
- Point the timing light at the engine's timing marks (usually on the crankshaft pulley or flywheel).
- Use the '+' and '-' buttons to adjust the advance angle on the timing light until the timing marks align.
- Adjust the engine's distributor or timing mechanism according to your vehicle's service manual until the timing marks align without needing compensation from the timing light.

Image 4.2: Process for checking and setting ignition timing.
4.3 Dwell Angle Test
The dwell angle test measures the time the ignition coil is charged, helping to identify potential misfires or coil issues.
- Connect the test wire (inductive pickup) to terminal 1 of the ignition coil.
- Start the engine.
- Press the FUN button until 'DWELL' or '%' is displayed.
- Read the dwell angle percentage on the LCD. Compare this reading to your vehicle's specifications.

Image 4.3: Performing a dwell angle test.
4.4 Voltage Test
The KT80 can also function as a voltmeter to check battery health, alternator output, and wiring circuits.
- Connect the 12V backup power cable's red clamp to the positive (+) terminal and the black clamp to the negative (-) terminal of the battery or circuit you wish to test.
- Press the FUN button until 'VOLTAGE' or 'V' is displayed.
- Read the voltage instantly on the LCD.

Image 4.4: Using the KT80 for voltage measurement.
4.5 RPM Measurement
The device automatically displays RPM when in timing mode or when selected via the FUN button.
- Ensure the inductive pickup is correctly clamped to cylinder #1 spark plug wire.
- Start the engine.
- Press the FUN button until 'RPM' is displayed.
- The current engine RPM will be shown on the LCD.
5. Maintenance
- Cleaning: Wipe the device with a soft, dry cloth. Do not use abrasive cleaners or solvents.
- Storage: Store the KT80 in a dry, cool place away from direct sunlight and extreme temperatures.
- Battery Care: For optimal battery life, charge the device regularly, even if not in frequent use. Avoid fully discharging the battery for extended periods.
- Cable Inspection: Periodically inspect all cables and clips for damage or wear. Replace if necessary.
6. Troubleshooting
- No Display/Device Not Powering On:
- Ensure the internal battery is charged.
- If using 12V backup, check connections to the vehicle battery for proper polarity and secure contact.
- No Signal/Inaccurate Readings (Timing/RPM/Dwell):
- Verify the inductive pickup is securely clamped to cylinder #1 spark plug wire.
- Ensure the arrow on the inductive pickup points towards the spark plug.
- Check that the engine is running smoothly.
- Confirm the correct stroke mode (2-stroke or 4-stroke) is selected on the device.
- Inaccurate Voltage Readings:
- Ensure the 12V backup power clips are making good contact with the battery terminals or test points.
- Check for corrosion on battery terminals.
- Strobe Light Not Flashing:
- Verify the device is powered on and receiving a signal from the spark plug wire.
- Check for damaged cables or inductive pickup.
7. Specifications
| Feature | Specification |
|---|---|
| Model Number | KT80 |
| Light Source Type | LED |
| Power Source | Battery Powered (USB-C Rechargeable) / 12V External Battery Backup |
| Engine Compatibility | 6V & 12V Gas Engines (2-Stroke, 4-Stroke) |
| Timing Advance Range | 0-90° |
| RPM Test Range | 200-9,999 RPM |
| Dwell Angle Test | Yes (Displayed as Percentage) |
| Voltage Test Range | 0-35V |
| Material | Acrylonitrile Butadiene Styrene (ABS) |
| Color | Orange |
| Product Dimensions | Approximately 22"L x 14.6"W x 7.9"H (Packaging dimensions: 13.39 x 11.42 x 3.35 inches) |
| Item Weight | Approximately 1.46 pounds |
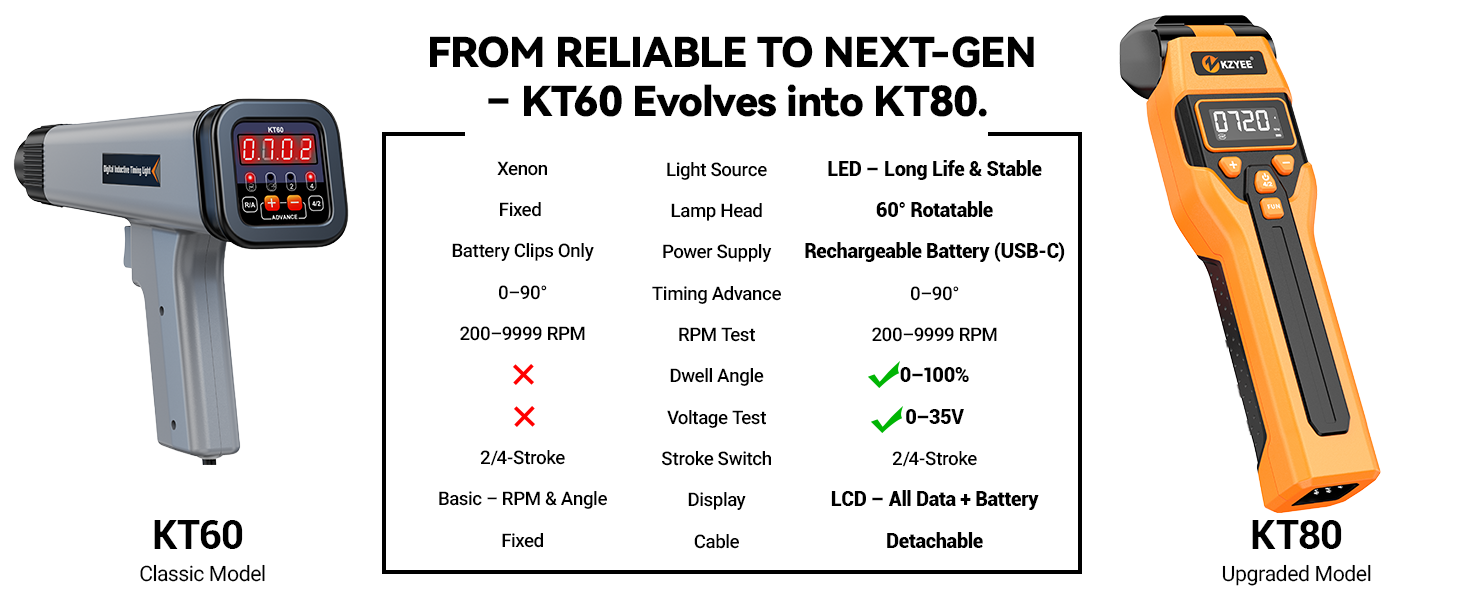
Image 7.1: The KT80 is compatible with a wide range of gas engines.
8. Warranty and Support
The KZYEE KT80 Digital Timing Light comes with a 90-day warranty from the date of purchase. For full warranty details, please refer to the information provided on the product packaging or contact KZYEE customer service.
For technical support, troubleshooting assistance, or warranty claims, please refer to the contact details provided on the product box or visit the official KZYEE website.


