1. Product Overview
This Intelligent Brushless Motor Controller is designed for various electric vehicles, including E-Tricycles, E-Bikes, cargo electric cars, and scooters. It supports rated power options of 1500W, 1800W, and 2000W, with a voltage range of 48V-72V. The controller features an intelligent dual-mode chip for enhanced performance and reliability.
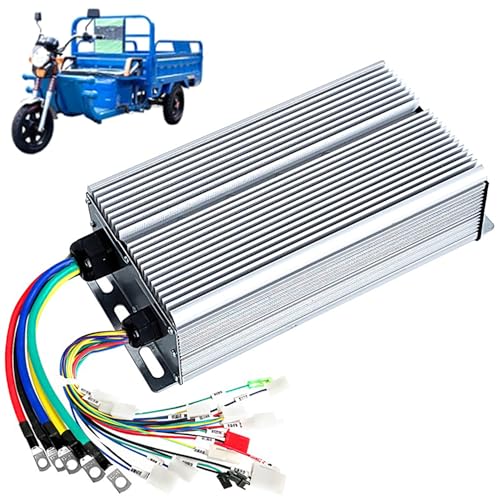
Image 1.1: The Intelligent Brushless Motor Controller showing its dimensions (25.3cm length, 14cm width, 7cm height) and weight (2.4kg).
2. Key Features
- Intelligent Dual-Mode Chip: Features self-learning technology, smooth start functionality, and automatic chip and phase recognition to minimize jitter.
- Smooth Operation: Ensures stable speed and enhanced sensitivity for braking and direction changes.
- Soft and Hard Start Function: Allows for gentle or rapid acceleration based on user preference.
- Flying Protection Function: Prevents unexpected takeoffs due to speed regulation issues.
- Under-Voltage Protection: Automatically halts output when battery voltage drops below a specified level, protecting the vehicle's performance.
- Blocking Function: Automatically limits current when the motor is obstructed, enhancing safety.
- Waterproof Interface: High-strength sealed waterproof connectors and harness sealing prevent short circuits, ensuring reliability in challenging conditions.
- Three-Speed Function: Allows selection of optimal speed gears for various terrains.
- Durable Construction: Made from aluminum alloy, designed for ambient temperatures from -20℃ to 50℃ with an IP55 protection grade.

Image 2.1: Detailed view highlighting the high-strength sealed waterproof connector, thickened aluminum case, new intelligent chip, and upgraded power tubes.
3. Setup and Installation
Proper installation is crucial for the safe and efficient operation of the motor controller. Ensure the vehicle's power is off before beginning installation.
3.1 Wiring Diagram
Refer to the following diagram for connecting the controller to your electric vehicle's components. Each wire is color-coded and labeled for identification.
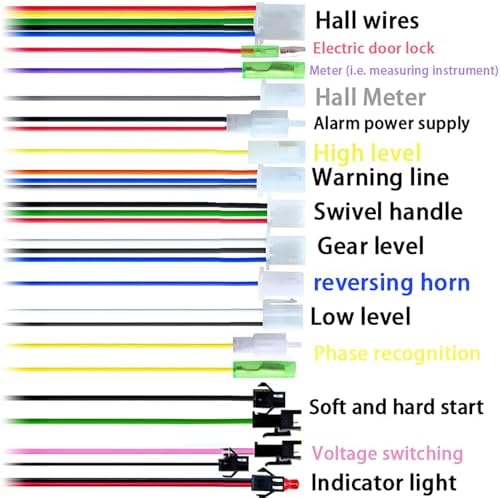
Image 3.1: Comprehensive wiring diagram illustrating connections for various functions including Hall wires, electric door lock, meter, alarm power supply, high/low level, swivel handle, gear level, reversing horn, phase recognition, soft/hard start, voltage switching, and indicator light.
3.2 Installation Steps
- Mount the Controller: Securely mount the controller in a location that is protected from direct impact and excessive heat, ideally with good airflow. Ensure the mounting surface is stable.
- Connect Power Wires: Connect the main power wires (typically thicker red and black wires) from the battery to the controller, observing polarity.
- Connect Motor Wires: Connect the motor phase wires (typically three thicker wires, e.g., yellow, green, blue) from the controller to the motor.
- Connect Hall Wires: Connect the Hall sensor wires (smaller wires, often a bundle) from the motor to the controller.
- Connect Signal Wires: Connect all other signal wires according to the wiring diagram (e.g., throttle, brake, ignition, speed display, alarm, soft/hard start, gear level, reversing horn). Ensure each connection is firm and correct.
- Secure Connections: Double-check all connections for tightness and proper insulation. Use cable ties to manage wiring and prevent chafing.
- Initial Test: After all connections are made, turn on the vehicle's power and perform a low-speed test in a safe environment.

Image 3.2: Example of the controller installed underneath an electric vehicle chassis, demonstrating a typical mounting location.
4. Operating Instructions
Once installed, the controller manages the power delivery to your motor based on your input.
- Power On/Off: Use the vehicle's main power switch or electric door lock to activate or deactivate the controller.
- Acceleration: Apply the throttle gradually for smooth acceleration. The controller's soft start function helps prevent sudden jerks.
- Speed Control: Utilize the three-speed function (if connected) to select appropriate speed gears for different driving conditions (e.g., low speed for crowded areas, high speed for open roads).
- Braking: The controller is designed to provide enhanced sensitivity for braking. Engage the brakes as needed; the controller will manage motor power accordingly.
- Reversing: If a reversing horn/switch is connected, activate it to engage reverse gear.
- Monitoring: Pay attention to any indicator lights or meter readings (if connected) for system status and battery voltage.

Image 4.1: The controller's scope of application, illustrating its use in 3-wheelers and 4-wheelers, and highlighting features such as soft/hard start, brake protection, and undervoltage protection.
5. Maintenance
Regular maintenance ensures the longevity and optimal performance of your motor controller.
- Keep Clean: Periodically clean the exterior of the controller to prevent dust and debris buildup, which can affect heat dissipation.
- Inspect Wiring: Regularly check all wiring connections for signs of wear, corrosion, or looseness. Ensure waterproof seals are intact.
- Avoid Overheating: Ensure the controller has adequate ventilation. Avoid operating the vehicle in conditions that cause prolonged overheating of the controller.
- Battery Health: Maintain your vehicle's battery in good condition. The controller's under-voltage protection relies on accurate battery voltage.
- Environmental Protection: While the controller has an IP55 rating, avoid prolonged exposure to extreme moisture or submersion.
6. Troubleshooting
This section addresses common issues you might encounter with the motor controller.
| Problem | Possible Cause | Solution |
|---|---|---|
| Motor does not start or runs intermittently. |
|
|
| Controller overheats. |
|
|
| Vehicle accelerates unexpectedly (Flying Protection). |
|
|
If you encounter issues not listed here or if solutions do not resolve the problem, please consult a qualified technician.
7. Specifications
| Attribute | Value |
|---|---|
| Rated Power Options | 1500W / 1800W / 2000W |
| Voltage Range | 48V-72V |
| Operating Temperature | -20℃ to 50℃ |
| Protection Grade | IP55 |
| Material | Aluminum Alloy |
| Item Weight | 2.2 pounds (approx. 1 kg) |
| Package Dimensions | 3.15 x 3.15 x 3.15 inches (approx. 8 x 8 x 8 cm) |
| Model Number | Generic |
8. Warranty and Support
Specific warranty information for this product is not provided in the available documentation. For warranty claims or technical support, please refer to the retailer or manufacturer's contact information provided at the point of purchase.