1. Overview
The XUNTOP Coaxial Centering Indicator is a precision instrument designed for accurate workpiece alignment in milling and boring machines. It provides precise measurement of fine variations with a high resolution, ensuring reliable results in dynamic assembly processes.
This indicator supports multi-angle operation and is suitable for both internal and external diameter measurements, making it a versatile tool for various machining applications.
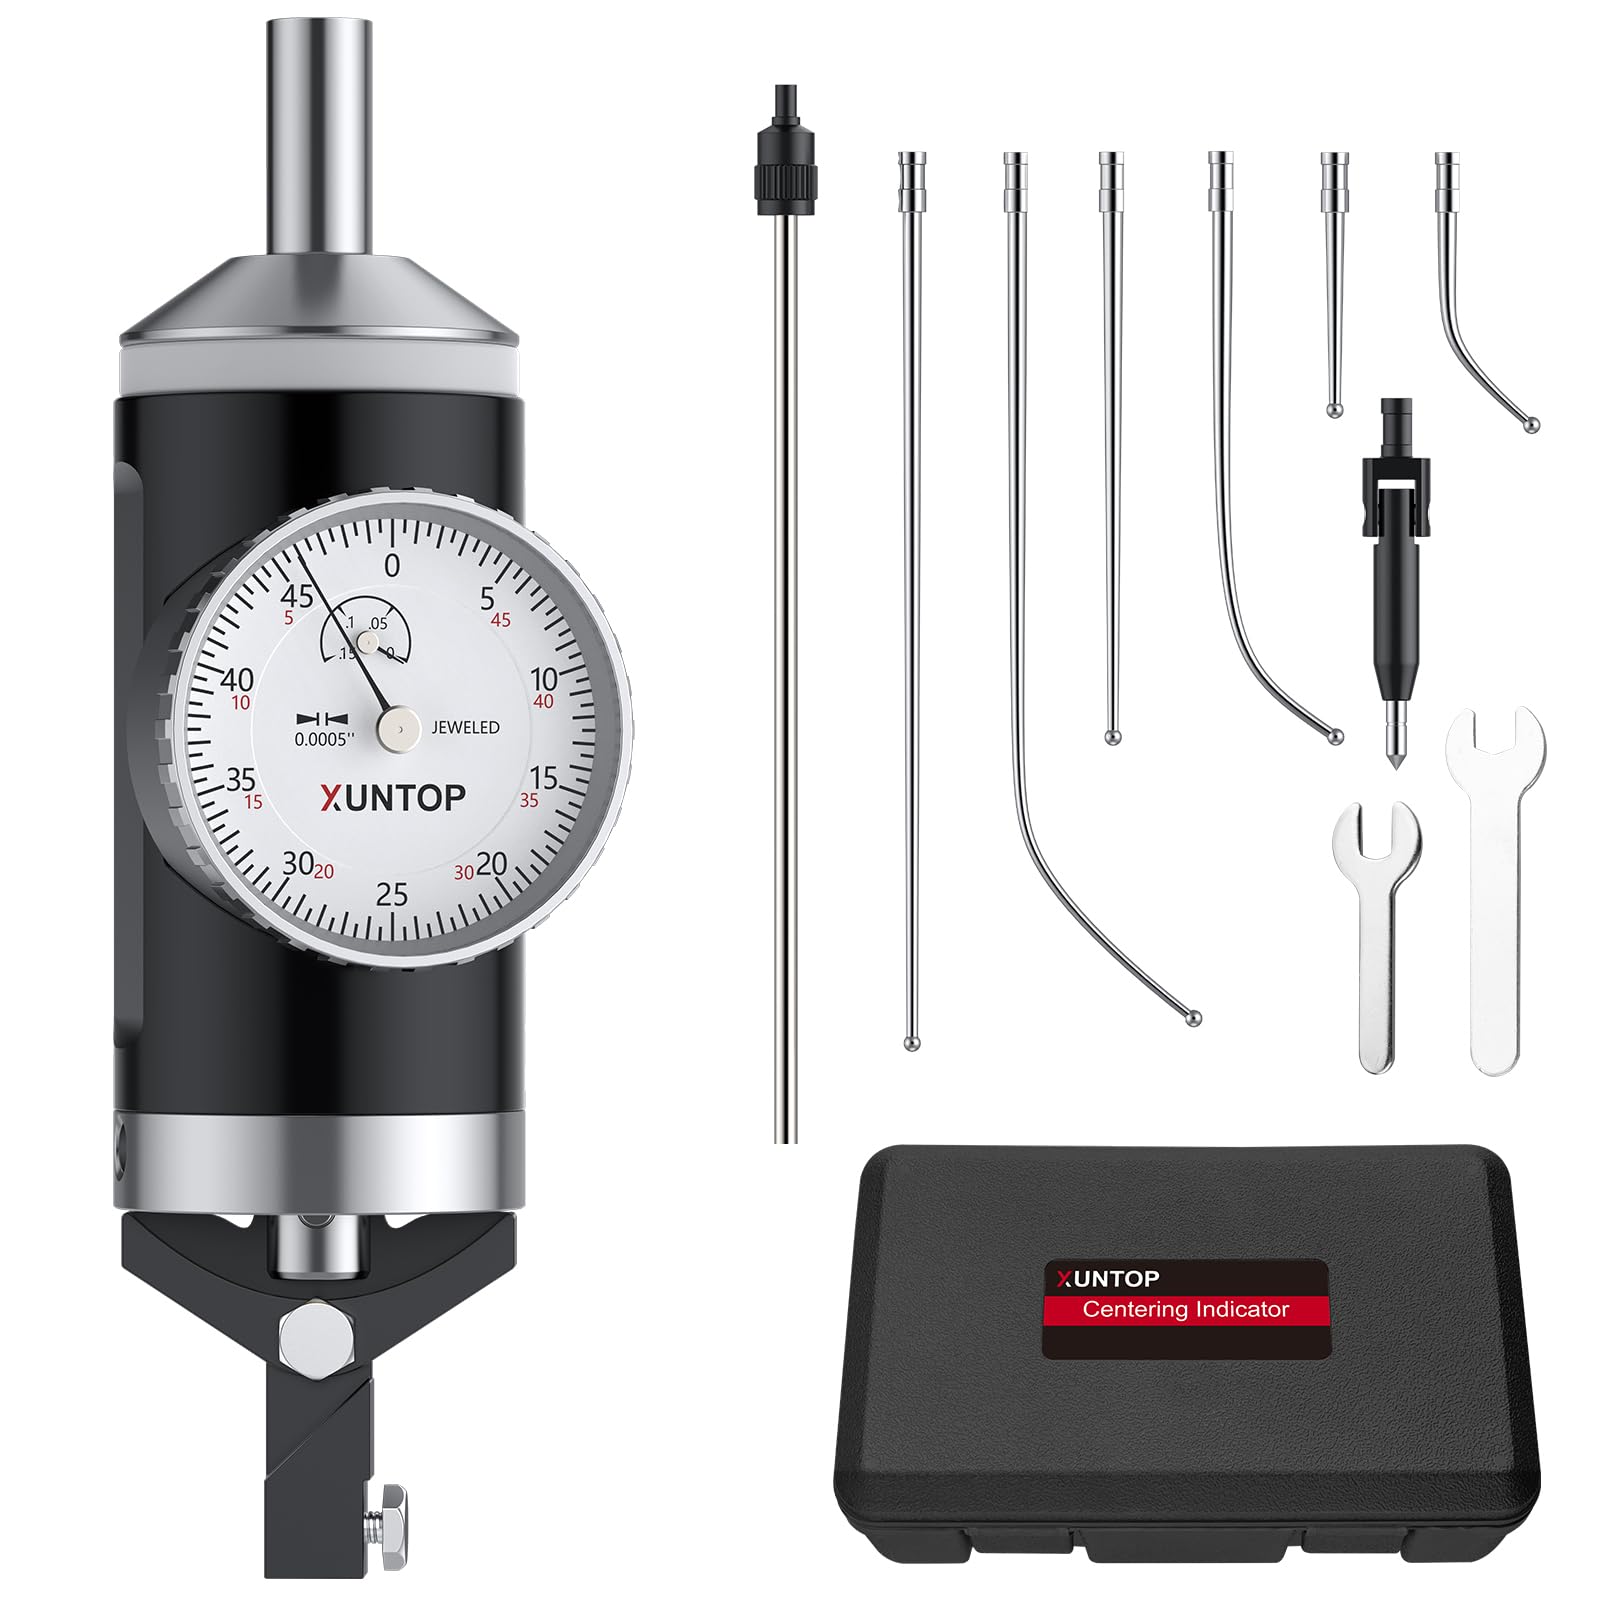
Image 1.1: XUNTOP Coaxial Centering Indicator
2. Product Components
The XUNTOP Coaxial Centering Indicator set includes the following components:
- 1x Coaxial Centering Indicator unit
- 1x Restraining Rod
- 1x Center Point Feeler
- 2", 4", and 6" Straight Feelers (3 pieces)
- 2", 4", and 6" Curved Feelers (3 pieces)
- 2x Wrenches for assembly
- 1x User Manual
- 1x Storage Box

Image 2.1: Complete set of XUNTOP Coaxial Centering Indicator components.

Image 2.2: Exploded view and dimensions of the indicator and feelers.
3. Specifications
| Feature | Specification |
|---|---|
| Model Number | TL338 |
| Measurement Accuracy | 0.0005'' |
| Travel Range | 0.15'' |
| Maximum Spindle Speed | 100 RPM |
| Mounting Shank | 3/8" |
| Inner Diameter Measurement Range | 5/32" to 4-1/4" |
| Outer Diameter Measurement Range | 0 to 4-1/4" |
| Included Feelers | 2", 4", 6" Straight/Curved |
| Item Weight | 1.09 kg |
| Country of Origin | China |
4. Setup
Follow these steps to set up your XUNTOP Coaxial Centering Indicator:
- Install the Restraining Rod: Insert the restraining rod into its designated slot on the indicator unit.
- Attach the Feeler: Select the appropriate straight or curved feeler based on your measurement requirements. Insert the feeler into the gauging head and tighten it securely with the included wrench.
- Mount the Indicator: Install the Coaxial Centering Indicator onto the machine tool's spindle. Ensure it is securely seated.

Image 4.1: Installation steps for the Coaxial Centering Indicator.
Setup Demonstration Video
Video 4.1: This video demonstrates the unboxing and assembly of the coaxial centering indicator, including attaching different feelers and preparing the unit for use.
5. Operating Instructions
The Coaxial Centering Indicator can be used in any orientation (horizontal to vertical) and for both internal and external diameter measurements by simply swapping the feeler. The dial face remains fixed during spindle rotation, allowing the operator to align the table precisely.
- Select Feeler: Choose the appropriate feeler (straight for inner diameters, curved for outer diameters, or center point for specific applications) based on the workpiece.
- Set Spindle Speed: Ensure the machine spindle speed does not exceed the recommended maximum of 100 RPM to prevent measurement errors.
- Position Indicator: Carefully bring the feeler into contact with the workpiece. The indicator's face should be visible for observation.
- Rotate Spindle: Slowly rotate the machine spindle. The indicator needle will show variations as the feeler traces the workpiece surface.
- Adjust Table: Adjust the machine table's position until the indicator needle shows minimal or no deflection, indicating that the workpiece is centered.

Image 5.1: Various measurement methods using the indicator.

Image 5.2: Examples of precision alignment applications.
Operational Demonstration Videos
Video 5.1: This video provides guidance on using a coaxial indicator to find the center of stock on a machine.
Video 5.2: A short demonstration of the coaxial indicator in operation.
6. Maintenance
Proper maintenance ensures the longevity and accuracy of your coaxial centering indicator:
- Cleaning: After each use, wipe down the indicator and feelers with a clean, soft cloth to remove any dust, oil, or debris. For stubborn grime, use a mild cleaning solution and ensure all parts are thoroughly dried.
- Lubrication: Periodically apply a thin film of light machine oil to moving parts, such as the feeler pivot points and the spindle shaft, to ensure smooth operation and prevent corrosion.
- Storage: Store the indicator and all its components in the provided storage box. Ensure the box is kept in a dry, clean environment away from direct sunlight, extreme temperatures, and corrosive substances.
- Inspection: Regularly inspect feelers for any signs of wear, bending, or damage. Replace worn or damaged feelers to maintain measurement accuracy. Check the dial for clear readability and smooth movement of the needle.
7. Troubleshooting
If you encounter issues with your coaxial centering indicator, consider the following:
- Inaccurate Readings:
- Ensure the feeler is securely tightened and not bent or damaged.
- Verify the spindle speed is within the recommended 100 RPM maximum. Higher speeds can cause instability and inaccurate readings.
- Check for any debris or obstruction preventing smooth movement of the feeler or dial mechanism.
- Confirm the indicator is properly seated in the machine spindle and the restraining arm is correctly positioned.
- Sticking or Jerky Needle Movement:
- Clean the indicator thoroughly, especially around the feeler pivot and dial mechanism.
- Apply a small amount of light machine oil to the moving parts.
- Ensure the indicator has not been subjected to impact or rough handling.
- Feeler Loosening:
- Always use the provided wrench to tighten the feeler securely.
- Avoid over-tightening, which can strip threads, but ensure it is firm enough to prevent movement during operation.
8. Warranty and Support
For warranty information and technical support, please refer to the documentation included with your product or contact XUNTOP customer service. Keep your purchase receipt as proof of purchase for any warranty claims.