1. Introduction
This instruction manual provides essential information for the safe and effective operation, maintenance, and care of your MAIHUITE LFC-300 Pro 13-Inch Laminate/Vinyl Floor Cutter. Please read this manual thoroughly before initial use and retain it for future reference. Proper understanding of these instructions will ensure optimal performance and extend the lifespan of your tool.

Image 1.1: The MAIHUITE LFC-300 Pro 13-Inch Laminate/Vinyl Floor Cutter with an extra blade.
2. Safety Information
Always prioritize safety when operating any cutting tool. Failure to follow these safety guidelines may result in serious injury.
- Wear Eye Protection: Always wear safety glasses or goggles to protect your eyes from flying debris.
- Keep Hands Clear: Never place hands or fingers near the blade during operation. The blade is extremely sharp.
- Stable Work Surface: Ensure the cutter is placed on a stable, level surface before use to prevent tipping.
- Secure Material: Always ensure the flooring material is properly positioned and stable before initiating a cut.
- Proper Leverage: Apply steady, controlled pressure to the handle. Avoid sudden or jerky movements.
- Store Safely: When not in use, store the cutter in a secure location, out of reach of children and unauthorized users.
- Inspect Before Use: Before each use, inspect the blade for damage or dullness and ensure all components are securely fastened.
3. Package Contents
Verify that all items are present in the package:
- MAIHUITE LFC-300 Pro 13-Inch Laminate/Vinyl Floor Cutter (Main Unit)
- Spare HSS Blade
- Honing Stone
- Hand Shank (Handle)
4. Product Features
The MAIHUITE LFC-300 Pro is engineered for efficient and precise flooring cuts.
- Universal Compatibility: Designed to cut laminate, luxury vinyl planks (LVP), luxury vinyl tiles (LVT), stone plastic composite (SPC), wood plastic composite (WPC), engineered hardwood, bamboo flooring, and more.
- Adjustable Angle Cuts: Features an adjustable guide for precise cuts from 0° to 45°, enabling straight, baseboard, and complex angled patterns.
- Heavy-Duty Construction: Built with a high-strength aluminum alloy frame and reinforced steel components for durability and reliability.
- Sharp Tungsten Steel Blade: Equipped with a premium tungsten steel blade for smooth, chip-free cuts. A spare blade and honing stone are included for extended tool life and consistent performance.
- User-Friendly Operation: Manual, electricity-free operation ensures a quiet, dust-free cutting experience. Ergonomic rubber grips on the handle reduce fatigue.

Image 4.1: Key features including the solid lock bar, angle guide, and telescopic handle.
5. Setup
Follow these steps to prepare your floor cutter for use:
- Unpack Components: Carefully remove all parts from the packaging.
- Attach Handle: Securely attach the hand shank (handle) to the cutter's lever arm. Ensure it is firmly tightened.
- Position Cutter: Place the cutter on a flat, stable, and non-slip surface.
- Inspect Blade: Verify that the blade is properly installed and sharp. If necessary, use the included honing stone to sharpen the blade or replace it with the spare blade.
6. Operating Instructions
6.1. General Cutting
- Measure and Mark: Accurately measure and mark the desired cut line on your flooring material.
- Position Material: Place the flooring plank on the cutter's base, aligning the marked cut line with the edge of the blade. Ensure the plank is flat and stable against the guide.
- Initiate Cut: Firmly grasp the handle and apply steady, downward pressure. Push the handle down in a continuous motion to cut through the material.
- Retrieve Cut Piece: Once the cut is complete, lift the handle and remove the cut pieces.

Image 6.1: Demonstrating the use of the floor cutter for a straight cut.
6.2. Angle Cutting
The cutter supports angle cuts from 0° to 45°.
- Adjust Angle Guide: Utilize the repositionable guide bar on the cutter's base. Align it with the desired angle marking (15°, 30°, or 45°).
- Position Material: Place the flooring plank against the adjusted angle guide, ensuring the marked cut line aligns with the blade.
- Perform Cut: Apply firm, steady pressure to the handle to execute the angled cut.

Image 6.2: Examples of straight (0°) and angled cuts (15°, 30°, 45°).
6.3. Material Compatibility and Capacity
This cutter is designed for a maximum cutting width of 13 inches (330mm) and a maximum thickness of 13mm.
- Laminate Flooring
- Luxury Vinyl Planks (LVP)
- Luxury Vinyl Tiles (LVT)
- Stone Plastic Composite (SPC)
- Wood Plastic Composite (WPC)
- Engineered Hardwood
- Bamboo Flooring
- Trim Vinyl
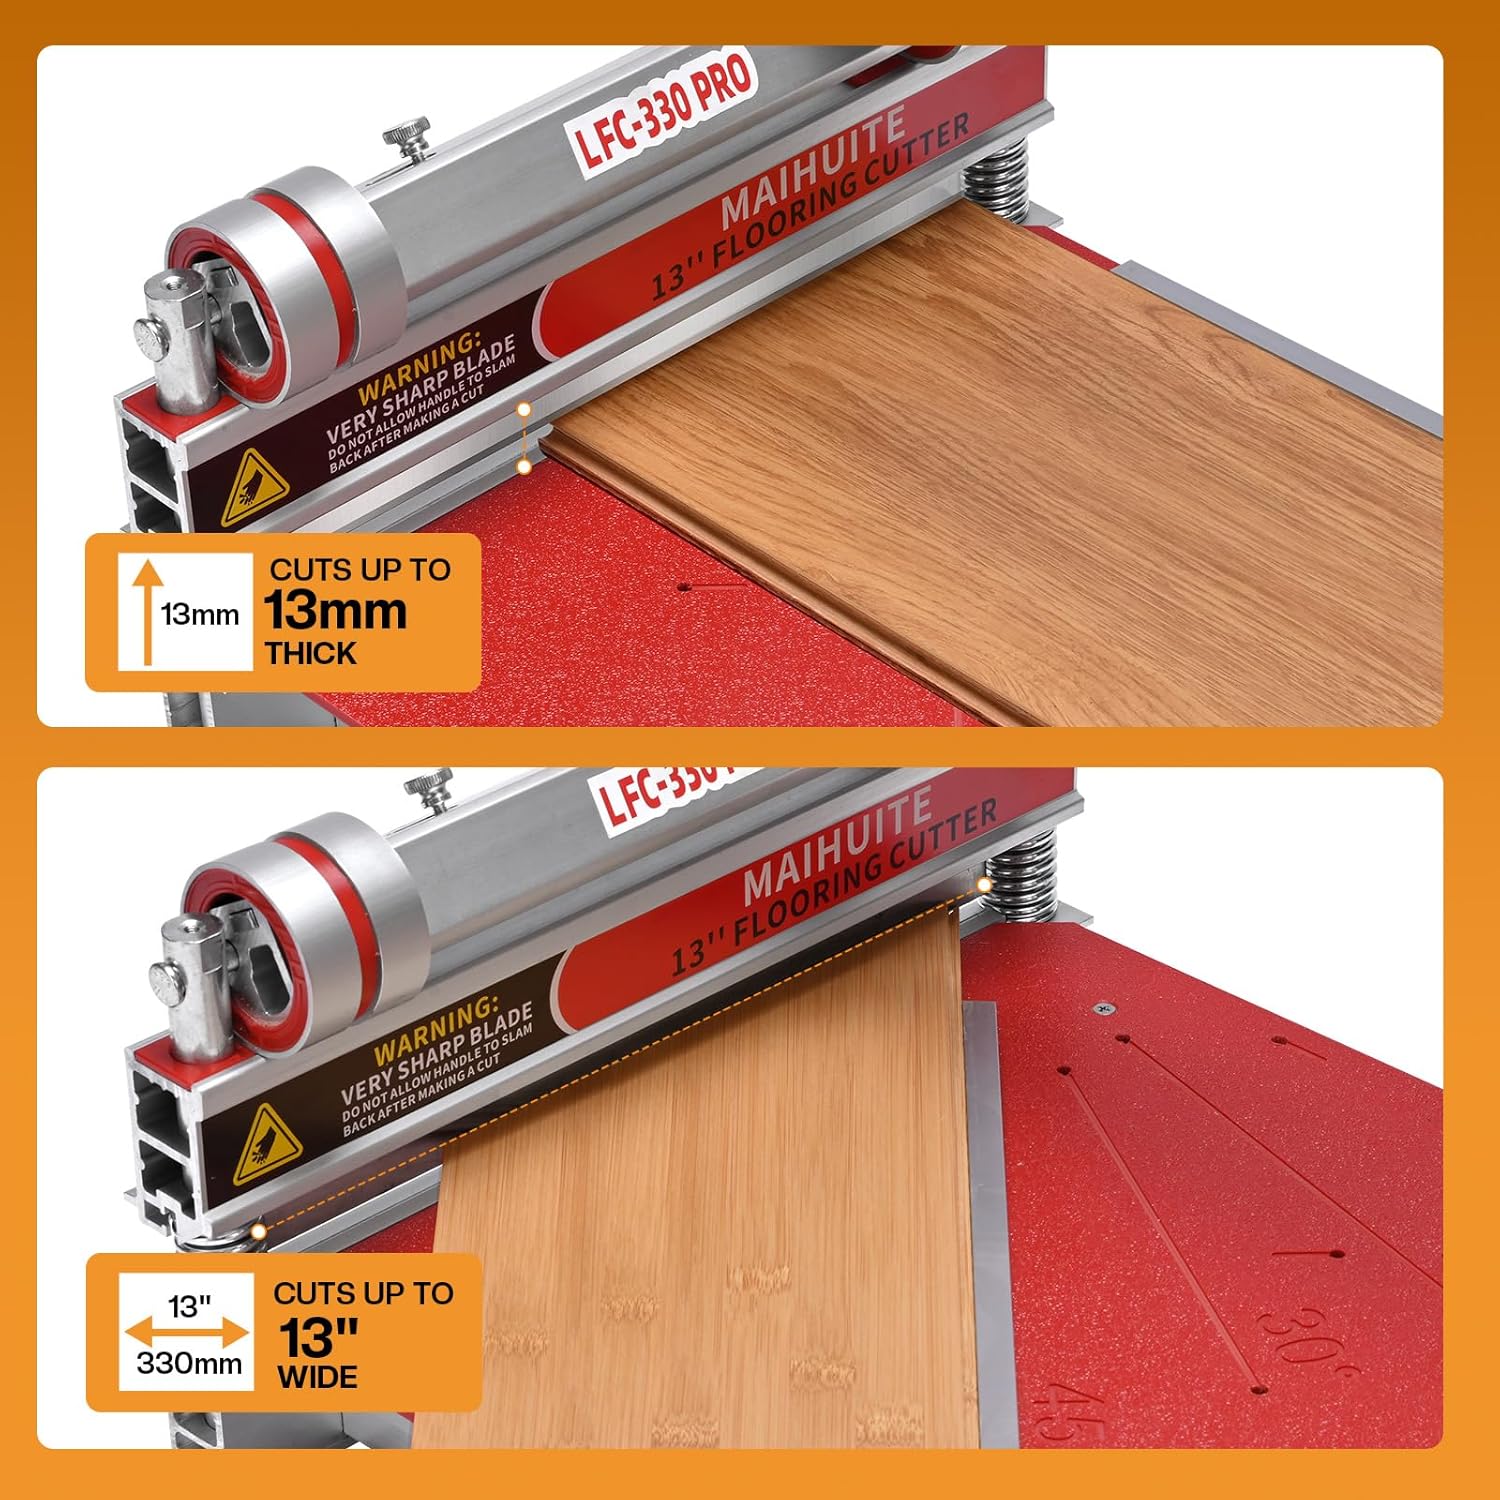
Image 6.3: Maximum cutting thickness and width capabilities.
7. Maintenance
Regular maintenance ensures the longevity and optimal performance of your cutter.
7.1. Blade Replacement
The cutter comes with a spare HSS blade. Replace the blade when it becomes dull or damaged to maintain clean cuts.
- Safety First: Ensure the handle is in the upright position and the cutter is stable.
- Loosen Screws: Carefully loosen the screws securing the blade in place.
- Remove Old Blade: With extreme caution, remove the dull or damaged blade. Use gloves if possible.
- Install New Blade: Insert the new HSS blade, ensuring it is correctly seated.
- Tighten Screws: Securely tighten the screws to hold the new blade firmly. Do not overtighten.
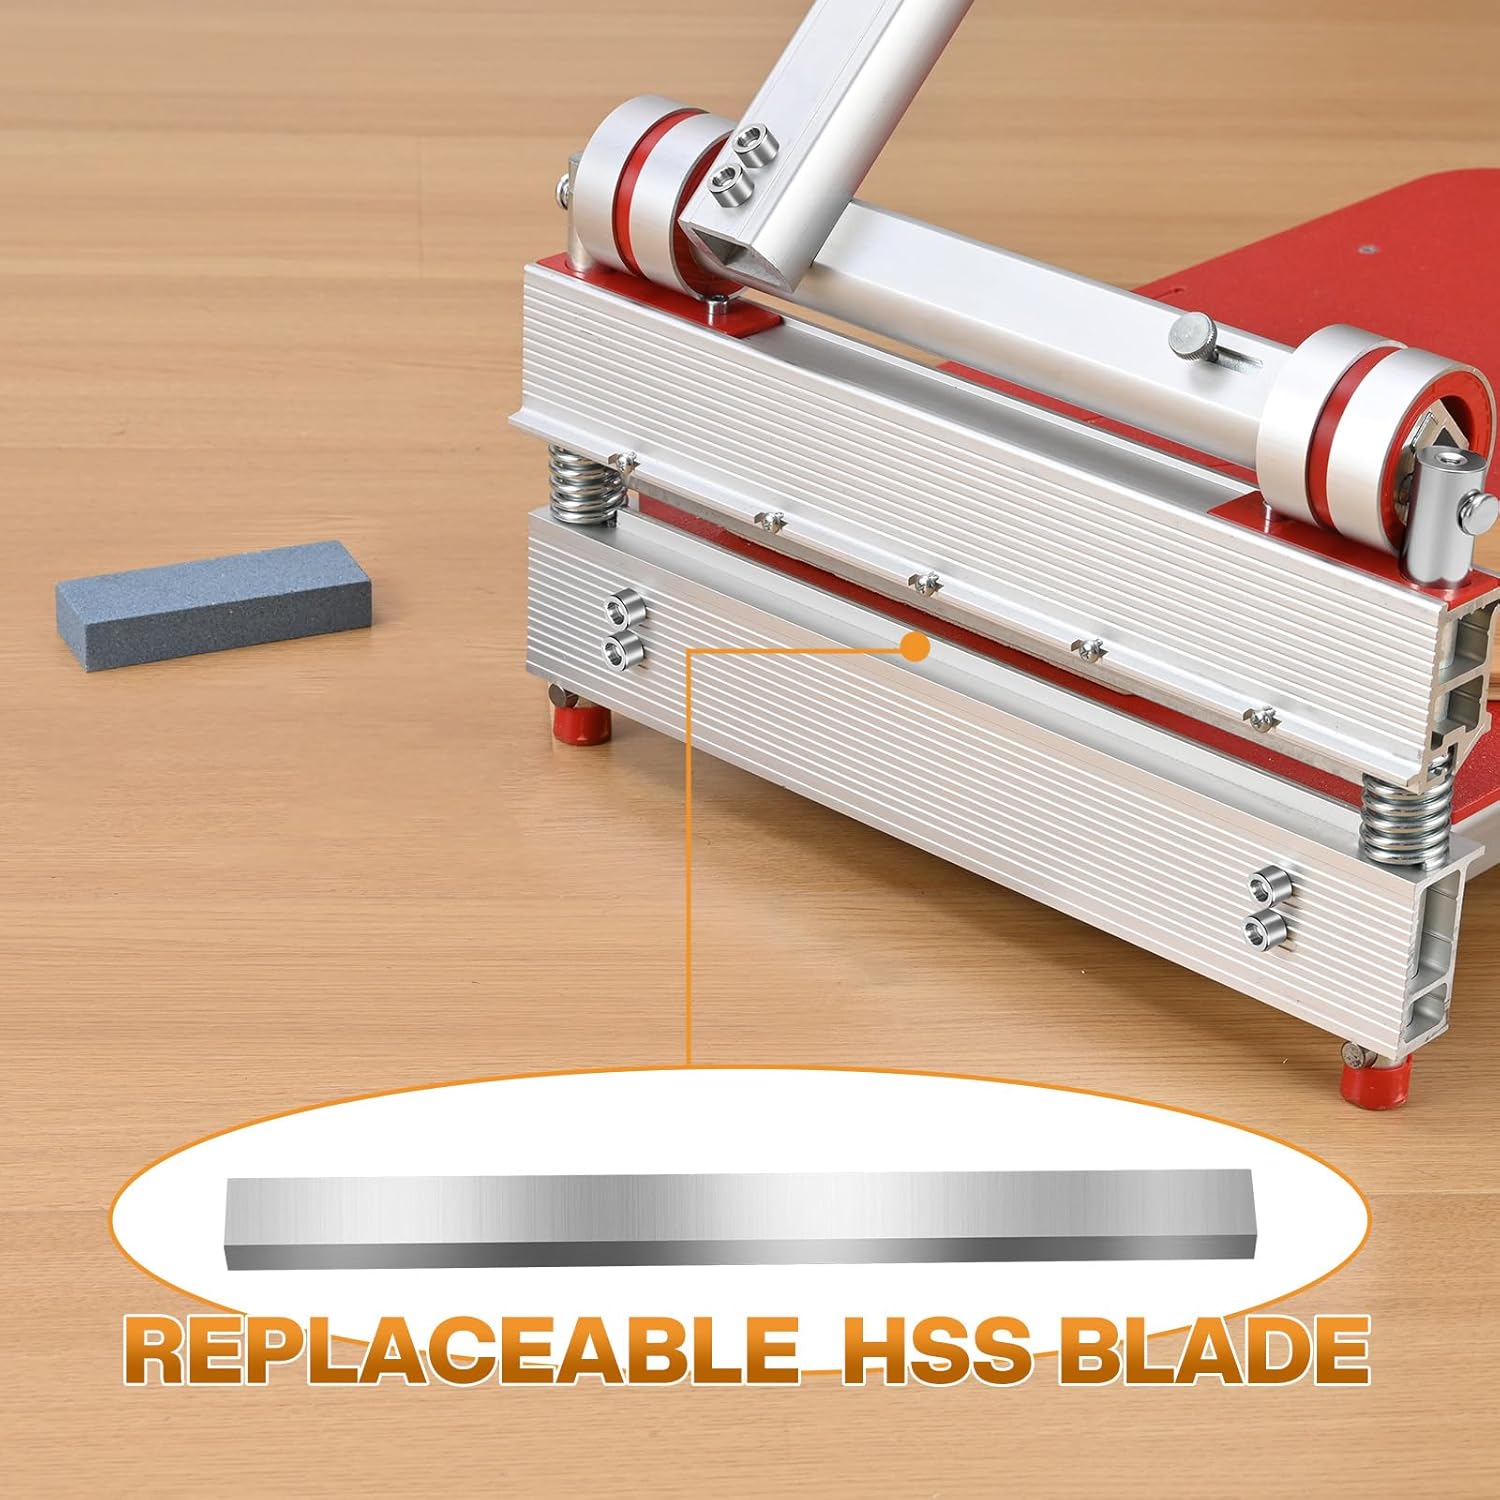
Image 7.1: The replaceable HSS blade and honing stone.
7.2. Blade Sharpening
Use the included honing stone to maintain the sharpness of your blade. Lightly run the honing stone along the blade's edge at the original bevel angle. This can extend the life of your blade between replacements.
7.3. Cleaning
After each use, wipe down the cutter with a dry cloth to remove any dust or debris. Periodically check for any material buildup around the blade mechanism and remove it carefully. Do not use harsh chemicals or abrasive cleaners.
8. Troubleshooting
Refer to this section for common issues and their solutions.
| Problem | Possible Cause | Solution |
|---|---|---|
| Unclean or jagged cuts | Dull or damaged blade; insufficient pressure; incorrect material positioning. | Sharpen or replace the blade. Apply more consistent, firm pressure. Ensure material is flush against the guide. |
| Difficulty cutting thick materials | Material exceeds maximum thickness (13mm); dull blade. | Verify material thickness. Sharpen or replace the blade. Apply steady, increased leverage. |
| Cutter moves during operation | Unstable work surface; cutter not properly secured. | Place the cutter on a firm, level, non-slip surface. Consider clamping the cutter if necessary. |
9. Specifications
Technical details for the MAIHUITE LFC-300 Pro.
- Model Number: LFC-300 Pro
- Manufacturer: MAIHUITE
- Item Weight: 17.32 pounds
- Package Dimensions: 22.9 x 14.7 x 3.8 inches
- Material: Aluminum, Iron
- Power Source: Hand-powered
- Maximum Cutting Width: 13 inches (330mm)
- Maximum Cutting Thickness: 13mm
- Angle Cutting Capability: 0° to 45°
- Included Components: Floor Cutter, Spare HSS Blade, Honing Stone, Hand Shank
10. Warranty and Support
For warranty information or technical support, please contact MAIHUITE customer service through the retailer where the product was purchased or visit the official MAIHUITE website. Please have your model number (LFC-300 Pro) and purchase date available when contacting support.


