
Introduction
This manual provides detailed instructions for the installation, operation, and maintenance of your 25HOURS 10.26-inch Wireless CarPlay & Android Auto Screen. Please read this manual thoroughly before using the device to ensure proper function and safety.
The device offers seamless integration with your smartphone, providing access to navigation, communication, and entertainment features directly on its 10.26-inch HD touchscreen. It supports both Apple CarPlay and Android Auto wirelessly, along with various audio output options and screen mirroring capabilities.
Package Contents
Verify that all items listed below are included in your package:
- 10.26-inch Portable Car Screen
- Car Charger (11.5 ft)
- AUX Audio Cable (5 ft)
- Suction Cup Bracket
- Adhesive Bracket
- User Manual
- Adhesive Gasket
- Base 3M Glue (2 pieces)

Setup & Installation
The 25HOURS 10.26-inch Wireless CarPlay & Android Auto Screen is compatible with 12V-32V vehicles, including cars, trucks, RVs, vans, buses, SUVs, and sedans.
Mounting Options
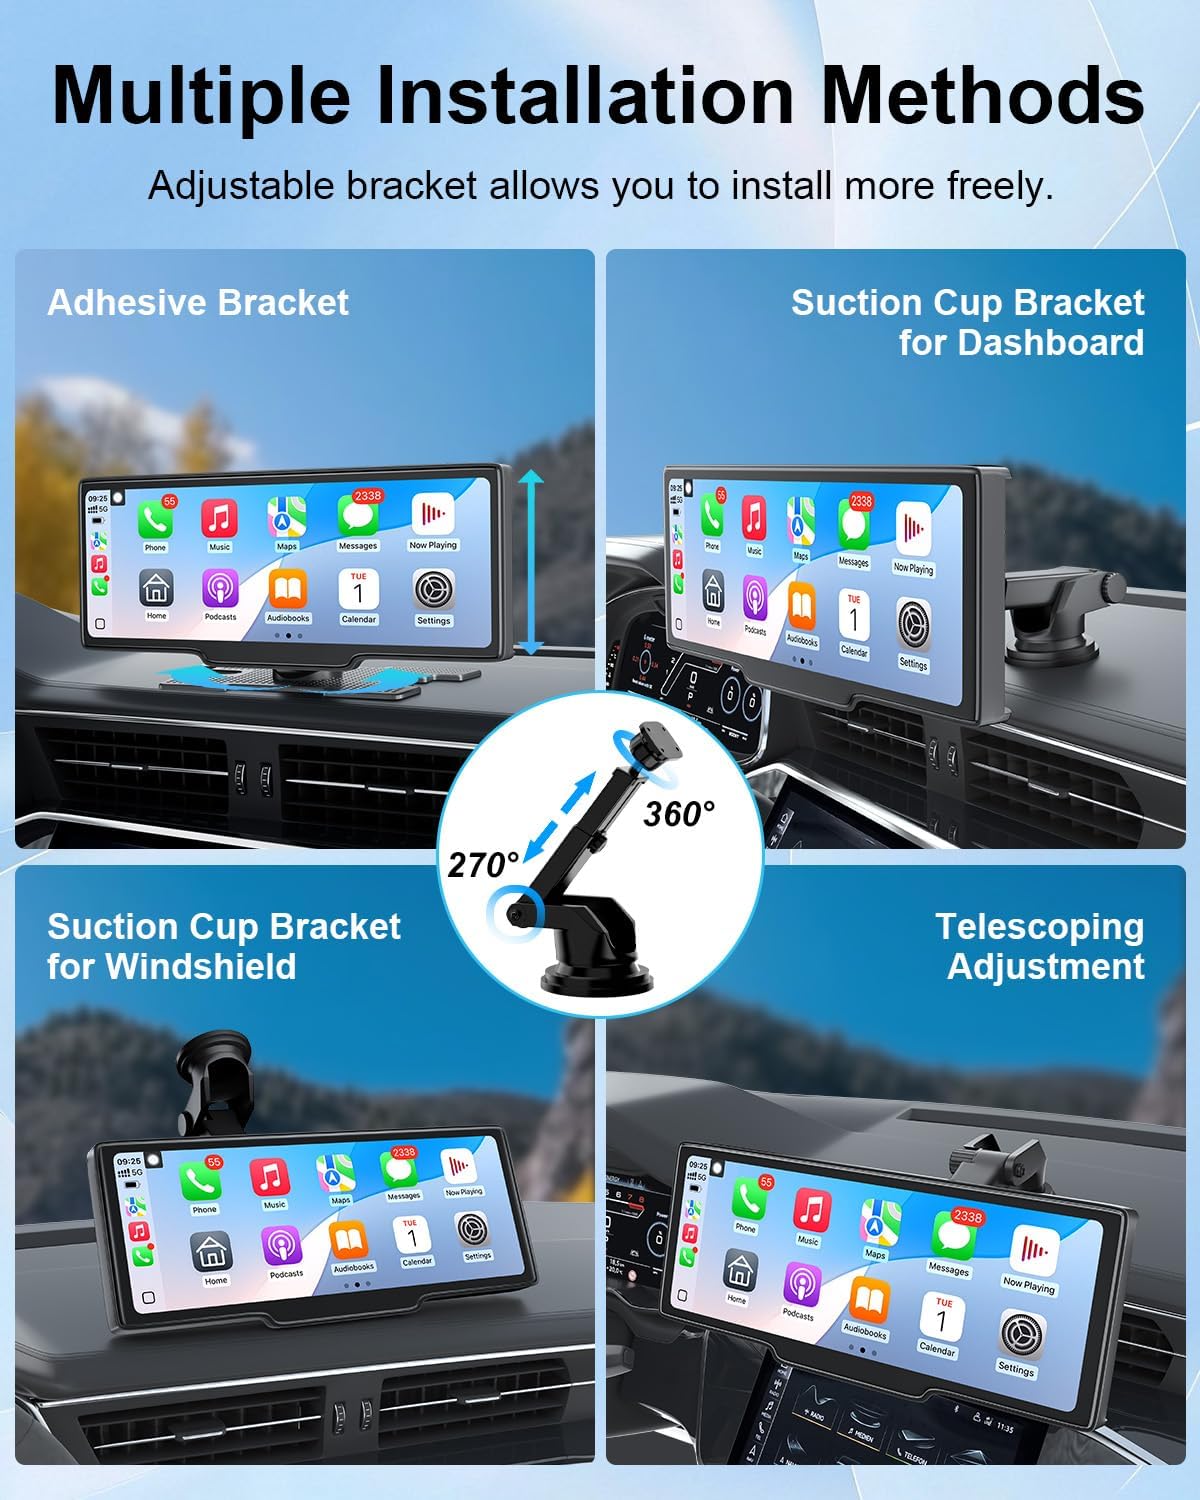
Two mounting brackets are provided for flexible installation:
- Adhesive Bracket: For dashboard mounting.
- Suction Cup Bracket: For dashboard or windshield mounting, offering adjustable angles.
Adhesive Bracket Installation
- Adjust the angle of the adhesive bracket as desired.
- Remove the protective film from the adhesive.
- Firmly stick the bracket to a clean, flat surface on your dashboard.
- Install the screen onto the mounted bracket.

Suction Cup Bracket Installation
- Remove the protective film from the suction cup.
- Stick the suction cup to a clean, smooth surface (dashboard or windshield) and press the bar to lock it in place.
- Install the screen onto the mounted bracket.
- Adjust the angle and tighten the screw to secure the position.

Power Connection
Connect the provided car charger to the device and plug it into your vehicle's cigarette lighter socket. The device will power on automatically.
Operating Instructions
Wireless CarPlay Connection (for iOS devices)
- Turn on Bluetooth on your iPhone.
- On the car screen, select the CarPlay icon.
- On your iPhone, search for and select the device's Bluetooth name (e.g., "T86B-E608") and tap Pair.
- Allow connection to your contacts and call history if prompted.
- CarPlay will connect automatically.

Wireless Android Auto Connection (for Android devices)
- Turn on Bluetooth and Wi-Fi on your Android phone.
- On the car screen, select the Android Auto icon.
- On your Android phone, search for and select the device's Bluetooth name (e.g., "T86B-E608").
- Allow connection if prompted.
- Wait approximately 10 seconds for Android Auto to connect.

Navigation & Voice Control
Once connected to CarPlay or Android Auto, you can use your phone's navigation apps (e.g., Google Maps, Waze, Apple Maps) directly on the screen. Voice control via Siri or Google Assistant is supported for hands-free operation, allowing you to manage navigation, calls, and music without distraction.

Audio Output Options
The device offers multiple ways to output audio:
- Built-in Speaker: The device has an integrated speaker for direct audio playback.
- Bluetooth Audio: Connect your phone via Bluetooth to stream audio to the device.
- FM Transmitter: Broadcast audio to your car's FM radio by tuning both the device and your car radio to the same FM frequency.
- AUX Connection: Use the provided 3.5mm AUX cable to connect the device to your car's AUX input for direct audio transfer.

Screen Mirroring (Mirror Link)
The device supports screen mirroring for both iOS (AirPlay) and Android (Android Cast) devices, allowing you to display your phone's screen content directly on the 10.26-inch display.
AirPlay Mirror Link (for iOS)
- On the screen, click the iPhone Mirror icon.
- Connect your iPhone to the device's Wi-Fi network.
- On your iPhone, open Control Center and tap Screen Mirroring.
- Select the device (e.g., "SmartScreen") to complete screen mirroring.

Android Cast Link (for Android)
- On the screen, open the Android Cast option. A QR code will appear.
- Scan the QR code with your mobile browser to download the TCLink app.
- Turn on Bluetooth on your Android phone.
- In the TCLink app, select and connect to the device.

Screen Management
- Brightness Adjustment: The screen features auto-dimming that adjusts brightness based on ambient light. Manual adjustment is also available.
- Screen Saver: You can set the screen to automatically turn off after 10s, 30s, or 1 minute of inactivity to conserve power.


Maintenance
To ensure the longevity and optimal performance of your 25HOURS 10.26-inch Wireless CarPlay & Android Auto Screen, follow these maintenance guidelines:
- Cleaning: Use a soft, dry cloth to clean the screen and device exterior. Avoid abrasive cleaners or solvents that may damage the surface.
- Temperature: The device is designed to operate in temperatures from -4°F to 148°F (-20°C to 65°C). Avoid exposing it to extreme temperatures outside this range for prolonged periods.
- Storage: When not in use for extended periods, store the device in a cool, dry place away from direct sunlight.
- Cable Management: Ensure all cables are securely connected and not pinched or strained to prevent damage.

Troubleshooting
If you encounter issues with your device, refer to the following common troubleshooting steps:
- Device Not Powering On: Ensure the car charger is securely plugged into both the device and the vehicle's cigarette lighter socket. Check if the vehicle's power outlet is functioning.
- No Wireless CarPlay/Android Auto Connection: Verify that Bluetooth and Wi-Fi are enabled on your smartphone. Ensure the device is selected in your phone's Bluetooth settings. Try restarting both the device and your phone.
- No Audio Output: Check the selected audio output mode (Speaker, BT Audio, FM, AUX). If using FM, ensure the device and car radio are on the same frequency. If using AUX, ensure the cable is properly connected.
- Touchscreen Unresponsive: Restart the device. If the issue persists, perform a factory reset (refer to the Settings menu).
- Screen Mirroring Issues: For iOS, ensure your iPhone is connected to the device's Wi-Fi and AirPlay is selected. For Android, ensure the TCLink app is installed and connected via Bluetooth.
For further assistance, please contact customer support.
Specifications
| Feature | Specification |
|---|---|
| Brand | 25HOURS |
| Model Number | B0FKSCQZW2 |
| Screen Size | 10.26 inches |
| Resolution | 1600x600 |
| Connectivity Technology | Auxiliary, Bluetooth, Wi-Fi |
| Controller Type | iOS/Android, Touch |
| Special Features | Wireless Apple CarPlay, Wireless Android Auto, Mirror Link, GPS Navigation, Siri/Google Assistant Voice Control, FM Transmitter, Auto-dimming, Screen Saver |
| Compatible Devices | Smartphone |
| Power Input | 12V-32V (for various vehicles) |
| Audio Output Mode | Stereo (Built-in Speaker, Bluetooth, FM, AUX) |
| Operating Temperature | -4°F to 148°F (-20°C to 65°C) |
| Item Weight | 1 Grams |
Warranty Information
This product comes with a 1-year warranty from the date of purchase. The warranty covers manufacturing defects and malfunctions under normal use. It does not cover damage caused by misuse, accidents, unauthorized modifications, or improper installation.
Please retain your proof of purchase for warranty claims.
Customer Support
If you have any questions, require technical assistance, or need to make a warranty claim, please contact 25HOURS customer support through the retailer where you purchased the product or visit the official 25HOURS store on Amazon:
Visit the 25HOURS Store on Amazon
Please have your product model number (B0FKSCQZW2) and proof of purchase ready when contacting support.