1. Introduction
Thank you for choosing the VEVOR XSP-36-1000 Professional Binocular Compound Microscope. This manual provides essential information for the correct assembly, operation, and maintenance of your microscope. Please read these instructions carefully before use to ensure optimal performance and longevity of the instrument.
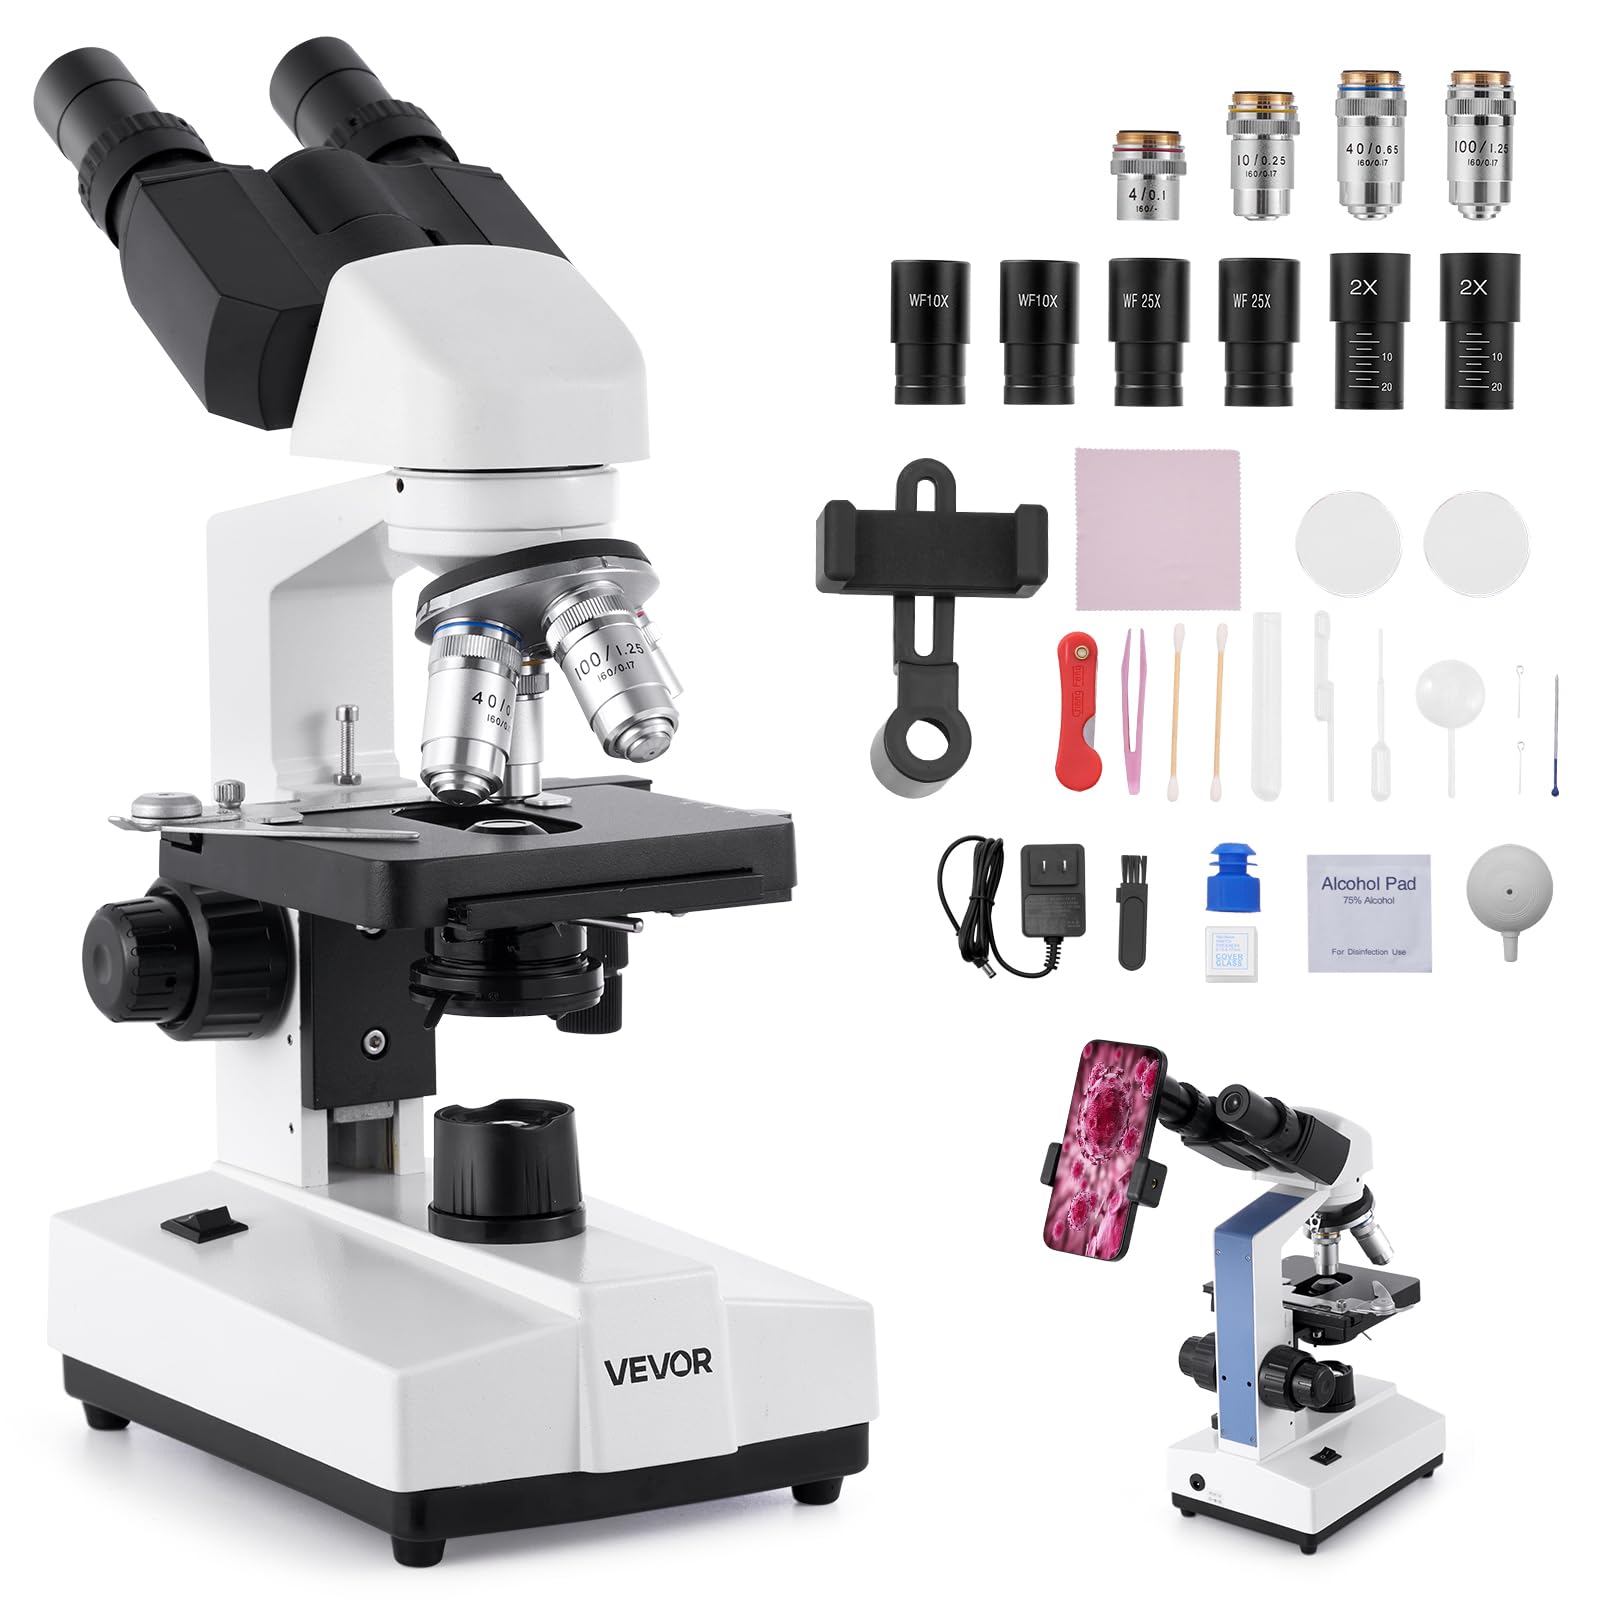
Image 1.1: VEVOR XSP-36-1000 Binocular Compound Microscope.
Key Features:
- Ultra-Clear Magnification: Offers a magnification range from 40X to 5000X with WF10X and WF25X eyepieces, and 4X/10X/40X/100X objective lenses.
- Dual Precision Focus: Equipped with 20mm coarse focus and 1.3mm fine focus for smooth and accurate adjustments.
- LED Illumination: Adjustable LED light source with a 1.25 NA condenser for optimal and controllable brightness.
- Achromatic Lenses 195: Professional-grade lenses and advanced infinity optical system reduce chromatic aberrations for clear images.
- User-Friendly Design: 360° rotatable binocular head, double-layer mechanical stage, and sturdy metal construction.
- Comprehensive Kit: Includes various accessories for scientific exploration and educational purposes.
2. What's in the Box
Carefully unpack all components and verify that all items listed below are present. If any items are missing or damaged, please contact customer support.

Image 2.1: All components included in the VEVOR XSP-36-1000 package.
- 1 x VEVOR XSP-36-1000 Binocular Microscope
- 1 x User Manual
- 1 x Phone Holder (PP Black)
- 100 x Cover Slats
- 5 x Prepared Slides
- 1 x Test Tube
- 1 x Petri Dish
- 1 x Standard Dropper
- 1 x Air Blower
- 1 x Lens Cloth
- 2 x Absorbent Paper
- 2 x Lens Cleaning Paper
- 1 x Alcohol Wipe
- 1 x Tweezers
- 3 x Cotton Swabs
- 1 x Dissection Needle
- 1 x Small Knife
- 1 x Brush
- 1 x Power Adapter (EU standard plug)
- 1 x Cedar Oil (for 100X objective lens)
3. Setup Instructions
- Unpacking: Carefully remove the microscope and all accessories from the packaging. Retain the packaging for future storage or transport.
- Placement: Place the microscope on a stable, level surface, away from direct sunlight, high temperatures, dust, and vibrations.
- Eyepiece Installation: Insert the desired eyepieces (WF10X or WF25X) into the binocular viewing tubes. If using the 2X Barlow lens, insert it into one of the eyepiece tubes before inserting the eyepiece.
- Objective Lens Installation: The objective lenses (4X, 10X, 40X, 100X) are typically pre-installed on the revolving nosepiece. Ensure they are securely screwed in.
- Power Connection: Connect the power adapter to the microscope's power input and then plug it into a standard AC 110-240V, 50/60Hz electrical outlet.
- Phone Holder Attachment (Optional): If using the phone holder, attach it to one of the eyepieces according to its specific instructions to prepare for capturing images or videos.
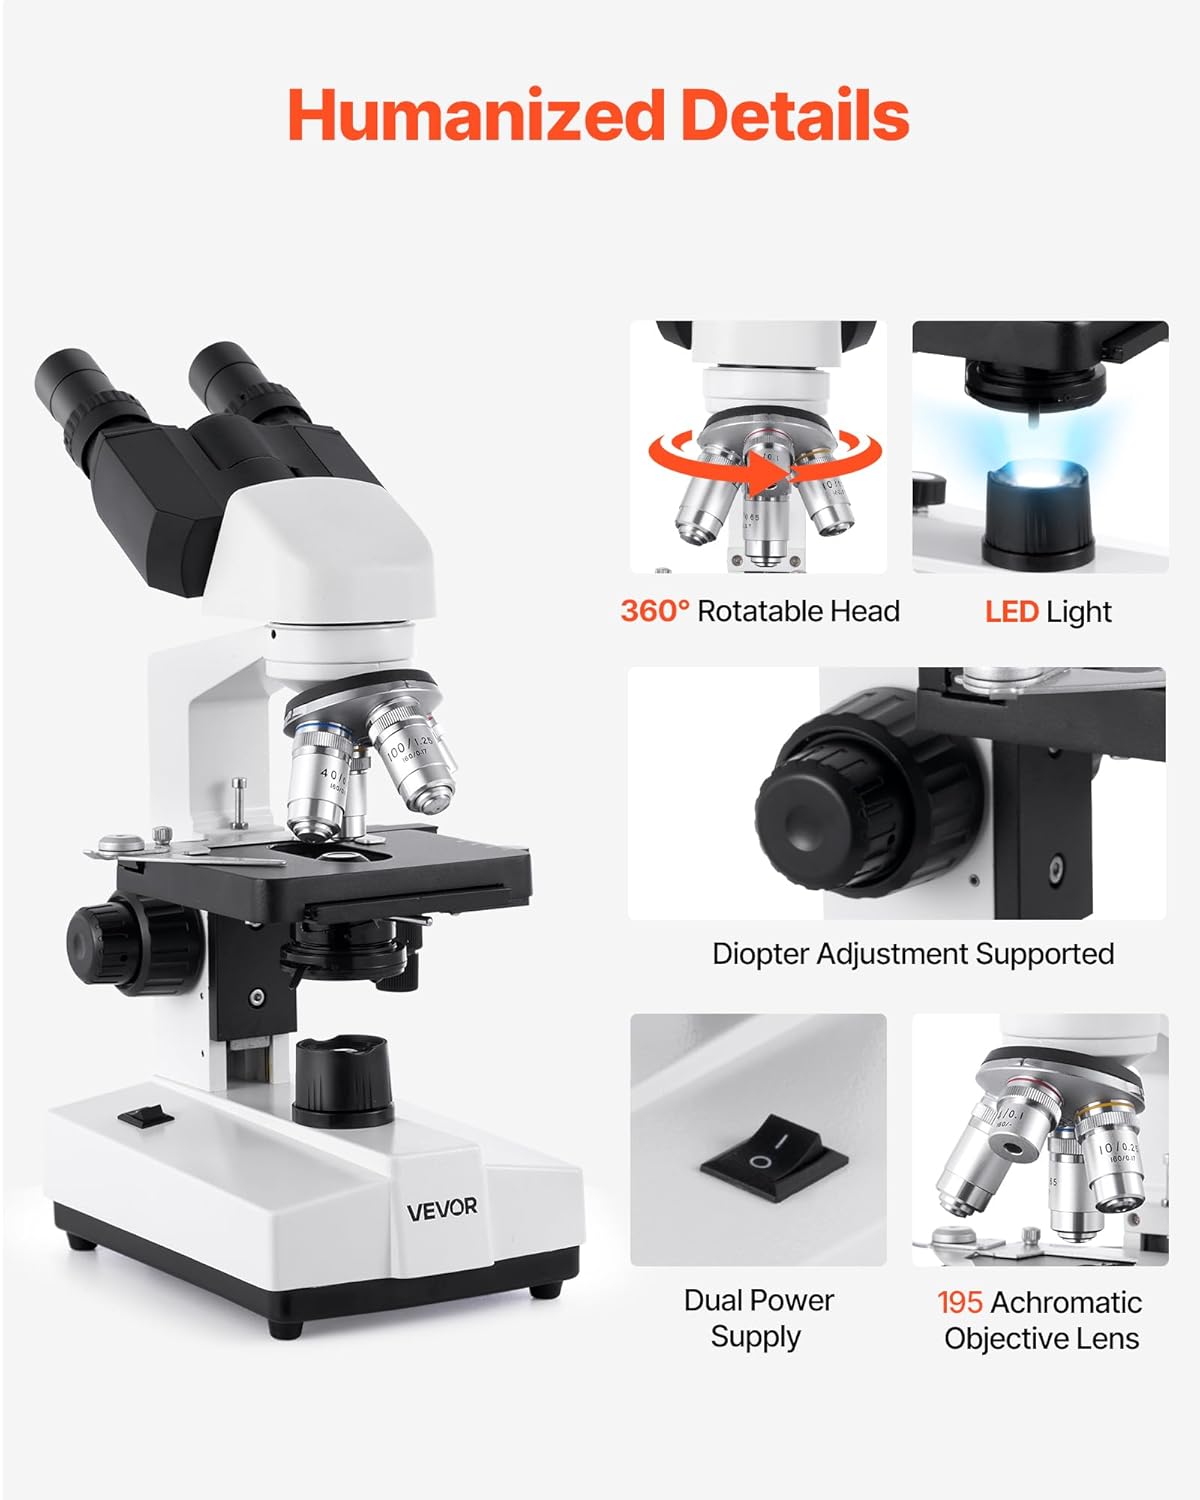
Image 3.1: Key components and features for setup and operation.
4. Operating Instructions
4.1 Powering On and Illumination
- Locate the power switch, usually on the base of the microscope, and turn it to the "ON" position.
- Adjust the LED light source brightness using the stepless dimming knob to achieve comfortable and clear illumination for your sample.
- The 1.25 NA condenser beneath the stage can be adjusted to optimize light focus and contrast. Use the iris diaphragm lever to control the amount of light reaching the specimen.

Image 4.1: LED lighting and condenser controls.
4.2 Preparing and Placing a Specimen
- Place a prepared slide or your own specimen on the mechanical stage.
- Use the stage clips to secure the slide in place.
- Adjust the X-Y stage control knobs to position the specimen directly under the objective lens.
4.3 Adjusting Magnification and Focusing
- Start with Low Magnification: Rotate the revolving nosepiece to select the lowest power objective lens (e.g., 4X). Ensure the objective clicks into place.
- Coarse Focus: While looking through the eyepieces, slowly turn the coarse focus knob (20mm range) to bring the specimen into approximate focus. Move the stage up until the specimen is almost touching the objective lens, then slowly lower it until the image appears.
- Fine Focus: Once the image is roughly focused, use the fine focus knob (1.3mm range) for precise focusing and to achieve a sharp, clear image.
- Adjusting Interpupillary Distance: Adjust the distance between the two eyepieces to match your eye spacing for comfortable binocular viewing.
- Diopter Adjustment: If one eye sees a sharper image than the other, use the diopter adjustment ring on one of the eyepiece tubes to compensate.
- Increasing Magnification: To increase magnification, rotate the revolving nosepiece to the next higher power objective (e.g., 10X, 40X). The microscope is parfocal, meaning the image should remain largely in focus, requiring only minor adjustments with the fine focus knob.
- Using 100X Objective (Oil Immersion): For the 100X objective, a drop of cedar oil must be placed directly on the specimen slide. Carefully lower the 100X objective into the oil. Focus using only the fine focus knob. Warning: Do not use the coarse focus knob with the 100X objective to avoid damaging the lens or slide.

Image 4.2: Coarse and fine focus adjustment knobs.

Image 4.3: Optical system adjustments for comfortable viewing.
5. Maintenance
5.1 Cleaning
- Lenses: Use the provided lens cloth or lens cleaning paper with a small amount of lens cleaning solution (or the alcohol wipe) to gently clean objective and eyepiece lenses. Never touch lens surfaces with your fingers.
- Microscope Body: Wipe the metal and plastic parts of the microscope with a soft, damp cloth. Avoid using harsh chemicals or abrasive cleaners.
- Oil Immersion Lenses: After using the 100X oil immersion objective, always clean the lens immediately with lens cleaning paper and cedar oil remover (if available) or a small amount of alcohol to prevent oil from drying on the lens.
5.2 Storage
- Always turn off the power and unplug the microscope after use.
- Rotate the nosepiece so the lowest power objective (e.g., 4X) is in position.
- Lower the stage completely.
- Cover the microscope with a dust cover (not included) or return it to its original packaging to protect it from dust and environmental factors.
- Store in a cool, dry place.
6. Troubleshooting
| Problem | Possible Cause | Solution |
|---|---|---|
| No illumination | Power switch off, power cord disconnected, LED bulb failure. | Ensure power switch is ON. Check power cord connection. If problem persists, contact customer support. |
| Image is blurry or out of focus | Incorrect focusing, objective lens not clicked into place, dirty lenses, specimen not flat. | Use coarse and fine focus knobs. Ensure objective lens is fully rotated. Clean lenses. Ensure specimen slide is flat on the stage. |
| Dark field or insufficient light | Iris diaphragm closed, condenser too low, light intensity too low. | Open iris diaphragm. Adjust condenser height. Increase LED brightness. |
| Specks or dust in the field of view | Dust on eyepiece, objective lens, or specimen slide. | Clean eyepieces, objective lenses, and specimen slides using appropriate cleaning materials. Use an air blower to remove loose dust. |
| Difficulty with high magnification (e.g., 100X) | Incorrect use of immersion oil, coarse focus used, specimen too thick. | Ensure immersion oil is applied correctly for the 100X objective. Only use fine focus with 100X. Use thinner specimens or prepared slides. |
| Image appears mirrored | This is a characteristic of some optical systems and is generally not a malfunction. | No action required. Users should adapt to this viewing orientation. |
7. Specifications
| Feature | Detail |
|---|---|
| Model Number | XSP-36-1000 |
| Magnification Range | 40X - 5000X |
| Eyepieces | WF10X, WF25X (2 sets) |
| Objective Lenses | 4X, 10X, 40X, 100X (Achromatic, 195) |
| Viewing Head | Binocular, 360° Rotatable, 30° Tilt |
| Focus Adjustment | Coarse (20mm), Fine (1.3mm) |
| Illumination | Adjustable LED Lighting |
| Condenser | 1.25 NA with Iris Diaphragm |
| Stage | Double-layer Mechanical Stage, 115 x 125 mm, Stroke: 72 x 30 mm |
| Power Parameters | Input: AC 110-240V, 50/60Hz; Output: DC 5V/2A |
| Main Material | Aluminum Alloy, Optical-Grade Glass |
| Product Dimensions | 200 x 140 x 345 mm (7.9 x 5.5 x 13.6 inches) |
| Net Weight | 3.04 kg (6.7 lb) |
8. Warranty and Support
Specific warranty information for the VEVOR XSP-36-1000 microscope is not provided in this manual. For details regarding warranty coverage, technical support, or service, please refer to the warranty card included with your product or contact VEVOR customer service directly through their official website or the retailer where the product was purchased.
Please have your model number (XSP-36-1000) and purchase date available when contacting support.