1. Important Safety Instructions
Always read and understand all instructions before operating the device. Failure to follow these instructions may result in electric shock, fire, or serious injury.
- Eye Protection: Always wear appropriate eye protection (safety goggles) to shield against flying debris during operation.
- Hand Protection: Keep hands clear of moving parts, especially the saw blade and grinding wheels. Use push sticks or clamps when necessary.
- Stable Work Surface: Ensure the saw is placed on a stable, level, and non-slip surface to prevent tipping or movement during use.
- Ventilation: Operate the saw in a well-ventilated area to avoid inhaling dust or fumes.
- Power Disconnection: Disconnect the power supply before changing accessories, performing maintenance, or when the tool is not in use.
- Soft-Start Feature: The saw features a soft-start function to prevent sudden acceleration. Always activate it via the control knob.
- Blade Guard: Ensure the blade guard is properly installed and functional before each use.
- Water Management: Utilize the integrated sink for wet cutting operations to manage debris and cool blades.
- Not a Woodworking Table Saw: This lapidary saw is designed for light-duty tasks and is not a substitute for a dedicated woodworking table saw. It does not include a riving knife.
2. Product Overview
The Flyrivergo WYS-5-1 Mini Lapidary Table Saw and Polisher is a versatile and compact tool designed for precision cutting, grinding, and polishing of various materials. Its adjustable speed motor and extensive accessory set make it ideal for DIY enthusiasts and crafters.
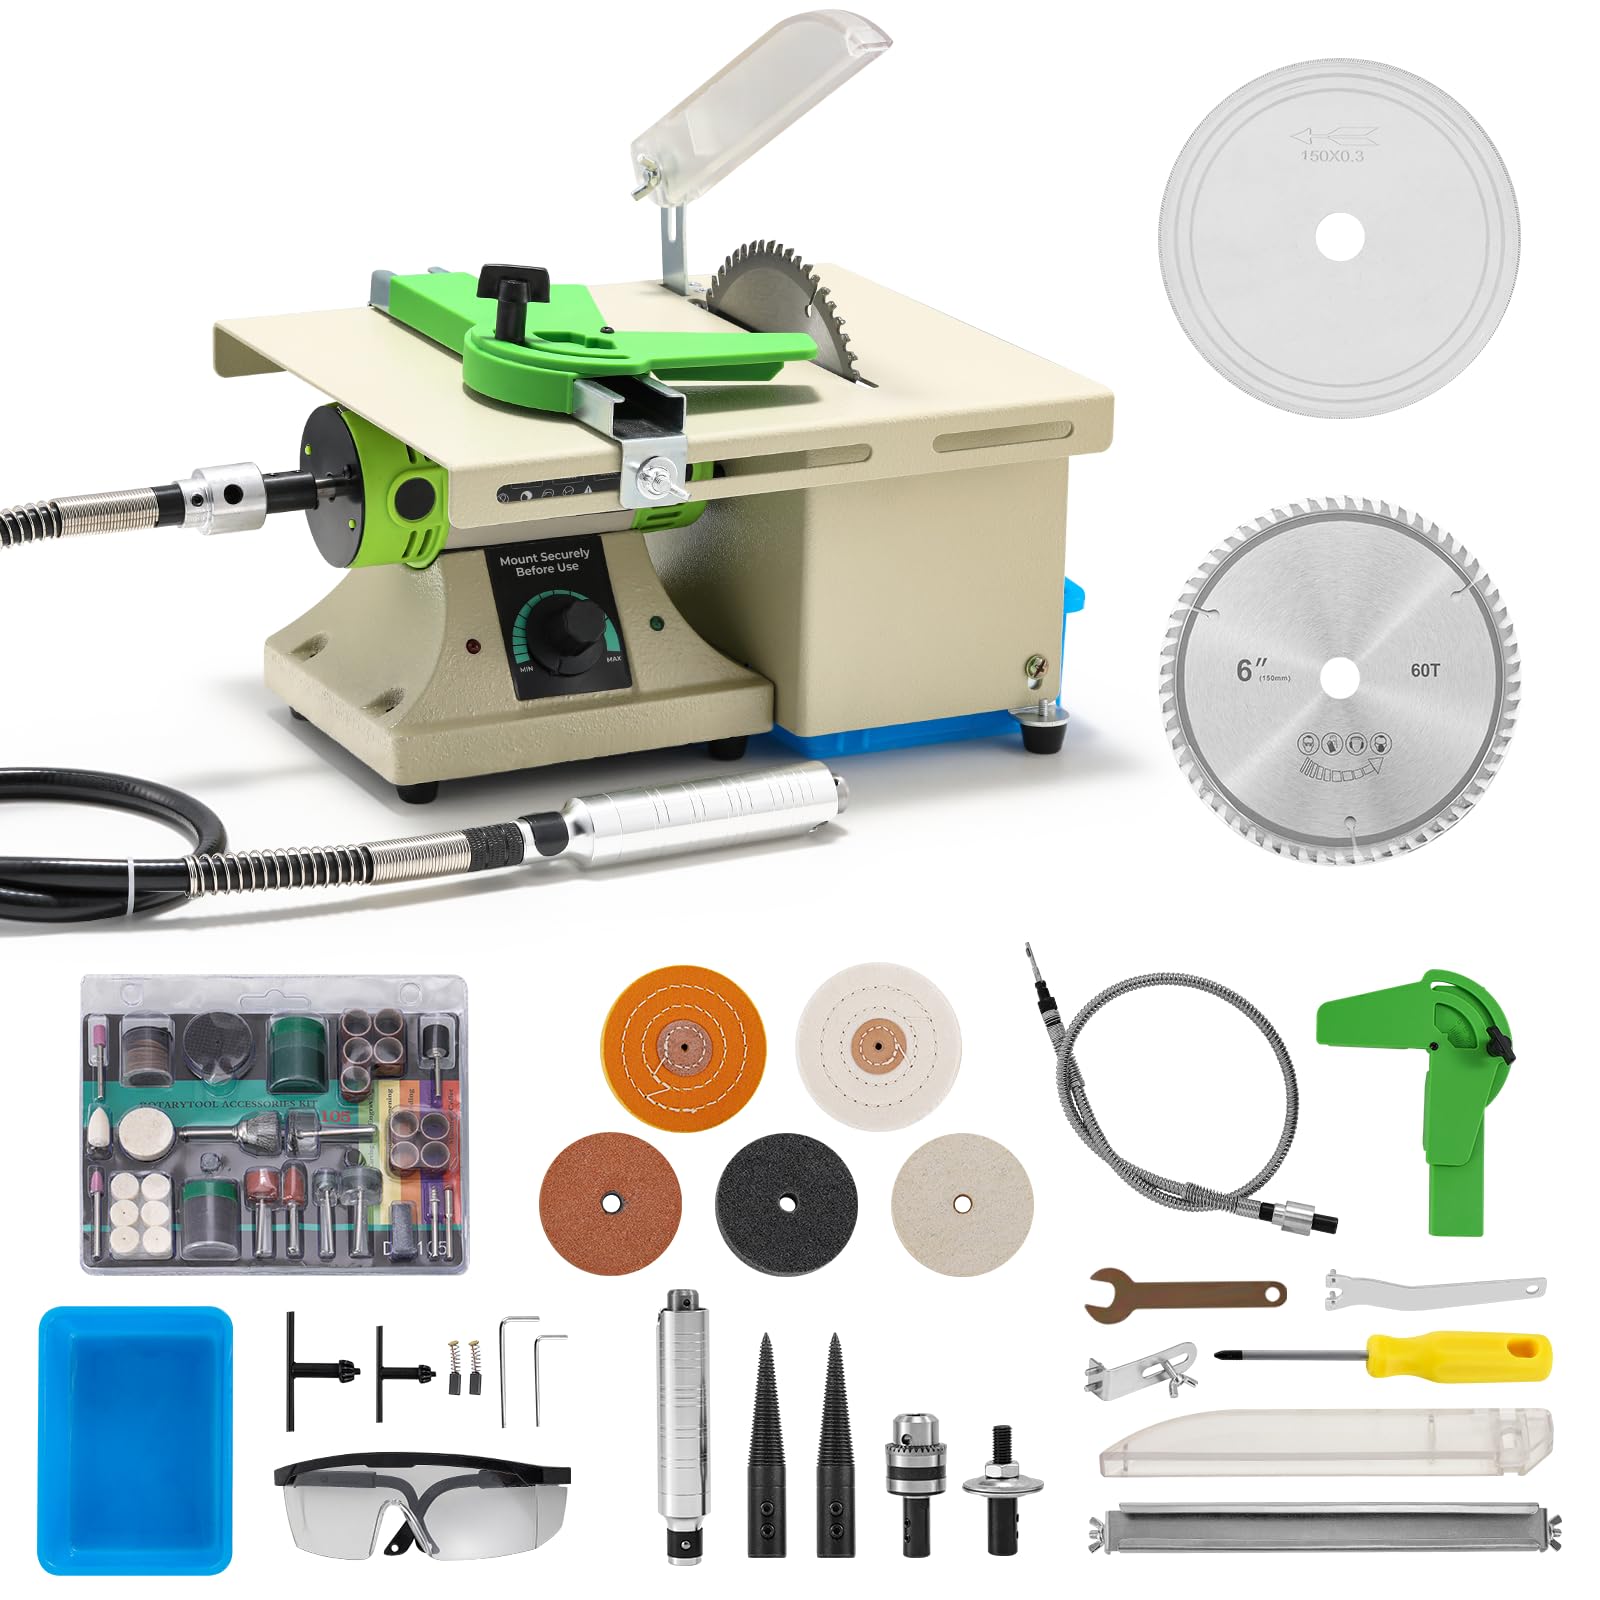
Image: The Flyrivergo WYS-5-1 Mini Lapidary Table Saw and Polisher, showcasing its compact design and various functions.
Key Features:
- Adjustable Speed: High-quality motor with adjustable speed up to 10,000 RPM for various polishing and cutting needs.
- Safety Design: Features a soft-start function, blade guard, sink, detachable slide rail, and safety goggles for secure operation.
- Versatile & Compact: Combines bench buffer and table saw functions, suitable for jade, wood, beeswax, and other materials. Includes a flexible shaft for detailed work.
- Extensive Accessories: Comes with a complete set of accessories for immediate use, including flexible shaft, drill chuck, polishing rods, and various polishing wheels.

Image: Hands demonstrating precision small-part cutting on the lapidary saw, highlighting its suitability for DIY tasks.
The compact body ensures stability and does not occupy excessive workspace, making it an excellent choice for hobbyists.
3. Setup and Assembly
Follow these steps to correctly assemble your mini lapidary table saw and attach accessories.
3.1 Installing the Rip Fence and Angle Ruler
- Fix the rip fence to the tabletop using the provided butterfly screws. Ensure it is securely fastened.
- Attach the angle ruler to the rip fence. Adjust the angle as needed for your cutting requirements and fix it in place.
Video: Detailed instructions on how to install the rip fence, angle ruler, and dust cover on the table saw. This video demonstrates the assembly process for various components.
3.2 Attaching the Dust Cover
- Position the dust cover over the saw blade area.
- Fix the dust cover to the tabletop using the two self-tapping screws provided.
3.3 Installing the Wood Cutting Disc
- Disassemble the pre-assembled washer from the motor shaft.
- Carefully place the wood cutting disc onto the motor shaft.
- Fix the wood cutting disc with the removed washer and tighten it securely using the spanner wrench.
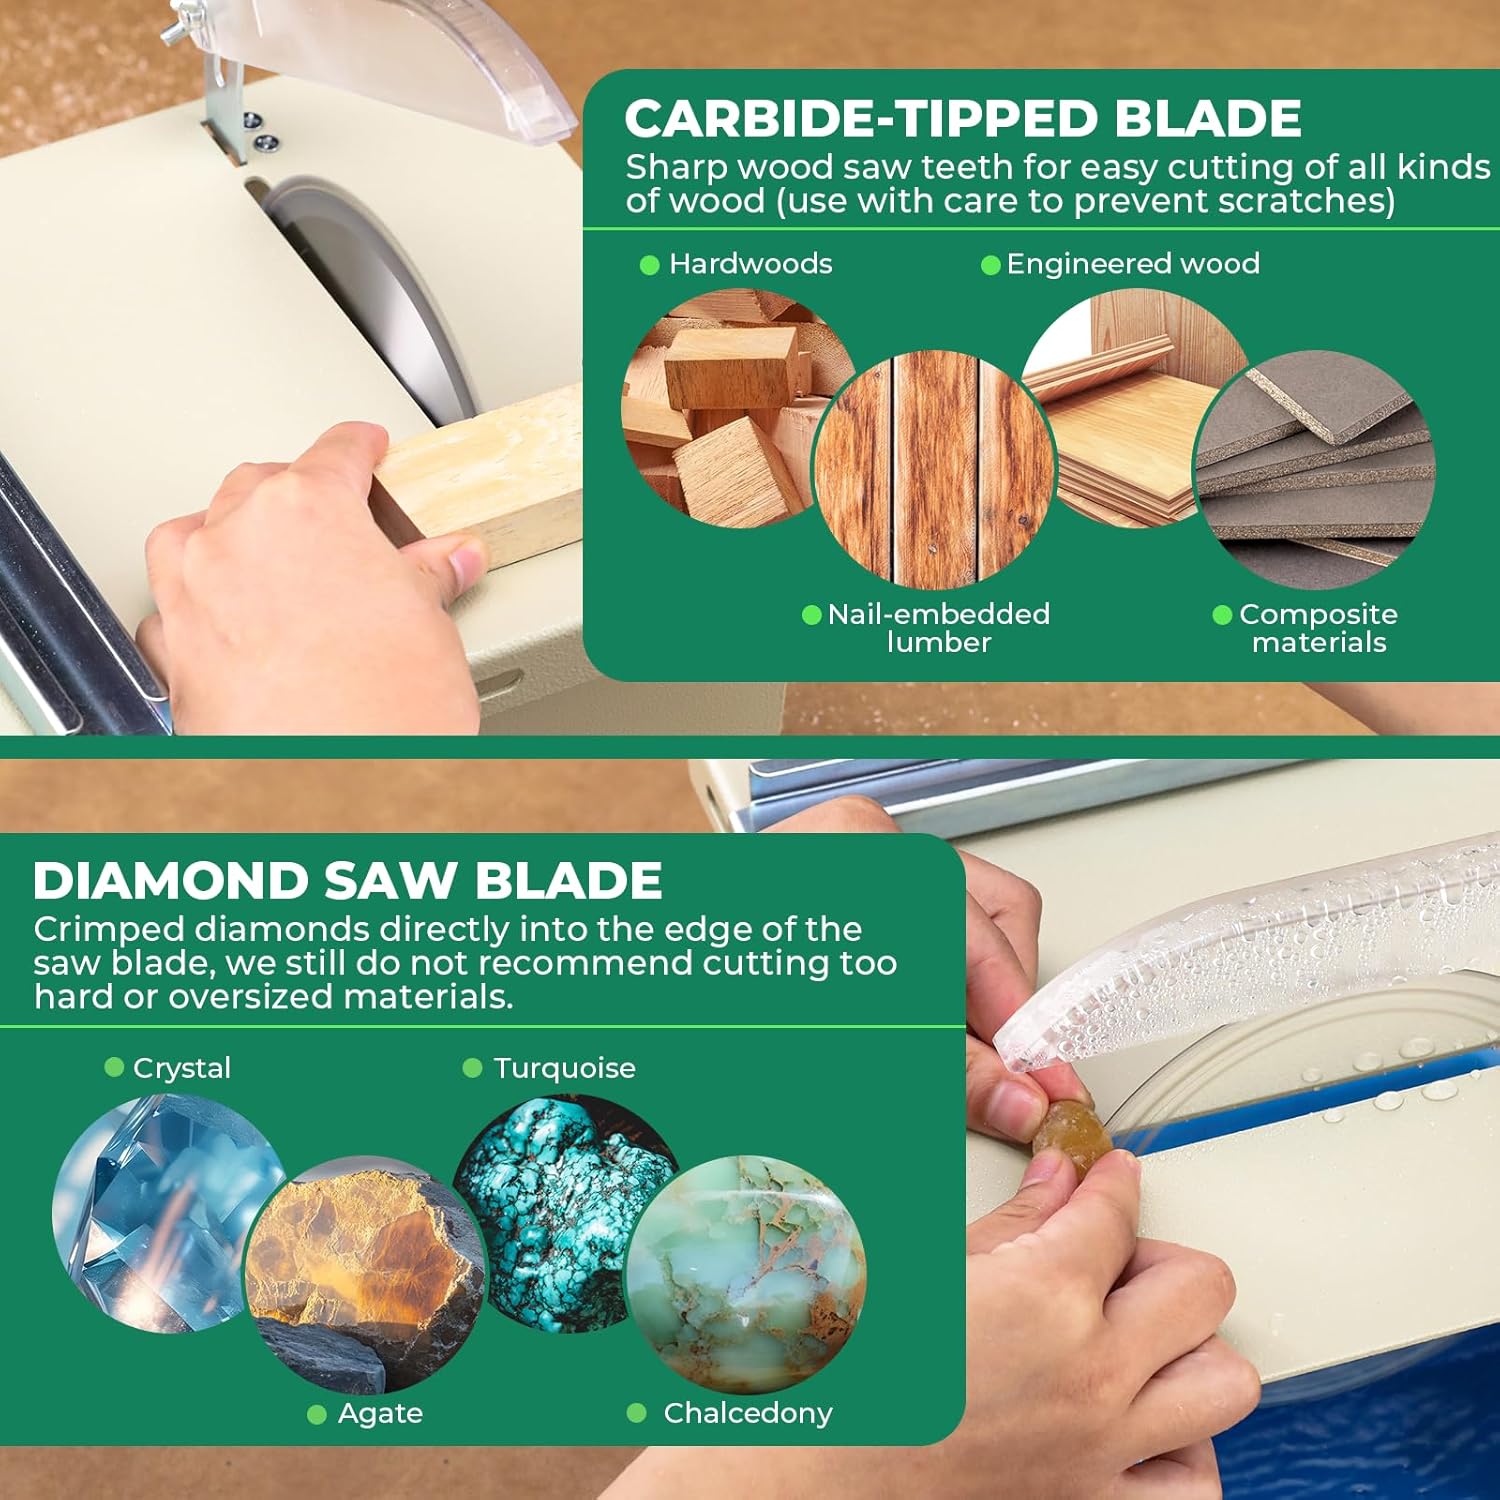
Image: Illustration of different blade types: carbide-tipped for wood (hardwoods, engineered wood, nail-embedded lumber, composite materials) and diamond saw blade for stone (crystal, turquoise, agate, chalcedony).
3.4 Installing the Abrasive Grinding Wheel
- Install the abrasive grinding wheel shaft to the left motor shaft.
- Install the abrasive grinding wheel, followed by two washers and the screw (originally fixed on the wheel shaft) in order.
- Tighten the screw with the spanner wrench to secure the grinding wheel.
Video: Demonstration of installing a saw vise accessory, which can be adapted for similar setup procedures on this device.
3.5 Connecting the Flexible Shaft
The flexible shaft can be attached to the motor for precise, detailed work or hard-to-reach areas. Ensure it is securely connected before use.

Image: A variety of accessories including grinding wheel, fiber wheel, cotton wheel, rigid cotton wheel, drill chuck, and flexible shaft, illustrating the tool's versatility.
4. Operating Instructions
This section details how to operate your Flyrivergo WYS-5-1 for various tasks.
4.1 Powering On and Speed Adjustment
- Connect the power adapter to the saw and then to a power outlet.
- Turn on the main power switch.
- Adjust the speed knob to select the desired RPM (up to 10,000 RPM). The soft-start function will prevent sudden acceleration.

Image: A hand adjusting the speed control knob, illustrating the soft-start acceleration feature for safe operation.
4.2 Cutting Operations
Use the table saw function for precise cuts on materials like wood, stone, and jade.
- Ensure the appropriate blade (carbide-tipped for wood, diamond for stone/gem) is installed.
- Adjust the rip fence and angle ruler for accurate measurements and cuts.
- Slowly feed the material into the blade, maintaining a firm grip.
4.3 Grinding and Polishing
Utilize the grinding wheel and various polishing wheels for finishing tasks.
- Attach the desired grinding or polishing wheel to the left motor shaft.
- Apply gentle pressure to the material against the rotating wheel.
- For rust removal, sanding, or carving, attach the flexible shaft and the corresponding accessory.
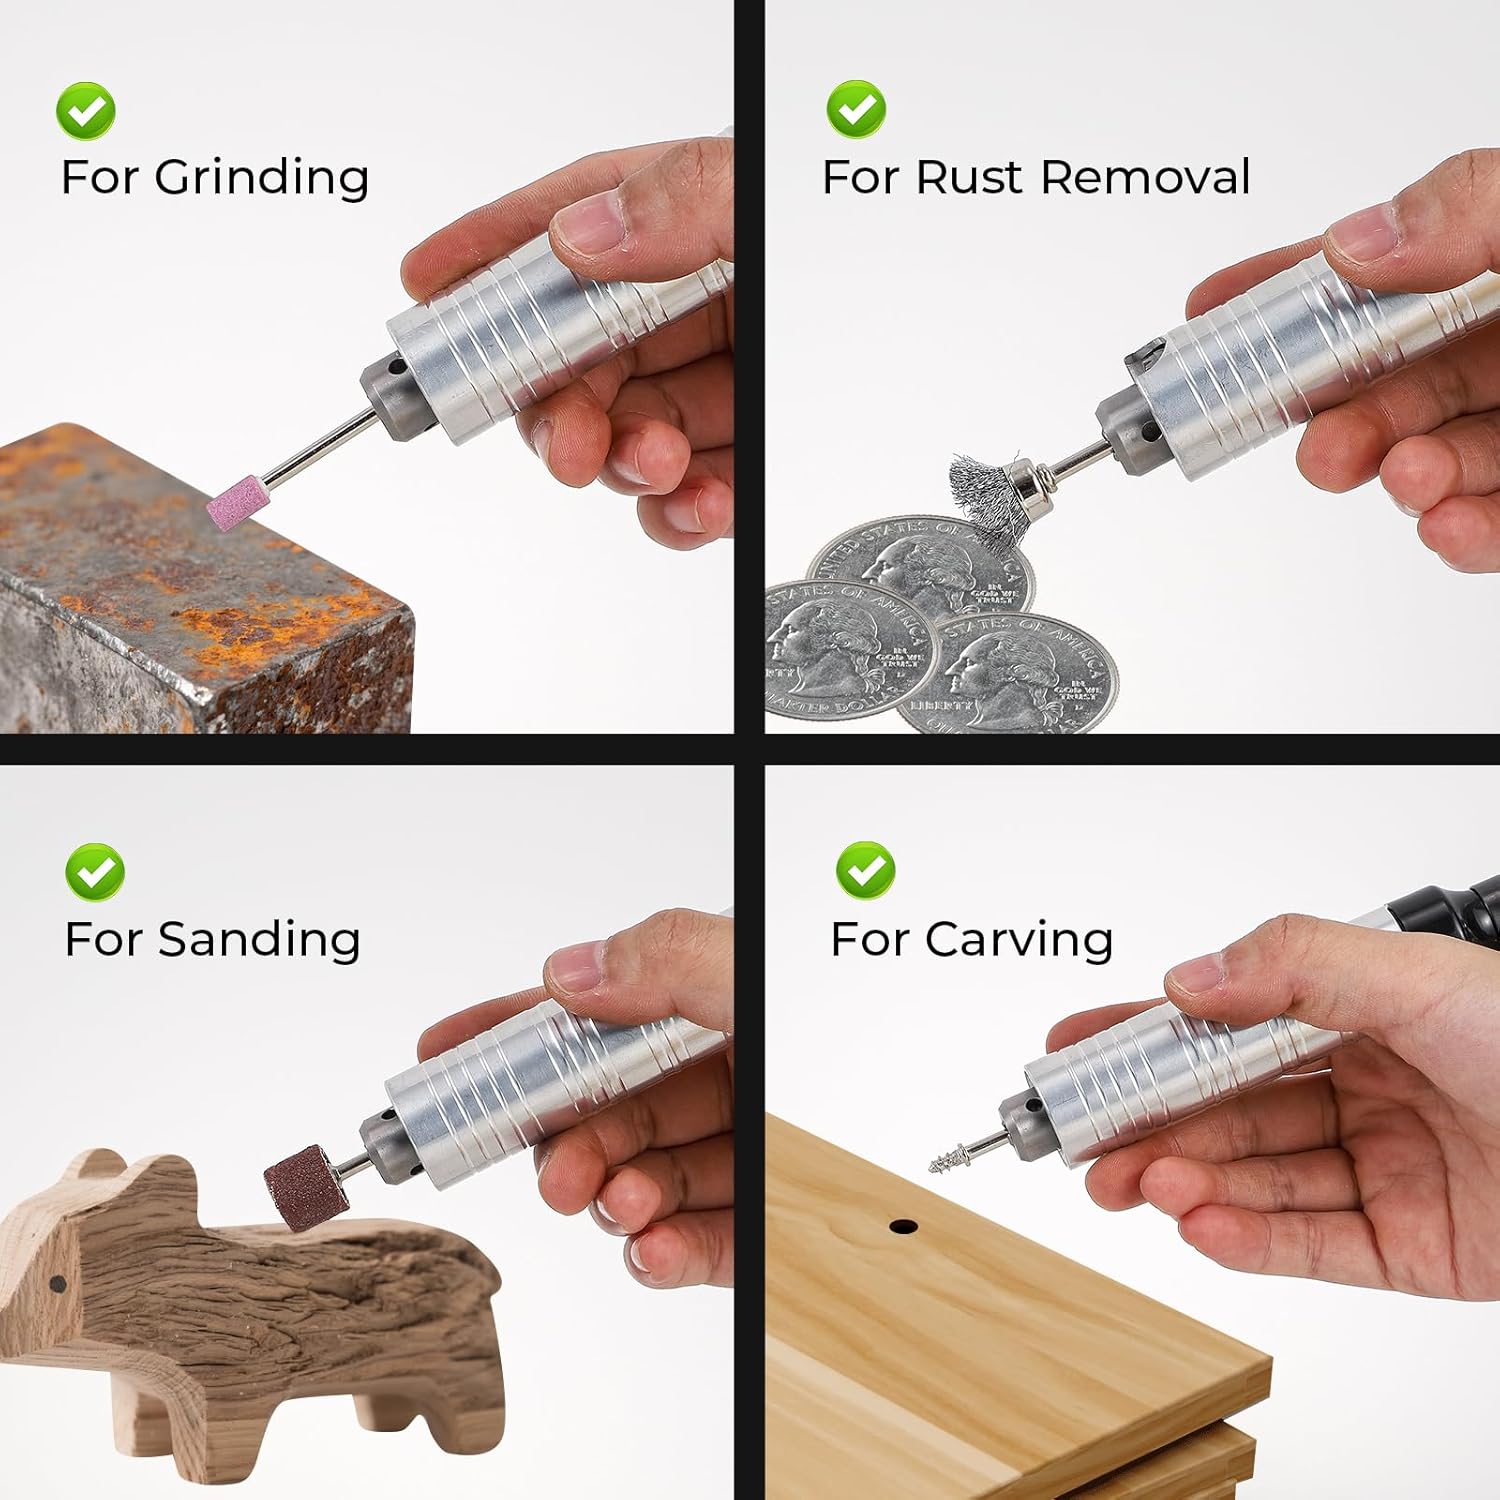
Image: Demonstrations of the flexible shaft being used for grinding, rust removal, sanding, and carving on various materials.
Video: A bench buffer polisher in action, demonstrating how to polish a metal object using a polishing wheel. This video highlights the polishing capabilities of the device.
5. Maintenance
Regular maintenance ensures the longevity and optimal performance of your tool.
- Cleaning: After each use, clean the saw and accessories to remove dust and debris. Use a soft cloth and mild detergent if necessary.
- Blade Inspection: Regularly inspect saw blades and grinding wheels for wear or damage. Replace worn blades promptly to ensure efficient and safe operation.
- Lubrication: Apply light machine oil to moving parts as needed to ensure smooth operation.
- Storage: Store the tool and its accessories in a dry, clean place, away from direct sunlight and moisture.
6. Troubleshooting
If you encounter issues with your Flyrivergo WYS-5-1, refer to the following common troubleshooting tips:
- Tool Not Starting: Check if the power adapter is securely connected to both the saw and the power outlet. Ensure the main power switch is in the 'ON' position.
- Reduced Performance: Inspect the blades or grinding wheels for wear. Replace them if dull or damaged. Ensure the speed setting is appropriate for the task.
- Excessive Vibration: Check that all accessories are securely fastened and that the saw is on a stable surface.
- Unusual Noise: Disconnect power and inspect for any loose parts or obstructions. If the noise persists, contact customer support.
7. Specifications
| Feature | Specification |
|---|---|
| Brand | Flyrivergo |
| Model Number | WYS-5-1 |
| Power Source | Corded Electric |
| Voltage | 110 Volts |
| Wattage | 750 watts |
| Speed | 10000 RPM |
| Product Dimensions | 27L x 22W x 14.2H Centimetres |
| Item Weight | 6.99 kg |
| Blade Material | Alloy Steel |
| Surface Recommendation | Wood, stone, jade |
| Special Feature | Upgraded motor |
| Included Components | Rock saw, saw blades, polishing wheels and other accessories |
8. Warranty and Support
For warranty information or technical support, please contact Flyrivergo customer service through your purchase platform or the official website. Keep your purchase receipt as proof of purchase.


