1. Introduction
Thank you for choosing the PetCove Wireless Dog Fence System & Remote Training Collar. This 2-in-1 system is designed to provide a safe and effective way to train your dogs and establish boundaries without the need for physical wires. It combines the functionality of a wireless containment system with a remote training collar, offering flexibility and control over your pet's behavior. Please read this manual thoroughly before use to ensure proper setup, operation, and the safety of your pet.
2. Package Contents
Before you begin, please verify that all items listed below are included in your package:
- 1 x Wireless Transmitter Unit
- 2 x Receiver Collars (for 2 dogs)
- 2 x Adjustable Receiver Collars (straps)
- 2 x Sets of Safety Silicone Caps (short and long prongs)
- 10 x Training Flags (5 Yellow, 5 White)
- 1 x USB Charging Cable
- 1 x User Manual (this document)
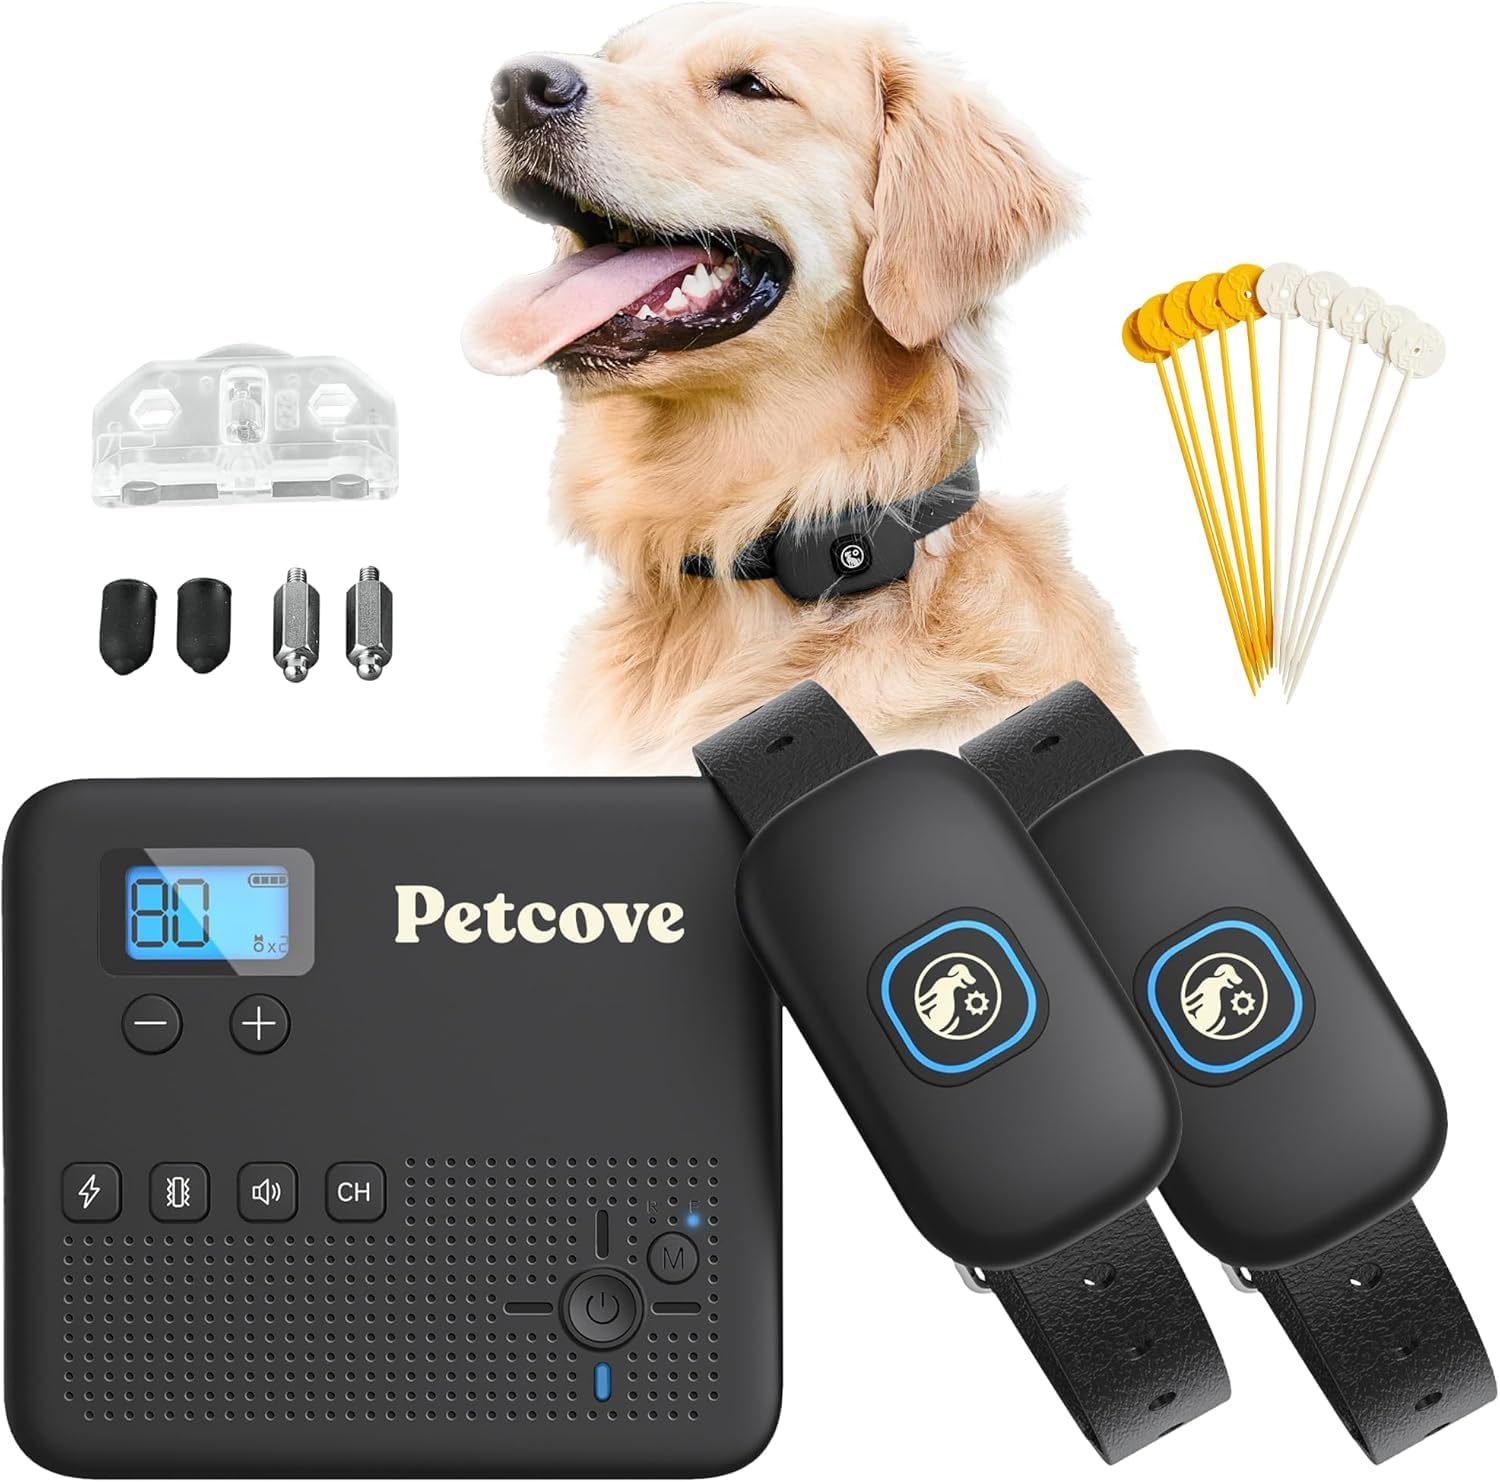
Figure 2.1: All components included in the PetCove Wireless Dog Fence System package.
3. Product Overview
Familiarize yourself with the main components of your PetCove system:
3.1. Transmitter Unit
The transmitter creates the wireless boundary and controls the training modes.

Figure 3.1: Detailed view of the Transmitter and Receiver components.
- Display Window: Shows current settings and signal strength.
- Increase/Decrease Buttons (+/-): Adjusts correction levels and boundary range.
- Channel Button (CH): Switches between different channels for multiple collars.
- Correction Buttons: Separate buttons for Buzz, Vibrate, and Beep corrections.
- LED Mode Indicators: Lights indicating active modes.
- Mode Button: Toggles between Wireless Fence and Remote Training modes.
- Power Button: Turns the unit on/off.
3.2. Receiver Collar
The receiver collar is worn by your dog and delivers the corrections.
- Power Button + LED Indicator: Turns the collar on/off and shows status.
- Contact Points: Deliver static correction (optional, use with silicone caps).
- Adjustable Collar Strap: Fits neck sizes from 7 inches to 26.7 inches.
4. Setup Guide
4.1. Charging the Devices
Ensure both the transmitter and receiver collars are fully charged before first use. The collars feature long-lasting batteries, providing up to 10 days of use per charge.
- Connect the USB charging cable to the charging ports on the transmitter and receiver collars.
- Plug the other end into a standard USB power adapter (not included).
- An indicator light will show charging status and turn off when fully charged.
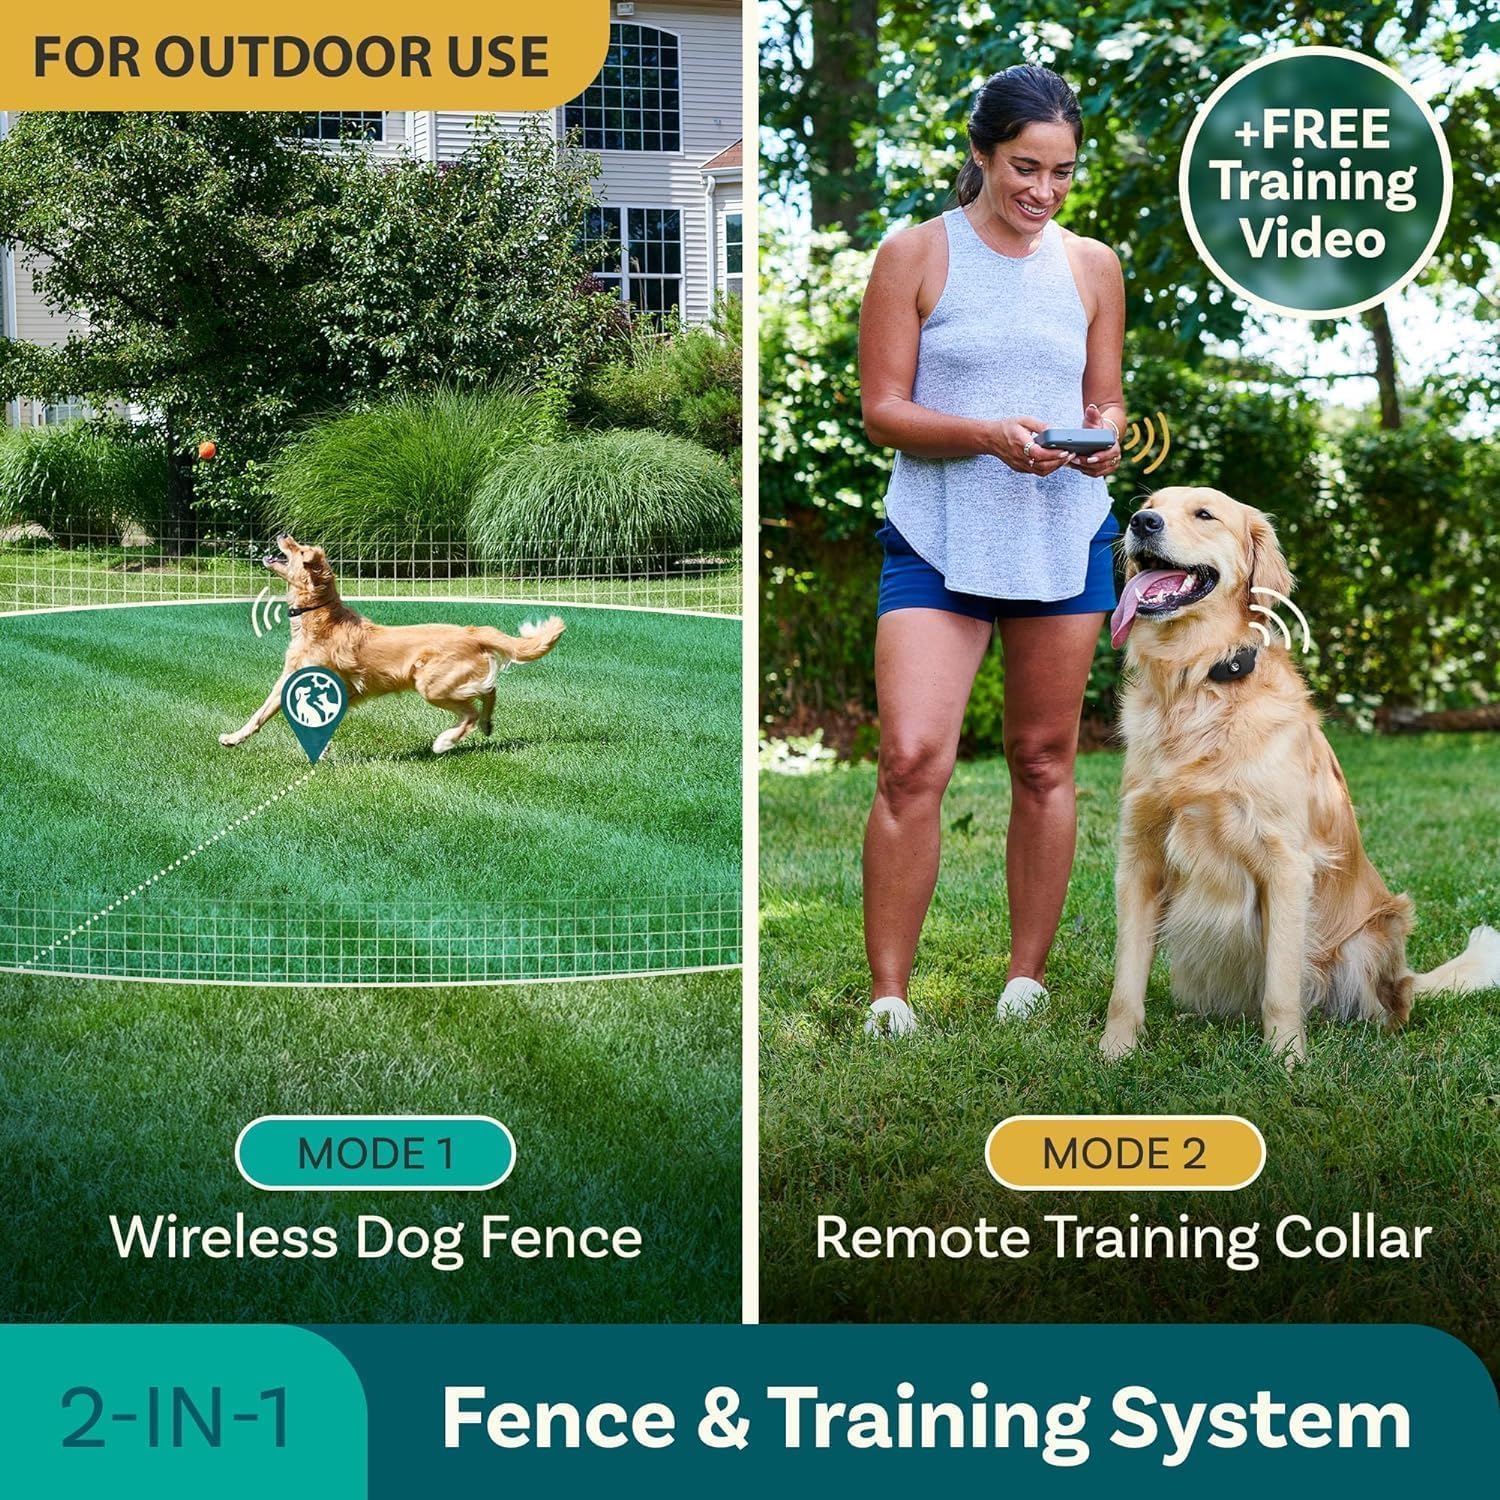
Figure 4.1: The PetCove collar features a long-lasting battery and IPX7 waterproof design.
4.2. Fitting the Receiver Collar
Proper collar fit is crucial for effective and humane operation. The collar is designed to fit all neck sizes from 7 inches to 26.7 inches.
- Place the receiver collar around your dog's neck, ensuring the contact points are positioned beneath the neck.
- Adjust the strap so that it is snug but not too tight. You should be able to fit two fingers comfortably between the collar and your dog's neck.
- For dogs with long or thick fur, you may need to trim the fur around the contact points to ensure proper skin contact.
- Use the included safety silicone caps over the contact points if you are using the static correction feature, especially for sensitive dogs, to reduce intensity and protect the skin.

Figure 4.2: The adjustable collar ensures a comfortable and secure fit for various dog sizes.
4.3. Transmitter Placement and Boundary Setup
The transmitter creates a circular wireless boundary. Optimal placement is key for consistent performance.
- Place the transmitter in a central location within the desired containment area, preferably indoors and away from large metal objects or strong electromagnetic interference.
- The system provides a signal range of up to a 500 ft radius (1000 ft diameter).
- Adjust the range setting on the transmitter to define the size of your wireless fence. Start with a smaller range and gradually increase it as needed.
- Use the included training flags to visually mark the boundary for your dog during the initial training phase. Place them at regular intervals around the perimeter.

Figure 4.3: The transmitter allows for custom control of training modes and signal range.
5. Operation
The PetCove system offers two primary modes of operation:
5.1. Wireless Dog Fence Mode
In this mode, the system creates an invisible boundary. When your dog approaches the boundary, the collar will emit a warning tone, followed by vibration, and then static correction (if enabled) to encourage them to return to the safe zone.
- Turn on the transmitter and receiver collar(s).
- Ensure the transmitter is set to Wireless Fence Mode (refer to the display).
- Adjust the boundary range using the +/- buttons on the transmitter.
- The collar will activate when your dog crosses the set boundary.
5.2. Remote Training Collar Mode
This mode allows you to manually deliver corrections to your dog using the handheld transmitter, useful for obedience training or correcting specific behaviors within or outside the fence boundary.
- Turn on the transmitter and receiver collar(s).
- Press the Mode button on the transmitter to switch to Remote Training Collar Mode.
- Select the desired correction type (Buzz, Vibrate, Beep) using the dedicated buttons.
- Adjust the intensity level for each correction type using the +/- buttons.
- Press the corresponding correction button to deliver the command to your dog.

Figure 5.1: The PetCove system offers both wireless fence and remote training functionalities.
6. Training Guidelines
Effective training requires patience, consistency, and positive reinforcement. Always prioritize your dog's well-being.
- Start with Visual Cues: Begin by walking your dog on a leash around the marked boundary (using training flags). When they approach the boundary, give a verbal command like "Stay" or "Boundary" before the collar activates.
- Introduce Corrections Gradually: Start with the lowest correction level (tone or vibration) and only increase if necessary. The goal is to get your dog's attention, not to cause distress.
- Positive Reinforcement: Always praise and reward your dog when they respond correctly and stay within the boundary or return to the safe zone.
- Short, Frequent Sessions: Conduct several short training sessions (10-15 minutes) throughout the day rather than one long session.
- Supervision is Key: Never leave your dog unsupervised with the collar on, especially during the initial training phase.
- Consistency: Ensure all family members understand and follow the same training protocols.
For additional guidance, refer to the free training video mentioned in the product description, which can provide visual demonstrations of effective training techniques.
7. Maintenance
Proper maintenance will extend the life and performance of your PetCove system.
- Cleaning: Regularly clean the receiver collar and contact points with a damp cloth. Ensure no dirt or debris accumulates around the contact points, as this can affect performance.
- Collar Inspection: Periodically check the collar strap for wear and tear. Replace if damaged.
- Battery Care: Avoid fully discharging the batteries frequently. Charge them regularly, even if not in constant use, to maintain battery health.
- Storage: When not in use for extended periods, store the system in a cool, dry place.
- Waterproof Rating: The receiver collar is IPX7 waterproof, meaning it can withstand submersion in up to 1 meter of water for 30 minutes. However, it is not recommended for prolonged swimming or diving. The transmitter is not waterproof and should be kept dry.
8. Troubleshooting
If you encounter issues with your PetCove system, please refer to the following common problems and solutions:
| Problem | Possible Cause | Solution |
|---|---|---|
| Collar not responding to transmitter. | Low battery; Collar or transmitter off; Out of range; Interference. | Charge devices; Turn on both units; Move closer to transmitter; Check for large metal objects or strong Wi-Fi signals nearby. |
| Inconsistent boundary. | Transmitter placement; Environmental interference; Battery low. | Relocate transmitter to a more central or open area; Charge devices; Avoid placing near large metal structures. |
| Collar not delivering correction. | Poor contact with skin; Correction level too low; Battery low. | Adjust collar fit; Ensure contact points touch skin (trim fur if needed); Increase correction level; Charge collar. |
| Dog not responding to correction. | Correction level too low; Dog not trained to system. | Increase correction level gradually; Revisit training guidelines and conduct more training sessions. |
If problems persist after attempting these solutions, please contact PetCove customer support for further assistance.
9. Specifications
| Feature | Detail |
|---|---|
| Model Number | PC-PWGRD2-BLK |
| Brand | PetCove |
| Item Weight | 8.8 ounces (total package) |
| Product Dimensions (Transmitter) | Approx. 8"L x 2.24"W x 8.5"H |
| Material | Plastic |
| Color | Black |
| Wireless Frequency | 2.4GHz (Non-GPS) |
| Max. Boundary Range | 500 ft Radius / 1000 ft Diameter |
| Collar Neck Size | 7 in. to 26.7 in. |
| Waterproof Rating (Receiver) | IPX7 |
| Battery Life (Collars) | Up to 10 days per charge |
| Correction Modes | Buzz, Vibrate, Beep, Static (adjustable levels) |
10. Warranty & Support
PetCove stands behind the quality of its products. This Wireless Dog Fence System & Remote Training Collar comes with a Lifetime Warranty.
For warranty claims, technical support, or any questions regarding your product, please contact PetCove customer service through the following channels:
- Website: Visit the official PetCove website for FAQs and support resources.
- Email: Refer to your product packaging or the PetCove website for customer support email address.
- Phone: Check the PetCove website for available phone support numbers.
Please have your model number (PC-PWGRD2-BLK) and purchase information ready when contacting support.