1. Introduction
The SCULPFUN H1 Auto Heat Press Machine is designed for efficient and precise heat transfer applications on various materials. Featuring an innovative upward pressure mechanism, it ensures uniform heat and pressure distribution for optimal results across different projects, including DTF, HTV, Sublimation, and Vinyl transfers.
This manual provides essential information for setting up, operating, maintaining, and troubleshooting your SCULPFUN H1 machine to ensure safe and effective use.
2. Product Overview
The SCULPFUN H1 features a 15x15 inch heating plate, capable of reaching 180°C (356°F) in just 7 minutes. It offers adjustable pressure up to 80kg (176lb) with three preset levels, and an intuitive control panel for precise temperature and time settings.
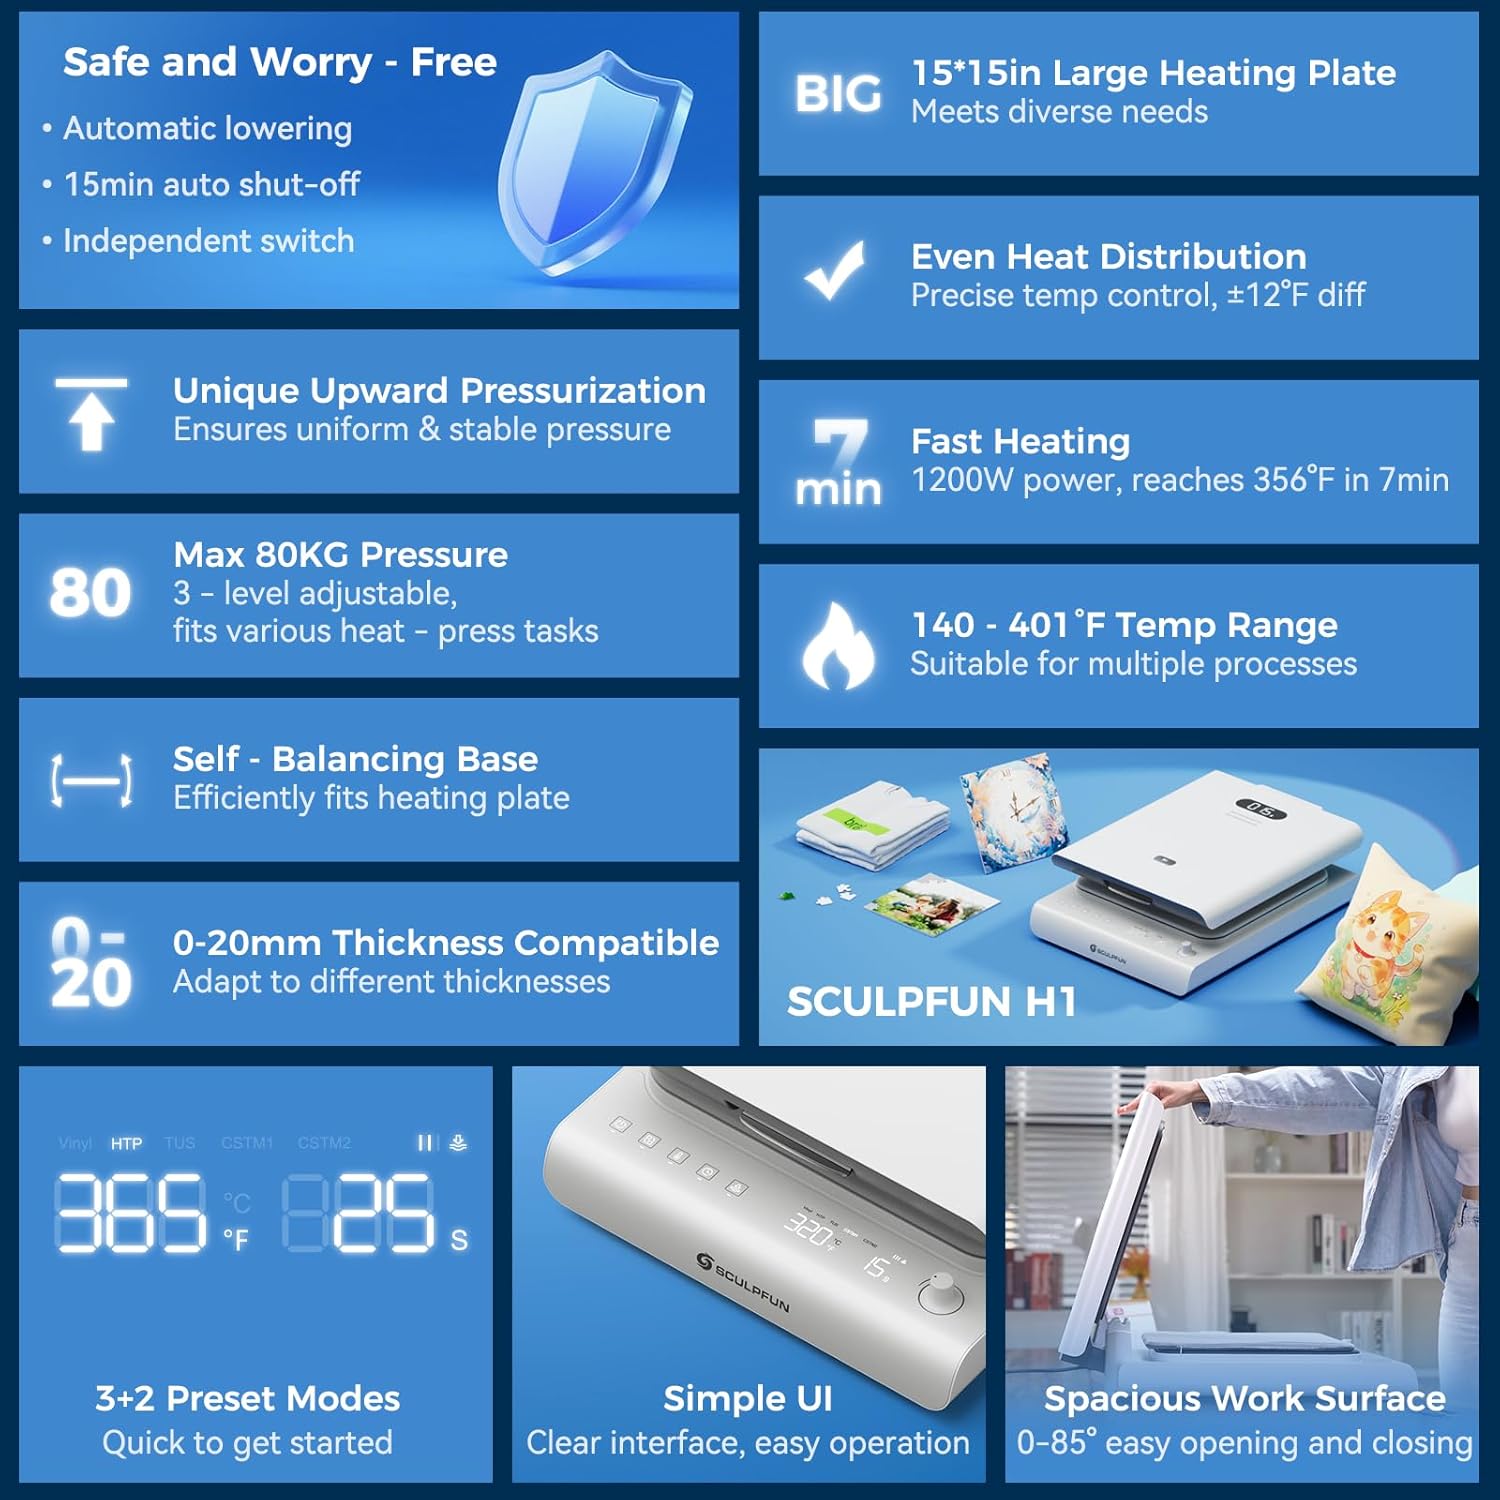
Figure 1: SCULPFUN H1 Auto Heat Press Machine highlighting key features like large heating plate, even heat distribution, fast heating, and smart control.
Key Features:
- World's First Upward Pressure Design: Lifts the plate from below for stable, continuous, and even pressure distribution, ideal for various material thicknesses.
- Adjustable Pressure: Offers three preset pressure levels (40kg/88lb, 60kg/132lb, 80kg/176lb) to suit different materials and transfer types.
- Fast & Even Heating: Dual-tube heating core and precise temperature control sensors allow the 15x15 inch plate to reach 180°C (356°F) in 7 minutes, ensuring uniform heat distribution.
- Precision Temperature Control: Real-time digital display provides accurate feedback on temperature, time, and pressure.
- Auto-Off Safety: Automatic shut-off after 15 minutes of inactivity prevents overheating and enhances safety.
- Advanced Cooling System: Built-in dual cooling fans reduce heat buildup and extend product lifespan.
- Intuitive Interface: Touch panel with preset modes for beginners and a rotary knob for expert customization.
3. Setup
- Unboxing: Carefully remove the heat press machine and all accessories from the packaging. Retain packaging for future storage or transport.
- Placement: Place the machine on a stable, heat-resistant surface. Ensure adequate clearance around the machine for ventilation.
- Power Connection: Connect the power cable to the machine's power inlet located at the rear. Plug the power cable into a grounded electrical outlet.
- Initial Power On: Locate the main power switch at the rear of the machine and flip it to the 'ON' position. The control panel will illuminate.

Figure 2: Machine components and dimensions for proper setup.
4. Operating Instructions
4.1 Powering On and Preheating
- Ensure the main power switch (at the rear) is ON.
- On the front control panel, long-press the power button for 2 seconds to fully activate the machine.
- The digital display will show the current temperature and time.
- The machine will begin to preheat to the last used temperature or a preset mode.
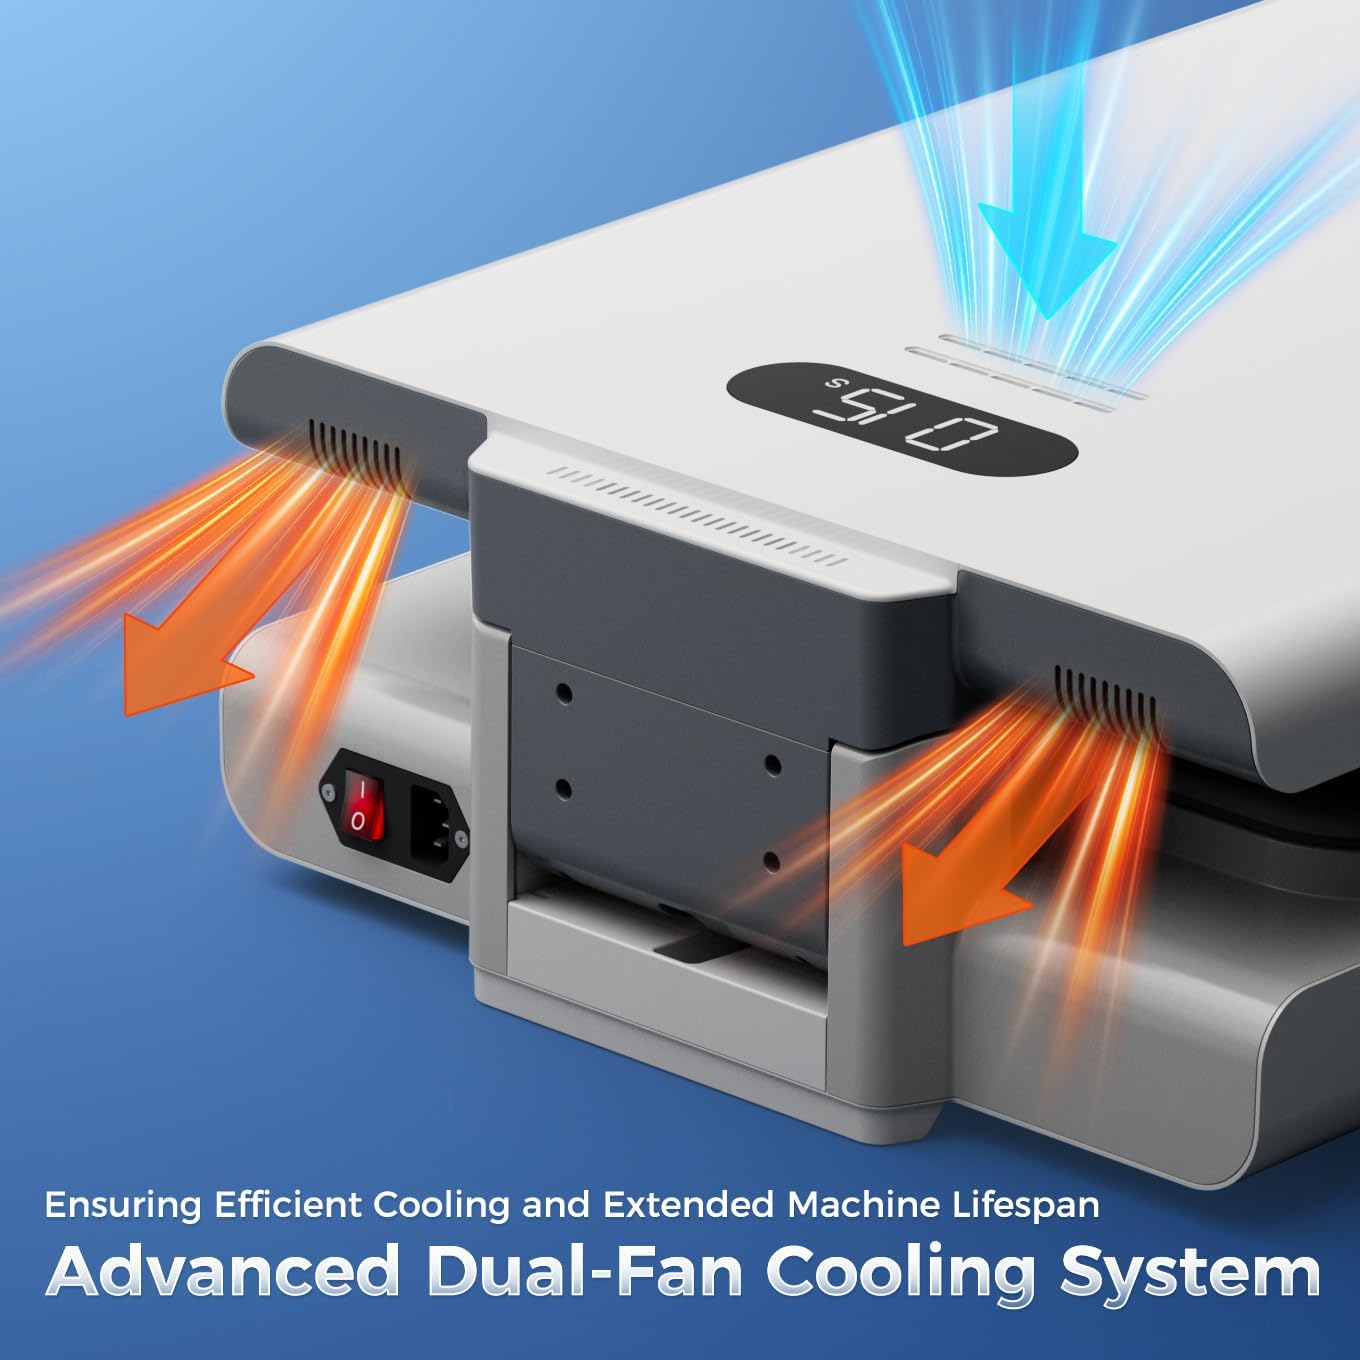
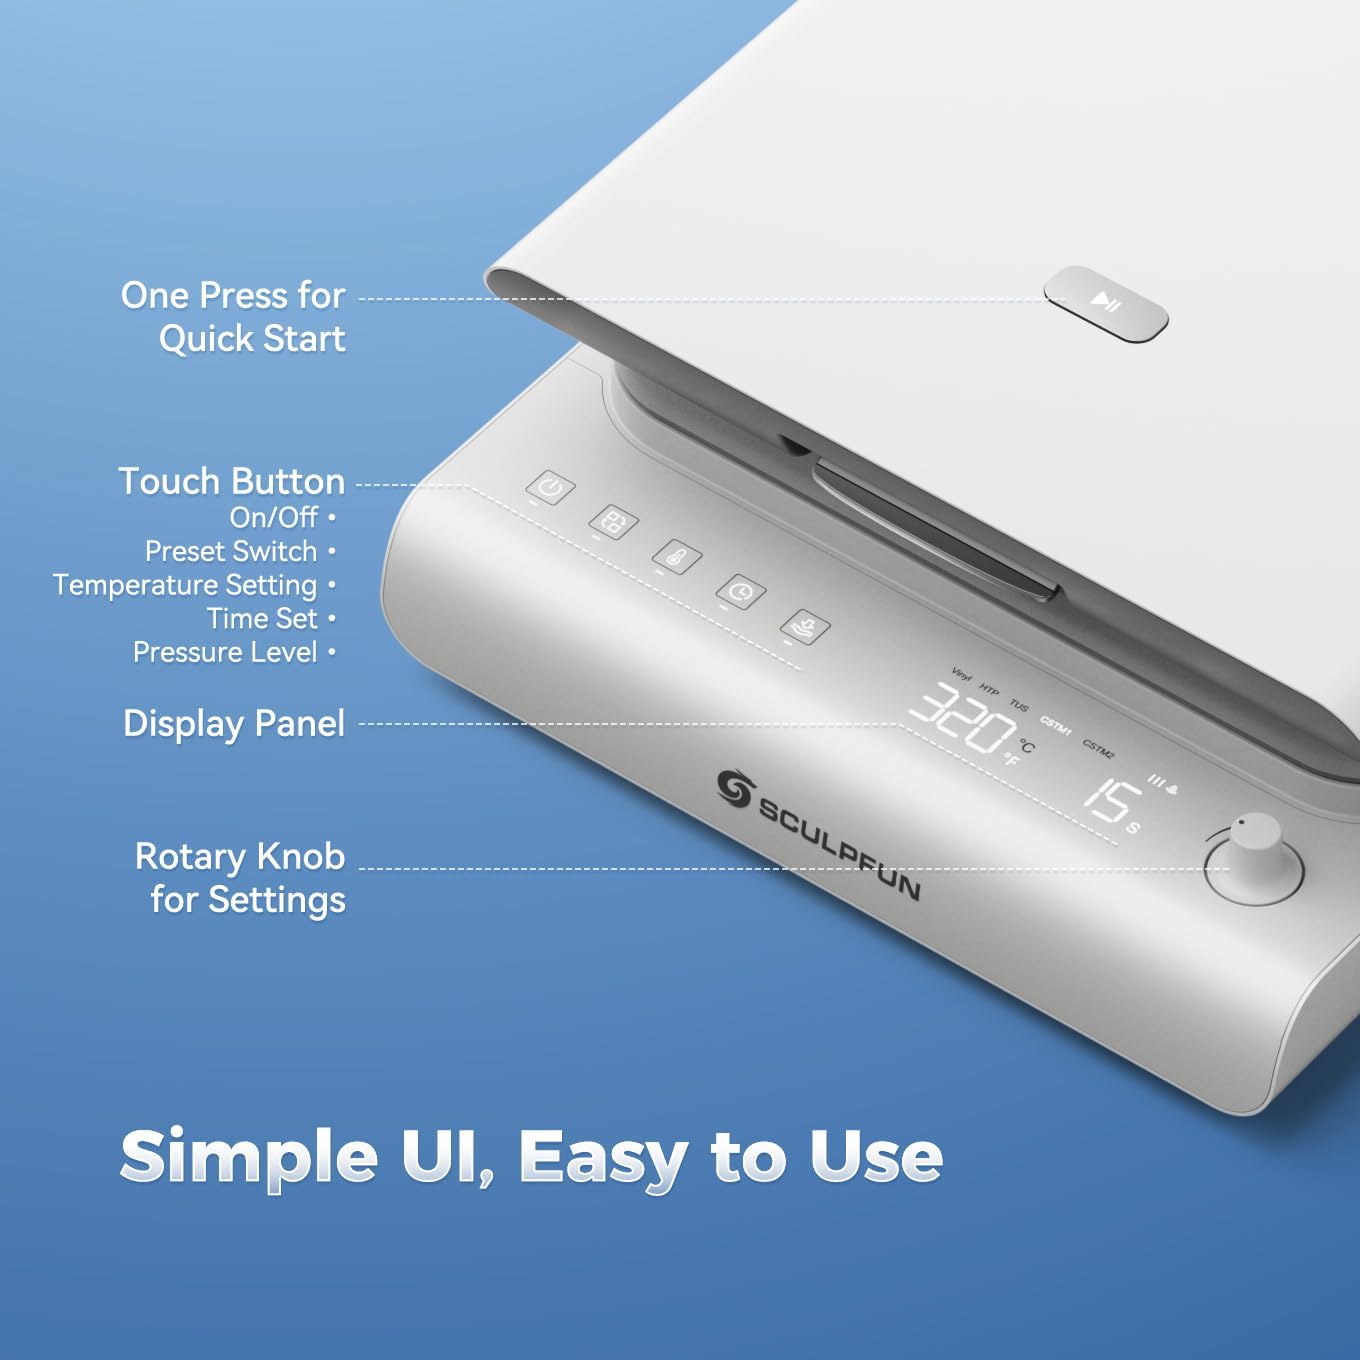
Figure 3: Detailed view of the intuitive control panel for easy operation.
4.2 Setting Temperature, Time, and Pressure
- Mode Selection: Press the 'Mode' button to cycle through preset modes (Vinyl, HTP, TUS) or custom modes (CSTM1, CSTM2).
- Temperature Adjustment: Press the 'Temperature' button. The temperature value on the display will flash. Rotate the rotary knob to adjust the temperature (140-401°F / 60-205°C). Press the 'Temperature' button again to confirm.
- Time Adjustment: Press the 'Time' button. The time value on the display will flash. Rotate the rotary knob to adjust the time (1-999 seconds). Press the 'Time' button again to confirm.
- Pressure Adjustment: Press the 'Pressure' button. The pressure level indicator will flash. Rotate the rotary knob to select from three preset pressure levels (40kg/88lb, 60kg/132lb, 80kg/176lb). Press the 'Pressure' button again to confirm.
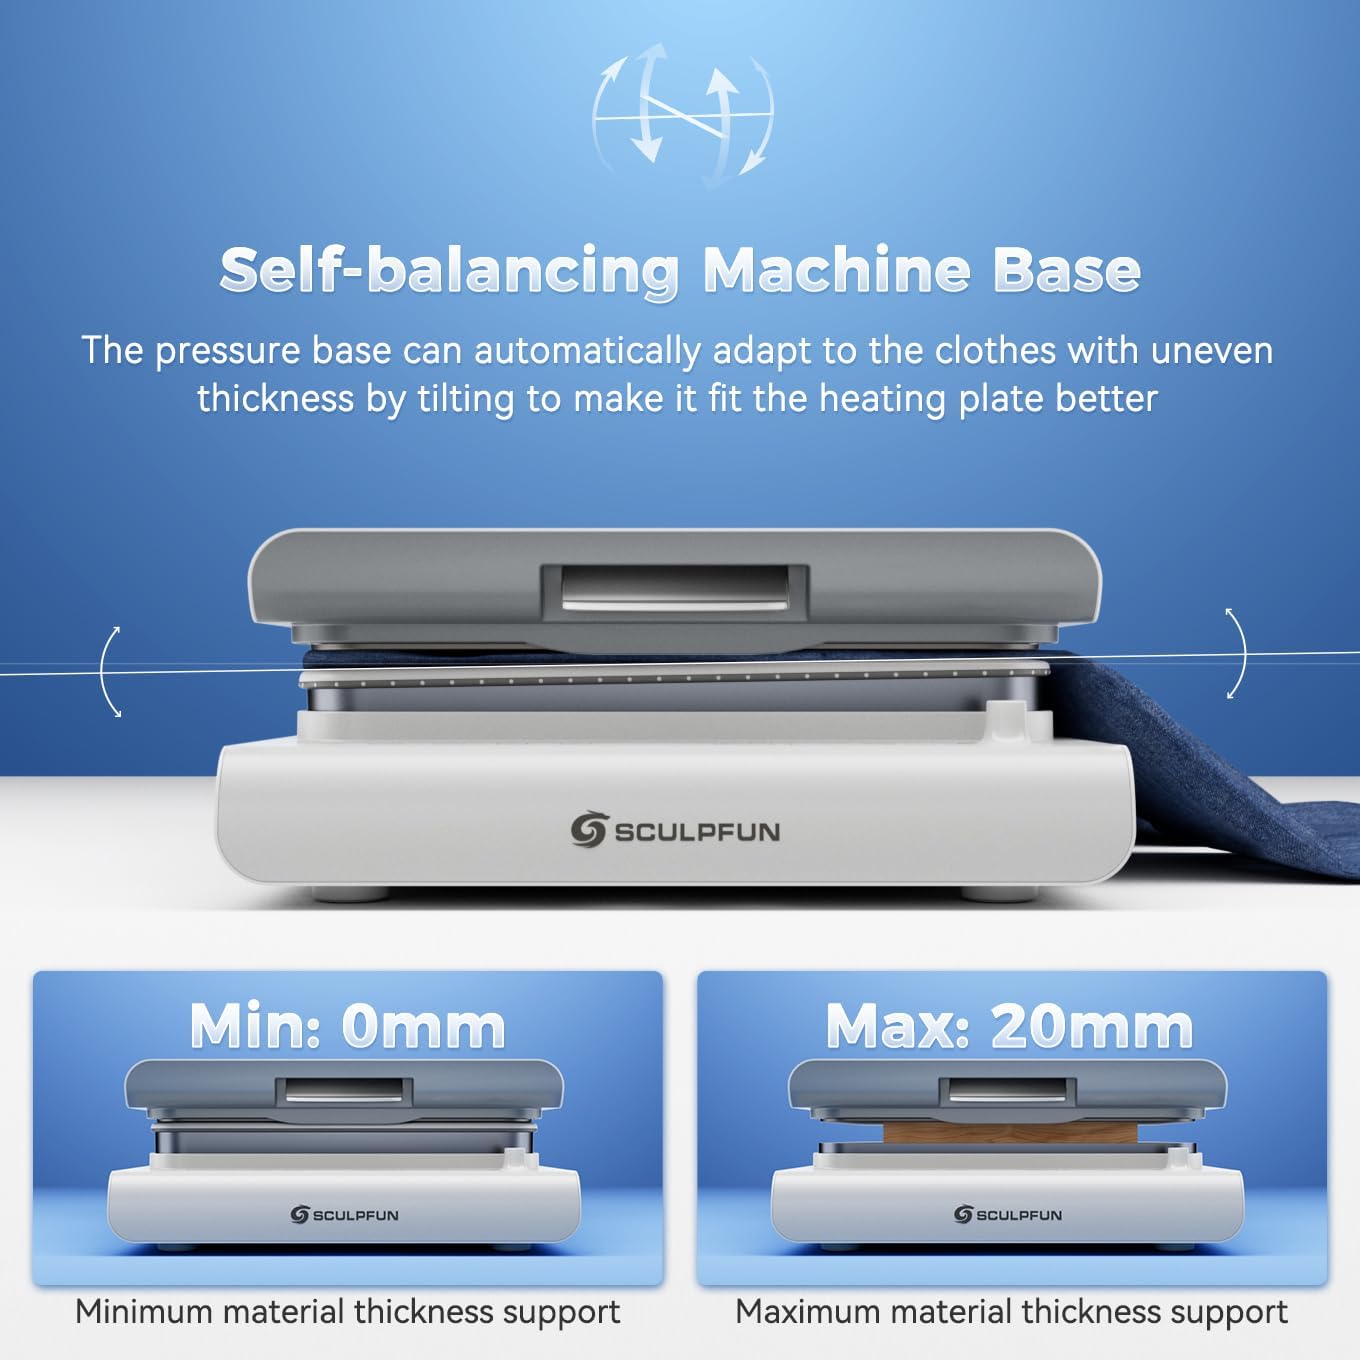
Figure 4: Upward pressure design and adjustable pressure levels for precise transfers.
4.3 Performing a Heat Transfer
- Prepare Material: Place your garment or item flat on the pressure platform. Ensure it is smooth and free of wrinkles.
- Position Design: Place your transfer design (DTF, HTV, Sublimation, Vinyl) onto the garment in the desired location.
- Cover with Protective Sheet: Place a PTFE Teflon sheet or parchment paper over your design to protect the heating plate.
- Close and Press: Gently lower the heating plate until it locks into position. The machine will automatically apply pressure and begin the countdown.
- Completion: Once the timer reaches zero, the machine will beep and automatically release the pressure. Carefully lift the heating plate.
- Peel Design: Follow the specific peeling instructions for your transfer material (hot peel, warm peel, or cold peel).

Figure 5: Example of a DTF transfer in progress using the SCULPFUN H1.
Video 1: Demonstration of the SCULPFUN H1 Heat Press Machine in action, showing the process of applying a design to a garment.
5. Maintenance
5.1 Safety Features
- Auto-Off Function: The machine automatically shuts off after 15 minutes of inactivity to prevent overheating and ensure safety.
- Dual Cooling Fans: Integrated fans help dissipate heat during extended use, protecting internal components and prolonging the machine's lifespan.

Figure 6: Illustration of the machine's safety features, including auto-off and dual cooling fans.
5.2 Cleaning and Storage
- Always disconnect the power supply before cleaning.
- Wipe the heating plate and exterior surfaces with a soft, damp cloth. Do not use abrasive cleaners.
- Store the machine in a dry, dust-free environment when not in use.
6. Troubleshooting
- Machine not powering on: Ensure the power cable is securely connected and the main power switch is ON. Long-press the front power button for 2 seconds.
- Uneven heat transfer: Verify that the temperature and pressure settings are appropriate for your material. Ensure the material is laid flat and free of wrinkles.
- Machine not closing/opening smoothly: Check for any obstructions on the pressure platform.
- Machine smoking slightly when heating: This is normal when using heat sublimation materials, as high temperatures heat sublimation ink to produce gases.
- Buzzer sound: A buzzing sound is normal when the machine is powered on, turned off, or when parameter setting is completed.
If you encounter any issues not covered here, please contact SCULPFUN customer service for assistance.
7. Specifications
| Feature | Detail |
|---|---|
| Brand | SCULPFUN |
| Model | H1 |
| Material | Aluminum |
| Color | White |
| Product Dimensions | 22.7"L x 16.6"W x 6.6"H |
| Item Weight | 44 Pounds |
| UPC | 860014205323 |
| Upper Temperature Rating | 180 Degrees Celsius (356°F) |
| Voltage | 120 Volts |
| Wattage | 1200 watts |
8. Warranty and Support
The SCULPFUN H1 Auto Heat Press Machine comes with a 1 Year Warranty. For warranty claims or technical support, please refer to the contact information provided in your product packaging or visit the official SCULPFUN website.
Please retain your purchase receipt as proof of purchase for warranty validation.
9. Additional Media
9.1 Product Images