1. Safety Instructions
Please read all instructions carefully before using the OSTBA Food Dehydrator. Retain this manual for future reference.
- Electrical Safety: Ensure the voltage matches your power supply. Do not immerse the base unit, cord, or plug in water or other liquids. Unplug when not in use and before cleaning.
- Placement: Use the dehydrator on a stable, heat-resistant surface. Ensure adequate ventilation around the unit. Do not operate near flammable materials.
- Children and Pets: Keep the appliance out of reach of children and pets. Close supervision is necessary when the appliance is used near children.
- Overheat Protection: The dehydrator is equipped with overheat protection and an auto shut-off feature for safety. If the unit overheats, it will automatically turn off.
- Damage: Do not operate the dehydrator if the cord or plug is damaged, or if the appliance malfunctions or has been damaged in any manner. Contact customer support for assistance.
- Intended Use: This appliance is for household use only. Do not use it outdoors or for commercial purposes.
- Food Safety: Always prepare food hygienically. Wash hands and utensils thoroughly. Do not dehydrate spoiled food.
2. Product Overview
The OSTBA 8-Tray Food Dehydrator is designed for efficient and uniform drying of various foods. It features a precise LED control panel and 360° airflow for optimal results.

Figure 2.1: The OSTBA 8-Tray Food Dehydrator, showcasing its clear trays filled with sliced fruits and vegetables, alongside the included recipe book and stainless steel tongs.
2.1 Components
- Base Unit: Contains the heating element, fan, and control panel.
- 8 Stackable Trays: BPA-free, clear trays for holding food. Adjustable heights (0.78" / 1.25") accommodate different food thicknesses.
- Lid: Covers the top of the stacked trays.
- LED Control Panel: Digital display for setting time and temperature.
- Accessories:
- 8 Mesh Sheets: Prevents small food items from falling through trays.
- 1 Fruit Roll Tray: For making fruit leathers and purees.
- 1 Pair of Stainless Steel Food Tongs: For handling food.
- Recipe Book: Provides guidance and ideas for dehydration.

Figure 2.2: An illustration of all components included with the OSTBA Food Dehydrator, such as the main unit, 8 BPA-free trays, 8 mesh screens, 1 fruit roll sheet, 1 pair of stainless steel food tongs, a user manual, and a recipe book.
3. Setup
- Unpack: Carefully remove all components from the packaging.
- Clean: Before first use, wash the trays, mesh sheets, fruit roll tray, and tongs in warm, soapy water. Rinse thoroughly and dry. The trays are dishwasher-safe. Wipe the base unit with a damp cloth.
- Assemble: Place the base unit on a clean, dry, and stable surface. Stack the desired number of trays onto the base unit. Ensure the trays are properly aligned.
- Power Connection: Plug the power cord into a standard electrical outlet.
4. Operating Instructions
The dehydrator's LED control panel allows for precise temperature and time adjustments.

Figure 4.1: The Smart LED Control Panel displaying time and temperature settings, along with a guide for recommended drying temperatures and durations for fruits, vegetables, herbs, and meat.
4.1 Preparing Food
- Wash and Slice: Wash food thoroughly. Slice food evenly to ensure uniform drying. Thinner slices dry faster.
- Arrange on Trays: Place food in a single layer on the dehydrator trays. Do not overlap items. Use mesh sheets for smaller items like herbs or berries, and the fruit roll tray for purees.
- Stack Trays: Stack the trays on the base unit, then place the lid on top.

Figure 4.2: The dehydrator's 8 adjustable height trays, demonstrating how they can be configured for different food thicknesses (0.78 inches or 1.25 inches).
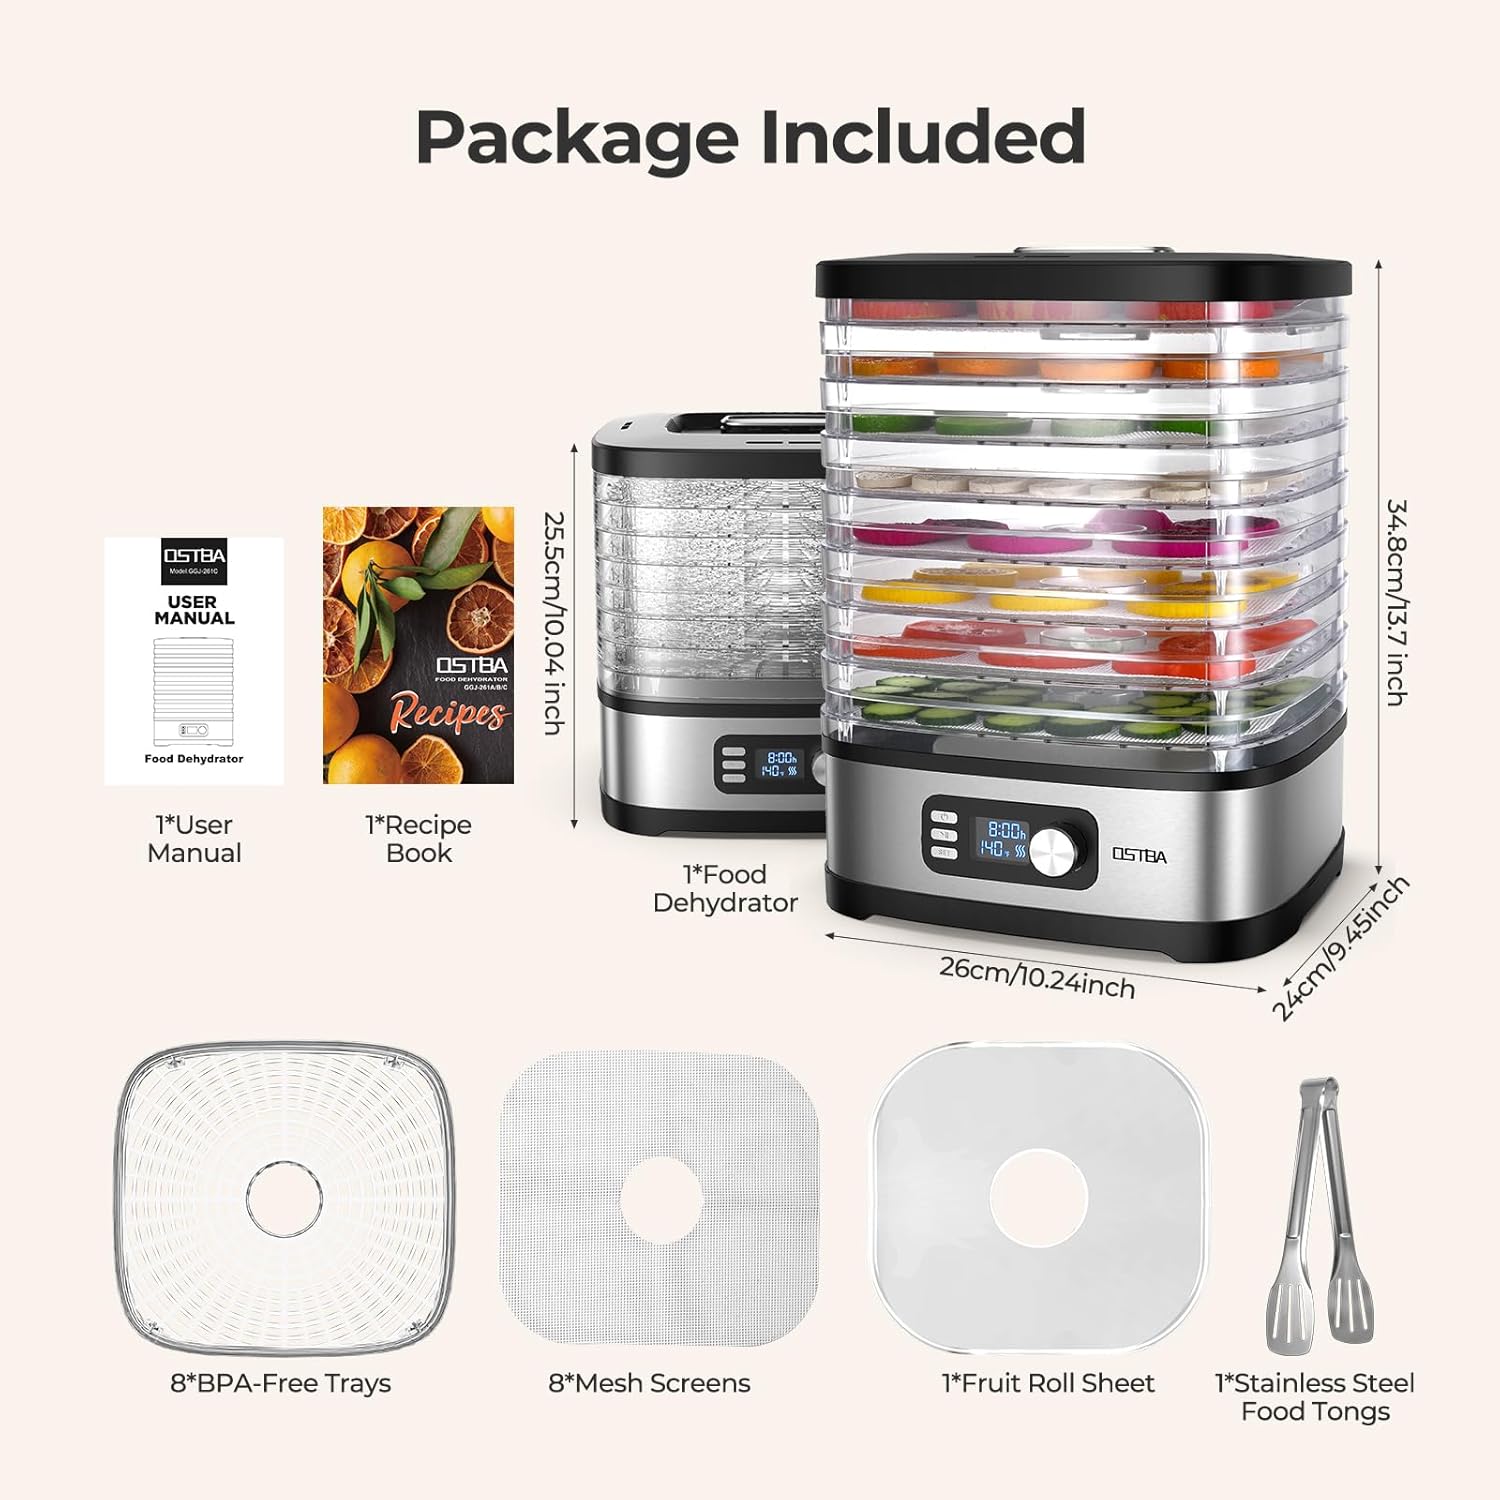
Figure 4.3: A close-up view of the mesh sheets, ideal for small items like nuts and herbs, and the fruit roll sheet, designed for purees and fruit leathers.
4.2 Setting Time and Temperature
- Power On: Press the power button on the control panel.
- Set Temperature: Use the temperature control knob or buttons to set the desired drying temperature. The range is 95°F to 158°F (35°C to 70°C). Adjustments can be made in precise increments.
- Set Timer: Use the timer control knob or buttons to set the drying duration. The timer can be set from 1 to 72 hours.
- Start Dehydration: Once time and temperature are set, the dehydrator will begin operation. The LED display will show the remaining time and current temperature.
- Monitoring: Periodically check the food's dryness. Drying times can vary based on food type, thickness, and moisture content.
- Completion: The dehydrator will automatically shut off when the timer expires.
4.3 Recommended Drying Guidelines
These are general guidelines. Adjust as needed based on desired dryness and food thickness.
| Food Type | Temperature Range | Drying Time |
|---|---|---|
| Fruit | 125-140°F (50-60°C) | 6-12 hours |
| Vegetables | 125-140°F (50-60°C) | 4-10 hours |
| Herbs | 95-115°F (35-45°C) | 2-6 hours |
| Meat (Jerky) | 140-160°F (60-70°C) | 6-12 hours |
For best results, ensure even air circulation. The 240W base-mounted fan and top air vents are designed to provide uniform heat distribution.
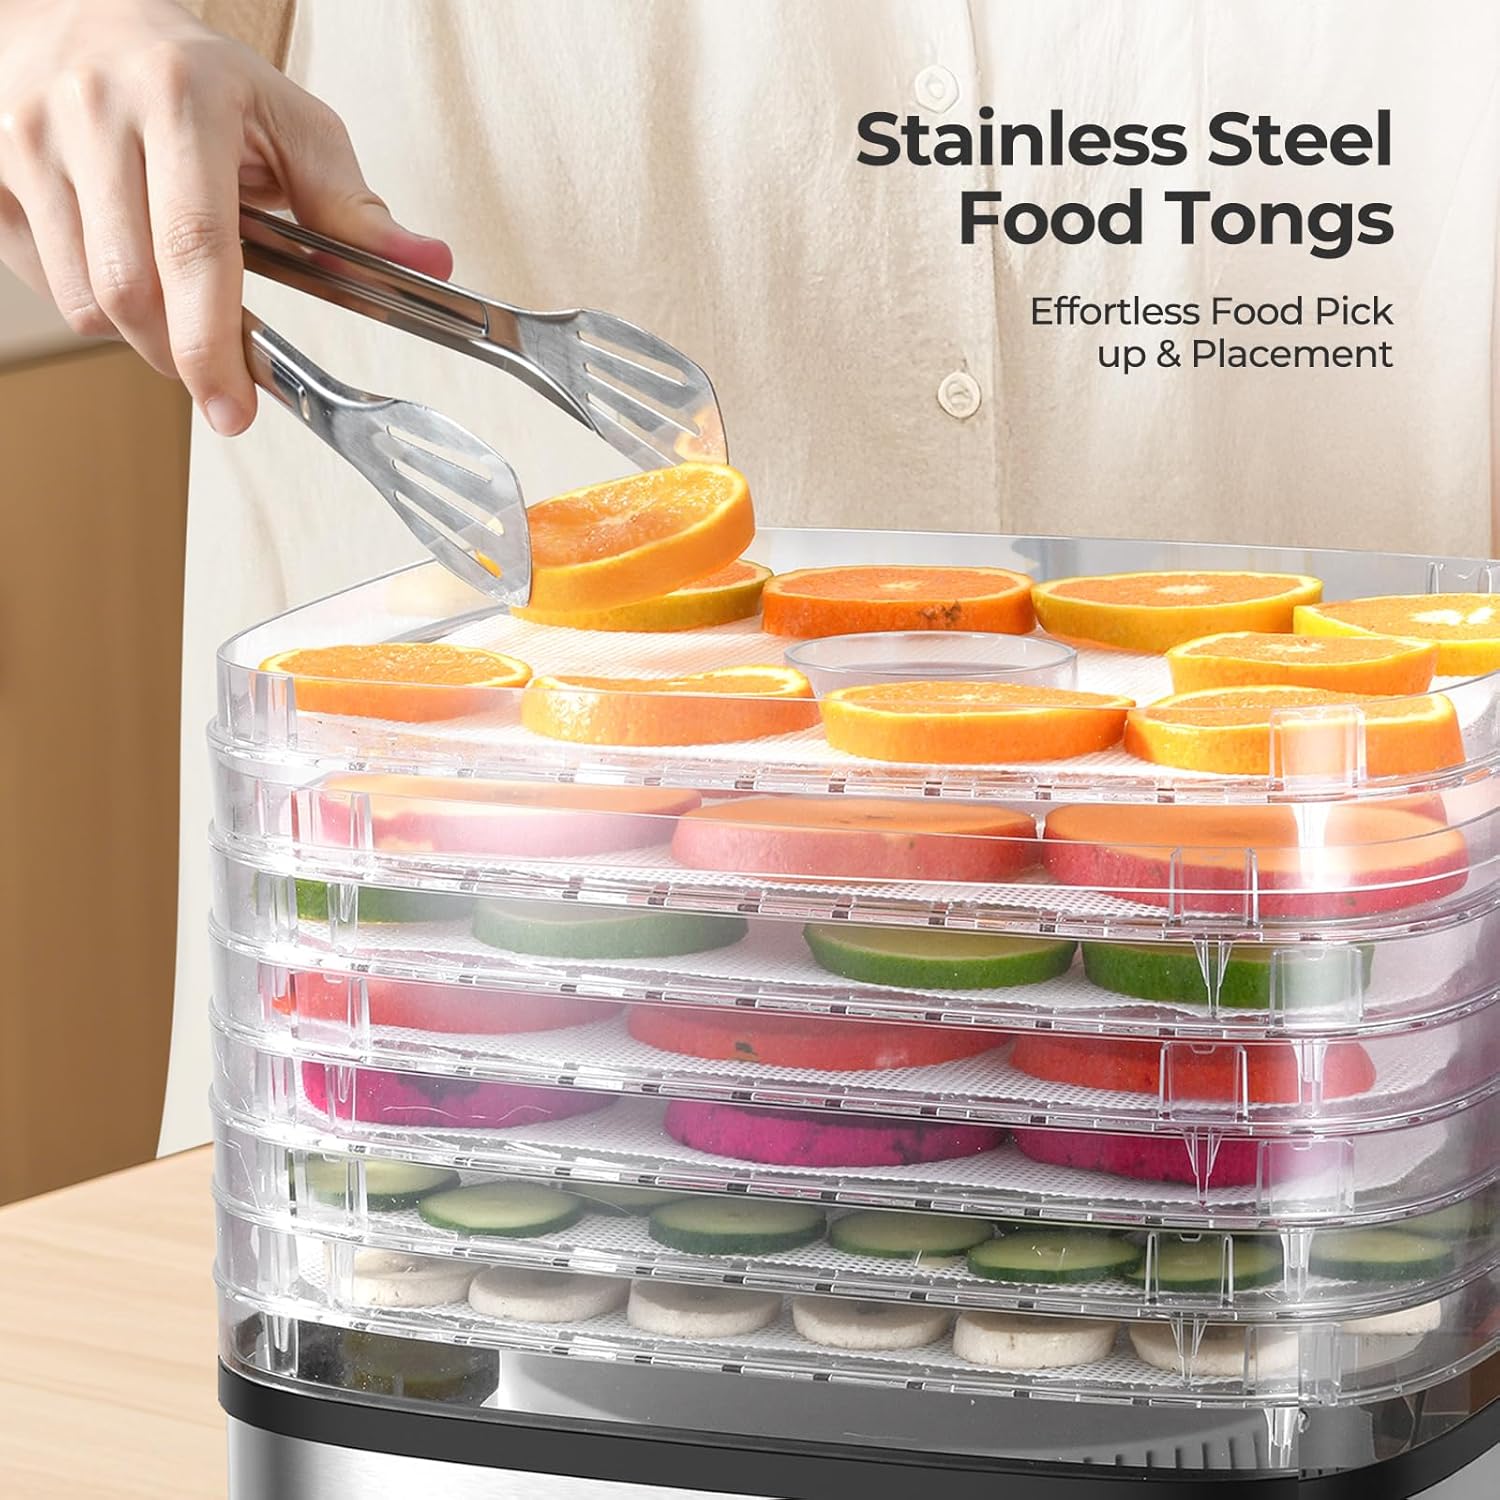
Figure 4.4: An illustration demonstrating the 360° air circulation system within the dehydrator, showing how air flows from the base fan upwards through the trays and out the top vents for efficient and uniform drying.
5. Maintenance and Cleaning
Regular cleaning ensures the longevity and hygienic operation of your dehydrator.
- Unplug: Always unplug the dehydrator from the power outlet before cleaning. Allow the unit to cool completely.
- Trays and Accessories: The trays, mesh sheets, fruit roll tray, and tongs are dishwasher-safe. Alternatively, wash them by hand in warm, soapy water, rinse thoroughly, and dry.
- Base Unit: Wipe the exterior of the base unit with a damp cloth. Do not immerse the base unit in water or any other liquid. Ensure no water enters the control panel area.
- Storage: Store the clean and dry dehydrator in a cool, dry place.
6. Troubleshooting
If you encounter issues, refer to the following common problems and solutions:
| Problem | Possible Cause | Solution |
|---|---|---|
| Dehydrator does not turn on. | Not plugged in; power outlet malfunction; unit overheated. | Ensure the unit is securely plugged in. Test the outlet with another appliance. If overheated, unplug and allow to cool for 30 minutes before restarting. |
| Food is not drying evenly. | Food slices are uneven; trays overloaded; insufficient air circulation. | Ensure food is sliced uniformly. Do not overcrowd trays; arrange food in a single layer. Check that air vents are not blocked. |
| Drying takes too long. | Temperature set too low; food too thick; high humidity. | Increase temperature within recommended range. Slice food thinner. Operate in a low-humidity environment. |
| Unit makes unusual noise. | Fan obstruction; unit not on a stable surface. | Unplug and check for any obstructions around the fan area (bottom of the base unit). Ensure the dehydrator is on a flat, stable surface. |
If the problem persists after attempting these solutions, please contact customer support.
7. Specifications
| Feature | Detail |
|---|---|
| Brand | OSTBA |
| Model Number | GGJ-261C |
| Material | Plastic, Stainless Steel (Food Safe) |
| Color | Black, Clear, Silver |
| Wattage | 240 watts |
| Voltage | 120V |
| Product Dimensions (L x W x H) | 10.24"D x 9.45"W x 10.04"H |
| Item Weight | 6.83 pounds |
| Number of Trays | 8 (Adjustable heights: 0.78" / 1.25") |
| Temperature Range | 95°F to 158°F (35°C to 70°C) |
| Timer Range | 1-72 hours |
| Dishwasher Safe Trays | Yes |
| Certifications | ETL Certified |
8. Warranty and Customer Support
For warranty information, product support, or any questions regarding your OSTBA Food Dehydrator, please contact OSTBA customer service. Refer to your purchase documentation for specific warranty terms and contact details.
You may also visit the official OSTBA store for additional resources: OSTBA Store on Amazon