1. Product Overview
The Panasonic Lamdash ES-L361W-A is a high-performance 3-blade electric shaver designed for a close and comfortable shave. It features a linear motor for powerful cutting, a close-contact 3D head that adapts to facial contours, and a waterproof design for wet and dry shaving. This manual provides essential information for safe and effective use of your shaver.

Image 1.1: Panasonic Lamdash ES-L361W-A Shaver, Charging Stand, and Box.
Key Features:
- Linear Motor Drive: Delivers approximately 13,000 strokes per minute for a powerful and consistent shave.
- New 3-Blade System: Features an under-chin trimmer blade and two deep shaving blades for efficient cutting of various beard types.
- Close-Contact 3D Head: Moves in multiple directions (front-back, left-right, up-down) to closely follow facial contours.
- Wet/Dry Shaving: Designed for use in the bath or with shaving foam/gel, as well as for dry shaving.
- Water-Through Cleaning: Allows for easy rinsing of beard clippings without removing the outer foil.
2. Setup
2.1 Unboxing and Included Accessories
Carefully unpack your Panasonic Lamdash ES-L361W-A shaver and ensure all accessories are present. The package should contain the following items:
- Panasonic ES-L361W-A Shaver Unit
- AC Adapter
- Charging Stand
- Dedicated Oil
- Cleaning Brush

Image 2.1: Included Accessories (AC Adapter, Charging Stand, Dedicated Oil, Cleaning Brush).
2.2 Initial Charging
Before first use, fully charge the shaver. This typically takes about 1 hour for a rapid charge.
- Connect the AC adapter to the charging stand.
- Place the shaver securely on the charging stand.
- Plug the AC adapter into a power outlet. The charging indicator light on the shaver will illuminate.
- Once charging is complete, the indicator light may change or turn off, depending on the model. Disconnect the AC adapter from the outlet and remove the shaver from the stand.
Note: The AC adapter and charging stand are not waterproof. Do not use or store them in wet environments.
3. Operating Instructions
3.1 Basic Shaving Technique
For optimal results, hold the shaver at a right angle to your skin and move it gently against the direction of beard growth. Avoid pressing too hard, as this can cause skin irritation.
Wet Shaving (in bath or with foam/gel):
Apply shaving foam or gel to your face. The shaver is designed for use in wet conditions, providing a smooth glide and comfortable shave.
Dry Shaving:
Ensure your face is clean and dry before shaving. This method is convenient for quick shaves.
3.2 Using the Close-Contact 3D Head
The shaver's 3D head is designed to move flexibly to follow the contours of your face, ensuring maximum skin contact and a close shave, especially around the jawline and neck.
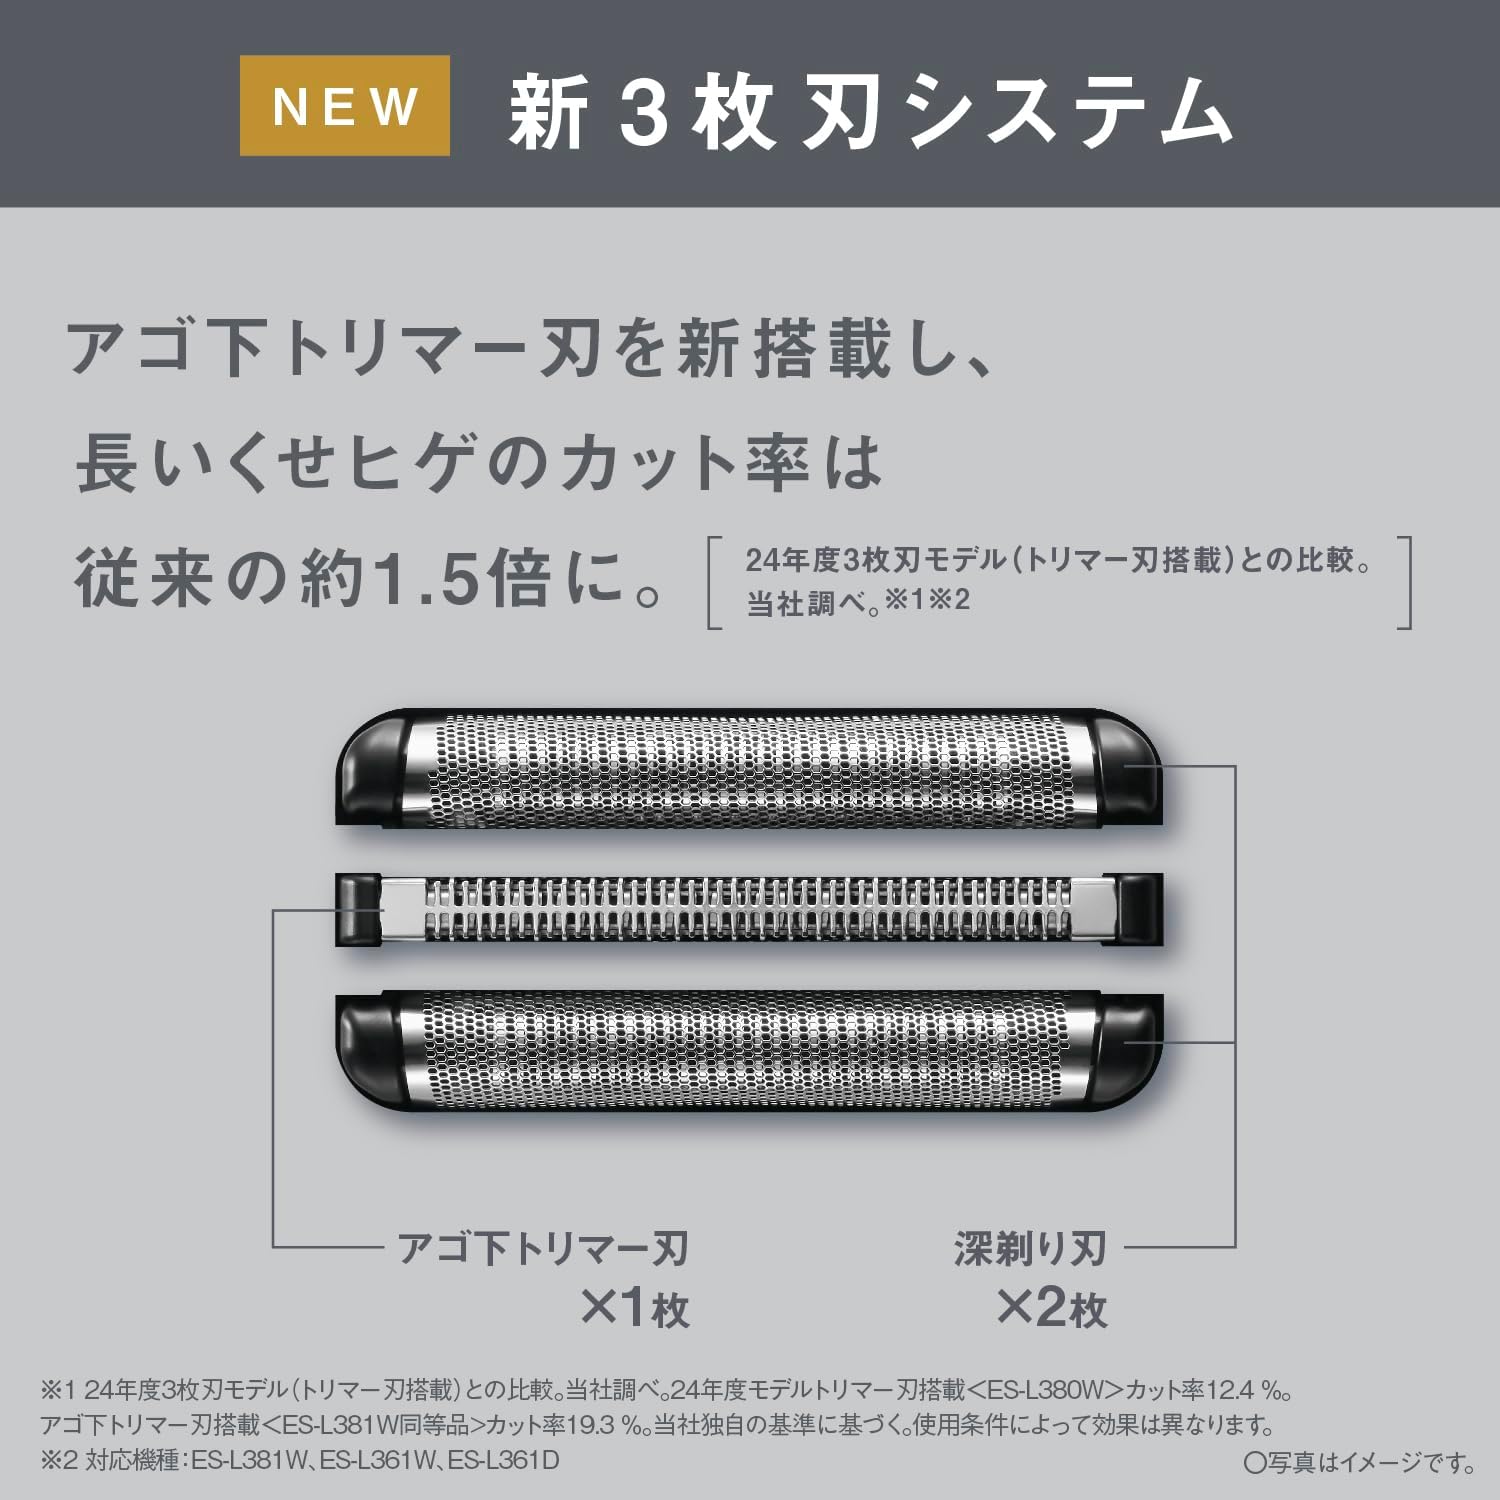
Image 3.1: The 3D head moves front-back, left-right, and up-down for close contact.
3.3 Using the Pop-Up Trimmer
The integrated pop-up trimmer is ideal for precise grooming of sideburns, mustaches, or for pre-cutting longer beard hairs before main shaving.
- Slide the trimmer switch upwards to engage the pop-up trimmer.
- Use the trimmer to shape or pre-cut hair as needed.
- Slide the switch downwards to retract the trimmer after use.

Image 3.2: The pop-up trimmer for detailed grooming.
4. Maintenance
Regular cleaning and maintenance ensure the longevity and optimal performance of your shaver.
4.1 Cleaning
The shaver is fully washable (IPX7 standard), allowing for easy and hygienic cleaning.
Water-Through Cleaning:
- After shaving, turn off the shaver.
- Rinse the shaver head directly under running water. The water-through design allows beard clippings to be washed away without removing the outer foil.
- Shake off excess water and allow the shaver to air dry.

Image 4.1: Water-through cleaning for easy removal of beard clippings.
Deep Cleaning with Cleaning Brush:
For a more thorough clean, especially if using dry shaving, use the provided cleaning brush.
- Remove the outer foil frame.
- Use the cleaning brush to gently brush away any trapped beard clippings from the inner blades and the shaver body.
- Reattach the outer foil frame securely.
4.2 Blade Replacement
To maintain optimal shaving performance, replace the outer foil and inner blades at recommended intervals.
- Outer Foil: Recommended replacement approximately every 1 year.
- Inner Blades: Recommended replacement approximately every 2 years.

Image 4.2: Recommended replacement times for outer foil (1 year) and inner blades (2 years).
Replacement parts can be purchased from authorized Panasonic retailers or service centers. Refer to your shaver's specific model number when purchasing replacement blades.
4.3 Lubrication
Apply a drop of the dedicated oil to the outer foil after cleaning, especially if you notice any decrease in smoothness or hear unusual noises. This helps maintain blade sharpness and smooth operation.
5. Troubleshooting
If you encounter any issues with your shaver, please refer to the following common troubleshooting tips:
- Shaver does not turn on: Ensure the shaver is fully charged. If the battery is depleted, charge it for at least 1 hour. Check if the power button is pressed firmly.
- Poor shaving performance: The blades may be dull. Consider replacing the outer foil and/or inner blades according to the recommended intervals. Ensure the shaver head is clean and free of debris. Apply a drop of dedicated oil to the blades.
- Battery not charging: Verify that the AC adapter is properly connected to both the charging stand and the power outlet. Ensure the shaver is correctly seated on the charging stand. Check if the power outlet is functional.
- Skin irritation: Ensure you are not pressing the shaver too hard against your skin. Shave against the direction of hair growth gently. If using wet shaving, ensure sufficient foam/gel is applied.
If the problem persists after trying these steps, please contact Panasonic customer support.
6. Specifications
| Feature | Specification |
|---|---|
| Model Number | ES-L361W-A |
| Dimensions (H x W x D) | 16.8 x 7.2 x 5.2 cm |
| Weight (excluding cap) | Approx. 180 g |
| Power Source | Rechargeable, 1-hour rapid charge |
| Charging System | AC Adapter Charging, Charging Stand |
| Blades | 3-Blade System (Under-chin trimmer blade x1, Deep shaving blade x2) |
| Motor Type | Linear Motor (Approx. 13,000 strokes/min) |
| Head Type | Close-Contact 3D Head |
| Waterproof | Yes (IPX7 standard for main unit) |
| Overseas Use | Yes (Requires separate plug adapter for specific regions) |
| Country of Origin | Main Unit: Japan / AC Adapter, Charging Stand: China |
| Included Accessories | AC Adapter, Charging Stand, Dedicated Oil, Cleaning Brush |
7. Warranty and Support
7.1 Manufacturer's Warranty
This Panasonic product is covered by a manufacturer's warranty for 12 months from the date of purchase. Please retain your proof of purchase for warranty claims. The warranty covers defects in materials and workmanship under normal use.
The warranty does not cover damage resulting from misuse, accident, unauthorized repair, or normal wear and tear of consumable parts like blades.
7.2 Customer Support
For further assistance, product inquiries, or warranty service, please contact Panasonic customer support. Contact information can typically be found on the official Panasonic website for your region or on the product packaging.
When contacting support, please have your product model number (ES-L361W-A) and date of purchase readily available.