1. Introduction
This instruction manual provides essential information for the safe and effective use of your Marcree Biometric Rifle Safe, Model 5H-135-F. Please read this manual thoroughly before operating the safe and retain it for future reference. Proper installation, operation, and maintenance are crucial for ensuring the security and longevity of your safe.
2. Safety Information
- Emergency Keys: Never store the emergency keys inside the safe. Keep them in a secure, separate location known only to authorized users. Forgetting the password without access to the keys will prevent the safe from being opened.
- Child Safety: Ensure the safe is always locked and secured to prevent unauthorized access, especially by children.
- Firearm Storage: Always follow local and national regulations regarding firearm storage. It is recommended to store firearms unloaded.
- Mounting: For optimal security and to prevent tipping, the safe must be securely mounted to a wall or floor using the provided expansion screws.
- Battery Power: The biometric and keypad functions require battery power. Monitor battery levels and use the emergency charging cable if batteries are depleted.
3. Package Contents
Verify that all components are present upon unpacking:
- Marcree Biometric Rifle Safe (Model 5H-135-F)
- Emergency Keys (for main safe)
- Keys for Drawer
- Emergency Charging Cable
- Instruction Manual (this document)
- Expansion Screws (for mounting)
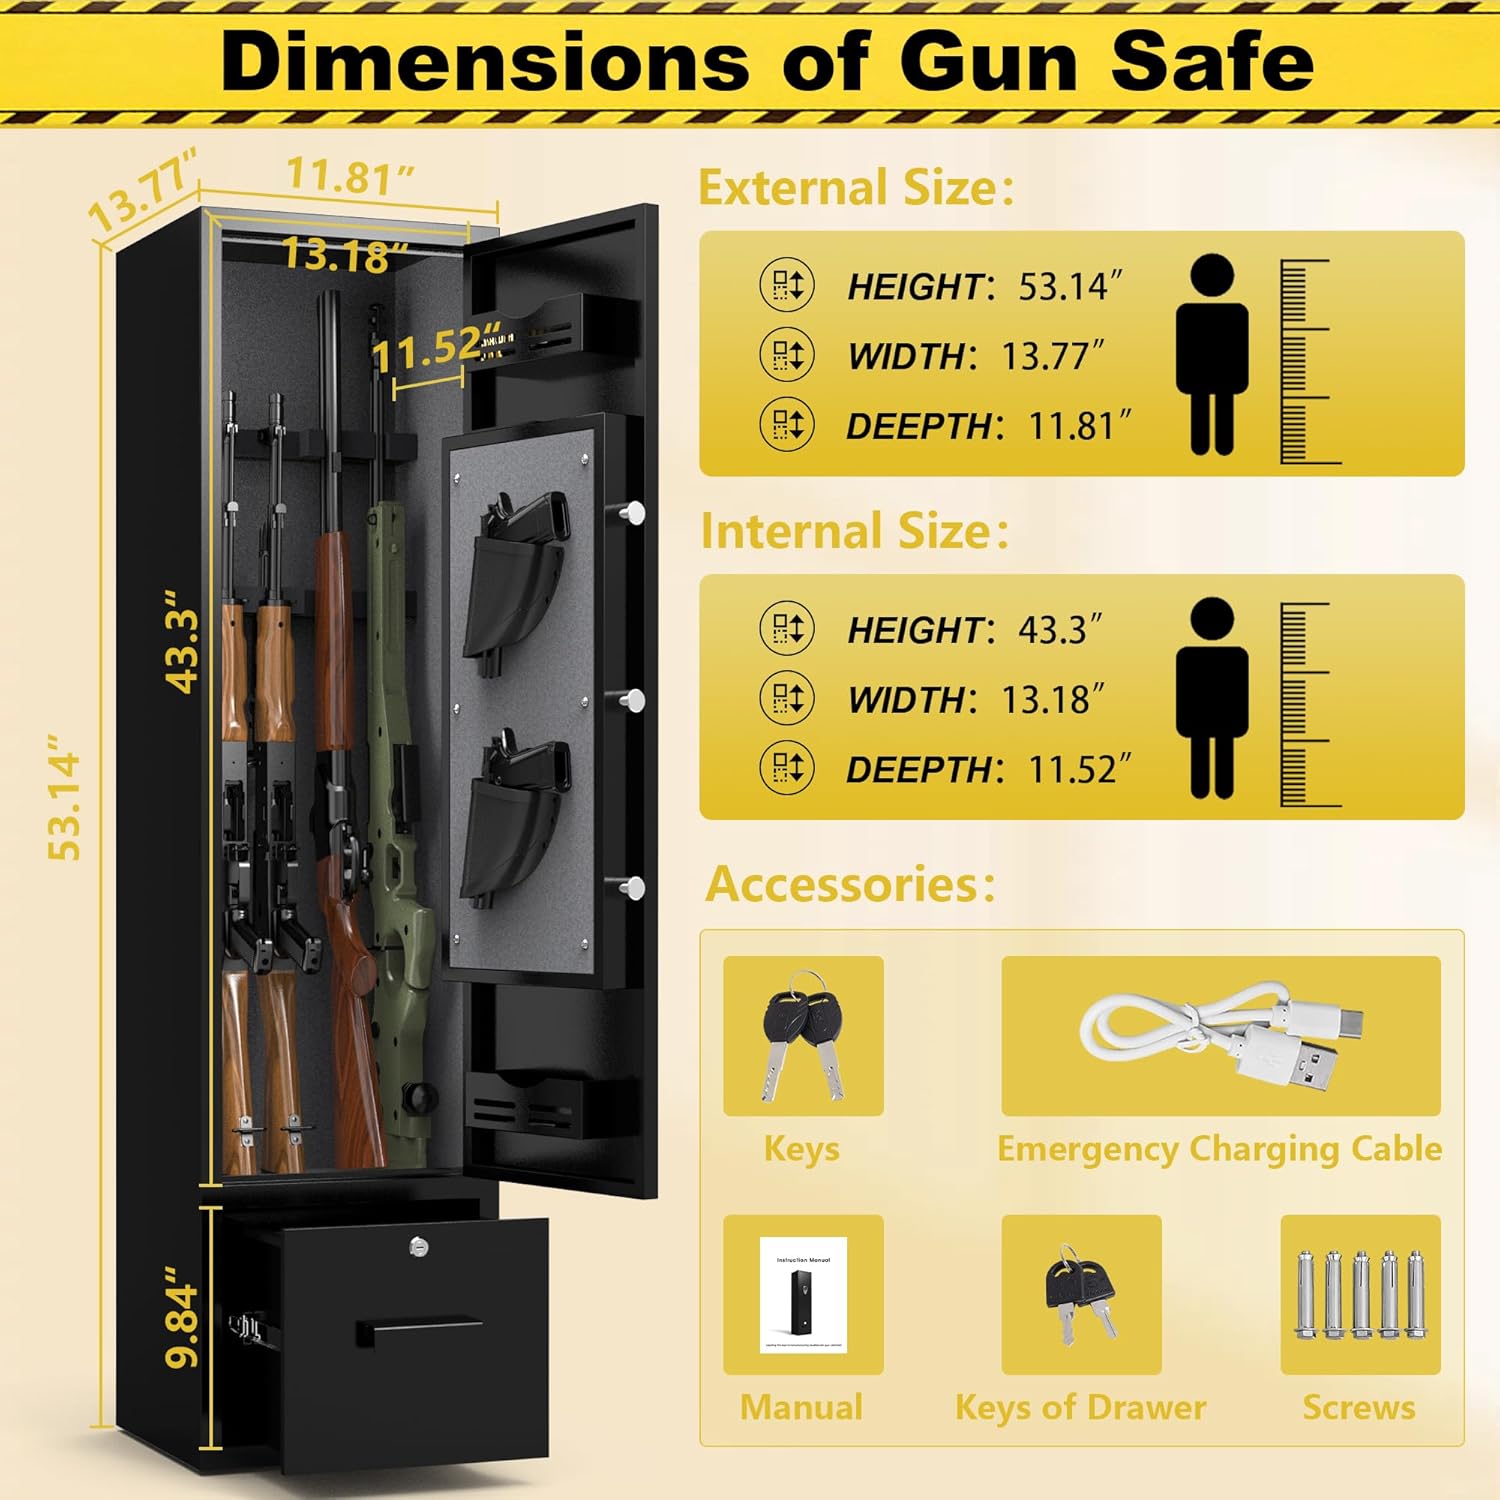
Figure 3.1: Included Components and Safe Dimensions. This image illustrates the external and internal dimensions of the safe, along with a visual representation of all items included in the package.
4. Product Features
The Marcree Biometric Rifle Safe is designed with multiple features to enhance security and user convenience:
- High Capacity: Accommodates 3 to 5 rifles up to 43 inches in length. Includes 2 independent handgun pouches and 2 upper and lower ammunition storage units.
- Lockable Bottom Drawer: A discreet and independently lockable drawer provides secure storage for ammunition or personal items.
- Robust Construction: Made from thickened cold-rolled steel for enhanced durability and resistance to unauthorized entry.
- Multiple Unlocking Methods: Offers biometric (fingerprint), password, and traditional key unlocking options for quick and reliable access.
- Dual Alarm System: An audible alarm triggers upon repeated incorrect entries or violent impact, deterring unauthorized access.
- Mute Function: Allows for silent operation of the keypad and alarm system, useful for discreet access.
- Anti-Tip Design: Includes pre-drilled holes and expansion screws for secure wall or floor mounting.
- Internal LED Light: Provides illumination inside the safe for better visibility.

Figure 4.1: Product Details. This image highlights key features such as the gun rack, locking bolts, ammunition storage, LED light, pistol bags, and the secure bottom drawer.

Figure 4.2: 180° Opening Door and Drawer Design. This image demonstrates the wide door opening for easy access and the secure, independent bottom drawer.
5. Setup and Installation
The Marcree Biometric Rifle Safe comes pre-assembled. The primary setup involves powering the lock system and securely mounting the safe.
5.1 Initial Power and Unlocking
- Locate the emergency keys. Insert one key into the keyhole on the main door and turn it to unlock.
- Open the safe door. Inside, locate the battery compartment (typically on the back of the door panel).
- Insert 4 AA batteries (not included) into the compartment, ensuring correct polarity.
- Close the battery compartment. The electronic lock system is now powered.
5.2 Secure Mounting (Recommended)
To prevent unauthorized removal or tipping, it is highly recommended to secure the safe to a wall or floor.
- Choose a suitable location for the safe, ensuring it is level and stable.
- Inside the safe, locate the pre-drilled mounting holes on the back panel.
- Position the safe against the desired wall or floor surface. Mark the drilling points through the pre-drilled holes.
- Move the safe away and drill pilot holes at the marked locations using an appropriate drill bit for your wall/floor material.
- Reposition the safe and align the holes. Insert the provided expansion screws through the safe's holes and into the pilot holes.
- Tighten the screws securely until the safe is firmly anchored.

Figure 5.1: Wall Mounting Instructions. This diagram illustrates the location of the pre-drilled holes and the process for securing the safe to a wall.
6. Operating Instructions
6.1 Unlocking the Safe
The safe offers three primary methods for unlocking:
- Biometric (Fingerprint) Unlocking: Place a registered finger on the scanner. If recognized, the safe will unlock.
- Password Unlocking: Enter your programmed password on the keypad, then press '#' or the designated confirmation button.
- Key Unlocking: Insert an emergency key into the keyhole and turn it. This method bypasses the electronic lock.

Figure 6.1: Multiple Unlocking Methods. This image visually explains the fingerprint, key, and password unlocking options.
6.2 Programming Fingerprints
Refer to the detailed instructions provided in the separate quick start guide for programming fingerprints. Typically, this involves pressing a program button inside the safe, then scanning your finger multiple times from different angles.
6.3 Setting a Password
Refer to the detailed instructions provided in the separate quick start guide for setting your personal password. This usually involves pressing a program button, entering your desired numerical code, and confirming it.
6.4 Mute Function
To activate or deactivate the mute function (silent mode for keypad and alarm), press and hold the '*' key (or designated mute button) on the keypad for approximately 3 seconds. The safe will provide a visual indicator (e.g., LED change) to confirm the mode change.

Figure 6.2: Alarm System and Mute Mode. This image illustrates the alarm activation and the discreet operation provided by the mute function.
6.5 Using the Keyed Drawer
The bottom drawer is equipped with a separate key lock. Use the provided drawer keys to unlock and access its contents. Ensure the drawer is locked when not in use.

Figure 6.3: Secure Bottom Drawer. This image shows the internal capacity of the independently lockable drawer, suitable for ammunition or small valuables.
7. Maintenance
- Battery Replacement: Replace batteries promptly when the low battery indicator appears. Use only high-quality AA alkaline batteries.
- Cleaning: Wipe the exterior of the safe with a soft, damp cloth. Avoid abrasive cleaners or solvents that could damage the finish. Clean the fingerprint scanner gently with a dry, lint-free cloth.
- Internal Components: Periodically check the gun rack and other internal components for wear and tear.
8. Troubleshooting
| Problem | Possible Cause | Solution |
|---|---|---|
| Safe does not open with fingerprint/password. | Low batteries; incorrect fingerprint/password; scanner/keypad malfunction. | Replace batteries; re-enter password carefully; try a different registered fingerprint; use emergency key. |
| Alarm sounds unexpectedly. | Repeated incorrect entries; physical impact; sensitivity setting. | Enter correct password/fingerprint to disarm; avoid bumping the safe; consult manual for alarm sensitivity adjustment if available. |
| Safe is completely unresponsive. | Dead batteries. | Use the emergency charging cable to temporarily power the lock, then replace batteries. Alternatively, use the emergency key. |
| Cannot open safe, emergency keys are inside. | Keys stored improperly. | This situation is not recoverable without professional assistance or damaging the safe. Always store emergency keys externally. |
9. Specifications
| Feature | Detail |
|---|---|
| Brand | Marcree |
| Model Number | 5H-135-F |
| Exterior Dimensions (H x W x D) | 53.14" x 13.77" x 11.81" |
| Interior Dimensions (H x W x D) | 43.3" x 13.18" x 11.52" |
| Lock Type | Biometric (Fingerprint), Keypad (Password), Key |
| Material | Alloy Steel |
| Color | Black |
| Item Weight | 60 Pounds |
| Special Features | Alarm System, Mute Function, Sensor Light, Keyed Drawer |
| Mounting Type | Floor Mount (Wall Mountable) |
| Power Source | 4x AA Batteries (not included), Emergency Charging Cable |
10. Warranty and Support
Marcree is committed to providing quality products and customer satisfaction. If you encounter any issues with your Biometric Rifle Safe, please contact our customer support team. We aim to resolve your concerns within 24 hours.
For support, please refer to the contact information provided with your purchase or visit the official Marcree website.