1. Introduction
This manual provides detailed instructions for the installation, operation, and maintenance of your VEVOR 7-in-1 Wi-Fi Solar Weather Station. This advanced weather station is designed to provide accurate, real-time weather data, including temperature, humidity, wind speed, wind direction, rainfall, and light intensity, both indoors and outdoors. Its solar-powered outdoor sensor and Wi-Fi connectivity allow for convenient monitoring and data sharing.
2. Safety Information
- Read all instructions carefully before assembly and operation.
- Ensure all components are securely fastened during installation to prevent damage from wind or other environmental factors.
- Do not attempt to disassemble or repair the unit yourself. Contact VEVOR support for assistance.
- Keep the indoor display unit away from water and extreme temperatures.
- Use only the provided power adapter for the indoor display unit.
- Dispose of batteries according to local regulations.
3. Package Contents
Verify that all items are present in your package:
- 1 x Weather Station Indoor Display Unit
- 1 x Wireless 7-in-1 Outdoor Sensor
- 1 x Funnel (for rain gauge)
- 1 x Wind Direction Vane with 1 Screw
- 1 x Wind Speed Cups with 1 Screw
- 1 x Mounting Pole with 4 Screws
- 1 x Mounting Brackets with 2 Screws & 2 Nuts
- 1 x Screwdriver I
- 1 x Screwdriver II
- 4 x Mounting Screws
- 4 x Plastic Expansion Plugs
- 1 x Adapter (for indoor display)
- 4 x Nuts
- 4 x Fixing Screws
- 2 x Rubber Pads
- 1 x User Manual

Image: Overview of all included components for the VEVOR weather station, including the indoor display, outdoor sensor, mounting hardware, and tools.
4. Product Overview
The VEVOR 7-in-1 Wi-Fi Solar Weather Station consists of an outdoor sensor array and an indoor TFT color display unit. The outdoor sensor measures various environmental parameters, while the indoor unit displays this data and allows for Wi-Fi connectivity.
4.1 Outdoor Sensor
The outdoor sensor is a comprehensive unit designed to collect multiple weather data points:
- Wind Speed: Measured by rotating cups.
- Wind Direction: Determined by a wind vane.
- Temperature & Humidity: Integrated sensors provide ambient conditions.
- Rainfall: Measured by a tipping bucket rain gauge.
- Light Intensity & UV: Sensors for solar radiation and ultraviolet index.
The outdoor sensor is solar-powered with rechargeable Ni-MH batteries for continuous operation.

Image: A detailed diagram illustrating the various components of the 7-in-1 outdoor sensor and their respective functions, such as wind direction, wind speed, rainfall, UV/light intensity, and temperature/humidity measurement.
4.2 Indoor Display Unit
The 7-inch TFT color display unit provides a clear and vibrant interface for viewing all collected weather data. It features:
- Real-time display of indoor and outdoor temperature, humidity, wind speed, wind direction, rainfall, light intensity, UV index, barometric pressure, dew point, and wind chill.
- 10-level adjustable brightness for optimal viewing day and night.
- Automatic internet time synchronization.
- Alarm functions for high/low values.
- Wi-Fi connectivity for data upload to platforms like Weather Underground and WeatherCloud.
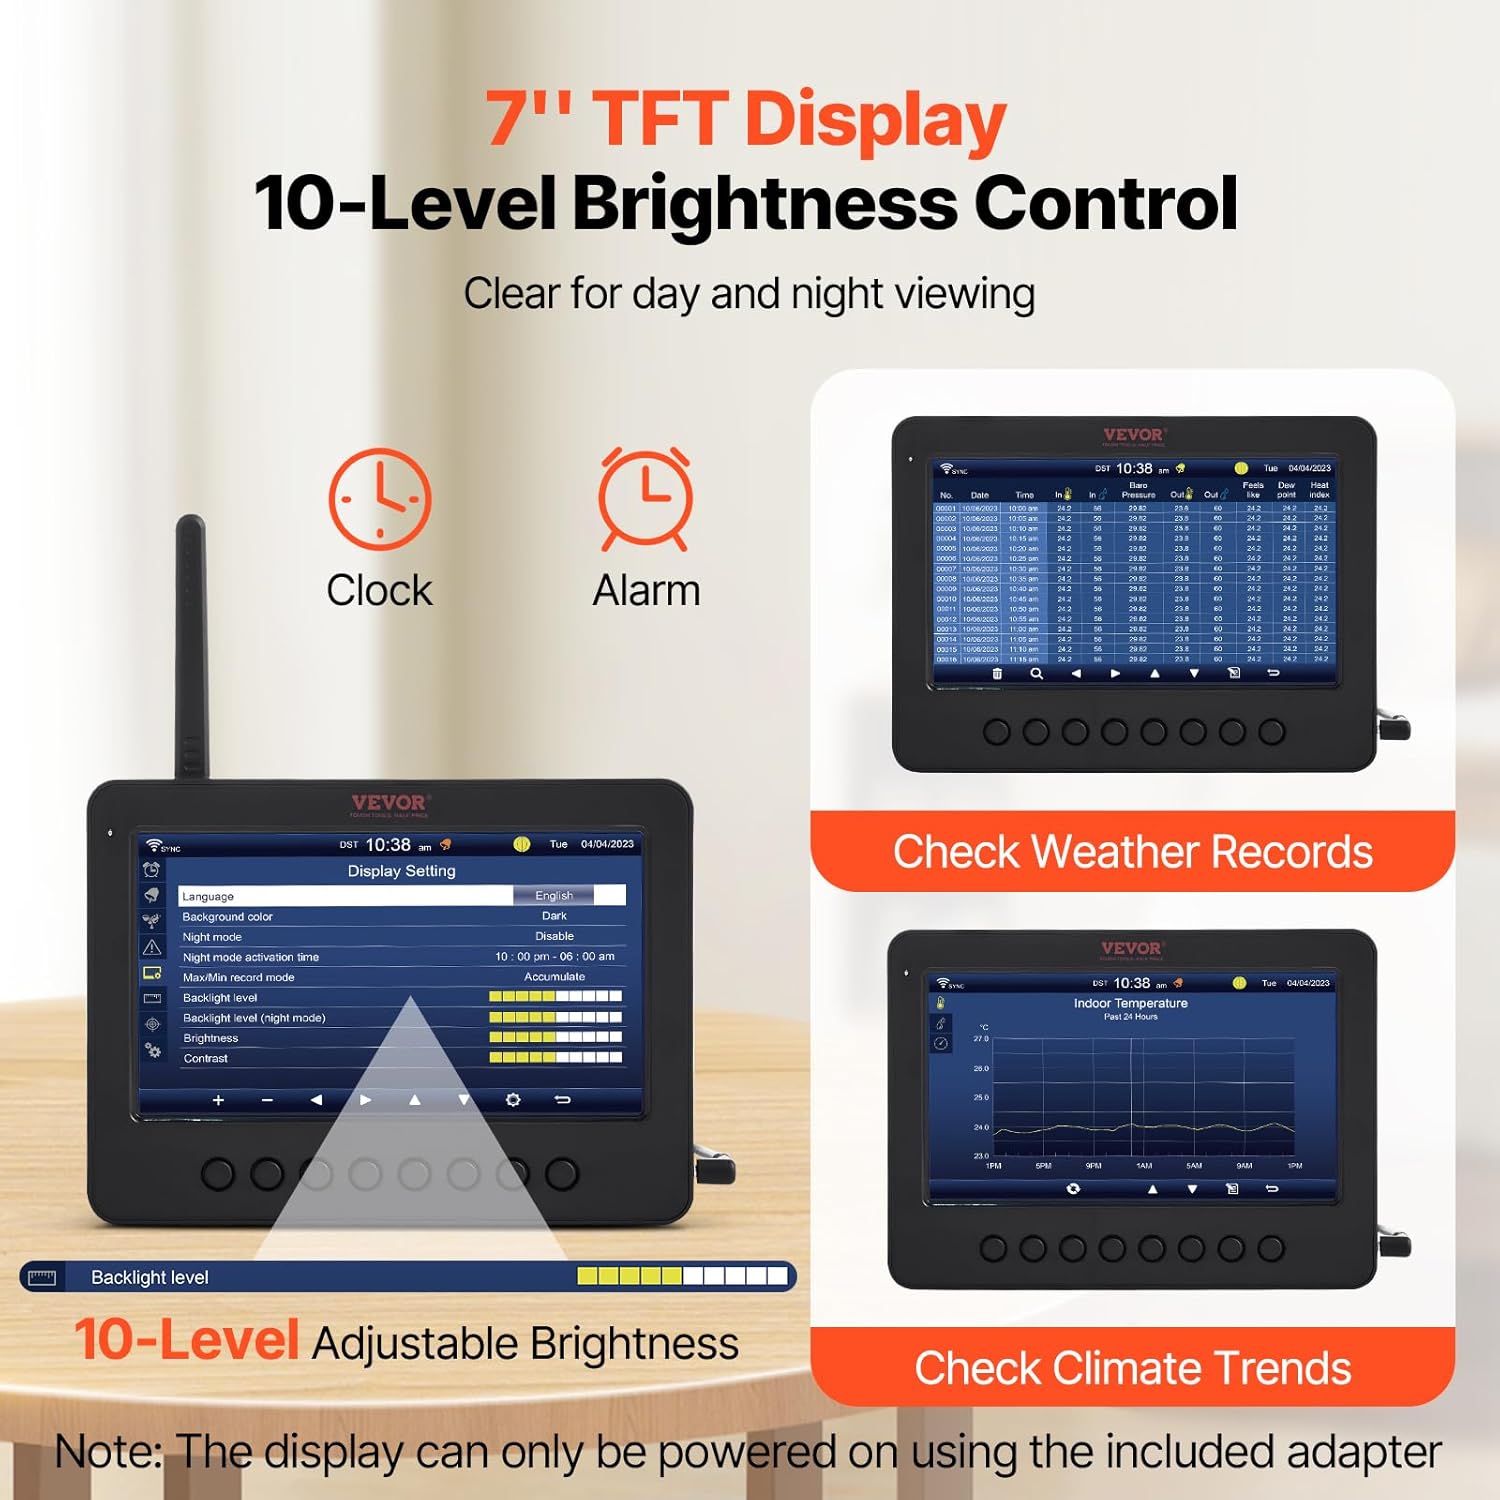
Image: The 7-inch TFT display unit highlighting its features, including a clock, alarm, the ability to check weather records, and climate trends, along with a visual representation of its 10-level adjustable brightness.
5. Setup
5.1 Outdoor Sensor Assembly
- Attach the wind speed cups to the designated shaft on the sensor unit and secure with the provided screw.
- Attach the wind direction vane to its shaft and secure with the provided screw.
- Ensure the rain gauge funnel is properly seated on top of the sensor unit.
- Insert the rechargeable Ni-MH batteries into the battery compartment of the outdoor sensor.
- Adjust the solar panel to face south (in the Northern Hemisphere) or north (in the Southern Hemisphere) for optimal sunlight exposure.
5.2 Outdoor Sensor Mounting
Choose an open location for the outdoor sensor, free from obstructions that could affect wind, rain, or sunlight measurements. Ideal locations include rooftops, open fields, or sturdy poles.
- Assemble the mounting pole and brackets.
- Securely attach the outdoor sensor to the mounting pole using the provided screws and nuts.
- Mount the assembly to a stable surface using the fixing screws and plastic expansion plugs. Ensure it is level.
- The sensor has a transmission distance of up to 100 meters (328 feet) to the indoor display unit. Avoid placing it near large metal objects, TV sets, signal towers, or high-voltage lines that may cause interference.

Image: An illustration demonstrating the 100-meter transmission range of the VEVOR weather station's outdoor sensor, showing its effective reach in diverse settings such as mountainous areas, farms, and coastal regions.
5.3 Indoor Display Unit Power-Up
- Place the indoor display unit in a central location within range of the outdoor sensor.
- Connect the provided power adapter to the display unit and plug it into a power outlet. The display will power on.
- The display will automatically search for the outdoor sensor and attempt to pair. This may take a few minutes.
5.4 Wi-Fi Connection
To enable remote monitoring and data upload, connect the display unit to your Wi-Fi network:
- Access the Wi-Fi settings on the display unit (refer to the on-screen menu).
- Select your 2.4GHz Wi-Fi network (5GHz networks are not supported).
- Enter your Wi-Fi password.
- Once connected, the display will synchronize time automatically and allow data upload to Weather Underground and WeatherCloud.

Image: A visual representation of the Wi-Fi remote connection, demonstrating how the outdoor sensor transmits data to the indoor display, which then uploads it via Wi-Fi (2.4GHz only) to online platforms like Weather Underground for viewing on PC and mobile devices.
6. Operation
6.1 Display Navigation
Use the buttons on the front of the display unit to navigate through menus and view different data screens. The 7-inch TFT display provides a clear overview of current weather conditions.
6.2 Data Interpretation
The display shows various parameters:
- Outdoor/Indoor Temperature & Humidity: Current readings.
- Wind Speed & Direction: Current wind conditions.
- Rainfall: Daily, weekly, monthly, and total rainfall.
- Barometric Pressure: Absolute and relative pressure.
- Dew Point & Wind Chill: Calculated values for comfort and risk assessment.
- Light Intensity & UV Index: Environmental light and UV radiation levels.
- Weather Forecast: Icon-based forecast based on barometric pressure trends.
6.3 Alarms
Set high and low alarms for various weather parameters (e.g., temperature, wind speed, rainfall). The display will alert you when these thresholds are met.
6.4 Checking Records and Trends
The display unit stores historical data, allowing you to review past weather conditions and observe climate trends over time.
7. Maintenance
7.1 Cleaning the Outdoor Sensor
- Periodically clean the solar panel with a soft, damp cloth to ensure optimal charging efficiency.
- Inspect the rain gauge funnel and tipping bucket mechanism for debris (leaves, insects) and clean as necessary to ensure accurate rainfall measurements.
- Ensure the wind cups and vane rotate freely. Remove any obstructions.
7.2 Battery Information
The outdoor sensor uses rechargeable Ni-MH batteries, which are continuously charged by the solar panel. Under normal conditions, these batteries should provide long-term operation. If the sensor loses power or connectivity frequently, check the solar panel for obstructions or consider replacing the Ni-MH batteries.
8. Troubleshooting
- No Outdoor Data Displayed: Ensure the outdoor sensor is within the 100m transmission range and free from major interference. Try re-pairing the sensor with the indoor display unit (refer to the display's menu for pairing instructions). Check the outdoor sensor's batteries.
- Inaccurate Rainfall Readings: Inspect the rain gauge for blockages or debris. Ensure the tipping bucket mechanism is installed correctly and moves freely. A common issue can be the magnet on the tipping bucket being mounted backward; ensure it faces inward towards the sensor.
- Wi-Fi Connection Issues: Verify your Wi-Fi network is 2.4GHz. Ensure the password is correct. Restart both your Wi-Fi router and the indoor display unit.
- Indoor Display Not Powering On: Ensure the power adapter is securely connected to both the display unit and a working power outlet.
- Time Not Synchronizing: Ensure the Wi-Fi connection is active. The display will automatically update the time within approximately 2 minutes after a successful Wi-Fi connection or restart.
9. Specifications
| Feature | Specification |
|---|---|
| Item Model Number | YT60233 |
| Main Material | ABS+PC, Aluminum |
| Sensor Battery | Ni-MH Battery: BPI-49AA2000mAh*3, 3.6V, 2000mA |
| Solar Panel Size | 4 x 3 in / 100 x 70 mm |
| Solar Panel Illuminance | 38000 LUX, 5.4V, 200mA |
| Wi-Fi Operation Frequency | 2.4 GHz |
| RF Frequency (US) | 915 MHz |
| RF Frequency (EU/AU/UK) | 868 MHz |
| Input (Adapter) | 100-240V AC, 50/60 Hz, 0.4A |
| Output (Adapter) | 5.0V DC, 1000 mA, 5W |
| IP Rating | IPX6 (Outdoor Sensor) |
| Net Weight | 3 lbs / 1.36 kg |
| Temperature Accuracy | 1 °C |
| Display Type | LCD (TFT Color) |
| Connectivity Technology | Wi-Fi |

Image: A comprehensive visual displaying the dimensions of both the outdoor sensor and the indoor display unit, alongside a table summarizing the product's key specifications such as model number, battery type, solar panel details, and connectivity.
10. Warranty and Support
VEVOR products come with a standard warranty. For specific warranty details, technical support, or service inquiries, please refer to the warranty card included with your product or visit the official VEVOR website. Please have your model number (YT60233) and purchase information ready when contacting support.