1. Introduction
Thank you for choosing the ICEVOKE 2-in-1 Water Dispenser with Ice Maker. This appliance provides convenient access to cold and room temperature water, along with on-demand ice production. This manual contains important information regarding the safe operation, installation, maintenance, and troubleshooting of your new appliance. Please read it thoroughly before use and retain it for future reference.

Image 1.1: Front view of the ICEVOKE 2-in-1 Water Dispenser with Ice Maker. The unit is black, sleek, and features a control panel at the top, a water/ice dispensing area, and a bottom-loading compartment.
2. Safety Instructions
To reduce the risk of fire, electric shock, or injury, always follow basic safety precautions when using this appliance.
- Electrical Safety: Ensure the power outlet matches the appliance's voltage requirements. Do not use extension cords or adapters. Always unplug the unit before cleaning or servicing.
- Placement: Place the dispenser on a flat, stable surface away from direct sunlight and heat sources. Allow adequate clearance around the unit for ventilation.
- Water Quality: Use only potable water. Do not operate the unit without a water bottle installed.
- Children and Pets: Keep children and pets away from the dispenser, especially during operation.
- Damage: Do not operate the appliance if the power cord or plug is damaged, or if the unit malfunctions or has been dropped. Contact customer support for assistance.
- Cleaning: Do not immerse the appliance, cord, or plug in water or other liquids.
3. Product Overview
The ICEVOKE 2-in-1 Water Dispenser is designed for convenience and efficiency, offering both water dispensing and ice making capabilities.
Key Features:
- Dual Temperature Output: Provides cold water (approximately 14°F) and room temperature water. Note: This model does not provide hot water.
- Built-in Ice Maker: Produces 9 bullet-shaped ice cubes in 6-8 minutes, with a daily capacity of up to 18 lbs. The internal storage holds approximately 0.7 lbs of ice. Note: The unit does not keep ice frozen long-term; melted ice water is recycled for new ice production.
- Bottom Loading Design: Simplifies water bottle replacement, accommodating 3 or 5-gallon bottles without heavy lifting.
- Removable Drip Tray: Easy to clean and maintain, preventing water stains and promoting hygiene.
- Automatic Shut-Off System: Automatically stops ice making when the ice bin is full or when there is insufficient water.
- Certifications: ETL, FCC, and UL certified, with food-grade materials in contact with water.
4. Setup
4.1 Unpacking
- Carefully remove the dispenser from its packaging.
- Remove all packing materials, tape, and protective film.
- Inspect the unit for any damage. If damaged, do not operate and contact customer support.
4.2 Placement
- Place the dispenser on a firm, level surface capable of supporting its weight when full.
- Ensure there is at least 4 inches (10 cm) of space from the back and sides of the unit to allow for proper ventilation.
- Avoid placing the unit near direct sunlight, heat sources, or in areas with extreme temperatures.
- Plug the power cord into a grounded electrical outlet.
4.3 Water Bottle Installation (Bottom Loading)

Image 4.1: Close-up of the bottom-loading compartment with a water bottle being inserted. The pump tube is visible, ready to be placed into the bottle.
- Open the lower cabinet door of the dispenser.
- Remove the cap from a new 3 or 5-gallon water bottle.
- Insert the probe from the dispenser into the neck of the water bottle. Ensure it is securely seated.
- Slide the water bottle into the cabinet.
- Close the cabinet door completely. The machine will not pump water unless the door is fully closed.

Image 4.2: The bottom-loading compartment with a water bottle securely placed inside and the door closed, indicating readiness for operation.
4.4 Initial Startup
- After installing the water bottle and plugging in the unit, allow approximately 5 minutes for the water to fill the internal reservoirs.
- Dispense a few cups of water from both the cold and room temperature spouts to prime the system and remove any air.
5. Operating Instructions

Image 5.1: Close-up of the control panel, showing indicator lights for Power, Ice, Cold Water, and Add Water, along with control buttons for Water Cooling, Make Ice, Ice Fill, and Water Fill.
5.1 Control Panel Functions
- Power Button: Turns the unit on/off.
- Water Cooling Button: Activates/deactivates the cold water function. The 'Cold Water' indicator light will illuminate when active.
- Make Ice Button: Initiates/stops the ice making process. The 'Ice' indicator light will illuminate when active.
- Water Fill Button: Dispenses water.
5.2 Dispensing Water

Image 5.2: Illustrates the three main functions: dispensing cold water, the ice-making process, and dispensing room temperature water.
- Cold Water: Ensure the 'Water Cooling' function is activated (indicator light on). Place a cup under the cold water spout and press the 'Water Fill' button.
- Room Temperature Water: To dispense room temperature water, ensure the 'Water Cooling' function is not activated. Place a cup under the water spout and press the 'Water Fill' button.
5.3 Ice Making Function
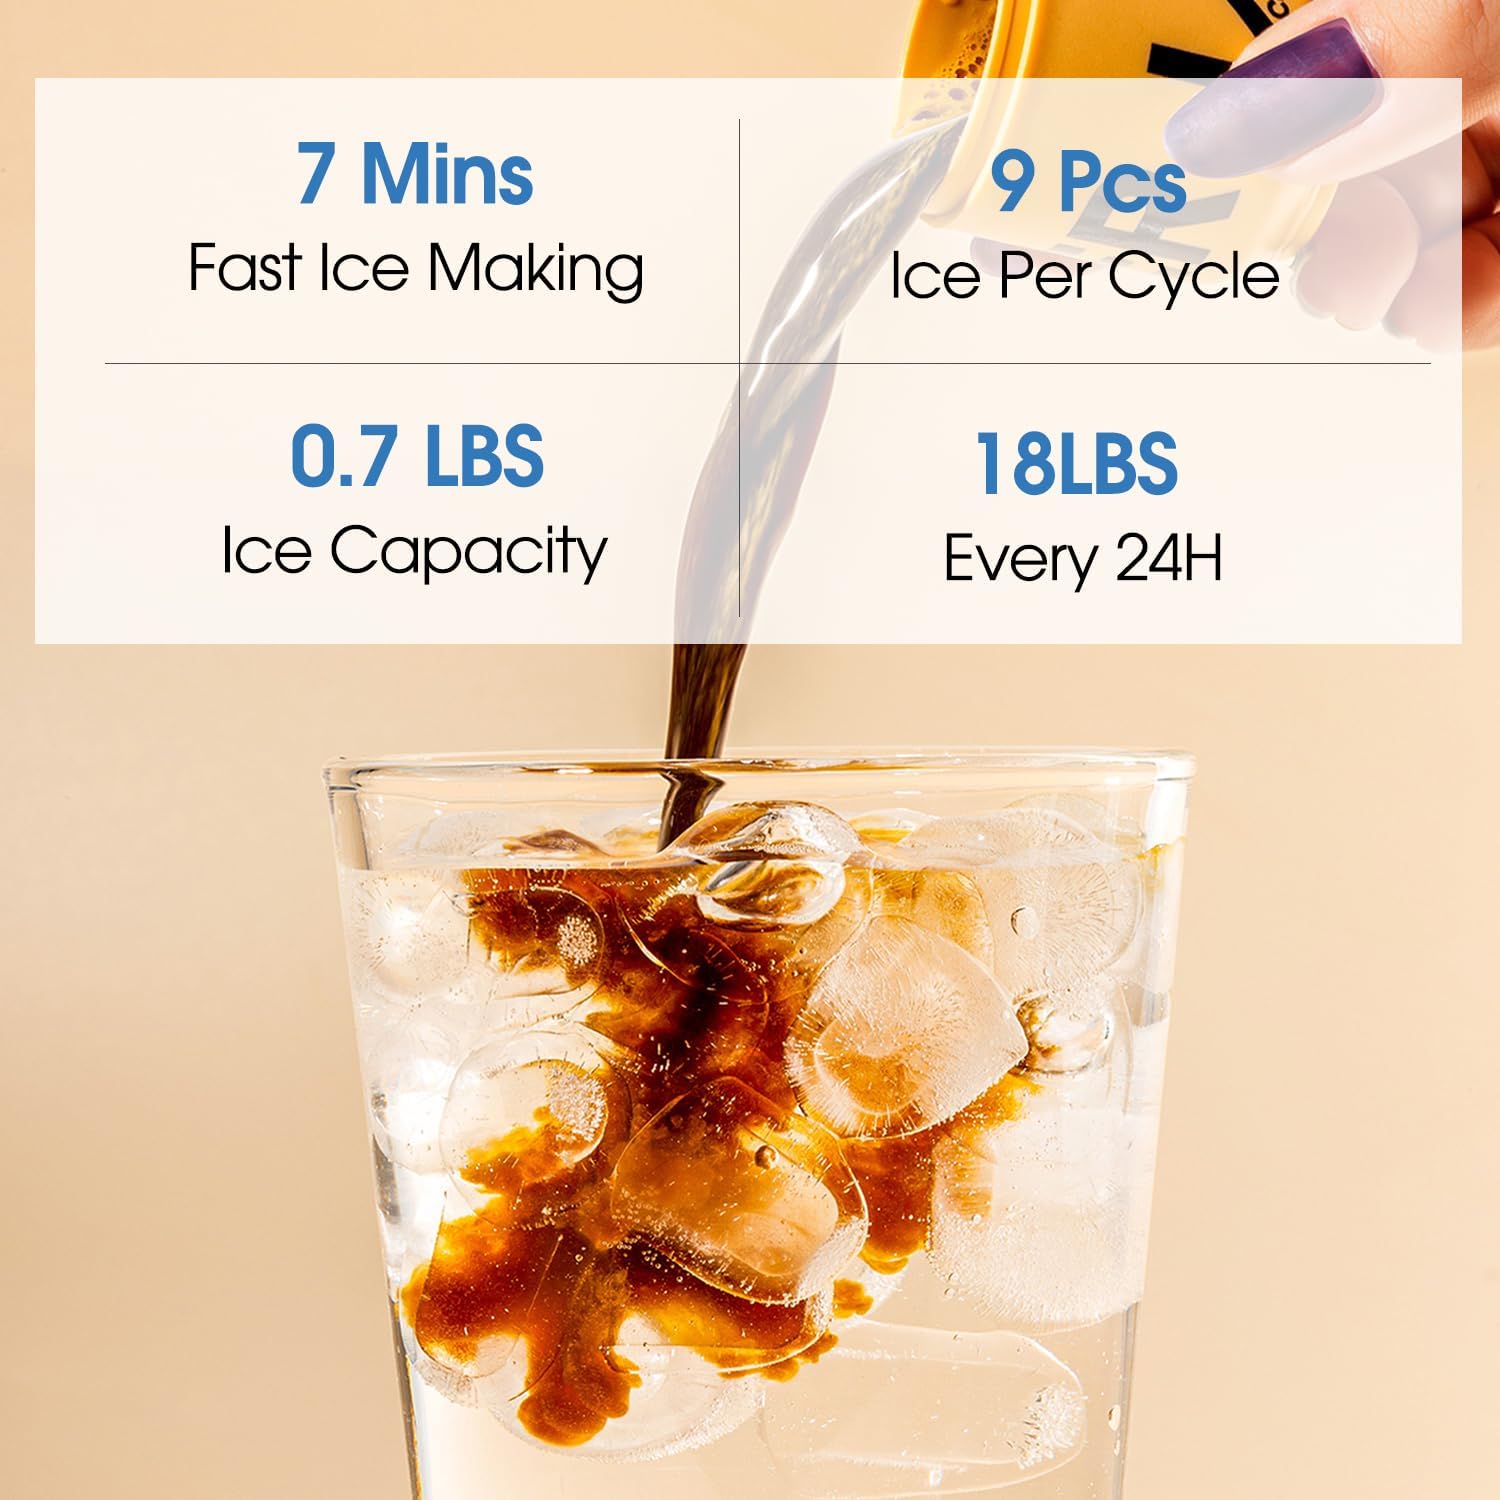
Image 5.3: Details the ice making performance: 7 minutes for fast ice making, 9 pieces per cycle, 0.7 lbs ice capacity, and 18 lbs daily production.
- Press the 'Make Ice' button to start ice production. The 'Ice' indicator light will illuminate.
- The unit will produce 9 bullet-shaped ice cubes in approximately 6-8 minutes.
- The ice will be stored in the internal ice bin. The unit will automatically stop making ice when the bin is full ('Ice Fill' indicator light).
- Melted ice water is recycled back into the reservoir for future ice production. This unit does not maintain ice in a frozen state for extended periods.
6. Maintenance
6.1 Cleaning the Drip Tray

Image 6.1: A close-up view of the removable drip tray, detached from the dispenser for cleaning.
- The drip tray is located below the dispensing spouts.
- Pull the drip tray forward to remove it.
- Empty any accumulated water and wash the tray with mild soap and warm water.
- Rinse thoroughly and dry before reinserting.
6.2 Cleaning the Exterior
- Unplug the dispenser before cleaning.
- Wipe the exterior surfaces with a soft, damp cloth. Do not use abrasive cleaners or solvents.
- Ensure no water enters the control panel or electrical components.
6.3 Internal Cleaning / Descaling
- Regular internal cleaning is recommended to prevent mineral buildup and maintain water quality.
- For detailed internal cleaning or descaling procedures, please refer to the full product manual or contact customer support.
7. Troubleshooting
If you encounter issues with your ICEVOKE water dispenser, please refer to the following common problems and solutions:
| Problem | Possible Cause | Solution |
|---|---|---|
| No water dispensed | Water bottle empty or not properly installed; cabinet door open; airlock in system. | Replace water bottle; ensure cabinet door is fully closed; dispense water to prime the system. |
| No ice produced | Ice making function not activated; water bottle empty; ice bin full; ambient temperature too high. | Press 'Make Ice' button; replace water bottle; empty ice bin; ensure proper ventilation. |
| 'Add Water' indicator light is on | Water bottle is empty or not detected. | Replace the water bottle and ensure it is correctly installed with the cabinet door closed. |
| 'Ice Fill' indicator light is on | Ice bin is full. | Remove ice from the bin. The unit will resume ice production automatically. |
| Water not cold enough | Cold water function not activated; unit recently plugged in; poor ventilation. | Activate 'Water Cooling'; allow 1-2 hours for water to chill; ensure adequate space around the unit. |
If the problem persists after attempting these solutions, please contact ICEVOKE customer support.
8. Specifications

Image 8.1: Diagram showing the product dimensions (14.5"D x 12.2"W x 40.8"H) and highlighting the ETL certification.
- Model: BYCZ623-0729
- Brand: ICEVOKE
- Color: Black
- Material: Acrylonitrile Butadiene Styrene (ABS), Stainless Steel
- Product Dimensions (D x W x H): 14.5" x 12.2" x 40.8"
- Item Weight: 37.5 pounds
- Water Bottle Capacity: 3 or 5 Gallons
- Ice Making Capacity: Up to 18 lbs per 24 hours
- Ice Storage Capacity: Approximately 0.7 lbs
- Ice Production Time: 9 cubes in 6-8 minutes
- Water Temperatures: Cold (approx. 14°F), Room Temperature (No Hot Water)
- Wattage: 100 watts
- Installation Type: Freestanding
- Power Source: Corded Electric
- Certifications: ETL, FCC, UL
9. Warranty and Support
For warranty information, technical support, or to inquire about replacement parts, please contact ICEVOKE customer service. Keep your purchase receipt as proof of purchase for warranty claims.
Contact Information: Please refer to the product packaging or the official ICEVOKE website for the most current customer support contact details.