1. Introduction
This manual provides detailed instructions for the installation, operation, and maintenance of your gorise OS01 Bicycle Display. This display is designed for electric bicycles equipped with a 500W motor and a 48V 15Ah battery system. Please read this manual thoroughly before using the product to ensure safe and correct operation.
2. Safety Information
- Always wear a helmet and appropriate safety gear when riding your electric bicycle.
- Ensure all components are securely fastened before each ride.
- Do not attempt to modify the display or any electrical components of the bicycle. Unauthorized modifications can lead to malfunction and void the warranty.
- Keep the display dry and avoid exposure to extreme temperatures.
- Regularly check the battery level and ensure it is adequately charged for your intended ride.
- Familiarize yourself with local traffic laws and regulations regarding electric bicycles.
3. Product Overview
The gorise OS01 display provides essential information for your electric bicycle, including speed, battery status, assist level, and various trip data. Below is an illustration of the display interface and its key indicators.
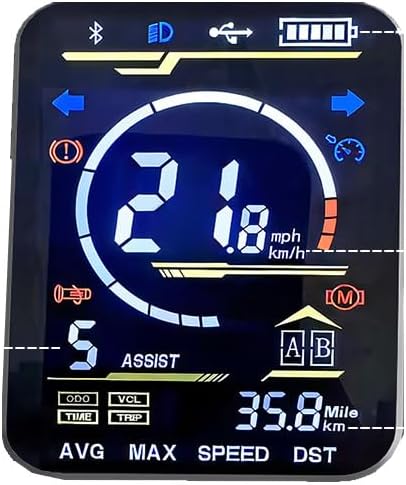
Figure 1: gorise OS01 Bicycle Display Interface. This image shows the main screen with various indicators for Bluetooth, headlight, USB charging, battery level, turn signals, warning, current speed, motor power, horn, assist level, mode, trip data, and average/max speed.
3.1 Display Indicators
- Bluetooth Indicator: (Top Left) Illuminates when the display is connected via Bluetooth.
- Headlight Indicator: (Top Center) Shows when the bicycle's headlight is active.
- USB Charging Indicator: (Top Right) Indicates if a device is connected for USB charging.
- Battery Level: (Top Right) Displays the current charge level of the bicycle battery.
- Turn Signal Indicators: (Left and Right Arrows) Flash when the corresponding turn signal is activated.
- Warning/Error Indicator: (Exclamation Mark in Circle) Illuminates to indicate a system warning or error.
- Current Speed: (Large Central Numbers) Shows the current riding speed in mph or km/h.
- Motor Power/Speed Bar: (Arc around speed) Visual representation of motor output or speed range.
- Horn Indicator: (Horn Icon) May indicate horn activation or status.
- Assist Level: (Number '5' with 'ASSIST') Displays the current pedal assist level, typically from 0 to 5.
- Mode Button Indicator: (M in Circle) Indicates the mode button functionality.
- Trip Data Selectors: (ODO, VCL, TIME, TRIP) Buttons or indicators for cycling through Odometer, Voltage, Ride Time, and Trip Distance.
- A/B Mode: (A and B in Boxes) Potentially indicates different riding profiles or settings.
- Distance Traveled: (35.8 Mile/km) Shows the total distance for the current trip or odometer reading.
- AVG/MAX Speed, DST: (Bottom Row) Displays Average Speed, Maximum Speed, and Total Distance (DST).
4. Setup and Installation
The gorise OS01 display is typically pre-installed on your electric bicycle. If replacement or re-installation is required, follow these general steps. For specific wiring diagrams, please refer to your bicycle's main manual or consult a qualified technician.
- Mounting: Securely attach the display to the handlebar using the provided bracket and screws. Ensure it is positioned for clear visibility and easy access to controls.
- Wiring: Connect the display's cable to the corresponding port on your electric bicycle's wiring harness. Ensure the connection is firm and waterproof.
- Power On: After installation, power on your electric bicycle. The display should illuminate and show the default screen.
- Initial Check: Verify all indicators and functions are working correctly. Test the headlight, turn signals, and pedal assist levels.
5. Operating Instructions
5.1 Power On/Off
- To power on the display, press and hold the power button (location may vary on your bicycle, typically near the display or on the battery).
- To power off, press and hold the power button again until the display turns off.
5.2 Adjusting Assist Level
Use the UP and DOWN buttons (usually located on a separate control pad) to cycle through the pedal assist levels (e.g., 0-5). Level 0 provides no motor assistance, while higher numbers provide more assistance.
5.3 Viewing Trip Data
Press the MODE button (indicated by 'M' on the display) to cycle through different trip data displays, such as:
- ODO: Odometer (total distance traveled).
- TRIP: Trip distance (distance for the current ride).
- TIME: Ride time for the current trip.
- VCL: Voltage (battery voltage).
- AVG SPEED: Average speed for the current trip.
- MAX SPEED: Maximum speed achieved during the current trip.
- DST: Total distance (similar to ODO).
5.4 Unit Settings (mph/km/h)
To switch between miles per hour (mph) and kilometers per hour (km/h), consult your bicycle's main controller manual. This setting is often adjusted through a combination of button presses on the display or a separate control unit while powering on.
5.5 Headlight and Horn
The headlight and horn are typically controlled by dedicated buttons on your bicycle's handlebar. The display will show an indicator when the headlight is active.
6. Maintenance
- Cleaning: Wipe the display screen with a soft, damp cloth. Do not use abrasive cleaners or solvents.
- Water Exposure: The display is designed to be water-resistant, but avoid submerging it or exposing it to high-pressure water jets.
- Cable Inspection: Periodically check the display's cable and connectors for any signs of wear, damage, or loose connections.
- Storage: When not in use for extended periods, store the bicycle and display in a dry, temperate environment.
7. Troubleshooting
| Problem | Possible Cause | Solution |
|---|---|---|
| Display does not power on. | Low battery, loose connection, power button issue. | Charge battery, check cable connections, ensure power button is pressed correctly. |
| Speed reading is inaccurate or absent. | Speed sensor malfunction, magnet misalignment. | Inspect speed sensor and magnet on the wheel; ensure proper alignment and connection. |
| Warning/Error indicator is on. | System fault, motor/controller issue. | Refer to your bicycle's main manual for specific error codes or contact customer support. |
| Assist level not changing. | Control button malfunction, communication error. | Check control button functionality, restart the system. |
8. Specifications
- Model Name: OS01
- Brand: gorise
- Manufacturer: Shenzhen Chirrey Technology Co., Ltd.
- Material: Aluminum
- Color: Black
- ASIN: B0FK4HN1CV
- Included Components: Kickstand (Note: This specification refers to the bicycle, not the display itself.)
9. Warranty Information
The gorise OS01 Bicycle Display comes with a 1-Year Warranty from the date of purchase. This warranty covers manufacturing defects under normal use. Please retain your proof of purchase for warranty claims. For detailed terms and conditions, refer to the warranty documentation provided with your electric bicycle or contact gorise customer support.
10. Customer Support
For further assistance, technical support, or warranty inquiries, please contact gorise customer service. You can also visit the official gorise store on Amazon for more product information and support resources: