1. Introduction
This manual provides essential instructions for the installation, operation, and maintenance of the LFBsZC LXQIN XP600 Main Board V6. This board is designed to control double-head carriage systems in compatible Senyang XP600 printers, enhancing printing efficiency and productivity. Please read this manual thoroughly before installation and use to ensure proper function and longevity of the product.
2. Product Overview
The LXQIN XP600 Main Board V6 is a critical component for managing the print head operations in Senyang XP600 series printers. It facilitates dual-head printing, offering improved performance for industrial applications.
- Compatibility: Specifically designed for LXQIN Senyang XP600 printers.
- Dual-Head Support: Enables efficient dual-head printing for increased output.
- Version V6: Compatible with 6-button key boards.
- Application: Ideal for replacing existing main boards or for new printer builds in industrial printing.
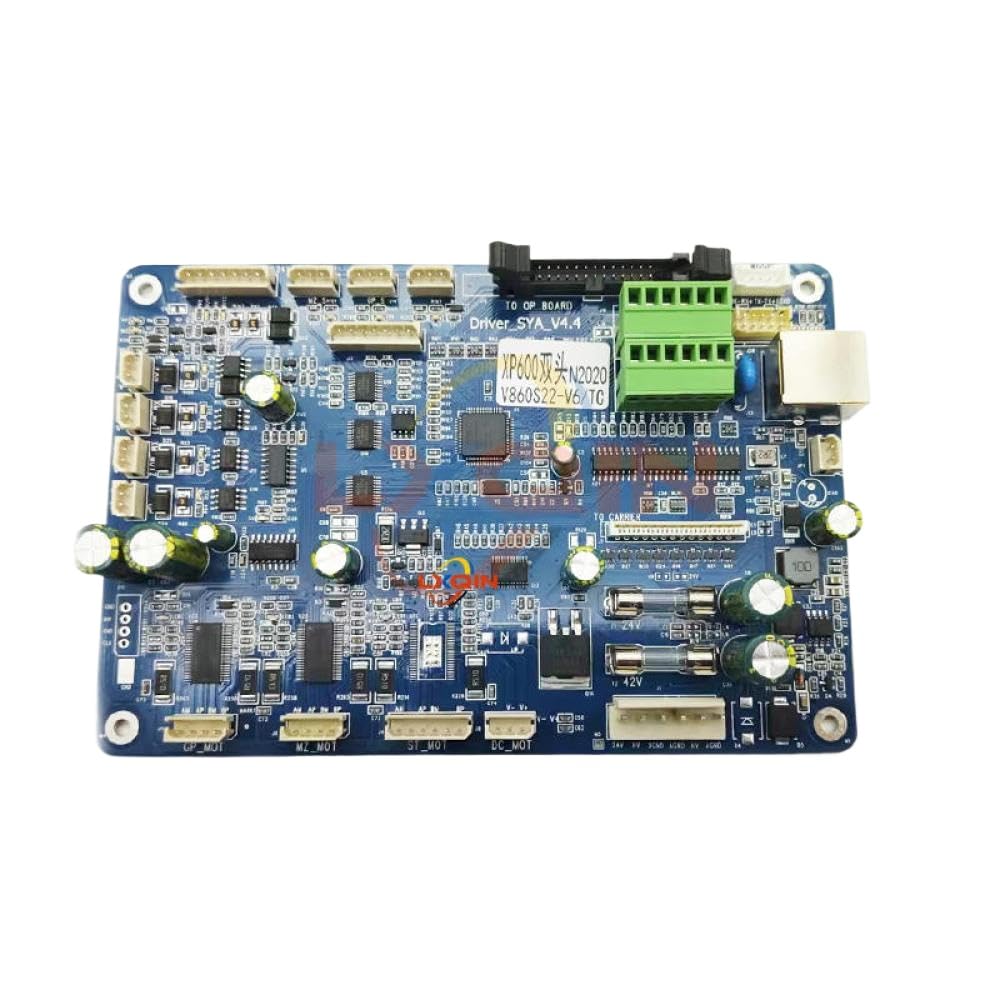
Image 1: LXQIN XP600 Main Board V6. This image displays the main control board, highlighting its various connectors and integrated circuits. It is the central component for managing printer functions.
3. Compatibility
This main board is compatible with Senyang XP600 printers utilizing a double-head carriage system. It is specifically the V6 version, designed to work with 6-button key boards. Ensure your printer configuration matches these requirements for proper functionality.
Note: A V12 version of the main board exists for 12-button key boards. Verify your printer's key board type before installation.
4. Setup and Installation
Installation of the main board requires technical expertise. If you are not familiar with printer electronics, it is recommended to seek professional assistance.
4.1 Safety Precautions
- Always disconnect the printer from the power source before beginning any installation or maintenance.
- Wear anti-static gloves and use an anti-static mat to prevent electrostatic discharge (ESD) damage to sensitive electronic components.
- Handle the board by its edges to avoid touching components directly.
4.2 Installation Steps
- Preparation: Ensure the printer is powered off and unplugged. Clear your workspace and prepare necessary tools (e.g., screwdrivers, anti-static equipment).
- Access the Main Board: Carefully open the printer casing to access the existing main board. Refer to your printer's specific service manual for exact access procedures.
- Disconnect Cables: Document or photograph all cable connections to the old main board before disconnecting them. Pay close attention to the orientation of ribbon cables and power connectors.
- Remove Old Board: Unscrew and carefully remove the old main board from its mounting points.
- Install New Board: Position the new LXQIN XP600 Main Board V6 in the same location. Secure it with the appropriate screws, ensuring it is firmly seated.
- Reconnect Cables: Reconnect all cables to the new board, following your documentation or photographs. Ensure all connections are secure and correctly oriented. Double-check ribbon cable connections for proper alignment.
- Close Casing: Carefully close the printer casing, ensuring no cables are pinched.
- Initial Power-Up: Plug in the printer and power it on. Observe for any error messages or unusual behavior.
- Driver and Software Configuration: If necessary, update or reconfigure printer drivers and software to recognize the new board.
5. Operating Instructions
The LXQIN XP600 Main Board V6 functions as the central control unit for your Senyang XP600 printer. Once correctly installed, its operation is integrated with the printer's overall system and software. There are no direct user controls on the board itself.
- Printer Power Cycle: Ensure the printer is powered on and initialized correctly after installation.
- Software Interface: All operational commands, such as print jobs, print head calibration, and maintenance routines, are managed through the printer's control panel or connected computer software.
- Dual-Head Functionality: The board enables the printer to utilize both print heads for faster and more efficient printing. Refer to your printer's software manual for specific settings related to dual-head operation.
- Monitoring: Monitor the printer's status indicators and software messages for any operational issues.
6. Maintenance
Proper maintenance ensures the longevity and reliable performance of your main board and printer system.
- Keep Clean: Periodically clean the interior of the printer, especially around the main board, using compressed air to remove dust and debris. Ensure the printer is powered off and unplugged before cleaning.
- Environmental Control: Operate the printer in a clean, dry, and temperature-controlled environment to prevent moisture and extreme temperatures from affecting electronic components.
- Cable Integrity: Regularly inspect all connected cables for signs of wear, damage, or loose connections. Secure any loose cables.
- Software Updates: Keep your printer's firmware and software drivers updated as recommended by the printer manufacturer.
7. Troubleshooting
This section addresses common issues that may arise after main board installation. For complex problems, consult a qualified technician or the printer manufacturer's support.
| Problem | Possible Cause | Solution |
|---|---|---|
| Printer does not power on after installation. | Loose power connection, incorrect board installation, faulty power supply. |
|
| Printer powers on but displays error codes. | Incorrect cable connections (e.g., ribbon cables), incompatible board version, software/driver issues. |
|
| Print heads are not recognized or not functioning correctly. | Loose print head cables, damaged print head, incorrect board configuration. |
|
8. Specifications
Key technical specifications for the LXQIN XP600 Main Board V6:
- Model Number: LFBsZC135
- Compatibility: Senyang XP600 printers (Double Head Carriage Board)
- Version: V6 (for 6-button key boards)
- Product Dimensions: 0.39 x 0.39 x 0.39 inches
- Item Weight: 14.1 ounces
- Manufacturer: LFBsZC
- ASIN: B0FK3XZFXG
9. Warranty and Support
For warranty information and technical support, please contact the manufacturer, LFBsZC, or your authorized reseller. Keep your purchase receipt and product model number (LFBsZC135) handy when contacting support.
This product is an aftermarket replacement part. Any brand names or model designations mentioned are used solely for the purpose of demonstrating compatibility.