Introduction
This manual provides detailed instructions for the safe and effective use of your banapoy 4K Spotting Scope with Tripod. Please read this manual thoroughly before operating the device and retain it for future reference. This spotting scope is designed for bird watching, wildlife viewing, target observation, and astronomical observation.
Important Safety Information
- Do not look directly at the sun: Never look directly at the sun through the spotting scope or its viewfinder. This can cause severe and permanent eye damage.
- Keep out of reach of children: This device is not a toy. Ensure children use the spotting scope under adult supervision.
- Handle with care: Avoid dropping or subjecting the device to strong impacts, which can damage optical components or electronics.
- Operating temperature: Use the device within recommended temperature ranges to prevent damage to the battery and internal components.
- Water exposure: This device is not waterproof. Avoid exposure to rain or moisture.
Package Contents
Verify that all items are present in your package:
- 1 x Spotting Scope
- 1 x Instruction Manual
- 2 x Cleaning Cloth
- 1 x Tripod
- 1 x Sunshade
- 1 x Charging Cable

Image: The banapoy 4K Spotting Scope with its tripod and main components.
Product Overview
Familiarize yourself with the main components of your spotting scope:
- Main Lens: 78mm diameter, F4.0 aperture, 300mm focal length.
- Eyepiece: Adjustable for vision compensation.
- External Screen: 2.8-inch display, rotatable 90 degrees.
- Internal Screen: 10-inch built-in enlarged display.
- Control Panel: Buttons for Mode, Menu, EV+, EV-, and OK.
- Tripod Mount: For stable observation.
- Battery: Built-in 4500mAh rechargeable Lithium-Ion battery.

Image: Close-up of the main lens with specifications.

Image: Control panel for operation.
Setup Instructions
1. Attaching the Tripod
- Unfold the tripod legs and ensure they are stable on a flat surface.
- Align the spotting scope's tripod mount with the tripod's quick-release plate or screw.
- Securely fasten the spotting scope to the tripod. Do not overtighten.
2. Powering On/Off
- To power on, press and hold the power button (usually integrated with the MODE button) until the screen illuminates.
- To power off, press and hold the power button again until the device shuts down.
- The device features an auto-power-off function (1, 3, 5, 10 minutes, or off) which can be configured in the settings.
3. Inserting Memory Card
- Locate the memory card slot on the device.
- Insert a compatible memory card (up to 512GB, Class 10 or above recommended, not included) with the contacts facing the correct direction.
- Gently push until it clicks into place. To remove, push again to eject.
Operating the Spotting Scope
1. Focus Adjustment
The spotting scope features manual focus control. Rotate the focus ring near the main lens until the image on the screen appears sharp and clear. For precise observation, fine-tune the focus as needed.
2. Digital Zoom
Utilize the 18x digital zoom feature to magnify your view. Use the EV+ and EV- buttons (often marked with zoom icons) to adjust the digital magnification level. The optical magnification technology provides up to 350x magnification.
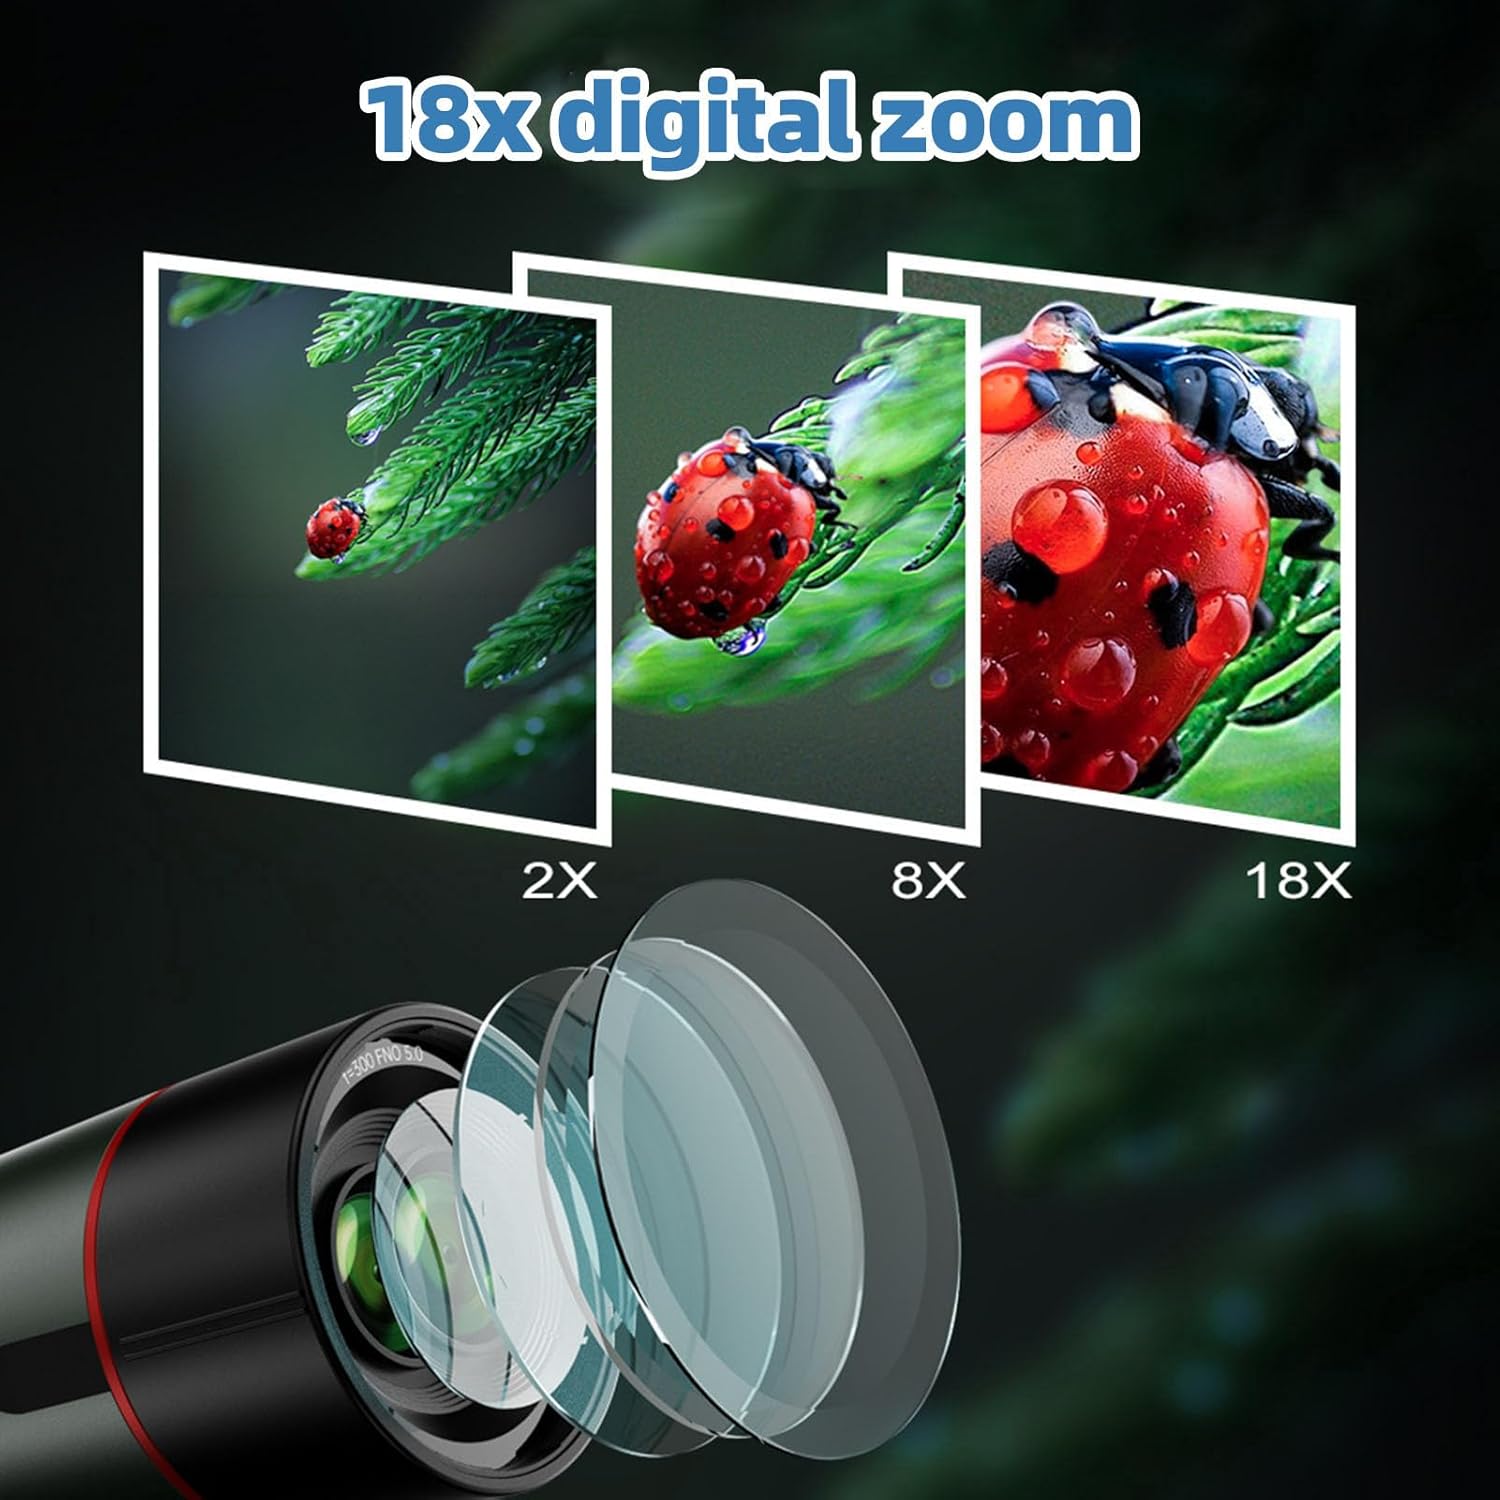
Image: Visual representation of digital zoom levels.
3. Screen Usage (Dual Screen)
Your spotting scope is equipped with both an external 2.8-inch screen and a 10-inch built-in enlarged display. The external screen can be rotated 90 degrees to adapt to different viewing angles and light conditions. Use the internal screen during the day and the external screen at night for flexible observation without environmental light interference.

Image: Dual screen functionality showing the same image on both displays.

Image: External screen rotated for optimal viewing.
4. Diopter Adjustment
The eyepiece features an adjustable vision compensation (diopter adjustment range of +/-4). This allows users with myopia or hyperopia (up to 400 diopters) to observe clearly without wearing corrective glasses. Rotate the diopter adjustment ring on the eyepiece until the image appears sharp for your vision.
5. Photo and Video Capture
The device supports capturing 4K 30MP photos and videos. Use the MODE button to switch between photo and video modes. The OK button typically initiates recording or takes a picture. Additional features include time-lapse photography, continuous photography, and selfie mode. Captured media can be reviewed using the playback function.
6. Menu Navigation
Press the MENU button to access settings. Use the EV+ and EV- buttons to navigate through menu options, and the OK button to select or confirm. The MODE button may also function as a back button in some menus.
Care and Maintenance
- Lens Cleaning: Use the provided cleaning cloth or a specialized lens cleaning kit. Gently wipe the lens surfaces to remove dust and smudges. Avoid using abrasive materials or harsh chemicals.
- Body Cleaning: Wipe the body of the spotting scope with a soft, dry cloth. Do not use solvents or strong detergents.
- Storage: When not in use, store the spotting scope in a dry, cool place, away from direct sunlight and extreme temperatures. Use lens caps to protect the optics.
- Battery Care: The built-in 4500mAh battery is rechargeable via the provided charging cable. For optimal battery life, avoid fully discharging the battery frequently and store the device with a partial charge if not used for extended periods.
- Memory Card: Regularly back up data from your memory card to a computer. Format the memory card periodically within the device settings to maintain performance.
Troubleshooting Guide
| Problem | Possible Cause | Solution |
|---|---|---|
| Device does not power on | Low battery; Power button not pressed correctly | Charge the battery; Press and hold the power button for a few seconds |
| Image is blurry | Incorrect focus; Diopter not adjusted | Adjust the manual focus ring; Adjust the diopter on the eyepiece |
| Cannot save photos/videos | No memory card; Memory card full; Memory card error | Insert a memory card; Delete old files or use a new card; Format the memory card (this will erase all data) |
| External screen not displaying | Screen not activated; Connection issue | Check menu settings for screen display options; Power cycle the device |
| Short battery life | Battery not fully charged; Cold environment; Old battery | Ensure full charge; Operate in moderate temperatures; Contact support if battery degradation is significant |
Technical Specifications
| Feature | Specification |
|---|---|
| Video Resolution | 4K 1.5°x0.9° (maximum) |
| Focus Mode | Manual |
| Eyepiece | Adjustable Vision Compensation (Diopter Adjustment Range of +/-4) |
| Aperture | F4.0 |
| Focal Length | 300mm |
| Main Lens Diameter | 78mm / 3.1in |
| Limit Magnitude | 11 |
| Digital Zoom | 18x |
| Storage Media | Memory Card (Support up to 512GB, Recommend Class 10 or above) (Not Included) |
| Auto Power Off | 1 Minute, 3 Minutes, 5 Minutes, 10 Minutes, Off |
| Power Type | Built-in 4500mAh Lithium Ion Battery, Rechargeable |
| Item Weight | 4.18 pounds |
| Package Dimensions | 16.14 x 7.87 x 5.12 inches |
| Model Number | banapoywgm8ar2eyh |
Warranty and Support
Your banapoy 4K Spotting Scope is covered by a standard manufacturer's warranty. Please refer to the warranty card included in your package for specific terms and conditions. For technical support, troubleshooting assistance, or warranty claims, please contact your retailer or the banapoy customer service department. Keep your purchase receipt as proof of purchase.