1. Introduction
This manual provides comprehensive instructions for the installation, operation, and maintenance of your AUDERWIN Solar Spot Lights (4-pack) and LED Low Voltage Landscape Lighting Kit (8-pack). Please read this manual thoroughly before installation and retain it for future reference.
The AUDERWIN lighting system is designed to enhance outdoor spaces with efficient and durable illumination, suitable for yards, gardens, pathways, and house exteriors.

Image 1.1: Overview of the AUDERWIN lighting kit, showing four solar spot lights, eight low-voltage landscape lights, a 65-foot wire coil, and a low-voltage transformer with power cord.
2. Product Components
The AUDERWIN lighting system includes the following main components:
- Solar Spot Lights (4 units): Equipped with 63 high-power LEDs, 6500K daylight, and an integrated solar panel.
- LED Low Voltage Landscape Lights (8 units): Each light provides 180 lumens output with 3 watts energy, operating on 12V AC/DC.
- Low-Voltage Transformer (1 unit): 12V DC, 60W output power, with a photocell sensor for automatic operation and multiple timer settings.
- 65FT Wire (1 unit): For connecting the low-voltage landscape lights to the transformer.
- Ground Stakes/Mounting Hardware: For installation of both solar and low-voltage lights.
3. Setup and Installation
3.1. Solar Spot Lights Installation
The solar spot lights offer two installation methods: ground insertion or wall mounting.
- Ground Insertion: Attach the ground stake to the bottom of the solar light. Select a location that receives direct sunlight for at least 6-8 hours daily. Insert the stake firmly into the ground.
- Wall Mounting: Use the provided screws and anchors to secure the light to a wall or fence. Ensure the solar panel is positioned to receive maximum sunlight.
Important: Before permanent installation, cover the solar panel and turn on the light to test its functionality.

Image 3.1: Illustration of the two installation options for the solar spot lights: ground insertion using a stake and wall mounting. Dimensions are shown as approximately 3 inches wide, 5 inches deep, and 13 inches high when ground inserted.

Image 3.2: Examples of the 120-degree adjustable solar lamp in use, illuminating a tree in a garden and a pathway. The adjustability allows for precise light direction.
3.2. Low Voltage Landscape Lighting Kit Installation
- Position Lights: Determine the desired locations for the 8 landscape lights. Each light is designed for ground insertion using a stake.
- Connect Wiring: Lay out the 65-foot wire. Connect each landscape light to the main wire. Ensure all connections are secure and waterproof.
- Connect Transformer: Plug the main wire from the landscape lights into the 12V DC output of the transformer.
- Power Transformer: Plug the transformer into a standard 100-240V AC outdoor power outlet.
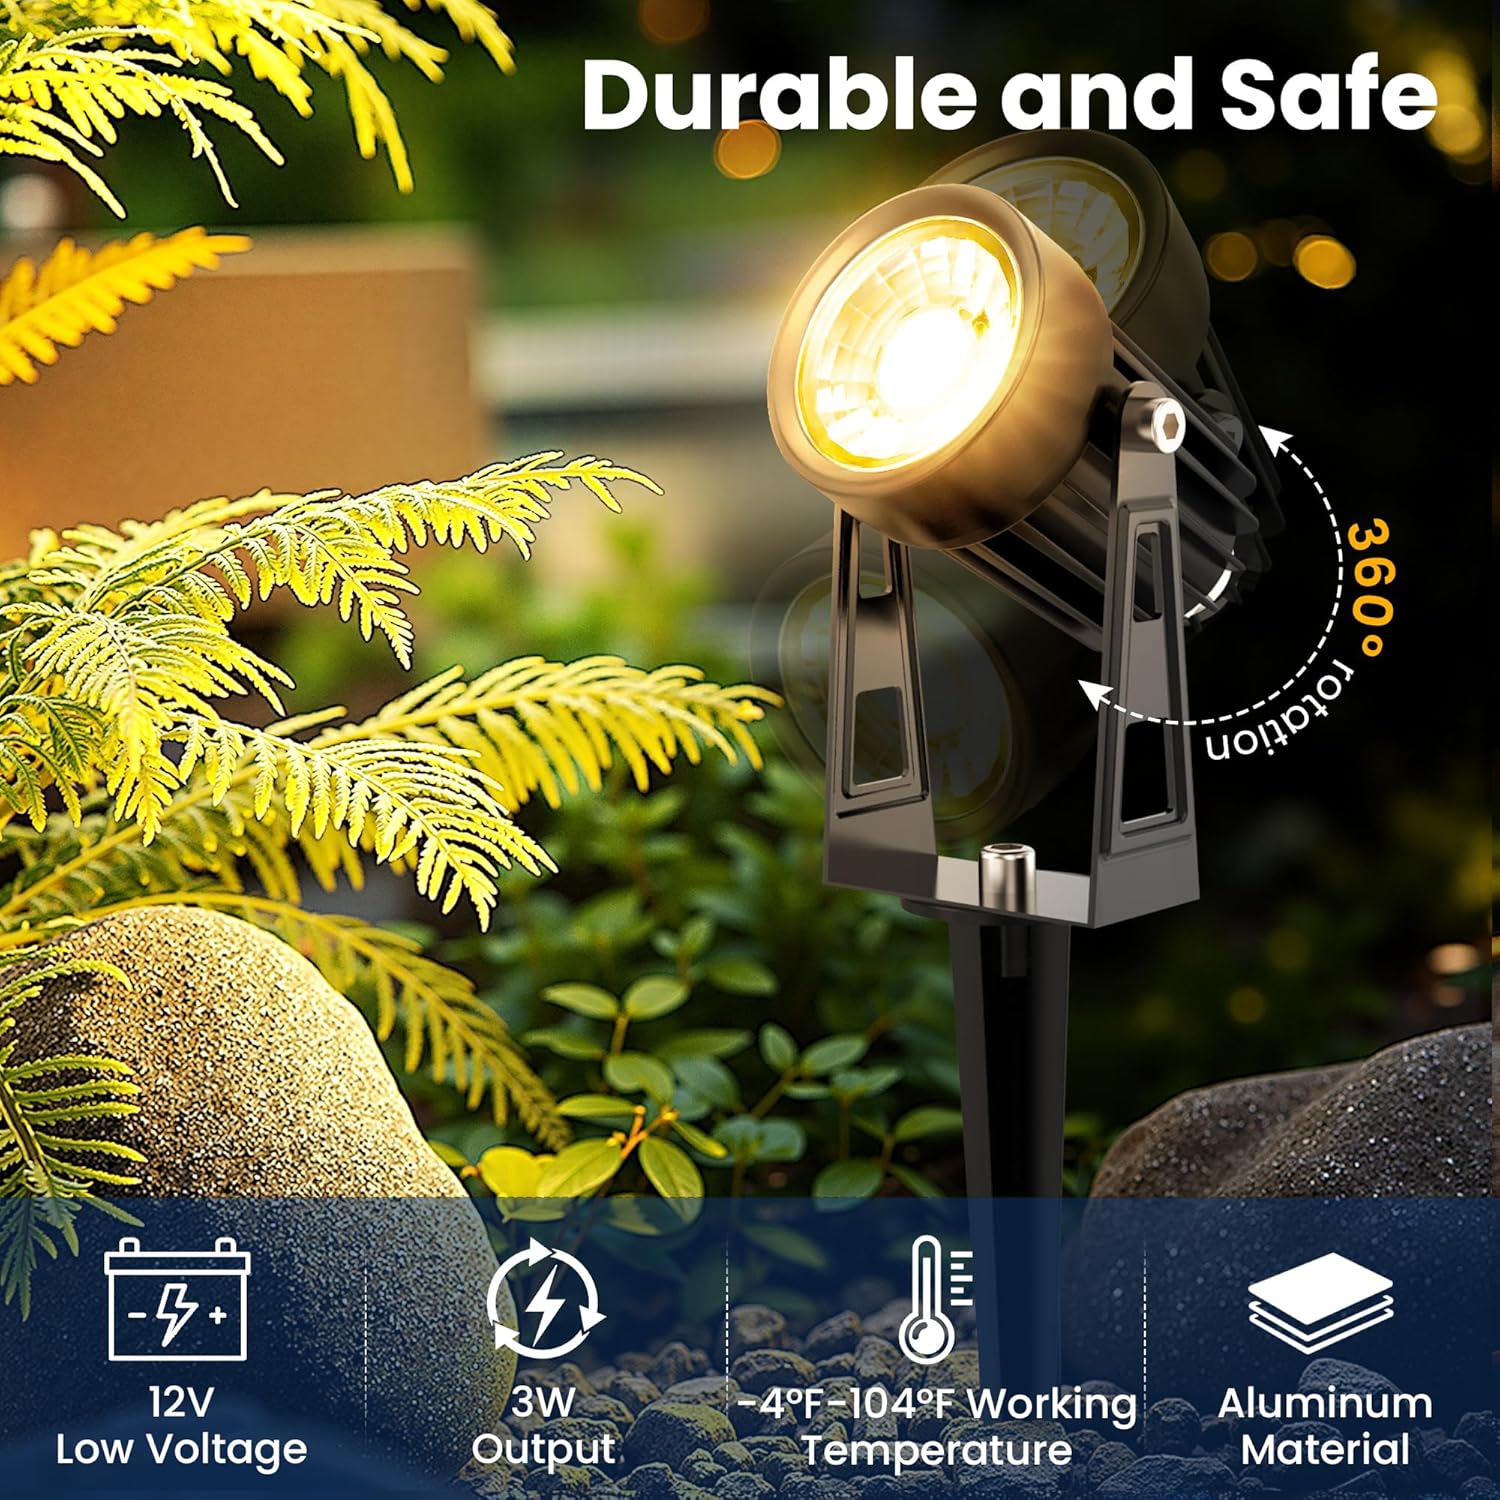
Image 3.3: A close-up of a low-voltage landscape light, highlighting its 360-degree rotation capability for flexible light direction. The image also notes its 12V low voltage, 3W output, -4°F to 104°F working temperature, and aluminum material.

Image 3.4: The 60W low-voltage transformer featuring a photocell light sensor. It illustrates two primary modes: "Dusk to Dawn" for automatic operation and "Countdown Off" for timed shut-off after a set duration.
4. Operation
4.1. Solar Spot Lights Operation
The solar spot lights feature three brightness modes, controlled by an ON/OFF/MODE button.
- Low Light Mode (Mode 1): Provides illumination for up to 24 hours on a full charge.
- Medium Light Mode (Mode 2): Provides illumination for up to 18 hours on a full charge.
- High Light Mode (Mode 3): Provides illumination for up to 12 hours on a full charge. In this mode, the spotlight operates at 100% brightness for 4 hours, then gradually dims to 40% for 2 hours, and finally to 20% for the remaining duration.
To switch between modes, press the ON/OFF/MODE button located on the light unit.

Image 4.1: A solar spot light illustrating its three lighting modes: Low (24 hours), Medium (18 hours), and High (12 hours). The image shows the ON/OFF/MODE button and emphasizes proper installation in an unobstructed location for optimal charging.
4.2. Low Voltage Landscape Lighting Kit Operation
The transformer for the low-voltage landscape lighting kit offers multiple operating modes:
- Manual ON/OFF: Lights can be turned on or off manually.
- Dusk to Dawn: The built-in photocell sensor automatically turns the lights on at dusk and off at dawn.
- Countdown Off: After selecting a working mode, the lights can be set to automatically shut off after 2, 4, 6, 8, or 10 hours.
Use the single button on the transformer to cycle through these operating modes and timer settings.

Image 4.2: The low-voltage transformer's control panel, demonstrating the single button for selecting between Manual ON/OFF, Dusk to Dawn, and Countdown Off (2/4/6/8/10 hours) modes. Input is 100-240V, output is DC12V.
5. Maintenance
- Clean Solar Panels: Regularly wipe the solar panels on the spot lights with a soft, damp cloth to remove dust, dirt, or debris. This ensures optimal charging efficiency.
- Inspect Wiring: Periodically check the wiring for the low-voltage landscape lights for any signs of damage, fraying, or loose connections.
- Clear Obstructions: Ensure that no foliage or other objects are blocking the solar panels or the light output of any fixture.
- Weather Resistance: Both lighting systems are designed to be IP65 waterproof and resistant to various weather conditions (snowproof, UV resistant, windproof). However, during prolonged overcast or rainy weather, the full charging capacity of solar lights may be impacted.

Image 5.1: Two solar spot lights installed near a swimming pool, illustrating their all-weather resistance. Icons indicate IP65 waterproof, snowproof, UV resistant, windproof, and CPF. A note advises that full charging may be impacted during overcast or rainy weather.
6. Troubleshooting
| Problem | Possible Cause | Solution |
|---|---|---|
| Solar light does not turn on at night. | Insufficient sunlight exposure; ON/OFF/MODE button not pressed; nearby light source interfering with sensor. | Relocate the light to an area with direct sunlight. Press the ON/OFF/MODE button. Ensure no other light sources are activating the sensor. |
| Low voltage lights are not working. | Transformer not powered; loose wire connections; incorrect mode selected on transformer. | Check if the transformer is plugged in and receiving power. Verify all wire connections are secure. Cycle through transformer modes to ensure "Dusk to Dawn" or "Manual ON" is selected. |
| Lights are dim or run for a short duration. | Solar panel dirty or obstructed; insufficient charging time; battery degradation (solar lights). | Clean solar panels. Ensure lights receive full, direct sunlight. For solar lights, consider replacing the internal battery if performance significantly degrades over time. |
7. Specifications
- Solar Spot Lights:
- LEDs: 63 high-power LEDs
- Color Temperature: 6500K (Daylight)
- Brightness Modes: Low (24hrs), Medium (18hrs), High (12hrs)
- Adjustability: 120-degree adjustable lamp head
- Waterproof Rating: IP65
- Working Temperature: -4°F to 140°F
- LED Low Voltage Landscape Lights:
- Input Voltage: 12V AC/DC
- Output: 180 lumens per light
- Power Consumption: 3 watts per light
- Material: Aluminum structure
- Adjustability: 360-degree rotation
- Waterproof Rating: IP65
- Working Temperature: -4°F to 104°F
- Low-Voltage Transformer:
- Input Voltage: 100-240V AC
- Output Voltage: 12V DC
- Output Power: 60W
- Features: Photocell sensor, Manual ON/OFF, Dusk to Dawn, Countdown Off (2/4/6/8/10 hours)
- Wire: 65 feet length
8. Warranty and Support
For warranty information or technical support, please refer to the AUDERWIN official website or contact customer service directly. Please have your product model and purchase date available when contacting support.
ASIN: B0FJXWRQDW
Date First Available: April 30, 2025
9. Application Examples
The AUDERWIN lighting kit is versatile and can be used to illuminate various outdoor areas, enhancing both aesthetics and safety.

Image 9.1: Various application examples of the low-voltage landscape lights, showcasing their use for illuminating a house facade, highlighting trees in a garden, and accentuating a stone wall along a pathway.