1. Product Overview
This manual provides instructions for the Sellrich 10.1-inch Incell Touch Screen Car Stereo, designed as an upgrade for Volvo XC90 models manufactured between 2004 and 2013. This unit features an Android operating system, 4GB RAM, 128GB ROM, DSP, Wireless Carplay, Android Auto, Bluetooth 5.0, GPS, FM/RDS radio, Mirrorlink, Steering Wheel Control (SWC), and supports a backup camera.
Compatibility: This car radio is compatible with Volvo XC90 models from 2004 to 2013, including vehicles with and without an AUX input. A Canbus decoder is included to ensure proper integration with your vehicle's systems.

Image 1.1: Overview of the Sellrich car radio upgrade for Volvo XC90, showcasing its main features like Android OS, 4 Core processor, Carplay, Android Auto, 4G+128G memory, GPS, IPS screen, Bluetooth 5.0, and DSP.
2. Package Contents
Verify that all items listed below are included in your package:
- Car Stereo (with integrated frame)
- Backup Camera
- Canbus Decoder
- External Microphone
- GPS Antenna
- RCA Cable
- Power Cable
- Fiber Optic Conversion Cable
- Small Horn
- Installation Tool
- User Manual

Image 2.1: Visual representation of the car stereo's dimensions and a comprehensive list of all components included in the package.
3. Installation
Professional installation is recommended. Ensure the vehicle's battery is disconnected before beginning installation.
3.1 General Installation Steps
- Carefully remove the original car radio unit from the dashboard.
- Disconnect all cables from the original unit.
- Connect the provided power cable, RCA cable, GPS antenna, and external microphone to the new Sellrich car stereo.
- Integrate the Canbus decoder as per the wiring diagram to ensure steering wheel controls and other vehicle functions operate correctly.
- Install the backup camera (if applicable) and connect its video input to the designated port on the new stereo.
- Carefully mount the new car stereo into the dashboard, ensuring all connections are secure and no wires are pinched.
- Reconnect the vehicle's battery and test all functions of the new stereo.

Image 3.1: A visual comparison showing the original Volvo XC90 center console versus the upgraded console with the new Sellrich car radio installed.
3.2 Specific Instructions for Vehicles with Power Amplifier
If your original Volvo XC90 is equipped with a power amplifier, follow these additional steps:
- Unplug the green connector from the original amplifier.
- Connect plug 5 (from the provided wiring harness) into the amplifier.
- Connect plug 6 (from the provided wiring harness) to the green connector of the original car amplifier. This completes a tandem transfer.
- Connect the provided fiber optic adapter cable to the fiber optic plug of your original car radio.
3.3 Wiring Diagram Notes
Refer to the wiring diagram for detailed connection points. Ensure all appropriate plugs (1-7) are connected. The module from the old radio, which contains the screen, should be removed but kept connected to its original wiring and placed behind the new head unit in the center console. This is crucial for certain vehicle functions.
- Connection 8: Connects to the Canbus.
- Connection 9: Power cable plug, connects to the new radio.
- Connection 10: 8-pin Canbus plug, connects to the new radio.

Image 3.2: A detailed wiring diagram illustrating the various connection points and specific instructions for integrating the new car radio with the vehicle's existing systems.
4. Operating Instructions
4.1 1280*720 Incell Touch Screen
The unit features a 10.1-inch 1280*720 IPS Incell capacitive touch screen. This display offers a clearer visual experience, faster response, true color reproduction, and is dustproof. The fully laminated design ensures no air gap, providing a more sensitive touch response and clearer viewing even in sunlight compared to traditional on-cell screens.

Image 4.1: Explanation of the 1280*720 Incell Capacitive Touch Screen technology, highlighting its advantages in clarity, response, and durability.
4.2 Wireless Carplay & Android Auto
Connect your smartphone wirelessly to access navigation, make calls, send/receive messages, and listen to music directly through the car stereo. This feature supports both Apple Carplay and Android Auto, allowing for hands-free operation via voice commands (e.g., Siri Assistant).
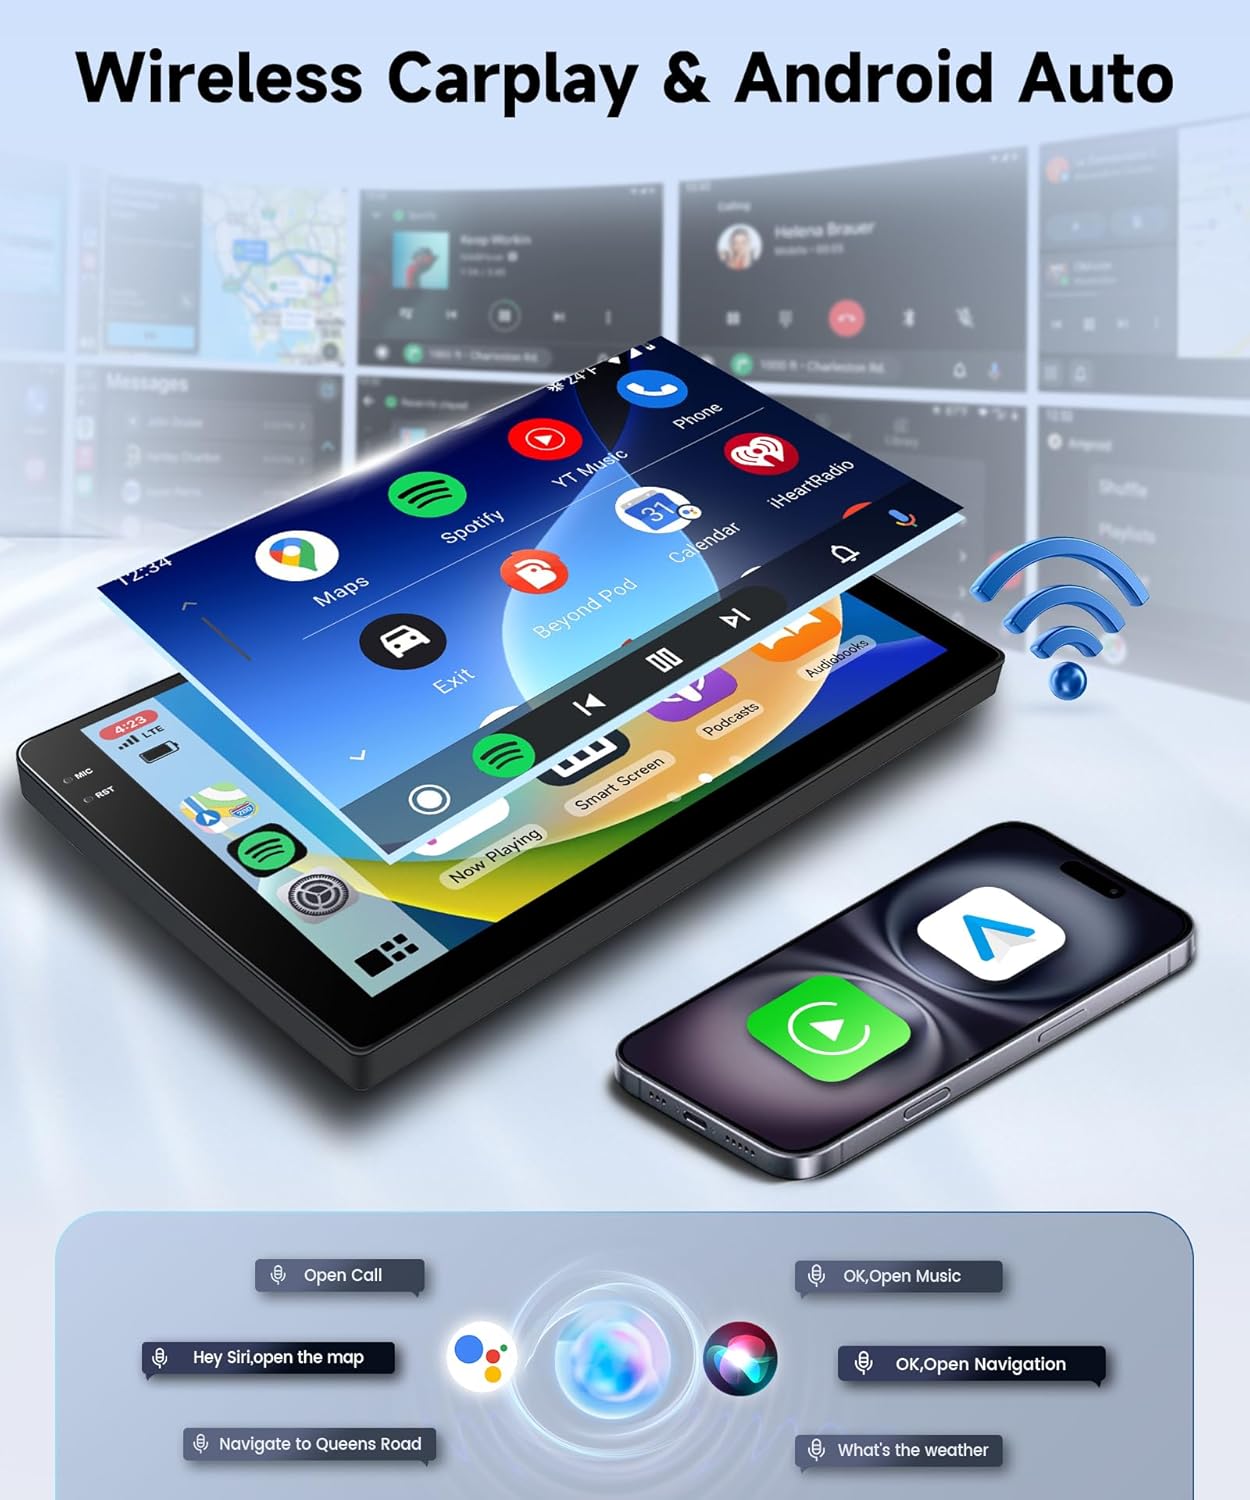
Image 4.2: Depiction of the Wireless Carplay and Android Auto interfaces, demonstrating seamless smartphone integration for navigation, communication, and entertainment.
4.3 GPS Navigation
The unit supports both online and offline GPS navigation. After connecting to Wi-Fi, you can download offline maps for use without an internet connection or utilize online navigation services like Google Maps or Waze. The system also allows for the download of various navigation applications.

Image 4.3: Visual representation of the car stereo's GPS navigation, supporting both online mapping services and downloadable offline maps.
4.4 Bluetooth 5.0
Bluetooth 5.0 provides faster, more stable, and smoother wireless connections. It supports Bluetooth phonebook access, hands-free calling, and music playback from your paired devices.

Image 4.4: Examples of the Bluetooth function in use, showing phone call interface and music streaming capabilities.
4.5 DSP / 32 EQ Audio
The integrated Digital Sound Processor (DSP) with 32-band Equalizer (EQ) allows for precise audio tuning. Customize your music style with various preset sound effects (e.g., Rock, Pop, Classical, Jazz) or fine-tune individual frequency bands to achieve optimal sound quality within your vehicle.

Image 4.5: The DSP/32 EQ interface, illustrating options for sound field adjustment and detailed equalization settings.
4.6 UI Themes & Split Screen
The car radio includes various user interface (UI) desktop themes. You can change them by long-pressing on a blank space on the homepage. The split-screen function allows you to run two applications simultaneously, such as navigation and music playback, enhancing multitasking capabilities.

Image 4.6: Examples of different UI themes and the split-screen feature, allowing simultaneous use of multiple applications.
4.7 Steering Wheel Control (SWC)
The unit supports steering wheel controls, allowing you to manage various functions of the car radio directly from your steering wheel buttons. This includes volume adjustment, track skipping, and answering calls, enhancing driving safety and convenience.
4.8 Backup Camera
An AHD night vision reversing camera is included, providing clear rear-view video input. This assists in safer and more efficient parking and reversing maneuvers.
5. Specifications
| Feature | Specification |
|---|---|
| Applicable Car Models | Volvo XC90 (2004-2013) |
| Operating System | Android |
| RAM | 4GB |
| ROM | 128GB |
| Screen Size | 10.1 inches |
| Screen Resolution | 1280*720 IPS |
| Touch Screen Type | Incell Capacitive, 2.5D Tempered Glass |
| Connectivity | Bluetooth 5.0, Wi-Fi, FM/RDS |
| Special Features | Wireless Carplay, Android Auto, DSP (32 EQ), GPS, Mirrorlink, SWC, Backup Camera Support |
| Audio Output Mode | Stereo |
| Surround Sound Channel Configuration | 5.1 |
| Video Encoding | H.264, H.265/HEVC |
| Item Weight | 1 Kilogram (2.2 pounds) |
| Package Dimensions | 11.02 x 5.91 x 3.94 inches |
6. Troubleshooting
This section addresses common issues you might encounter.
6.1 No Power / Unit Not Turning On
- Check all power connections to ensure they are securely plugged in.
- Verify the vehicle's fuse related to the car stereo is not blown.
- Ensure the vehicle's battery is fully charged and properly connected.
6.2 No Sound or Distorted Audio
- Check all speaker wire connections for proper polarity and secure fit.
- Ensure the volume is not muted or set too low.
- Verify the audio source (e.g., radio, Bluetooth, Carplay) is correctly selected.
- Specific Issue (Audio Channel Reversal): If you experience reversed audio channels (e.g., left audio from right speaker, rear audio from front speaker), this may indicate an incorrect pin-out on one of the wiring harnesses. Carefully re-check the wiring connections, especially the main power and speaker harnesses, against the provided wiring diagram. If the issue persists, contact customer support for further assistance.
6.3 GPS Signal Issues
- Ensure the GPS antenna is properly installed and placed in a location with a clear view of the sky (e.g., on the dashboard near the windshield).
- Check the GPS antenna connection to the main unit.
- If using online maps, ensure a stable Wi-Fi or mobile data connection.
6.4 Steering Wheel Controls Not Working
- Verify the Canbus decoder is correctly installed and connected.
- Check the wiring connections between the Canbus and the car stereo.
- Access the steering wheel control settings in the unit's menu to ensure proper configuration.
7. Maintenance
To ensure the longevity and optimal performance of your car stereo, follow these maintenance guidelines:
- Cleaning the Screen: Use a soft, lint-free cloth specifically designed for electronic screens. Dampen the cloth slightly with water or a screen-cleaning solution if necessary. Avoid harsh chemicals or abrasive materials.
- General Cleaning: Wipe the unit's exterior with a soft, dry cloth. Do not use excessive moisture or spray cleaners directly onto the unit.
- Software Updates: Periodically check for available software updates from the manufacturer to ensure optimal performance and access to new features.
- Avoid Extreme Temperatures: While designed for automotive use, prolonged exposure to extreme heat or cold can affect electronic components.
8. Warranty and Support
For warranty information, technical support, or any questions not covered in this manual, please contact Sellrich customer service. Refer to your purchase documentation for specific warranty terms and contact details.
Manufacturer: Sellrich
ASIN: B0FJXG3DCM