1. Introduction
This user manual provides comprehensive instructions for the safe and efficient operation, setup, and maintenance of your HITBOX HBC45II Plasma Cutter. Designed for cutting various metals, this non-touch pilot arc machine offers reliable performance for both beginners and experienced users. Please read this manual thoroughly before operating the device.

Figure 1: HITBOX HBC45II Plasma Cutter and included accessories.
2. Safety Information
Operating plasma cutting equipment requires strict adherence to safety protocols to prevent injury or damage. Always wear appropriate personal protective equipment (PPE), including welding helmets with proper shade, flame-resistant clothing, gloves, and safety shoes. Ensure adequate ventilation in the work area to disperse fumes. Never operate the machine in damp or wet conditions. Disconnect power before performing any maintenance or changing consumables. Keep children and unauthorized personnel away from the operating area.
- Always wear a welding helmet with appropriate shade.
- Use flame-resistant clothing and gloves.
- Ensure proper ventilation to avoid inhaling fumes.
- Do not operate in wet environments.
- Disconnect power before maintenance.
3. Product Overview
3.1 Components and Controls
The HBC45II Plasma Cutter features an intuitive design with a large LED display for real-time monitoring of operational parameters.
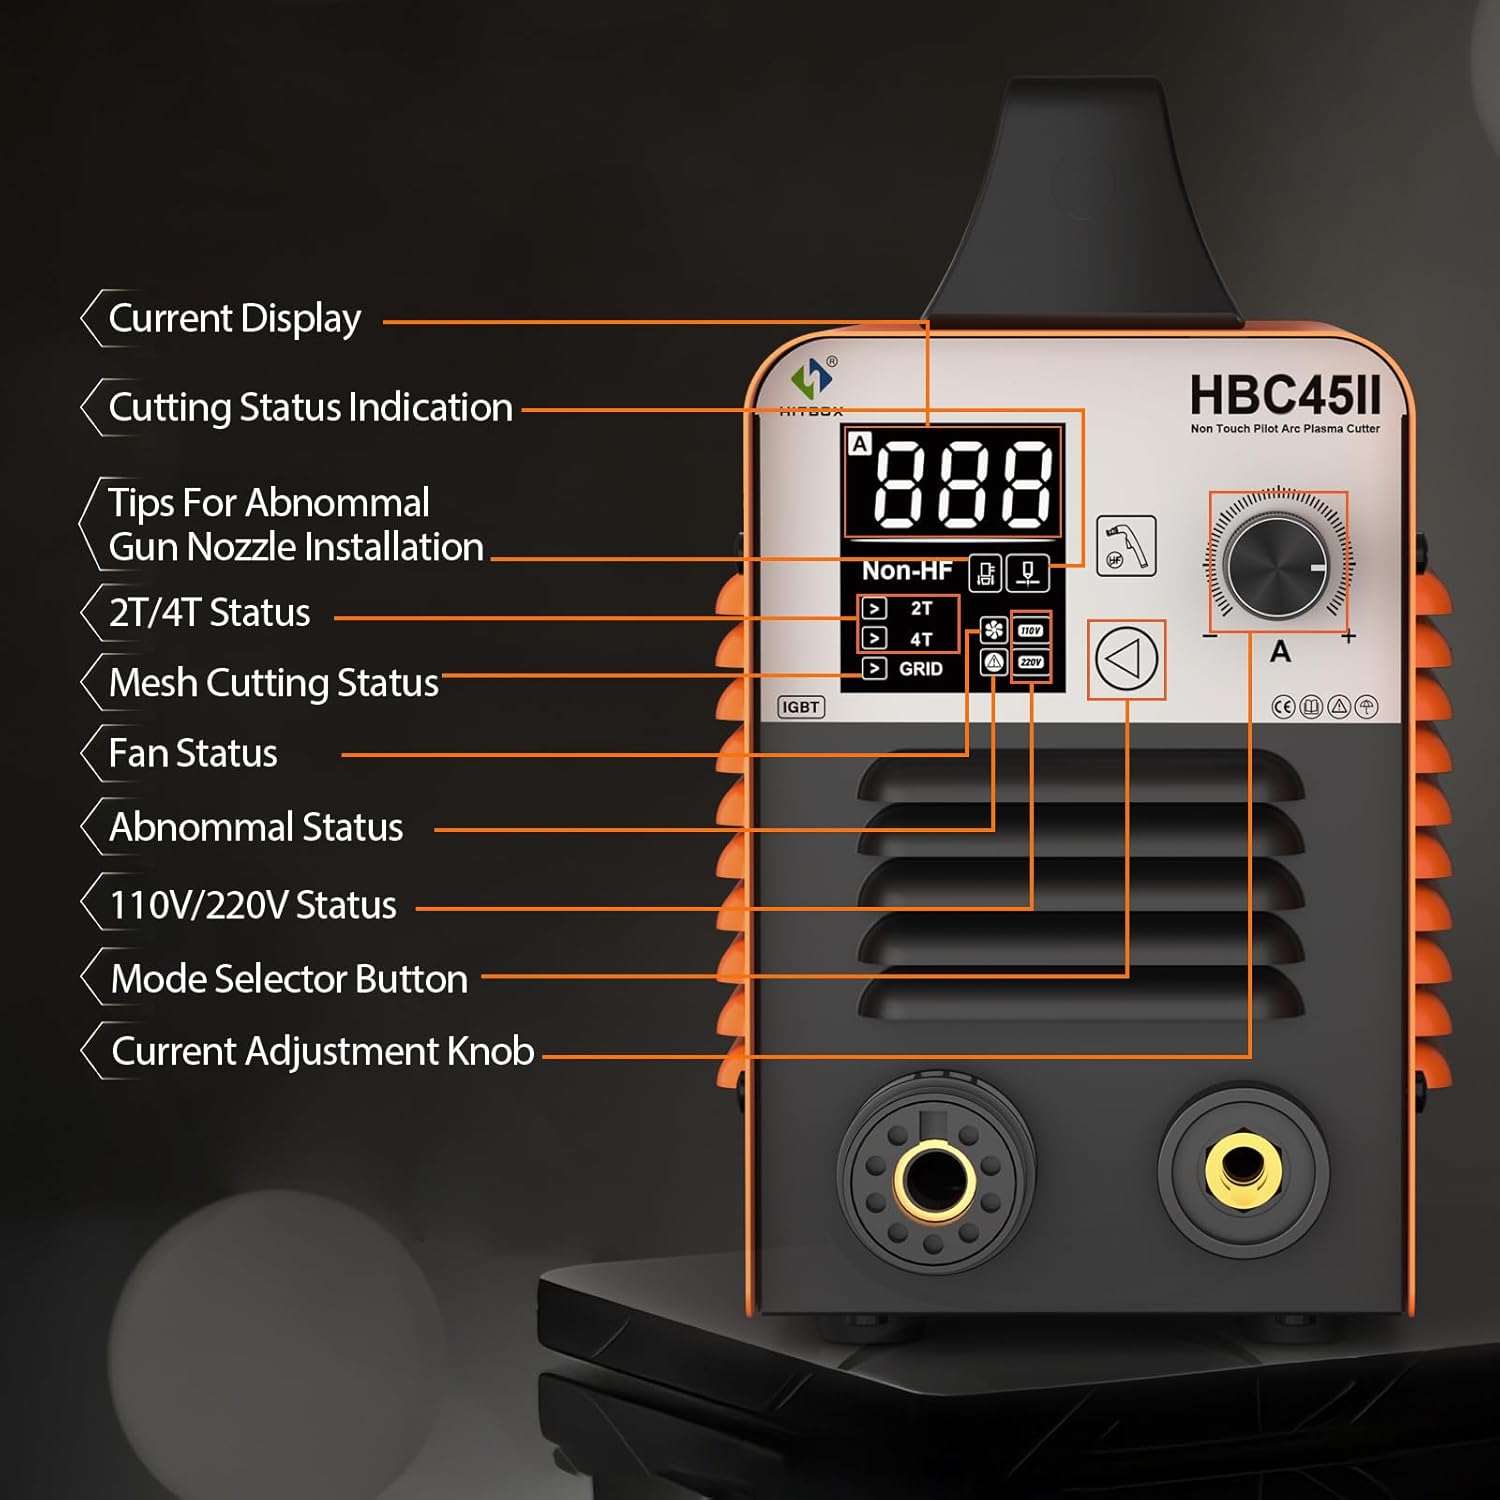
Figure 2: Front panel layout with LED display and control functions.
- Current Display: Shows the output current in Amperes.
- Cutting Status Indication: Indicates the current cutting mode or status.
- Tips For Abnormal Gun Nozzle Installation: Alerts if the torch nozzle is incorrectly installed.
- 2T/4T Status: Displays the selected trigger mode (2-Touch or 4-Touch).
- Mesh Cutting Status (GRID): Indicates if the machine is optimized for cutting mesh or expanded metal.
- Fan Status: Shows if the cooling fan is active.
- Abnormal Status: Displays error codes if a malfunction occurs.
- 110V/220V Status: Indicates the detected input voltage.
- Mode Selector Button: Used to cycle through different operational modes.
- Current Adjustment Knob: Adjusts the output cutting current.
3.2 Key Features
- Non-High Frequency Start: Utilizes a non-high-frequency blowback start, reducing electromagnetic interference.
- Non-Touch Pilot Arc: Allows cutting without direct contact between the torch tip and the workpiece, ideal for rusty or painted surfaces, and extends consumable life.
- Large LED Display: Provides real-time display of air pressure, voltage, and current, along with error codes for easy troubleshooting.
- 2T/4T Function: Offers two trigger modes for continuous cutting, reducing operator fatigue.
- PT/PA Function: Post-Time (PT) cools the torch head, extending consumable life. Pilot Arc (PA) duration can be adjusted for cutting mesh metal.
- CNC Functionality: Compatible with CNC cutting tables for enhanced precision.

Figure 3: Explanation of 2T and 4T trigger modes for continuous cutting.

Figure 4: Demonstrating the stable, non-stick arc of the low frequency non-contact pilot arc technology.
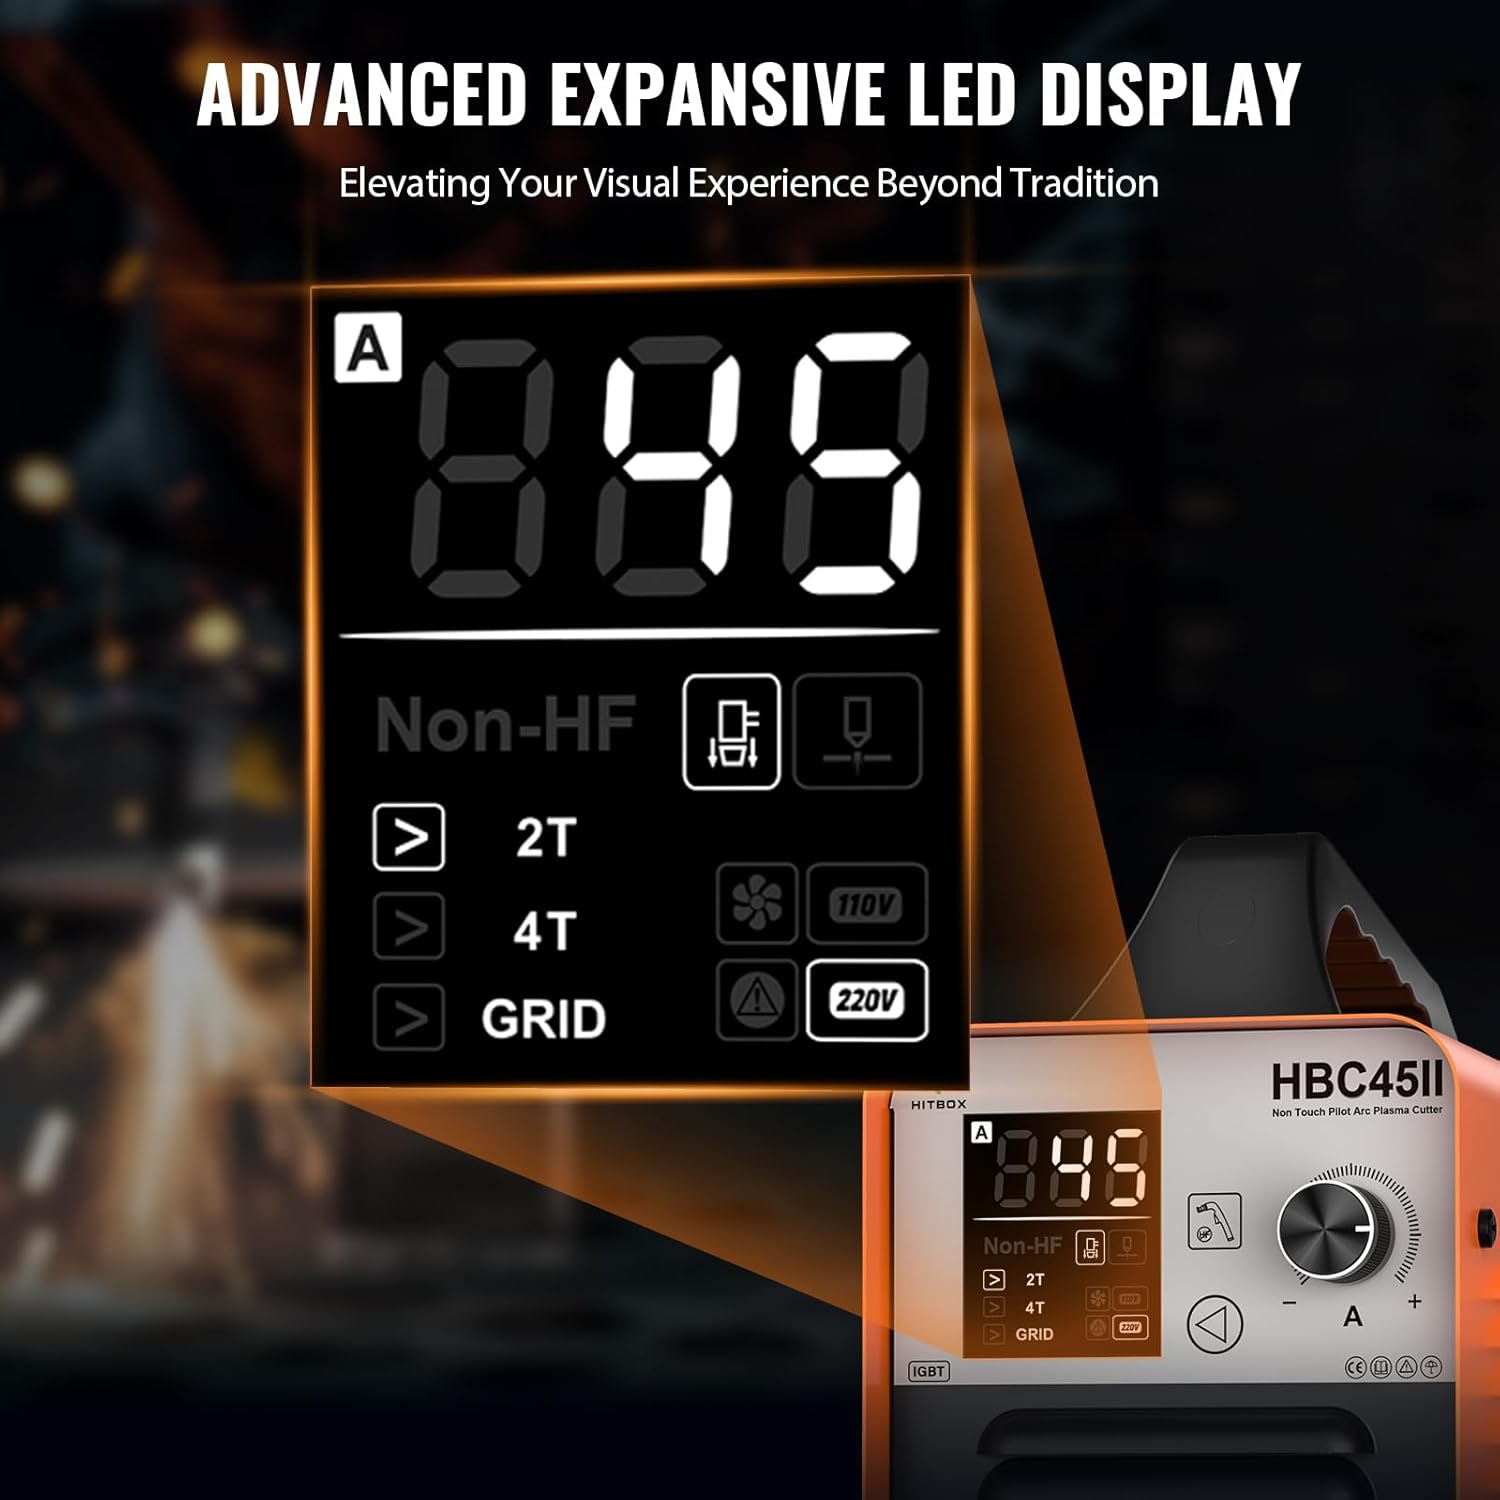
Figure 5: Detailed view of the advanced LED display showing current, voltage, and status indicators.
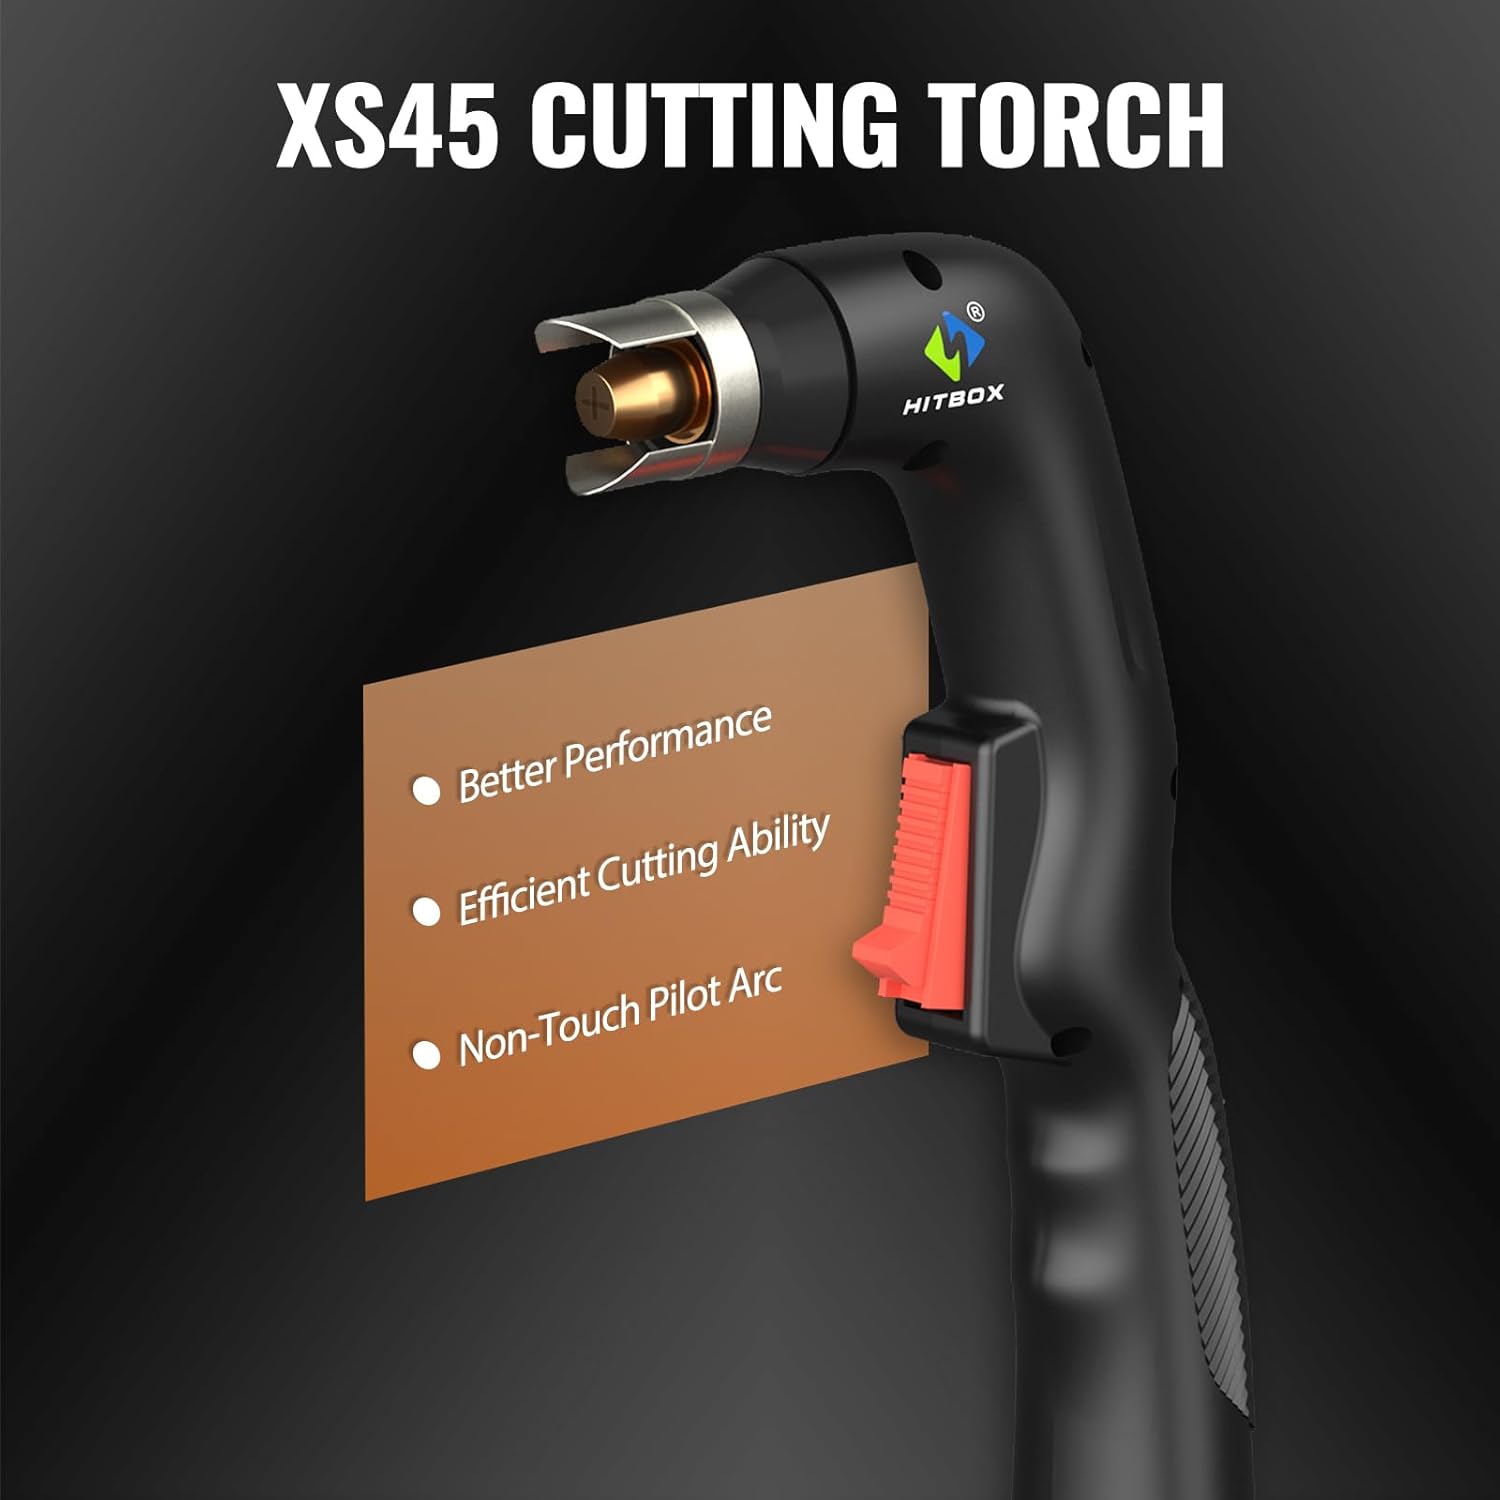
Figure 6: The XS45 cutting torch, designed for better performance and non-touch pilot arc cutting.
4. Setup
- Unpacking: Carefully remove the plasma cutter and all accessories from the packaging. Inspect for any shipping damage.
- Power Connection: Connect the machine to a suitable 110V or 220V AC power source. The machine automatically detects the voltage. Ensure the power outlet is properly grounded.
- Air Compressor Connection: Connect your air compressor to the air inlet on the plasma cutter. Ensure the air pressure regulator is properly installed and set to the recommended PSI (typically 40-60 PSI for optimal cutting).
- Torch and Ground Clamp Connection: Connect the plasma cutting torch and the ground clamp to their respective terminals on the front panel of the machine. Ensure connections are secure.
- Workpiece Preparation: Ensure the workpiece is clean and free of rust, paint, or other contaminants for best cutting results. Secure the ground clamp firmly to the workpiece or work table, ensuring good electrical contact.
5. Operating Instructions
5.1 Basic Operation
- Power On: Turn on the main power switch located on the rear or front panel. The LED display will illuminate.
- Adjust Air Pressure: Set the air pressure using the regulator to the recommended range (e.g., 40-60 PSI) for the material thickness you intend to cut.
- Select Mode (2T/4T): Use the mode selector button to choose between 2T (2-Touch) or 4T (4-Touch) operation.
- 2T Mode: Press and hold the torch trigger to cut; release to stop.
- 4T Mode: Press and release the trigger to start cutting; press and release again to stop. This mode is ideal for longer cuts to reduce finger fatigue.
- Adjust Cutting Current: Use the current adjustment knob to set the appropriate amperage for your material thickness. Refer to the cutting capacity guidelines below.
- Initiate Cut: Position the torch tip approximately 1/8 inch (3mm) above the workpiece. Press the torch trigger to initiate the pilot arc. Once the arc is established, move the torch steadily along the cutting line.
- Post-Time (PT) and Pilot Arc (PA) Adjustment: The machine automatically manages PT to cool the torch. For mesh cutting, the PA function can be utilized to maintain the arc across gaps.
5.2 Cutting Capabilities
The HBC45II is capable of cutting various metals including steel, stainless steel, copper, iron, galvanized sheet, and carbon steel.

Figure 7: Broad spectrum of materials that can be cut with the HBC45II.

Figure 8: Cutting thickness guidelines for the HBC45II.
| Cutting Type | Thickness Range | Recommended Air Pressure |
|---|---|---|
| Ideal Cutting | 1-8mm (0.04"-0.31") | 40-50 PSI |
| Maximum Cutting | 8-15mm (0.31"-0.59") | 50-60 PSI |
6. Maintenance
Regular maintenance ensures the longevity and optimal performance of your plasma cutter.
- Consumables: Regularly inspect and replace worn-out torch consumables (nozzles, electrodes, swirl rings, shield cups). Worn consumables can lead to poor cut quality and damage to the torch.
- Air Filter: Check and clean or replace the air filter element in the air pressure regulator periodically to ensure clean, dry air supply to the torch. Moisture and oil in the air can severely impact cutting performance and torch life.
- Cleaning: Keep the machine clean and free of dust and metal particles. Use compressed air to blow out internal components if necessary, ensuring the machine is unplugged.
- Cables and Connections: Inspect all cables and connections for damage or loose fittings before each use.
7. Troubleshooting
The HBC45II's LED display provides error codes to assist in diagnosing issues. If the plasma cutter cannot work, refer to the display for specific error codes.
| Problem | Possible Cause | Solution |
|---|---|---|
| No Arc / Arc Fails to Start | No power, poor ground connection, worn consumables, insufficient air pressure, incorrect torch nozzle installation. | Check power supply, ensure ground clamp is secure, replace consumables, adjust air pressure, verify torch nozzle installation (check LED display for "Tips For Abnormal Gun Nozzle Installation" alert). |
| Poor Cut Quality | Worn consumables, incorrect cutting speed/current, improper air pressure, dirty workpiece. | Replace consumables, adjust current and speed, set correct air pressure, clean workpiece. |
| Overheating / Machine Shuts Off | Exceeded duty cycle, blocked ventilation, fan malfunction. | Allow machine to cool down, ensure clear ventilation paths, check fan operation. |
| LED Display Shows Error Code | Internal fault, specific operational issue. | Consult the specific error code in the full product manual (if available) or contact HITBOX customer support with the code. |
8. Specifications
| Feature | Detail |
|---|---|
| Manufacturer | HITBOX |
| Part Number | HBC45II |
| Item Weight | 14.42 pounds |
| Product Dimensions | 8.11 x 11.1 x 17.1 inches |
| Item Model Number | HBC45II |
| Size | HBC45 110V/220V Non HF |
| Color | Orange |
| Style | HBC45II |
| Power Source | AC |
| Cutting Technology | Non-Touch Pilot Arc, Non-High Frequency Start |
| Max Cut Thickness | 15mm (0.59 inches) |
| Input Voltage | 110V/220V (Auto-sensing) |
| Display | Large LED Display (Air Pressure, Voltage, Current, Error Codes) |
| Functions | 2T/4T, PT/PA, CNC Compatibility |
9. Warranty and Support
HITBOX offers 2 years of quality support for the HBC45II Plasma Cutter. For technical assistance, troubleshooting, or warranty claims, please contact HITBOX customer service through their official website or the retailer where the product was purchased. Please have your model number and purchase date available when contacting support.
For more information, visit the official HITBOX store: HITBOX Store on Amazon


