1. Product Overview
The Globe Electric Harlo 1-Light Outdoor Wall Sconce is designed to enhance outdoor spaces with its matte black finish and contemporary farmhouse style. This fixture is suitable for various outdoor applications such as porches, balconies, and decks. It requires one E26/Medium Base 60W bulb (sold separately) and is fully dimmable with a compatible dimmer switch.
Key features include:
- Farmhouse Contemporary Design: Matte black finish complements various outdoor decors.
- Dimmable Functionality: Compatible with dimmer switches (sold separately) for adjustable lighting.
- Easy Installation: Includes all necessary mounting hardware for quick setup.
- Weather Resistant: Designed for outdoor use.
- Smart Bulb Compatible: Can be automated with a Globe Electric Smart bulb (sold separately).

Image 1.1: The Harlo wall sconce illuminating an outdoor patio area.

Image 1.2: Two Harlo wall sconces installed on a balcony, enhancing the outdoor living space.
2. Safety Information
WARNING: Risk of electric shock. Disconnect power at the fuse box or circuit breaker before installation or servicing. Consult a qualified electrician if you are not familiar with electrical wiring.
- Read all instructions carefully before beginning installation.
- Ensure all electrical connections are made in accordance with local codes and ordinances.
- Use only the specified bulb type and wattage to avoid overheating.
- Do not install this fixture on a surface that is not structurally sound.
- Keep children and pets away from the work area during installation.
3. Package Contents
Verify that all components are present before beginning installation. If any parts are missing or damaged, contact Globe Electric customer support.
- 1 x Harlo Outdoor Wall Sconce Fixture
- Mounting Hardware (screws, wire nuts, mounting plate)
- Instruction Manual
Note: E26/Medium Base 60W bulb and dimmer switch are sold separately and are not included in the package.

Image 3.1: Product packaging for the Harlo wall sconce.
4. Specifications
| Feature | Detail |
|---|---|
| Model Number | 60000170 |
| Brand | Globe Electric |
| Color | Matte Black |
| Material | Metal |
| Style | Farmhouse |
| Product Dimensions (L x W x H) | 27.9L x 25.4W x 23.8H Centimetres |
| Indoor/Outdoor Usage | Outdoor |
| Power Source | Hardwired |
| Voltage | 120 Volts |
| Number of Light Sources | 1 |
| Bulb Base | E26 (Medium Base) |
| Max Wattage | 60 Watts |
| Water Resistance Level | Water Resistant |
| Mounting Type | Wall Mount |
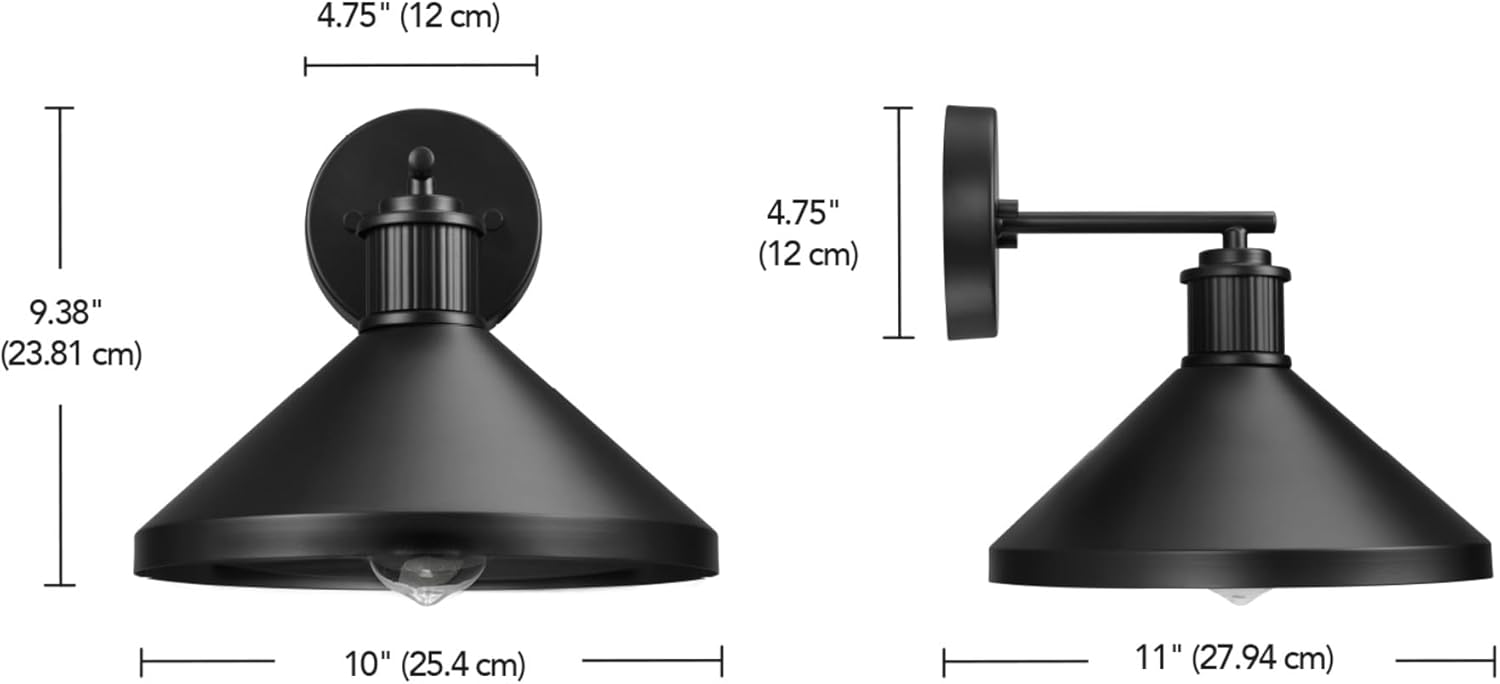
Image 4.1: Dimensional drawing of the Harlo wall sconce.
5. Setup and Installation
Before you begin, ensure the power is turned OFF at the circuit breaker or fuse box. It is recommended to have a second person assist with installation.
5.1 Tools Required (Not Included)
- Phillips Head Screwdriver
- Flat Head Screwdriver
- Wire Strippers
- Electrical Tape
- Safety Glasses
- Ladder (if necessary)
5.2 Installation Steps
- Turn Off Power: Locate the circuit breaker or fuse box controlling the power to the installation location and turn off the power.
- Prepare Mounting Plate: Attach the mounting plate to the junction box using the provided screws. Ensure the plate is securely fastened.
- Make Electrical Connections:
- Connect the black wire from the fixture to the black (live) wire from the junction box using a wire nut.
- Connect the white wire from the fixture to the white (neutral) wire from the junction box using a wire nut.
- Connect the ground wire from the fixture to the ground wire from the junction box (or to the green ground screw on the mounting plate) using a wire nut.
- Ensure all wire nuts are tightly secured and wrap connections with electrical tape for added safety.
- Mount the Fixture: Carefully align the fixture with the mounting plate and secure it using the provided screws. Ensure the fixture is flush against the wall and stable.
- Install Bulb: Screw in one E26/Medium Base 60W maximum bulb (sold separately) into the socket. Do not overtighten.
- Restore Power: Turn the power back ON at the circuit breaker or fuse box.
- Test Fixture: Turn on the light switch to ensure the fixture is working correctly.

Image 5.1: The Harlo wall sconce ready for bulb installation.

Image 5.2: Detail of the ribbed metal socket.
6. Operating Instructions
6.1 Basic Operation
Once installed and powered, the Harlo wall sconce operates via a standard wall light switch. Simply toggle the switch to turn the light on or off.
6.2 Dimmable Functionality
This fixture is fully dimmable. To utilize the dimming feature, you must install a compatible dimmer switch (sold separately) in place of your standard wall switch. Ensure the bulb you use is also dimmable.
6.3 Smart Bulb Compatibility
For advanced control and automation, you can replace the standard E26 bulb with a Globe Electric Smart bulb (sold separately). Once installed, you can control the lighting solutions with your smartphone via the Globe Electric app, enabling features like scheduling, remote control, and voice commands.

Image 6.1: Key features including weather resistance and bulb type.
7. Maintenance
7.1 Cleaning
To clean the fixture, ensure the power is turned off. Wipe the fixture with a soft, damp cloth. Do not use abrasive cleaners or solvents, as these may damage the finish. Allow the fixture to dry completely before restoring power.
7.2 Bulb Replacement
Before replacing the bulb, turn off the power to the fixture at the circuit breaker or fuse box. Allow the bulb to cool completely if it has been recently in use. Unscrew the old bulb and screw in a new E26/Medium Base bulb, ensuring it does not exceed the maximum 60W rating. Restore power and test the new bulb.
8. Troubleshooting
If you experience issues with your Harlo wall sconce, refer to the table below for common problems and solutions.
| Problem | Possible Cause | Solution |
|---|---|---|
| Light does not turn on. | No power to the fixture. | Check circuit breaker or fuse. Ensure wall switch is ON. |
| Loose wire connections. | Turn off power, check all wire connections. Tighten wire nuts. | |
| Faulty bulb. | Replace bulb with a new, working E26 bulb. | |
| Light flickers. | Loose bulb or wiring. | Turn off power, tighten bulb. Check wire connections. |
| Incompatible dimmer switch or bulb. | Ensure both dimmer switch and bulb are dimmable and compatible. | |
| Fixture hums. | Incompatible dimmer switch. | Replace dimmer switch with a high-quality, compatible LED dimmer. |
If the problem persists after trying these solutions, contact Globe Electric customer support.
9. Warranty and Customer Support
Globe Electric products are manufactured to high-quality standards and are warranted against defects in materials and workmanship. For specific warranty details, including duration and terms, please refer to the warranty card included with your purchase or visit the official Globe Electric website.
For technical assistance, missing parts, or warranty claims, please contact Globe Electric customer support:
- Website: www.globe-electric.com
- Phone: Refer to the website for regional contact numbers.