1. Introduction
The Huepar SW-T100 is a versatile 3-in-1 measurement tool designed for various applications in construction, home improvement, and DIY projects. It integrates a laser distance meter, a green cross line laser level, and a traditional tape measure into a single compact device. This manual provides detailed instructions for safe and effective operation of your device.
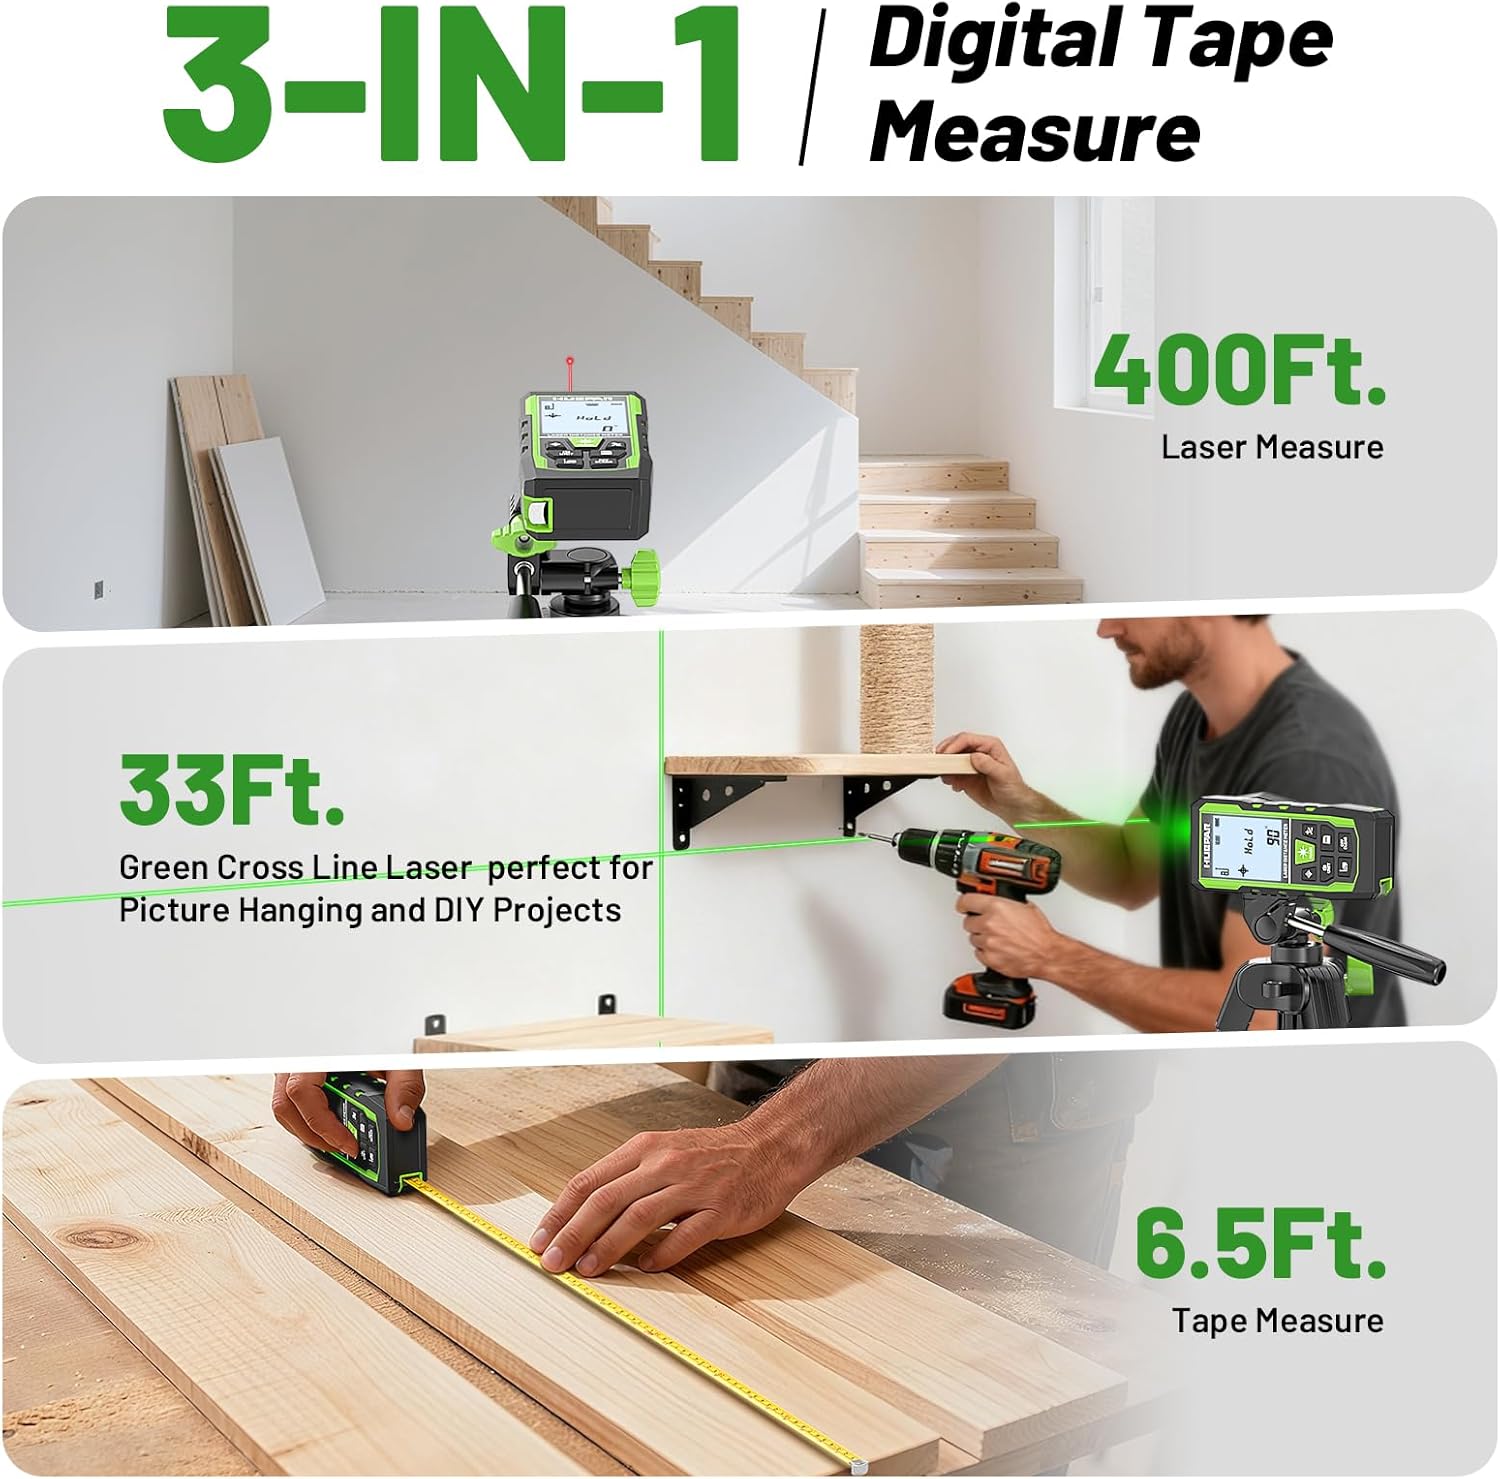
Image 1.1: The Huepar SW-T100 demonstrating its three core measurement functions.
2. Safety Information
This device uses a Class 2 laser (490-560nm, <1mW). Observe the following safety precautions:
- Do not stare directly into the laser beam.
- Avoid directing the laser beam at other people or reflective surfaces.
- Do not disassemble the device; laser radiation exposure may occur.
- Keep the device out of reach of children.
- Use only the specified Type-C charging cable.
3. Package Contents
Verify that all items are present in your package:
- 1x Huepar SW-T100 3-in-1 Laser Measurement Tool
- 1x Type-C Charging Cable
- 1x Portable Carry Bag
- 1x Hand Strap
- 1x Auxiliary Measuring Target Plate
- 1x User Manual (this document)
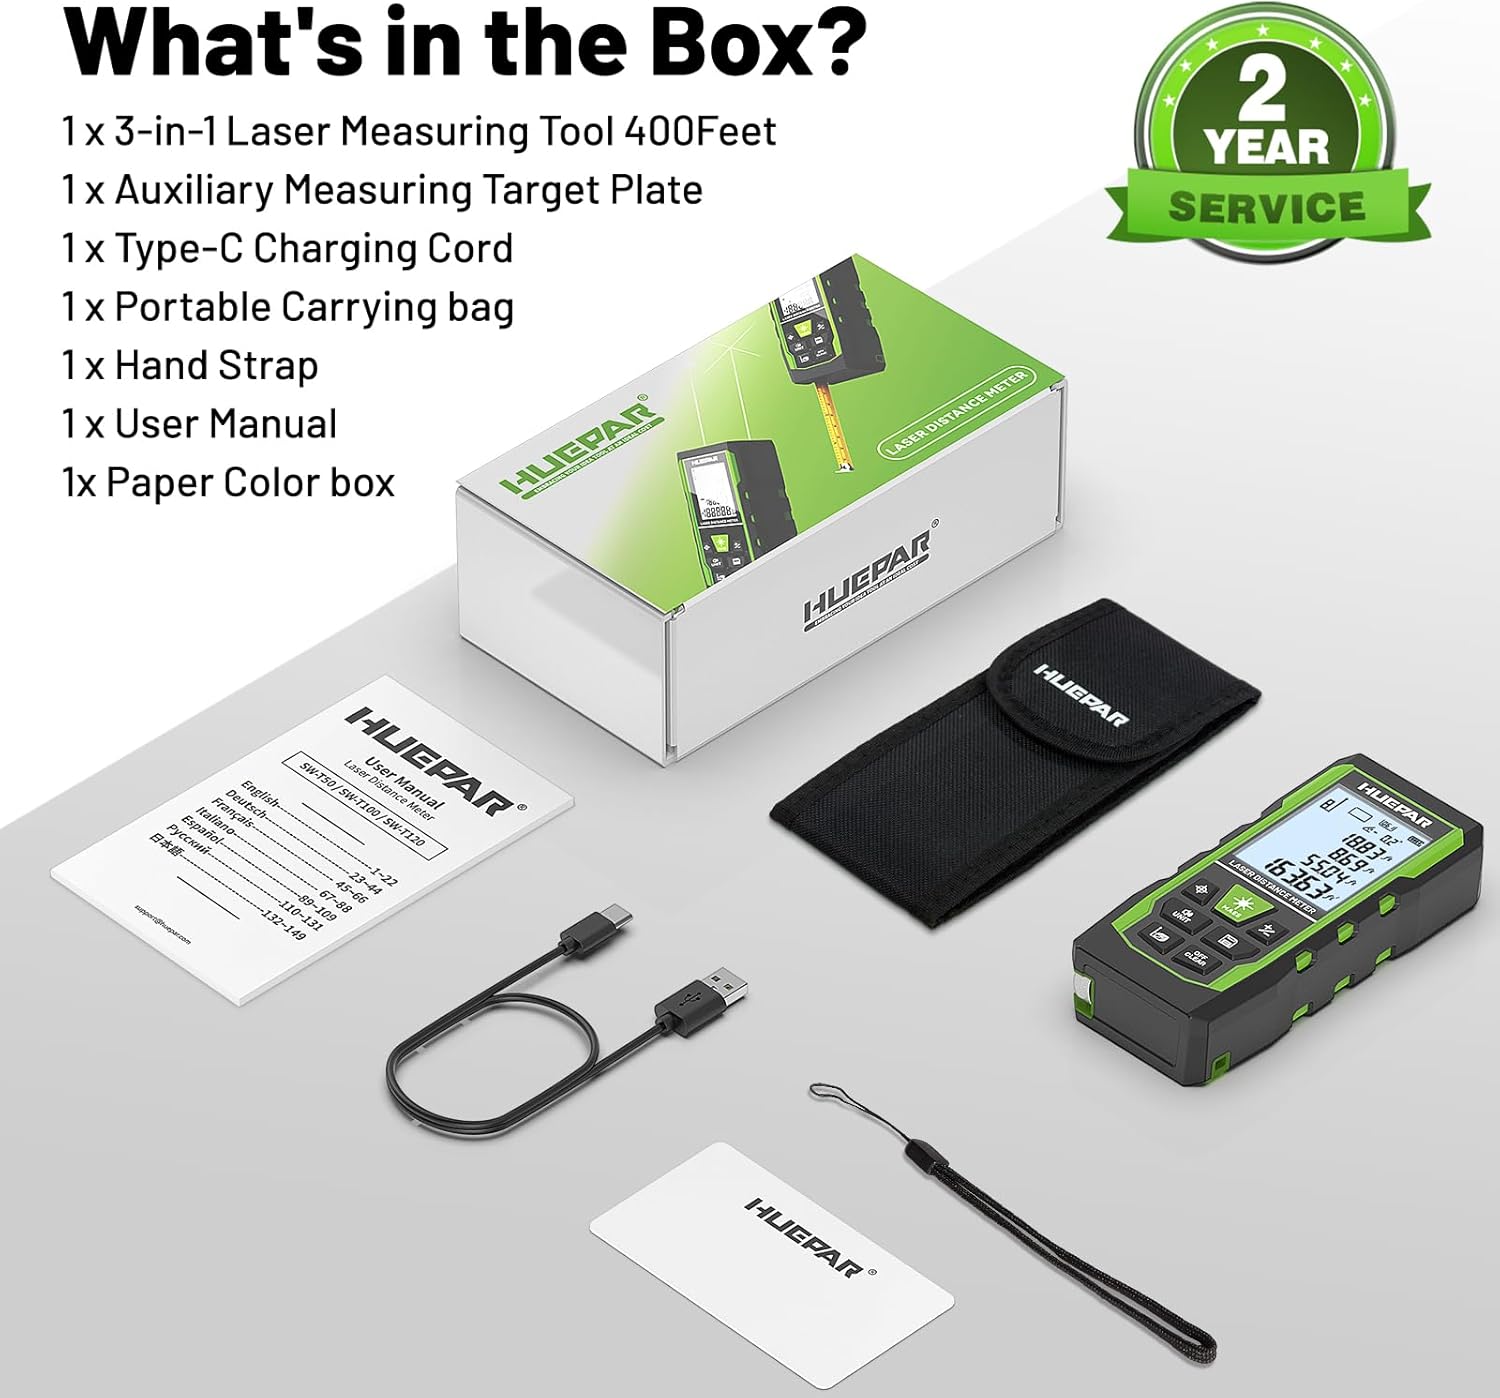
Image 3.1: All components included in the Huepar SW-T100 product box.
4. Setup
4.1. Charging the Device
The device is equipped with a built-in 3.7V / 600mAh Lithium-Ion rechargeable battery. Before first use, fully charge the device.
- Connect the provided Type-C charging cable to the charging port on the device.
- Connect the other end of the cable to a standard USB power adapter (not included).
- The charging indicator on the screen will show the charging status.
- A full charge typically takes a few hours.

Image 4.1: The device being charged via its Type-C port.
4.2. Initial Power On
Press the Power ON/Measure button to turn on the device. The display will illuminate, and the device will be ready for use.
5. Operating Instructions
5.1. General Controls
The device features several buttons for various functions:
- Power ON/Measure Button: Turns the device on/off and initiates measurements.
- Laser Level Mode Button: Activates the green cross line laser.
- Unit Switch/Sound Button: Changes measurement units and controls voice broadcast.
- Benchmark/Mode Switch Button: Selects measurement reference points and different measurement modes.
- Addition/Subtraction Buttons: Adds or subtracts measurements.
- Data Saving Button: Saves current measurement data.
- Turn off/Clear Button: Clears the last measurement or turns off the device with a long press.
5.2. Laser Distance Measurement Mode
This mode provides precise distance measurements up to 330ft/100M with an accuracy of ±1/16 inch.
- Press the Power ON/Measure button to activate the laser.
- Aim the laser at the target point.
- Press the Power ON/Measure button again to take a measurement. The result will be displayed on the screen.
Measurement Types:
The device supports various measurement functions:
- Distance Measurement: Single point-to-point distance.
- Area Measurement: Calculates the area of a surface.
- Volume Measurement: Calculates the volume of a space.
- Indirect Height (Pythagoras): Calculates height using two or three measurements.
- Wall Area: Calculates the total area of multiple walls.
- Continuous Measurement: Provides real-time distance updates as you move the device.

Image 5.1: Visual representation of the 9 available measurement modes.
Reference Points:
You can select the measurement reference point:
- Front-based: Measures from the front edge of the device.
- Rear-based: Measures from the rear edge of the device.
- Screw-hole based: Measures from the tripod screw hole.
Voice Broadcast:
The device features real-time voice feedback for measurements, enhancing readability and efficiency, especially in challenging conditions or for users with limited vision.
- Long press the Unit Switch/Sound button to switch between Chinese voice, English voice, or to turn off the sound.
- Note: The device does not broadcast voice while charging.

Image 5.2: The voice broadcast feature in action, providing audible measurement readings.
Data Memory:
The device can store up to 100 readings, allowing you to recall past measurements without manual notes.
5.3. Green Cross Line Laser Level Mode
This mode projects bright green horizontal and vertical cross lines, ideal for tasks like picture hanging, shelf installation, and tile alignment. Accuracy is ±1/9 inch.
- Press the Laser Level Mode button to activate the green cross lines.
- Place the device on a stable surface or mount it on a tripod using the 1/4"-20 threaded mount.
- The screen displays angles from -90° to +90° horizontally.
- If the angle is > ±4°, the 'Out' indicator will flash on the screen, and the laser line will flash rapidly, indicating the device is not level.

Image 5.3: Using the green cross line laser for leveling tasks.
5.4. Tape Measure Function
The integrated digital tape measure extends up to 6.5ft/2M for traditional short-distance measurements.
- Pull out the tape measure from the side of the device.
- The tape measure features both imperial and metric markings.
5.5. Unit Switching
Press the Unit Switch/Sound button to cycle through available measurement units (m, cm, mm, ft, ft+inches, ft+fractions).
5.6. Automatic Shut-off
To conserve battery life, the device will automatically shut off after 150 seconds of inactivity. This setting cannot be changed.
6. Maintenance and Care
- Cleaning: Wipe the device with a soft, damp cloth. Do not use harsh chemicals or abrasive cleaners.
- Storage: Store the device in its portable carry bag in a cool, dry place when not in use.
- Rugged Design: The device features a tough TPE housing, providing resistance against drops, dust, and light water spray (IP54 rated). While durable, avoid intentional exposure to harsh conditions.

Image 6.1: The device's robust construction and tripod mounting option.
7. Troubleshooting
- Device not turning on: Ensure the battery is charged. Connect to the Type-C charger and try again.
- Inaccurate laser measurements: Ensure the laser lens is clean. Verify the correct reference point is selected. Ensure the target surface is flat and reflective enough. Use the auxiliary target plate if needed.
- Laser line flashing in level mode: This indicates the device is outside its self-leveling range (> ±4°). Adjust the device's position until the flashing stops.
- Voice broadcast not working: Check if the voice broadcast is turned off by long-pressing the Unit Switch/Sound button. Voice broadcast is also disabled during charging.
- Auto shut-off too fast: The device is designed to shut off after 150 seconds of inactivity to save battery. This duration is fixed and cannot be adjusted.
8. Specifications
| Feature | Specification |
|---|---|
| Brand | Huepar |
| Model | SW-T100 |
| Measuring Range (Laser) | 330ft / 100M |
| Laser Measure Accuracy | ±1/16 inch |
| Laser Level Accuracy | ±1/9 inch |
| Laser Class | Class 2 |
| Laser Type | 490-560nm, <1mW |
| Tape Measure Length | 6.5ft / 2M |
| Battery | 3.7V / 600mAh Lithium-Ion (Rechargeable) |
| Charging Port | Type-C |
| Material | Acrylonitrile Butadiene Styrene, TPE |
| Item Weight | 200 Grams |
| IP Rating | IP54 (Dust and light water spray resistant) |
| Auto Shut-off | 150 seconds (laser), 150 seconds (device) |
9. Warranty and Support
9.1. Warranty
This Huepar laser measurement tool comes with a 2-year quality assurance. In the event of a product fault, free repair or replacement will be provided.
9.2. Technical Support
Huepar is committed to providing best-in-class service to our customers. We offer:
- 24/7 Service Team (response within 24 hours & solution within 48 hours).
- Lifetime Technical Support.
- Worldwide Maintenance Center for faster repair or replacement.
For support, please visit the official Huepar website or contact our customer service team directly.
10. Product Video Overview
Watch this video for a quick overview of the Huepar 3-in-1 Laser Measurement Tool's features and functions.
Video 10.1: An official product video demonstrating the key features and usage scenarios of the Huepar SW-T100 3-in-1 Laser Measurement Tool. This video highlights the voice broadcast, distance measurement, laser leveling, and tape measure functions.