NQODRNDQ SD003-DVR
Digital Display Potentiometer Variable Resistor User Manual
Brand: NQODRNDQ | Model: SD003-DVR
Introduction
This user manual provides detailed instructions for the installation, operation, and maintenance of the NQODRNDQ Digital Display Potentiometer Variable Resistor. This device is designed for precise control in various electrical applications, including speed controllers and inverters, offering a digital display for accurate resistance value monitoring.
Safety Information
- Always ensure the power supply is disconnected before installation or maintenance to prevent electric shock.
- Operate the device within the specified input voltage range (DC 6-30V) to avoid damage.
- Do not expose the device to excessive moisture, dust, or extreme temperatures.
- Handle with care to prevent physical damage to the components, especially the display and rotary knob.
- If you are unsure about any installation or operation steps, consult a qualified electrician or technician.
Product Overview
The Digital Display Potentiometer features a clear digital readout for precise resistance adjustment. It is available in various resistance values (5K, 10K, 20K, 50K, 100K) to suit different application needs. The device includes a rotary knob for adjustment and terminal blocks for secure wiring.

Figure 1: Front view of the Digital Display Potentiometer, showing the red LED display and the rotary adjustment knob.

Figure 2: Angled view of the potentiometer, highlighting its compact design and digital display.
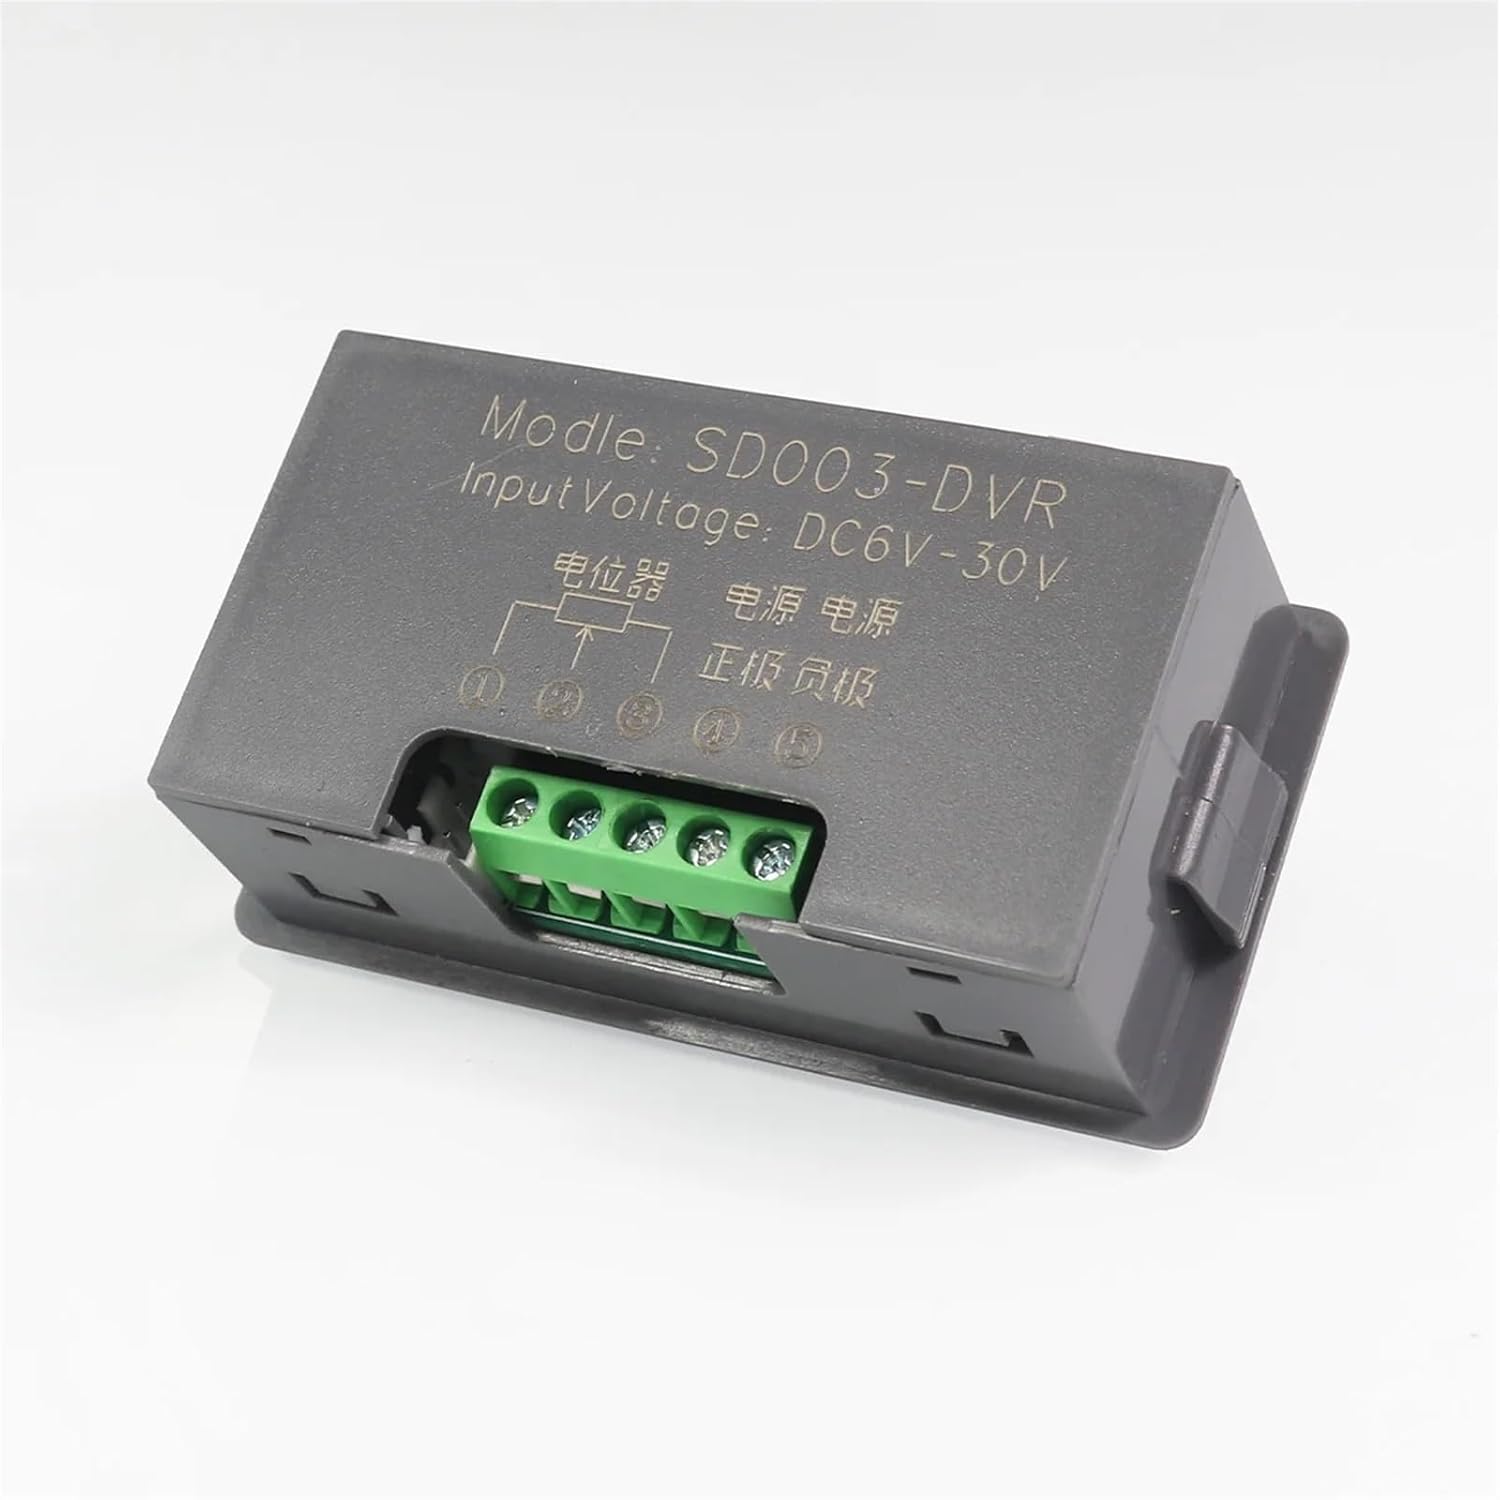
Figure 3: Rear view of the potentiometer, displaying the screw terminal block for electrical connections and model information.
Specifications
| Parameter | Value |
|---|---|
| Model Number | SD003-DVR |
| Input Voltage | DC 6-30V |
| Resistance Range Options | 5K, 10K, 20K, 50K, 100K |
| DIY Supplies Category | Electrical |
| Item Weight | 50 Grams (1.76 ounces) |
| Package Dimensions | 0.39 x 0.39 x 0.39 inches |
Setup and Installation
Follow these steps for proper installation of your digital display potentiometer:
- Power Off: Ensure that the power supply to your circuit is completely disconnected before making any connections.
- Identify Terminals: Locate the input voltage terminals (Power+ and Power-) and the potentiometer output terminals (Potentiometer output 1 and Potentiometer output 2) on the back of the device.
- Connect Power: Connect the DC 6-30V power supply to the "Power+" and "Power-" terminals. Ensure correct polarity.
- Connect Potentiometer Output: Connect either "Potentiometer output 1" or "Potentiometer output 2" to your circuit's input. You only need to use one of these outputs.
- Secure Connections: Tighten all screw terminals to ensure secure and reliable electrical connections.
- Mounting (Optional): The device can be panel-mounted or integrated into an enclosure using its side tabs.

Figure 4: Detailed wiring diagram showing connections for power input and potentiometer outputs. Note that only one potentiometer output needs to be connected.
Operating Instructions
Once installed and powered, the digital display potentiometer is ready for operation:
- Power On: Apply DC 6-30V power to the device. The digital display will illuminate, showing the current resistance value.
- Adjust Resistance: Rotate the silver knob on the front panel clockwise to increase the resistance value, and counter-clockwise to decrease it.
- Monitor Display: The digital display will show the real-time resistance value as you adjust the knob.
- Parameter Setting (Advanced): Refer to the "Reference table for parameter setting" for advanced configuration options, if applicable to your specific model and application. This table provides guidance on adjusting display range, magnification, and decimal points.

Figure 5: Reference table detailing various parameters for display settings, including minimum/maximum display numbers, set values, magnification, and decimal point settings. Pay attention to the "Attention" notes regarding standard potentiometer linear error and display ranges.
Important Notes for Parameter Setting:
- Standard potentiometer linear error is typically more than 5%.
- The display range is from -1999 to 9999.
- If the minimum value displayed is less than -1000 or greater than 1000, consider C02 or C10 settings first.
Maintenance
The Digital Display Potentiometer is designed for low maintenance. Follow these guidelines to ensure its longevity:
- Cleaning: Use a soft, dry cloth to clean the display and housing. Do not use abrasive cleaners or solvents.
- Environment: Keep the device in a clean, dry environment, free from excessive dust, moisture, and corrosive gases.
- Connections: Periodically check all electrical connections to ensure they remain tight and free from corrosion.
- Inspection: Inspect the rotary knob for smooth operation and the display for any signs of damage or malfunction.
Troubleshooting
| Problem | Possible Cause | Solution |
|---|---|---|
| Display does not light up. | No power, incorrect voltage, or reversed polarity. | Check power supply connections and voltage (DC 6-30V). Ensure correct polarity (+ to Power+, - to Power-). |
| Resistance value does not change or is erratic. | Loose connections, faulty knob, or internal damage. | Verify all wiring connections are secure. Gently rotate the knob to check for responsiveness. If issues persist, the unit may be faulty. |
| Display shows "Err" or abnormal values. | Out of range input, or internal error. | Ensure the connected circuit is within the potentiometer's operational range. Refer to the parameter setting table for display range adjustments. Power cycle the device. |
Replacement and Compatibility
This digital display potentiometer is designed to replace most commonly used single-turn low-power potentiometers with the same resistance value. This includes types such as RV09, WH148, and RK097NS, provided their resistance values match.

Figure 6: Visual representation of the digital display potentiometer's ability to replace common analog potentiometer types, emphasizing the need for matching resistance values.
Warranty and Support
For warranty information and technical support, please refer to the product packaging or contact NQODRNDQ customer service directly. Keep your purchase receipt as proof of purchase for any warranty claims.
For further assistance, you may visit the manufacturer's website or contact their support channels. Details are typically provided with the product or on the official brand website.
Related Documents - SD003-DVR
 |
Promax SD003-DVR Digital Potentiometer Signal Generator Simulator User Manual Comprehensive user manual for the Promax SD003-DVR panel-mounted digital potentiometer signal generator simulator. Details features, operation procedures, parameter settings, terminal definitions, and installation dimensions. |
 |
Logicom Security 4/8/16CH DVR User Manual Comprehensive user manual for Logicom Security 4/8/16 Channel Digital Video Recorders (DVRs) supporting AHD and 960H 720P resolutions. This guide covers installation, setup, features, network configuration, and troubleshooting. |
 |
DISH Remote User Guide: 5.4 and 6.4 Models Comprehensive user guide for DISH 5.4 and 6.4 remote controls, covering setup, configuration, programming, and troubleshooting for various DISH receivers and other home entertainment devices. |
 |
HiLock デジタルビデオレコーダー ユーザーマニュアル このユーザーマニュアルは、HiLock デジタルビデオレコーダー(DVR)の安全な設置、操作、およびメンテナンスに関する包括的なガイドを提供します。製品の機能、設定、トラブルシューティング、および規制情報について詳しく解説しています。Hikvisionの最新情報やサポートについては、公式ウェブサイトをご覧ください。 |
 |
HiLook Digital Video Recorder User Manual - Setup, Configuration, and Operation Guide Comprehensive user manual for HiLook Digital Video Recorders (DVRs). Learn how to set up, configure, operate, and maintain your device with detailed instructions and safety guidelines. |
 |
Amcrest Eco HDCVI DVR Quick Start Guide This guide provides step-by-step instructions for setting up and using the Amcrest Eco HDCVI DVR, covering hardware connections, software configuration, network setup, web access, and mobile app integration. |