1. Introduction
Thank you for choosing the GarveeLife 6x8 ft Outdoor Portable Storage Shed. This manual provides essential information for the safe and proper assembly, operation, and maintenance of your new storage shed. Please read all instructions carefully before beginning assembly and retain this manual for future reference.

Image: The GarveeLife 6x8 ft Outdoor Portable Storage Shed, showcasing its primary function as a shelter for vehicles like motorcycles.
2. Safety Warnings
Important: Safety warnings provided with the product must be strictly followed during installation and use. Always ensure the product is securely anchored to prevent unintended movement. Avoid installing the product near or directly over air vents, as airflow variations may adversely affect the normal operation of the product. Choose a location away from air vents to ensure the product's stability under various environmental conditions.
3. Product Features
- Simple Assembly: Designed for quick assembly, typically by one person in under an hour, with pre-numbered parts and clear instructions. No frustrating screw assembly required.
- Durable Construction: Features a 19-gauge rust-resistant galvanized steel frame (1.5-inch diameter poles) and a durable 220gsm waterproof PE tarp, engineered for longevity and to withstand extreme weather conditions.
- Enhanced Ventilation: Includes mesh windows to ensure proper airflow while keeping insects out.
- Secure Access: Smooth zippers provide easy access and form a secure seal.
- Versatile Use: Ideal for storing bicycles, motorcycles, small trucks, lawnmowers, firewood, gardening tools, and other outdoor equipment.

Image: Various applications of the shed, including motorcycle storage, tool shed, firewood storage, and a utility room, highlighting its versatility.

Image: Detailed view of the premium 220G PE tarp, emphasizing its waterproof, anti-snow, anti-UV, and overall weather-resistant qualities.
4. Package Contents
All components for the shed are packed in a single box. Please verify that all parts are present before beginning assembly.
- Galvanized Steel Frame Poles (19-gauge, 1.5-inch diameter)
- 220gsm Waterproof PE Tarp
- Roll-Up Door Panels with Zippers and Mesh Windows
- Base Plates
- Roller Shutter Buckles
- Connecting Pipes
- Ventilation Holes/Mesh Windows
- Ratchet-Tite System (for securing)
- Assembly Instructions

Image: Close-up of key components such as the Ratchet-Tite mechanism, zipper, ventilation mesh, base plate, roller shutter buckle, and connecting pipes, illustrating the shed's construction.
5. Setup and Assembly
Follow these steps for a simple and efficient assembly process. It is recommended to have at least one person for assembly.
- Assemble the Roof Frame: Connect the designated poles to form the roof structure.
- Install Vertical Poles: Attach the vertical support poles to the roof frame and secure them to the base plates.
- Cover with Side Tarp: Drape the main tarp over the assembled frame, ensuring it is centered and covers all sides.
- Install Front and Rear Doors: Attach the roll-up door panels to the front and rear openings of the frame. Secure them using the integrated zippers and buckles.
- Secure the Structure: Utilize the provided stakes and ratchet-tite system to firmly anchor the shed to the ground, ensuring stability against wind and other elements.

Image: A visual breakdown of the assembly process, showing the roof assembly, pole installation, side tarp covering, and door installation.
Assembly Video
Video: A seller-provided video demonstrating the assembly process of a similar portable storage shed, including unboxing and setup. This video helps visualize the steps for setting up the frame and covering it with the tarp.
Securing the Shed
Video: A seller-provided video illustrating the correct method to use the ratchet-tite system for securing the storage shed, ensuring maximum stability and resistance against environmental factors.
6. Operating Instructions
The GarveeLife storage shed is designed for ease of use and protection.
- Roll-Up Doors: The front and rear panels feature roll-up doors. Unzip the doors completely, then roll them upwards and secure them with the integrated buckles to keep them open for easy access.
- Ventilation: The mesh windows on the doors and sides allow for cross-ventilation. Ensure these are clear of obstructions to maintain airflow and prevent moisture buildup inside the shed.
- Securing Contents: While the shed provides protection, consider additional internal securing methods for valuable items, especially in areas prone to high winds.
7. Maintenance
Regular maintenance will extend the lifespan of your storage shed.
- Cleaning: Periodically clean the PE tarp with mild soap and water. Avoid harsh chemicals that could damage the material.
- Frame Inspection: Regularly check the steel frame for any signs of rust, damage, or loose connections. Tighten any loose bolts or connections as needed.
- Tarp Inspection: Inspect the tarp for tears, punctures, or excessive wear. Repair small damages promptly to prevent them from worsening.
- Anchoring: Ensure the shed remains securely anchored, especially after strong winds or heavy rainfall. Re-tighten ratchet straps if necessary.
8. Troubleshooting
- Shed Instability: Ensure all frame connections are tight and the shed is properly anchored using the provided stakes and ratchet-tite system. Consider adding sandbags or additional weights to the base in windy conditions.
- Water Accumulation: Verify that the tarp is taut and properly positioned to allow water to run off. Check for any tears or punctures in the tarp that may require repair. Ensure the ground beneath the shed allows for proper drainage.
- Difficulty with Zippers: Ensure zippers are clean and free of debris. Apply a silicone-based lubricant if they are stiff. Avoid forcing zippers.
- Poor Ventilation/Moisture: Ensure mesh windows are open when possible to allow for airflow. Avoid storing damp items inside the shed.
9. Specifications
| Feature | Detail |
|---|---|
| Brand | GarveeLife |
| Model Number | PPG_33AFUK3D-0001 |
| Product Dimensions | 72"D x 60.24"W x 72"H (6x8 ft) |
| Material | Metal Frame, 220gsm PE Tarp |
| Frame Material | 19-gauge Galvanized Steel (1.5 in-diameter poles) |
| Water Resistance Level | Waterproof |
| Door Style | Roll-Up Door |
| Assembly Required | Yes |
| Item Weight | 49.4 pounds |
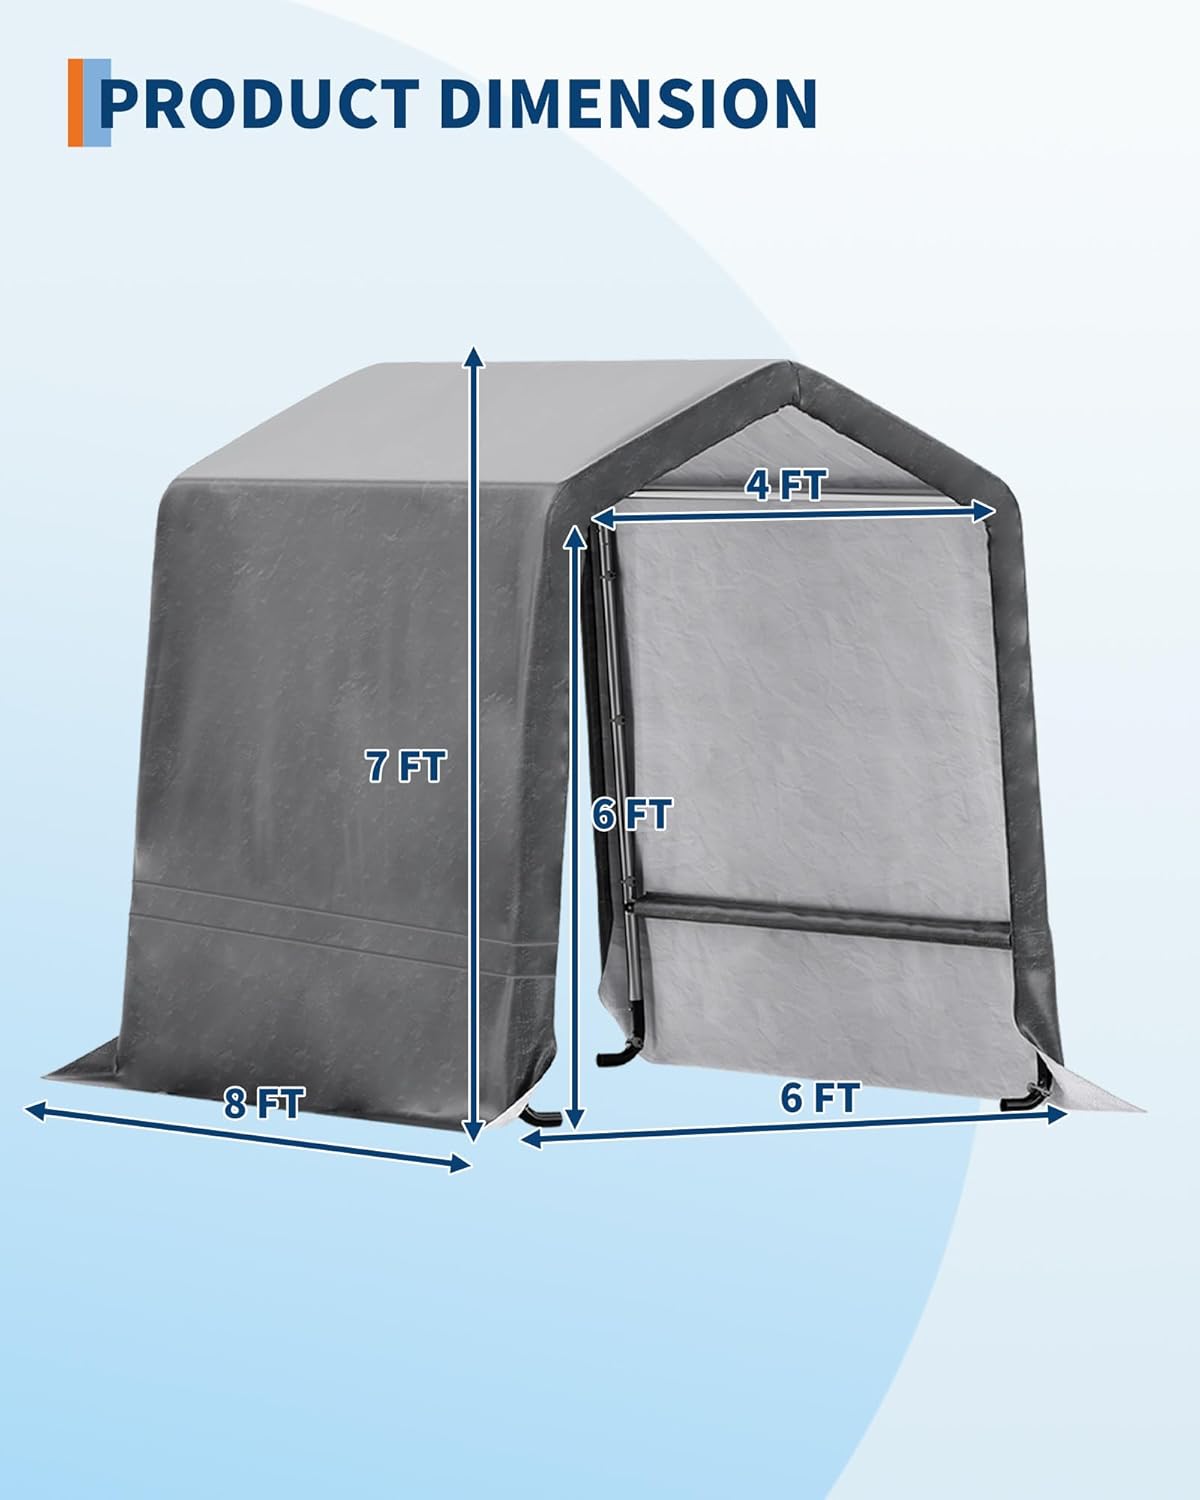
Image: A clear diagram illustrating the overall dimensions of the shed, including its 6 ft width, 8 ft depth, and 7 ft height, along with door opening measurements.
10. Warranty and Support
GarveeLife is committed to providing high-quality products and customer satisfaction.
- Reliability Assurance: All components are carefully inspected. If you encounter any issues during installation or use, please do not hesitate to contact our customer support team for immediate assistance.
- Contact Information: For support, please refer to the contact details provided with your purchase or on the product packaging.