1. Important Safety Information
Please read all instructions carefully before beginning installation and save these instructions for future reference. Incorrect installation can lead to electric shock, fire, or personal injury.
- Always disconnect power at the main circuit breaker before installation or servicing.
- All wiring must be in accordance with national and local electrical codes. If you are unfamiliar with wiring, consult a qualified electrician.
- The mounting bracket must be securely fastened to the building structure and capable of supporting the full weight of the fan.
- Ensure the installation location does not allow the fan blades to strike any objects or walls.
- Do not operate the fan if any part is damaged.
2. Package Contents
Carefully unpack your ceiling fan and check that all contents are present and undamaged. Refer to the diagram below for a visual representation of the components.

Image: All components of the NKPU 60 Inch Ceiling Fan with Lights, including blades, motor housing, light panel, remote control, and downrods, laid out for inspection.
- Motor Housing
- Fan Blades (6 double-sided)
- Blade Brackets
- LED Light Panel
- Light Cover
- Remote Control with Wall Mount
- Receiver
- Downrods (6-inch and 8-inch options)
- Mounting Bracket
- Hardware Pack (screws, washers, wire nuts)
- User Manual
3. Specifications
| Feature | Specification |
|---|---|
| Brand | NKPU |
| Model Name | Ceiling fan with light (SY12) |
| Size | 60 Inch |
| Color | Black |
| Number of Blades | 6 |
| Motor Type | DC Motor |
| Speed Settings | 6 |
| Air Flow Capacity | 8577 CFM |
| Noise Level | ≤35 Decibels |
| Light Type | Dimmable LED (10%-100%) |
| Color Temperature | 3000K (Warm), 4500K (Natural), 6000K (Cool White) |
| Control Method | Remote Control, Smart App ("Fan Lamp Pro") |
| Timer Functions | 1H, 2H, 4H, 8H |
| Indoor/Outdoor Use | Indoor, Outdoor (not directly exposed to rain) |
| Downrod Lengths | 6 Inches, 8 Inches |
4. Installation Guide
This section provides step-by-step instructions for installing your NKPU 60 Inch Ceiling Fan. For a visual guide, please refer to the installation video below.
Video: NKPU 60 inch ceiling fan with lights installation video. This video demonstrates the complete assembly and mounting process for the ceiling fan.
4.1 Blade Assembly
- Attach each fan blade to a blade bracket using the provided screws and washers. Ensure they are securely tightened.

Image: Close-up view of the double-sided fan blades, showing one side in classic black and the other in warm wood grain, allowing for versatile aesthetic choices.
4.2 Motor and Downrod Assembly
- Secure the assembled blades to the motor housing.
- Select the appropriate downrod (6-inch or 8-inch) for your ceiling height.
- Feed the motor wires through the chosen downrod.
- Attach the downrod to the motor housing, securing it with the provided pin and screws.
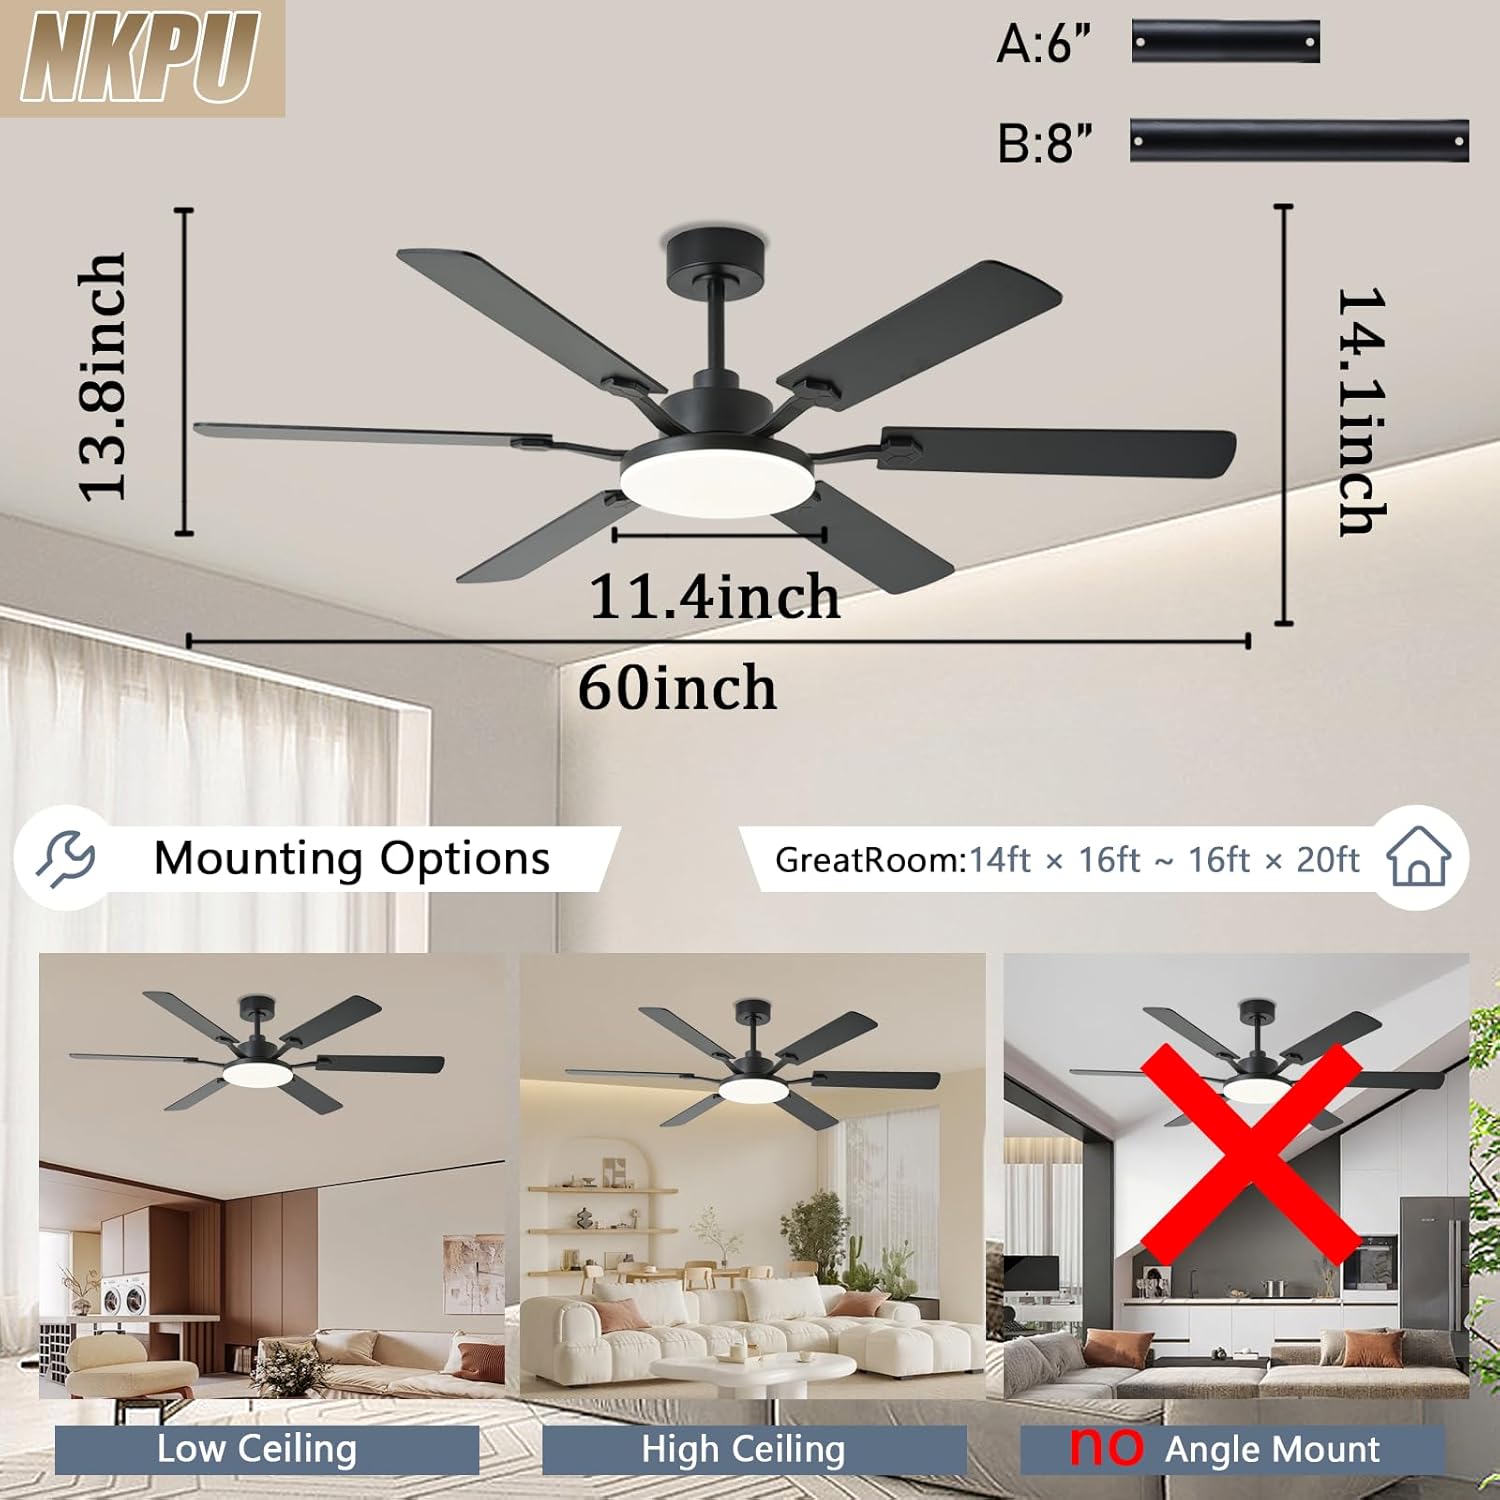
Image: Diagram illustrating the dimensions of the 60-inch ceiling fan and various mounting options for low and high ceilings, noting that it is not suitable for angled ceilings.
4.3 Mounting to Ceiling
- Install the mounting bracket to your ceiling junction box. Ensure it is firmly secured.
- Carefully lift the fan assembly and hang it on the mounting bracket.
- Connect the electrical wires from the fan to the house wiring according to the wiring diagram in the full manual. Ensure all connections are secure.
- Tuck the wires neatly into the junction box and secure the canopy to the mounting bracket.
4.4 Light Panel Installation
- Connect the LED light panel wires to the corresponding wires from the motor.
- Secure the LED light panel to the motor housing with screws.
- Attach the light cover by twisting it into place.

Image: A person wearing gloves is shown using a screwdriver to install the ceiling fan, highlighting the ease of installation.
5. Operating Instructions
Your NKPU ceiling fan can be controlled via the included remote control or the "Fan Lamp Pro" smartphone application.
Video: NKPU 60 inch ceilings fan with lights function display video. This video demonstrates the various operational features of the ceiling fan, including speed, light, and direction controls.
5.1 Remote Control Functions
The remote control allows for convenient adjustment of fan and light settings.

Image: Diagram of the remote control with labels for each button, including fan on/off, speed control, light brightness, color temperature, timer, and reverse function.
- Fan On/Off: Turns the fan on or off.
- Fan Speed: Adjusts between 6 speed settings.
- Light On/Off: Turns the light on or off.
- Brightness Adjustment: Dims the light from 10% to 100%.
- Color Temperature: Cycles through Warm (3000K), Natural (4500K), and Cool White (6000K).
- Timer: Sets the fan to turn off after 1, 2, 4, or 8 hours.
- Forward/Reverse: Changes the direction of blade rotation for summer (downward airflow) or winter (upward airflow).
5.2 Smart App Control ("Fan Lamp Pro")
Download the "Fan Lamp Pro" app from your smartphone's app store. Ensure your phone's Bluetooth is enabled for pairing.

Image: Screenshots of the "Fan Lamp Pro" app interface on a smartphone, showing controls for fan speed, light settings, and timer functions.
- Scan the QR code in the manual or search for "Fan Lamp Pro" in your app store to download.
- Open the app and ensure your phone's Bluetooth is turned on.
- Power on the fan. Within 5 seconds, tap the pairing button in the app. The fan light will flash twice to confirm successful pairing.
- Once paired, you can control all fan and light functions via the app, similar to the remote control.
5.3 Reversible Motor Function
The fan features a reversible DC motor for year-round comfort.
- Summer Mode: Blades rotate counter-clockwise to push cool air downwards, creating a cooling effect.
- Winter Mode: Blades rotate clockwise to draw cool air up towards the ceiling, circulating warm air trapped near the ceiling.

Image: A diagram illustrating the airflow patterns for the reversible DC motor, showing downward airflow for summer cooling and upward airflow for winter heat circulation.
6. Maintenance
Regular maintenance ensures optimal performance and longevity of your ceiling fan.
- Cleaning: Periodically clean the fan blades and motor housing with a soft, damp cloth. Do not use abrasive cleaners or solvents.
- Tightening Screws: Check all screws, especially those on the blade attachments and mounting bracket, at least twice a year. Tighten any loose screws.
- Blade Balancing: If the fan wobbles, ensure all blades are securely attached and balanced. A balancing kit (not included) can be used if necessary.
- Light Cover: Clean the light cover with a soft, lint-free cloth.
7. Troubleshooting
If you experience issues with your ceiling fan, refer to the following common troubleshooting steps:
- Fan does not start:
- Check that the power is on at the circuit breaker.
- Ensure all electrical connections are secure.
- Verify remote control batteries are installed correctly and are not depleted.
- Light does not work:
- Check light wiring connections.
- Ensure the light is turned on via remote or app.
- Fan wobbles:
- Ensure all blade screws are tight.
- Check that the mounting bracket is securely fastened.
- Verify blades are not bent or damaged.
- Remote control not working:
- Replace remote batteries.
- Ensure the remote is paired with the fan (refer to pairing instructions).
8. Warranty and Support
NKPU offers a 30-day no-hassle return policy and a 2-year after-sales service for your peace of mind. If you encounter any problems during installation or use, our dedicated customer service team is ready to assist you.
For support, please contact us via the email provided in your product packaging or on the product page. We welcome your ideas and feedback to help us improve our products and services.