Introduction
Thank you for choosing the Originbuty Smart Bidet Toilet Model 709. This manual provides essential information for the safe and efficient installation, operation, and maintenance of your new smart toilet. Please read this manual thoroughly before installation and use, and retain it for future reference.
Key Features
- Integrated Bidet Function: Provides warm water washing for enhanced hygiene.
- Heated Seat: Offers adjustable warmth for comfort, especially in colder conditions.
- Instant Warm Water System: Ensures continuous warm water without a tank, eliminating waiting times.
- Automatic Lid Operation: Features an auto open/close lid for hands-free convenience.
- Foot Sensor Activation: Allows hands-free operation for lid opening and flushing.
- Dual Flush System: Efficiently conserves water with options for different flush volumes.
- Warm Air Drying: Provides a gentle warm air stream for drying after bidet use.
- LED Display & Night Light: Offers clear status indication and soft illumination for nighttime use.
- Remote Control: Full control over all functions from a convenient remote.
Setup and Installation
Proper installation is crucial for the optimal performance and safety of your smart toilet. It is recommended to have a qualified plumber perform the installation.
Pre-Installation Checklist:
- Ensure an available electrical outlet (1.4m power cord included).
- Verify rough-in size is greater than 13 inches.
- Confirm water supply line and sewage outlet are accessible.
Installation Steps:
- Prepare the Area: Clear the installation area and ensure the floor is clean and level.
- Install Wax Ring: Apply the wax ring to the toilet flange on the floor.
- Position the Toilet: Carefully align the toilet with the floor flange and press down firmly to create a seal.
- Secure the Toilet: Use appropriate bolts and nuts to secure the toilet to the floor.
- Connect Water Supply: Attach the water supply hose to the toilet's inlet valve and the wall's water supply. Ensure all connections are tight to prevent leaks.
- Connect Power: Plug the toilet's power cord into a grounded electrical outlet.
- Seal the Base: Apply a bead of silicone sealant around the base of the toilet where it meets the floor for a finished look and added stability.

Figure 1: Product components and installation dimensions.

Figure 2: Fully installed Originbuty Smart Bidet Toilet.
Installation Video:
Video 1: Detailed installation guide for the smart toilet.
Operating Instructions
Your smart toilet offers various functions for personalized comfort and hygiene. All functions can be controlled via the intelligent knob on the toilet or the included remote control.
Intelligent Knob Functions:
- Female Cleaning: Rotate clockwise for feminine wash.
- Stop/Flush/Drying: Click the button once to stop current function, double press for air drying, or press and hold for flushing.
- Hip Cleaning: Rotate counter-clockwise for posterior wash.

Figure 3: Intelligent knob for primary controls.
Remote Control Functions:
The remote control provides comprehensive access to all features. Refer to the diagram below for button functions:

Figure 4: Remote control layout and functions.
- Stop: Stops all active functions.
- Rear: Activates posterior wash.
- Front: Activates feminine wash.
- Drying: Activates warm air drying.
- Light: Toggles the night light on/off.
- Clean: Initiates nozzle self-cleaning.
- Water Temp: Adjusts water temperature.
- Seat Temp: Adjusts seat temperature.
- Air Temp: Adjusts drying air temperature.
- Flush: Activates flushing. Long press for automatic flushing on/off.
- Water Pressure +/-: Adjusts water pressure for washing.
- Nozzle Position +/-: Adjusts nozzle position.
Automatic Functions:
- Auto Open/Close Lid: The lid automatically opens upon approach and closes after use.
- Auto Flush: The toilet flushes automatically upon departure.
- Night Light: A soft blue night light illuminates the bowl for convenience in the dark.

Figure 5: Hands-free automatic lid and flush operation.

Figure 6: Seat heating and warm air adjustment controls.
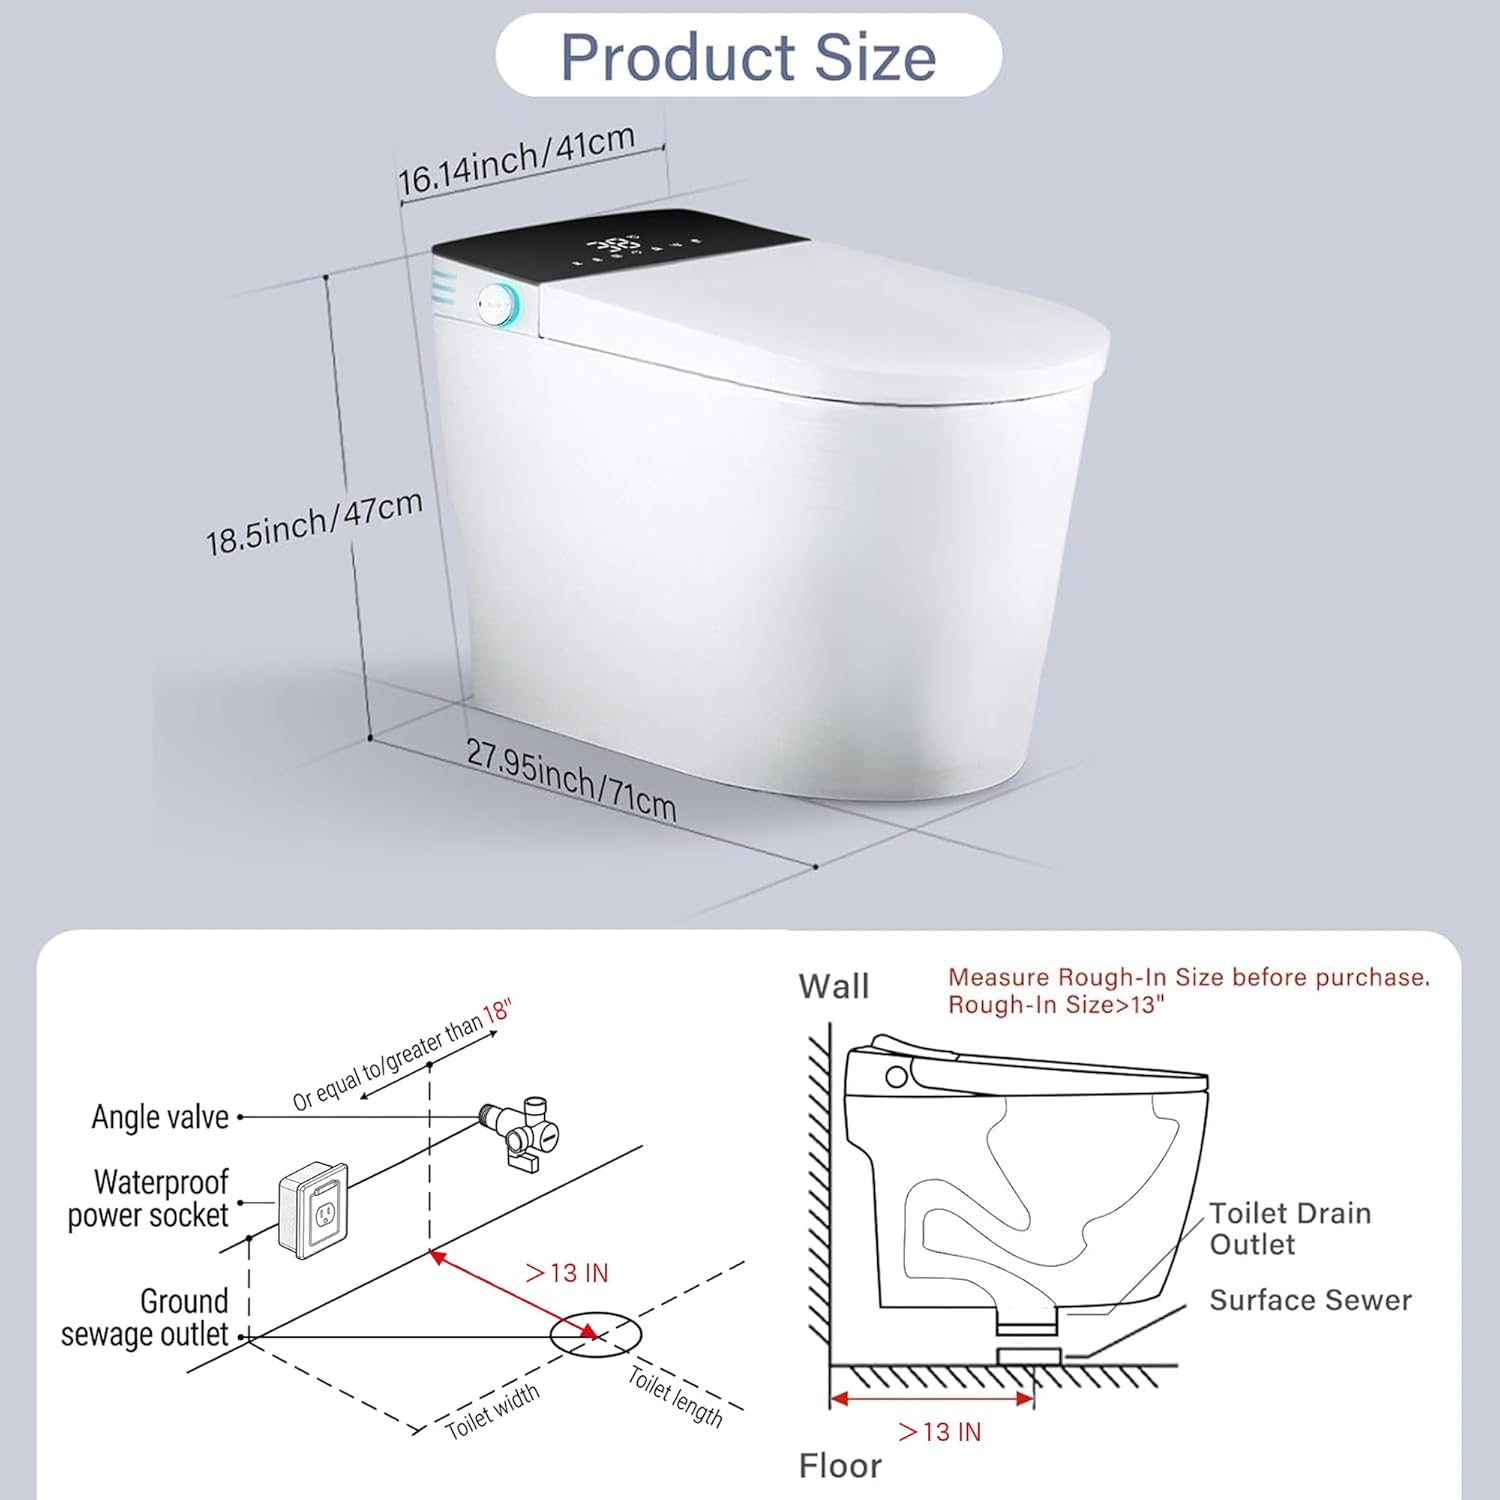
Figure 7: Instant warm water bidet with rear, lady, self-cleaning, and moveable wash options.
Usage Video:
Video 2: Demonstration of smart toilet usage and features.
Maintenance
Regular cleaning and maintenance will ensure the longevity and hygienic performance of your smart toilet.
- Exterior Cleaning: Wipe the exterior surfaces with a soft, damp cloth and mild, non-abrasive cleaner. Avoid harsh chemicals.
- Nozzle Cleaning: The bidet nozzle has a self-cleaning function. Activate it via the remote control. For deeper cleaning, gently wipe the nozzle with a soft brush or cloth when it is extended.
- Seat and Lid: Clean the seat and lid with a mild soap solution. The soft-close mechanism requires no special maintenance.
- Water Filter: Periodically check and clean or replace the water filter as per the manufacturer's recommendations to maintain optimal bidet performance.

Figure 8: IPX4 Waterproof Protection ensures durability and easy cleaning.
Troubleshooting
If you encounter any issues with your Originbuty Smart Bidet Toilet, please refer to the following common solutions. If the problem persists, contact customer support.
| Problem | Possible Cause | Solution |
|---|---|---|
| No power/functions unresponsive | Power cord unplugged, circuit breaker tripped. | Check power connection, reset circuit breaker. |
| Bidet water not warm | Water heater off, temperature setting too low. | Ensure water heater is on, adjust water temperature setting on remote. |
| Lid not opening/closing automatically | Sensor obstructed, auto-open/close feature disabled. | Clear sensor area, ensure feature is enabled via remote. |
| Weak water pressure for bidet | Water supply valve partially closed, nozzle clogged. | Fully open water supply valve, clean bidet nozzle. |
Specifications
| Feature | Detail |
|---|---|
| Brand | Originbuty |
| Model Number | 709 |
| Color | White |
| Material | Plastic |
| Installation Type | Floor Mounted |
| Seat Material Type | Plastic |
| Power Cord Length | 1.4 m (approx. 4.6 ft) |
| Waterproof Rating | IPX4 |
Figure 9: Product dimensions for planning installation.
Warranty and Support
Originbuty is committed to providing reliable products and excellent customer satisfaction. For any concerns or assistance, please contact our professional after-sales support team through Amazon messaging. We aim to respond within 24 hours.


