
1. Product Overview
The Meshnology ESP32 LoRa V3 Development Board is a versatile platform designed for Internet of Things (IoT) projects, offering advanced wireless communication capabilities. It integrates an ESP32-S3FN8 main controller with an SX1262 LoRa chip, providing robust performance for various applications.
Key Features:
- Advanced Communication: Supports LoRaWAN standards, dual-mode Bluetooth, and Wi-Fi for flexible connectivity.
- High-Performance Hardware: Features a 240MHz Xtensa 32-bit LX7 dual-core processor and 8MB FLASH memory.
- Integrated OLED Display: A 0.96-inch 128x64 dot matrix OLED module provides clear visual feedback for debugging and monitoring.
- Developer-Friendly: Compatible with Arduino and supports a wide operating voltage range (3.3V to 7V) and temperature range (-20°C to 70°C).
- Versatile Power Supply: Includes a built-in SH1.25 battery interface and a Type-C power port with ESD protection.

Figure 1: Overview of ESP32 LoRa V3 Board features and applications.
2. Setup Guide
2.1 Component Identification
Familiarize yourself with the board's components and pinout before proceeding with setup.

Figure 2: Hardware resources and key components of the ESP32 LoRa V3 board.

Figure 3: Detailed pinout diagram for the ESP32 LoRa V3 board.
2.2 Antenna Connection
Connect the provided LoRa antenna to the SMA connector on the board. Ensure it is securely fastened to achieve optimal signal strength and range. Do not power on the board without the antenna connected when using LoRa, as this can damage the LoRa module.
2.3 Power Supply
The board can be powered via two methods:
- USB Type-C: Connect a standard USB Type-C cable to the board and a power source (e.g., computer USB port, USB wall adapter).
- Battery: Connect a 3.7V LiPo battery to the SH1.25 battery interface. The board includes built-in charging and protection circuits for connected batteries.
2.4 Driver Installation
For communication with your computer via USB, you may need to install the CP2102 USB-to-UART bridge driver. This driver enables your computer to recognize the board as a serial port.
- Search online for "CP2102 driver" and download the appropriate version for your operating system.
- Follow the installation instructions provided with the driver.
2.5 Development Environment Setup
The ESP32 LoRa V3 board is compatible with the Arduino IDE. Follow these general steps to set up your development environment:
- Install the Arduino IDE from the official Arduino website.
- Add ESP32 board support to the Arduino IDE via the Boards Manager.
- Install necessary libraries for LoRa, OLED, and other functionalities (e.g., LoRa library, U8g2 library for OLED).
- Select the correct board (e.g., "ESP32 Dev Module" or specific Heltec LoRa board if available) and COM port in the Arduino IDE.
3. Operation
3.1 Communication Modes
The board supports multiple communication protocols:
- LoRa: For long-range, low-power wireless communication, ideal for Meshtastic and LoRaWAN applications.
- Bluetooth: Supports dual-mode Bluetooth (Classic and BLE Low Energy) for short-range connectivity with other devices or mobile applications.
- Wi-Fi: Enables standard Wi-Fi connectivity for internet access or local network communication.
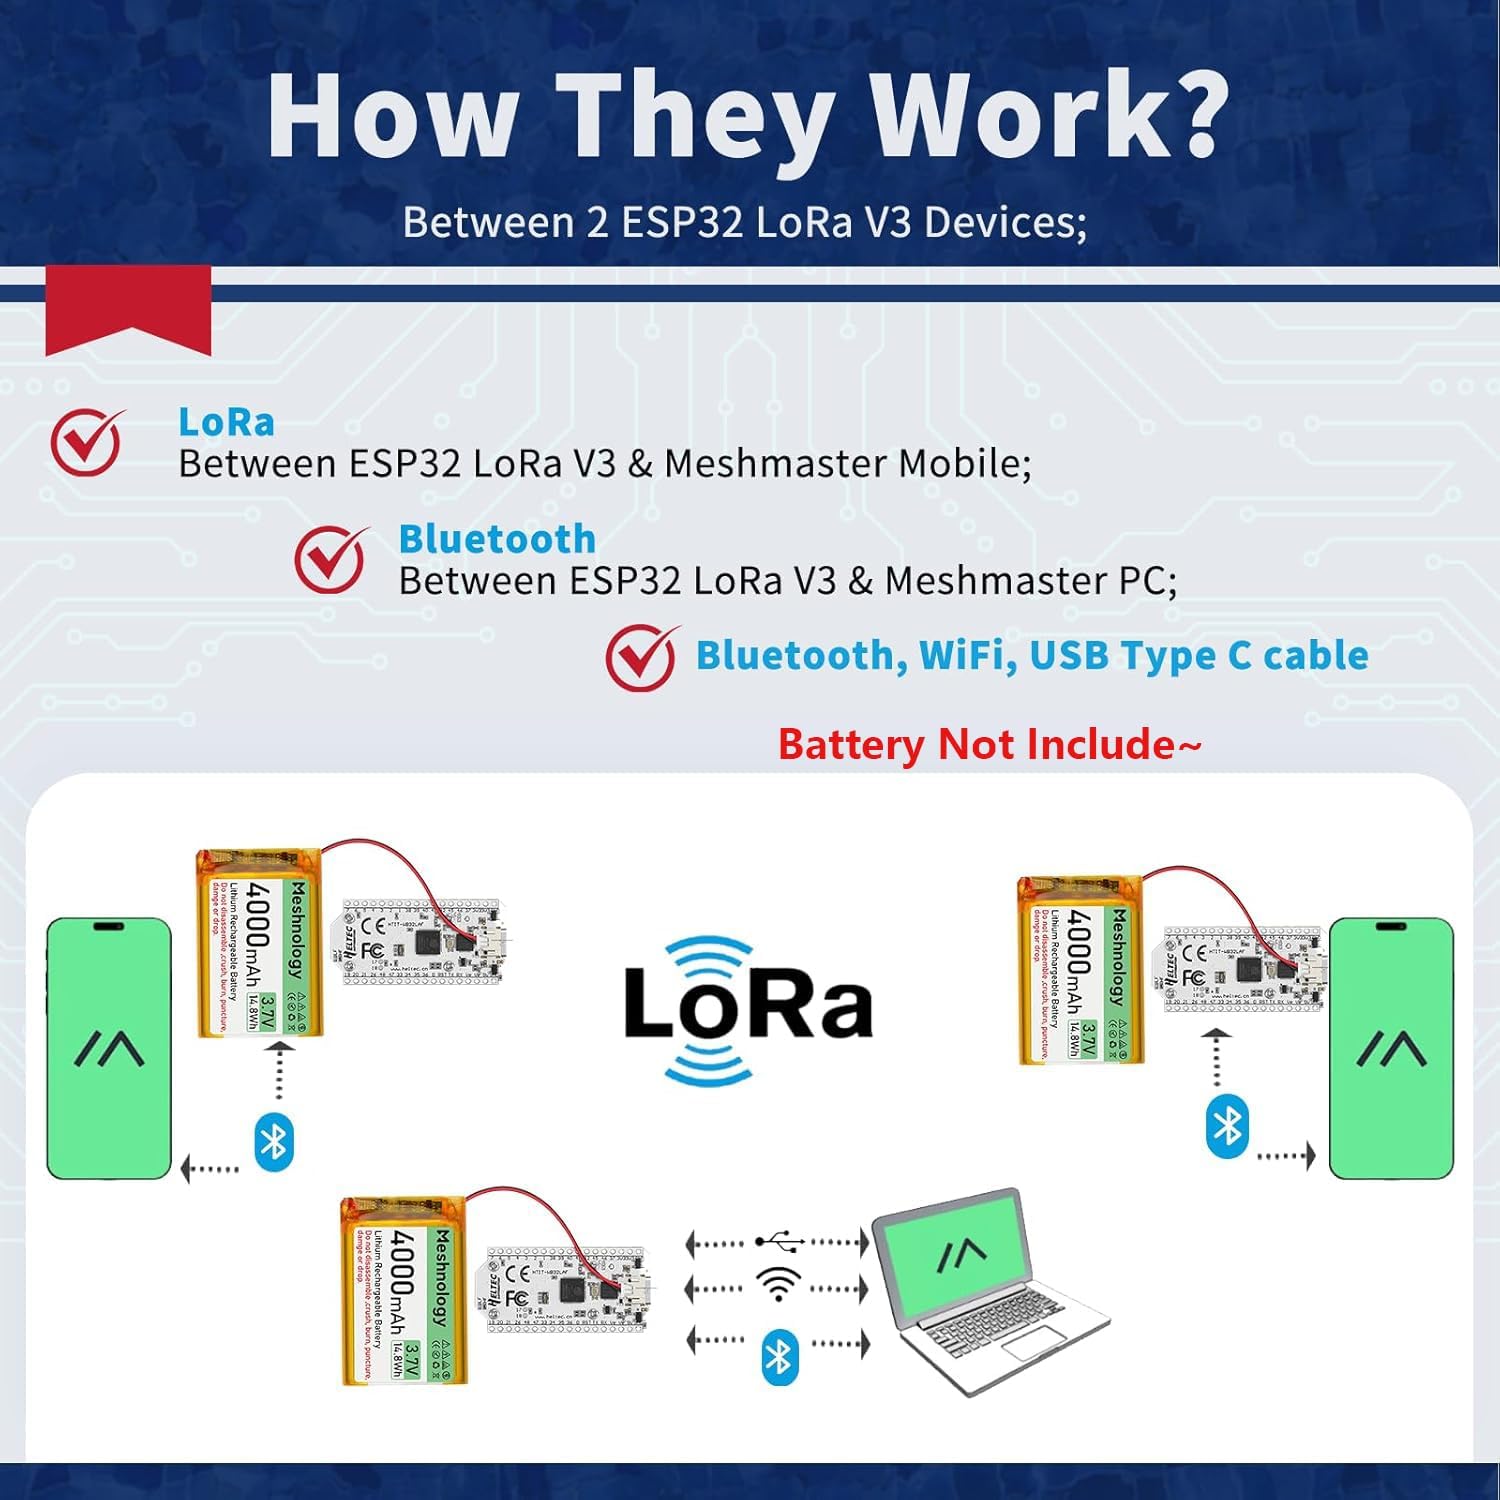
Figure 4: Communication methods of the ESP32 LoRa V3 board.
3.2 Programming and Uploading
Once your development environment is set up, you can write and upload your code (sketches) to the ESP32 LoRa V3 board. Use the Arduino IDE's upload function to transfer your compiled program to the board via the USB Type-C connection.
3.3 OLED Display Usage
The integrated 0.96-inch OLED display can be programmed to show various information, such as sensor readings, network status, battery level, or debugging messages. Refer to the U8g2 library documentation for programming the OLED.
4. Maintenance
To ensure the longevity and proper functioning of your ESP32 LoRa V3 Development Board, observe the following maintenance guidelines:
- Handle with Care: Avoid dropping the board or subjecting it to physical shock.
- Environmental Conditions: Operate the board within its specified temperature range (-20°C to 70°C) and avoid high humidity or direct exposure to liquids.
- Static Discharge: Take precautions against electrostatic discharge (ESD) when handling the board, as electronic components are sensitive to static electricity.
- Cleaning: If necessary, gently clean the board with a soft, dry brush or compressed air to remove dust. Do not use liquid cleaners.
- Antenna Care: Ensure the antenna connection remains secure. Avoid bending or stressing the antenna excessively.
5. Troubleshooting
If you encounter issues with your ESP32 LoRa V3 Development Board, consider the following troubleshooting steps:
- Board Not Powering On:
- Check USB cable connection and power source.
- If using a battery, ensure it is charged and correctly connected to the SH1.25 interface.
- Upload Errors in Arduino IDE:
- Verify that the correct board and COM port are selected in the Arduino IDE.
- Ensure the CP2102 driver is installed correctly.
- Try pressing the RST (Reset) button on the board before or during the upload process.
- Check for syntax errors in your code.
- LoRa Communication Issues:
- Confirm the antenna is securely connected.
- Ensure both transmitting and receiving devices are configured for the same LoRa frequency and settings.
- Check for obstacles or excessive distance between LoRa devices.
- OLED Display Not Working:
- Verify that the OLED library is correctly installed and initialized in your code.
- Check for any loose connections if the OLED is not integrated directly.
- General Instability:
- Ensure your power supply is stable and provides sufficient current.
- Check for short circuits or incorrect wiring in your project.
6. Specifications
Detailed technical specifications for the Meshnology ESP32 LoRa V3 Development Board:
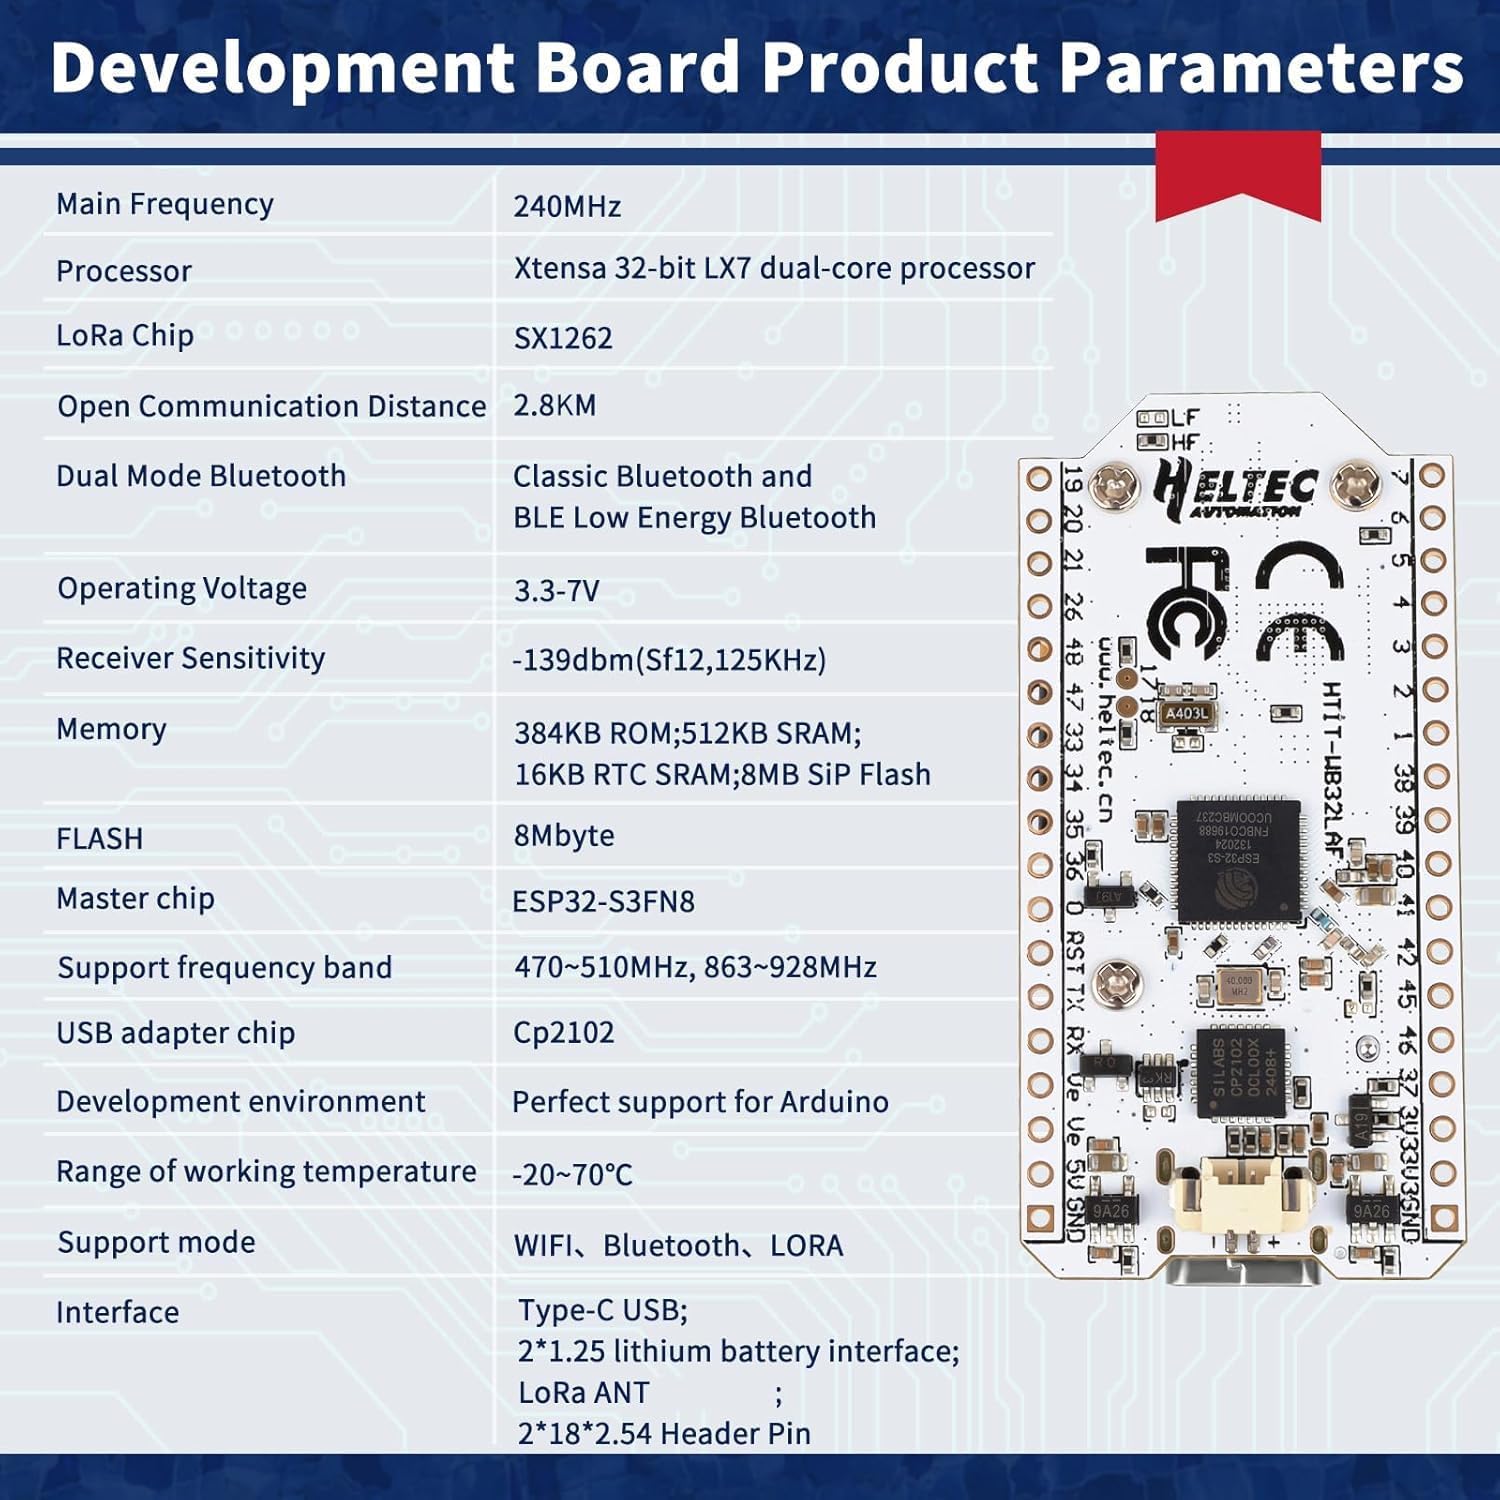
Figure 5: Detailed product parameters.
| Feature | Detail |
|---|---|
| Brand | Meshnology |
| Model Name | HTIT-WB32LAF |
| CPU Speed | 0.24 GHz |
| Connectivity Technology | Bluetooth, LoRa, Type-C, Wi-Fi |
| Processor Speed | 0.24 GHz |
| Operating System | Linux |
| Processor Brand | Espressif |
| Wireless Compatibility | 802.11bgn |
| Compatible Devices | Arduino, other compatible microcontrollers |
| Processor Count | 2 |
| Total USB Ports | 1 |
| Model Number | HTIT-WB32LAF |
| Manufacturer | Meshnology |
6.1 Product Dimensions

Figure 6: Physical dimensions of the development board.
7. Package Contents
The standard package for the ESP32 LoRa V3 Development Board includes the following items:
- 1x ESP32 LoRa V3 Development Board
- 1x LoRa Antenna
- 2x Pin Headers

Figure 7: Items included in the package.
8. Warranty Information
This product comes with a 15-day warranty from the date of purchase. This warranty covers manufacturing defects under normal use. It does not cover damage caused by misuse, accidents, unauthorized modifications, or improper installation.
9. Support and Resources
For further assistance, technical documentation, or community support, please refer to the following resources:
- Manufacturer's Website: Visit the Meshnology Store on Amazon for product updates and related information.
- Online Forums: Engage with the ESP32 and LoRa development communities for project ideas, troubleshooting tips, and shared knowledge.
- Documentation: Consult official ESP32 and LoRa documentation for in-depth technical details and programming guides.