VEVOR YTMN-01
VEVOR Mini Pottery Wheel User Manual
Model: YTMN-01
Introduction
This user manual provides essential information for the safe and effective operation, maintenance, and troubleshooting of your VEVOR Mini Pottery Wheel. Please read this manual thoroughly before first use and retain it for future reference.
Designed for young creators, this mini pottery wheel is equipped with a 30W motor and a 15 cm aluminum wheel. Its continuous speed control (0 to 140 RPM) and bidirectional switch make it simple and intuitive to use, transforming playful energy into artistic expression.
Safety Note: Always supervise children during use. Ensure the device is placed on a stable, level surface. Keep hands and clothing clear of moving parts.
Product Overview
The VEVOR Mini Pottery Wheel is a compact and portable device designed for creative pottery projects. It comes with a comprehensive set of tools to facilitate various artistic techniques.
Key Features:
- Powerful Motor: Equipped with a 30W motor for consistent performance.
- Adjustable Speed: Easily control rotation speed from 0 to 140 RPM.
- Bidirectional Rotation: Switch between clockwise and counter-clockwise rotation for versatile shaping.
- Durable Turntable: Robust 15 cm (6 inch) aluminum turntable supports up to 3 kg (6.6 lbs) of clay.
- Stable Design: Features a non-slip base for enhanced stability during operation.
- Easy to Clean: Removable water basin and turntable for convenient cleaning.
- Complete Tool Kit: Includes plastic and wooden modeling tools, paints, palette, clay, brush, power adapter, and hex wrench.
Components:
The package includes the main pottery wheel unit and a variety of accessories to get you started:

Figure 1: Overview of the VEVOR Mini Pottery Wheel and its complete accessory kit, including the main unit, power adapter, clay, paints, palette, and various shaping tools.

Figure 2: Detailed view of the comprehensive tool set, featuring 8-piece plastic tools, 8-piece wooden tools, paints, a brush, and a palette, essential for various pottery techniques.
Setup
- Unpack: Carefully remove all components from the packaging. Verify that all items listed in the "Box Contents" section (see Specifications) are present and undamaged.
- Placement: Place the pottery wheel on a stable, flat, and dry surface. Ensure there is enough space around the unit for comfortable operation and to prevent accidental spills.
- Connect Power: Insert the power adapter into the DC input port on the back of the pottery wheel. Plug the other end of the adapter into a suitable power outlet.
- Prepare Water Basin: Ensure the removable water basin is correctly seated around the turntable. This basin helps contain clay and water splashes during use.
Operating Instructions
Follow these steps to create your pottery masterpieces:
- Prepare Clay: Take a suitable amount of clay and knead it to remove any air bubbles. Shape it into a ball or cone.
- Center Clay: Place the prepared clay firmly in the center of the turntable. Ensure it is well-adhered to prevent it from flying off during rotation.
- Power On and Adjust Speed: Turn the power switch to the "ON" position. Use the speed control knob to gradually increase the rotation speed to your desired level (0-140 RPM).
- Select Direction: Use the bidirectional switch to select either clockwise or counter-clockwise rotation, depending on your preference and shaping technique.
- Shape Your Piece: With the wheel rotating, use your hands and the provided tools to center and shape the clay. Keep your hands moist to prevent the clay from sticking.
- Refine and Detail: Once the basic shape is achieved, use the various plastic and wooden tools to refine details, trim excess clay, and create textures.
- Dry and Decorate: After shaping, carefully remove your pottery piece from the turntable and allow it to dry completely. Once dry, you can use the included paints and brush to decorate your creation.

Figure 3: Visual guide demonstrating the five key steps of pottery creation: placing clay, powering on and adjusting speed, shaping with tools, drying, and finishing with color.
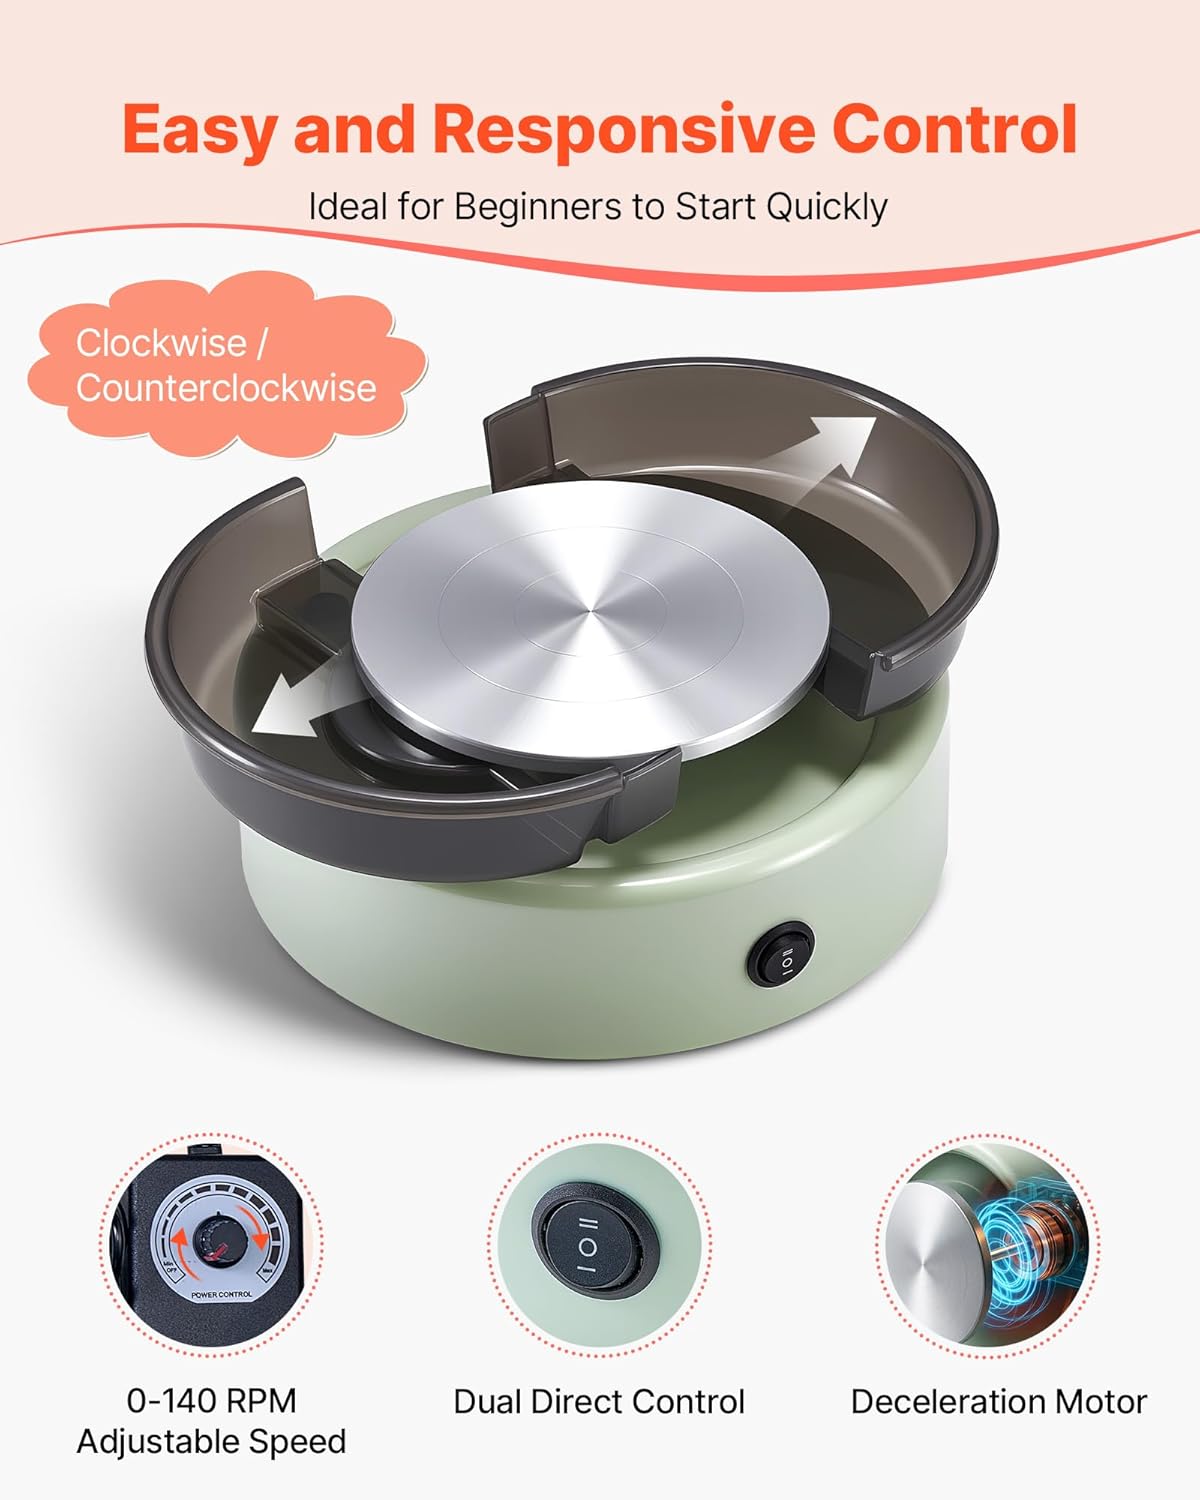
Figure 4: Close-up of the pottery wheel's control panel, highlighting the adjustable speed dial (0-140 RPM) and the dual direct control switch for selecting rotation direction.
Maintenance and Cleaning
Regular cleaning and maintenance will ensure the longevity and optimal performance of your pottery wheel.
- Power Off: Always turn off the pottery wheel and unplug it from the power outlet before cleaning.
- Remove Water Basin: The water basin is designed to be easily detachable. Carefully lift it off the main unit.
- Clean Turntable: The aluminum turntable can also be removed for thorough cleaning. Wipe off any clay residue with a damp cloth.
- Rinse Components: Rinse the removable water basin and turntable under running water. Use a soft brush if necessary to remove stubborn clay.
- Wipe Main Unit: Use a damp cloth to wipe down the main body of the pottery wheel, ensuring no water enters the motor or electrical components.
- Dry Thoroughly: Ensure all components are completely dry before reassembling or storing the unit.

Figure 5: Illustration demonstrating the simple process of disassembling the water basin and turntable for easy and convenient cleaning after use.
Troubleshooting
This section addresses common issues you might encounter with your VEVOR Mini Pottery Wheel.
| Problem | Possible Cause | Solution |
|---|---|---|
| Wheel does not turn on. | No power supply; Power switch is off; Loose connection. | Ensure the power adapter is securely plugged into both the unit and a working electrical outlet. Check if the power switch is in the "ON" position. |
| Wheel rotates inconsistently or slowly. | Speed knob set too low; Overload; Clay not centered. | Adjust the speed control knob to a higher setting. Ensure the amount of clay does not exceed the 3 kg (6.6 lbs) capacity. Re-center the clay on the turntable. |
| Excessive noise during operation. | Unit not on a stable surface; Internal issue. | Place the pottery wheel on a firm, level surface. If the noise persists, contact customer support. |
| Clay flies off the wheel. | Clay not properly centered or adhered; Speed too high for initial centering. | Ensure the clay is firmly pressed onto the center of the turntable. Start at a lower speed when centering the clay and gradually increase. |
If you encounter an issue not listed here or if the suggested solutions do not resolve the problem, please contact VEVOR customer support for assistance.
Specifications
| Attribute | Detail |
|---|---|
| Brand | VEVOR |
| Model Number | YTMN-01 (Mini Pottery Wheel, Green) |
| Power | 30 W |
| Turntable Diameter | 6 inches / 158 mm |
| Rotation Speed | 0-140 RPM |
| Noise Level | ≤ 60 dB |
| Net Weight | 5.07 lbs / 2.3 kg |
| Maximum Clay Load | 6.6 lbs / 3 kg |
| Product Dimensions (L x W x H) | 24 x 24 x 10.49 cm |
| Color | Green |
Box Contents:
- 1 x Mini Pottery Wheel Unit
- 1 x 8-piece Plastic Tool Set
- 1 x 8-piece Wooden Tool Set
- 2 x 6-color Paint Sets
- 1 x Palette
- 2 x Clay Blocks
- 1 x Brush
- 1 x Power Adapter
- 1 x Hex Wrench
- 1 x User Manual

Figure 6: Detailed diagram illustrating the dimensions of the pottery wheel and a visual representation of the 24-piece accessory set included in the package.
Warranty and Support
Information regarding specific warranty terms and conditions for the VEVOR Mini Pottery Wheel is not available in this manual. For warranty claims, technical support, or spare parts inquiries, please refer to the contact information provided with your purchase or visit the official VEVOR website.
Please retain your proof of purchase for any warranty-related issues.
Official Product Videos
No official product videos from the seller are available for embedding at this time.
Ask a question about this manual
Ask about setup, troubleshooting, compatibility, parts, safety, or missing instructions. Manuals+ will review the question and use this page’s manual context to help answer it.