
1. Introduction
Thank you for choosing the jurmiture Kitchen Island. This manual provides essential information for the safe assembly, operation, and maintenance of your new kitchen island. Please read these instructions thoroughly before assembly and retain them for future reference.
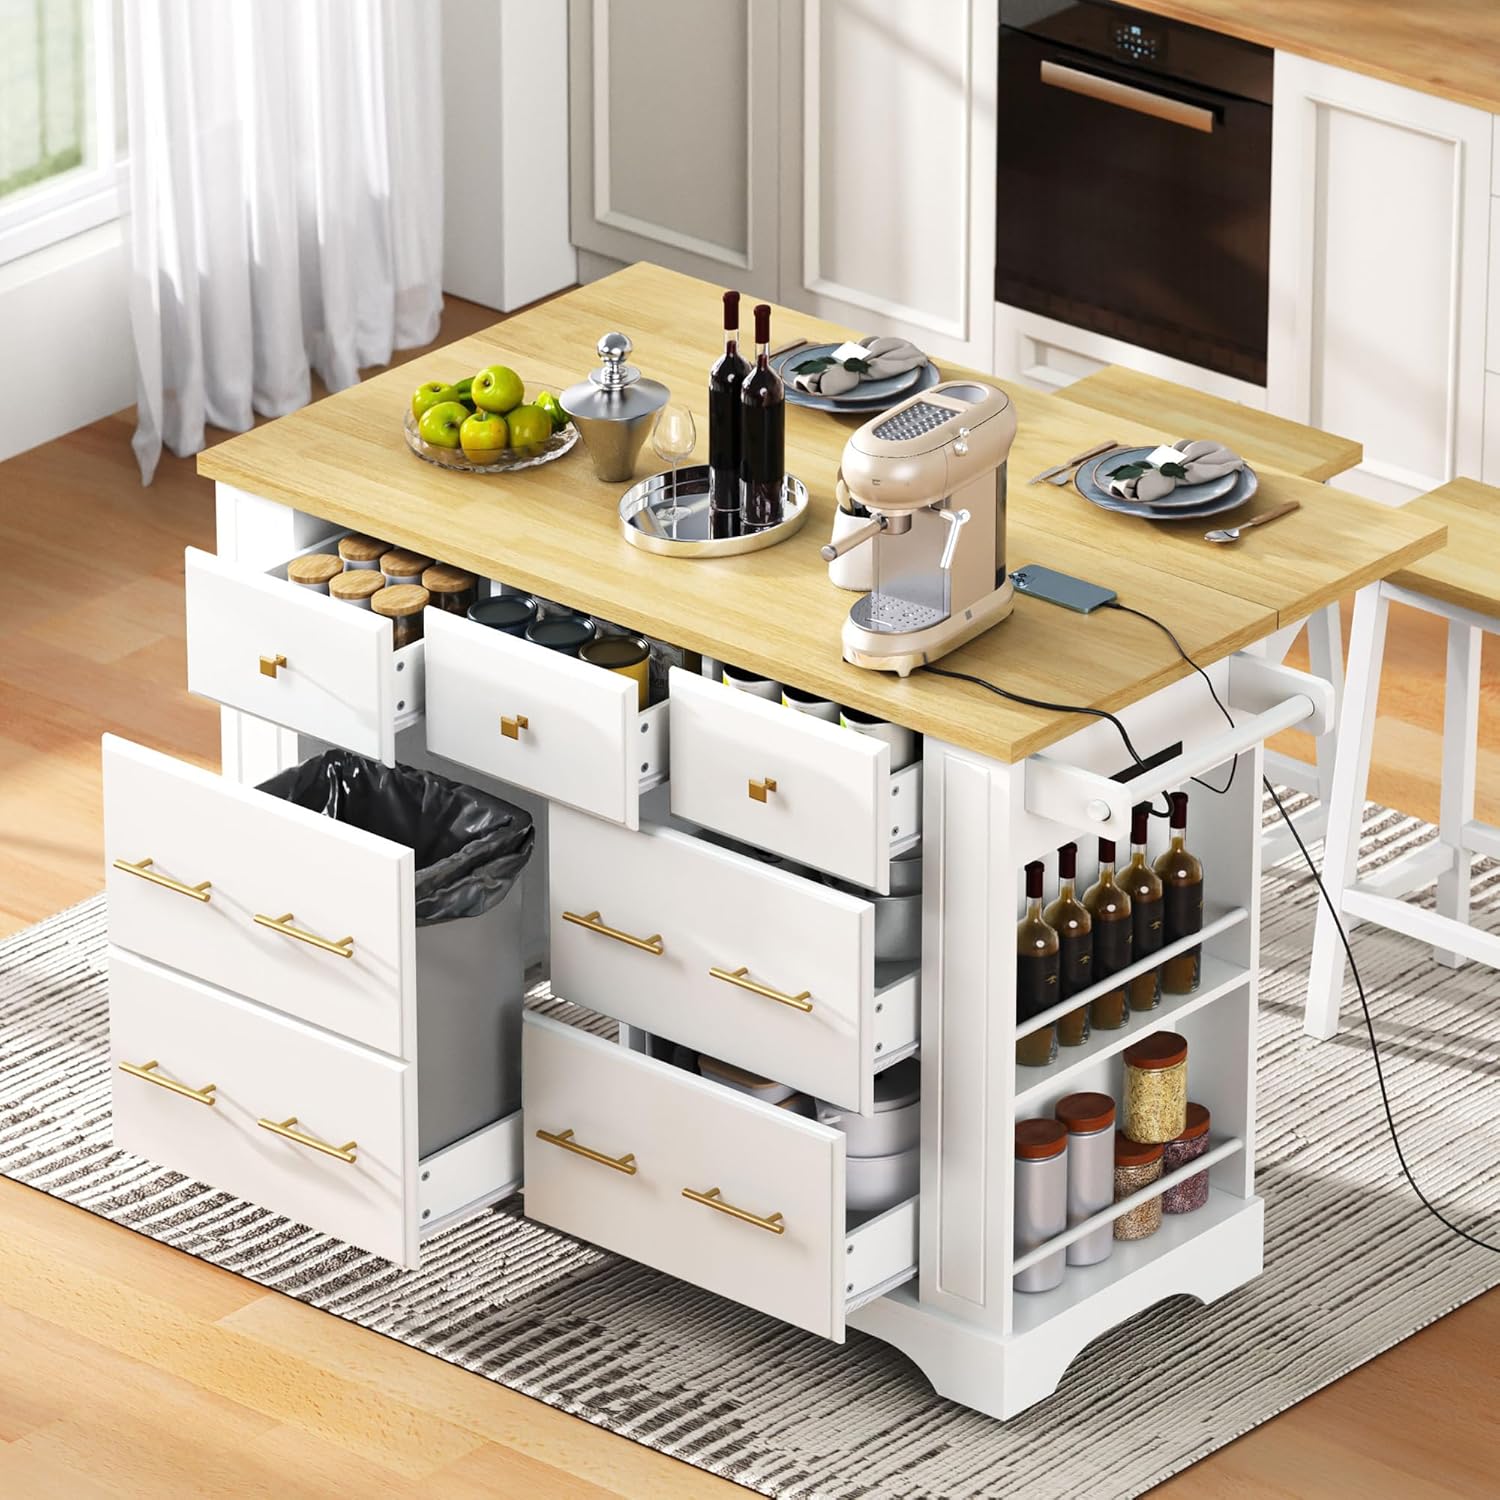
Image 1.1: The jurmiture Kitchen Island in a kitchen environment, showcasing its design and features.
2. Product Features
The jurmiture Kitchen Island is designed to enhance your kitchen's functionality and aesthetic. Key features include:
2.1. Ample Storage Capacity
- Six Drawers: Features three small top drawers for utensils and three larger drawers for pots, pans, and containers. Each drawer is 13.3 inches deep.
- Pull-Out Trash Can Cabinet: A dedicated compartment designed to accommodate one large 10-gallon trash can (not included), measuring 16.5"W x 11.3"D x 22.4"H. This helps conceal waste and prevent odors.
- Open Side Racks: Five open shelves with sticks are provided on the side for organizing spices, bottles, and wine, allowing for easy access during cooking.

Image 2.1: View of the kitchen island with drawers and trash can storage open, demonstrating its internal capacity.

Image 2.2: Detailed view of the pull-out trash can cabinet, highlighting its dimensions and function.
2.2. Design and Construction
- Classic & Rustic Aesthetics: Features a natural wood texture, vintage design elements, beveled edges, and a curved kickboard. Modern golden metal handles provide a classic finishing touch.
- Sturdy and Secure: Constructed with CARB Phase II certified MDF and a 1-inch thick tabletop, capable of supporting up to 400 lbs. The tabletop is durable, smooth, and scratch-resistant.
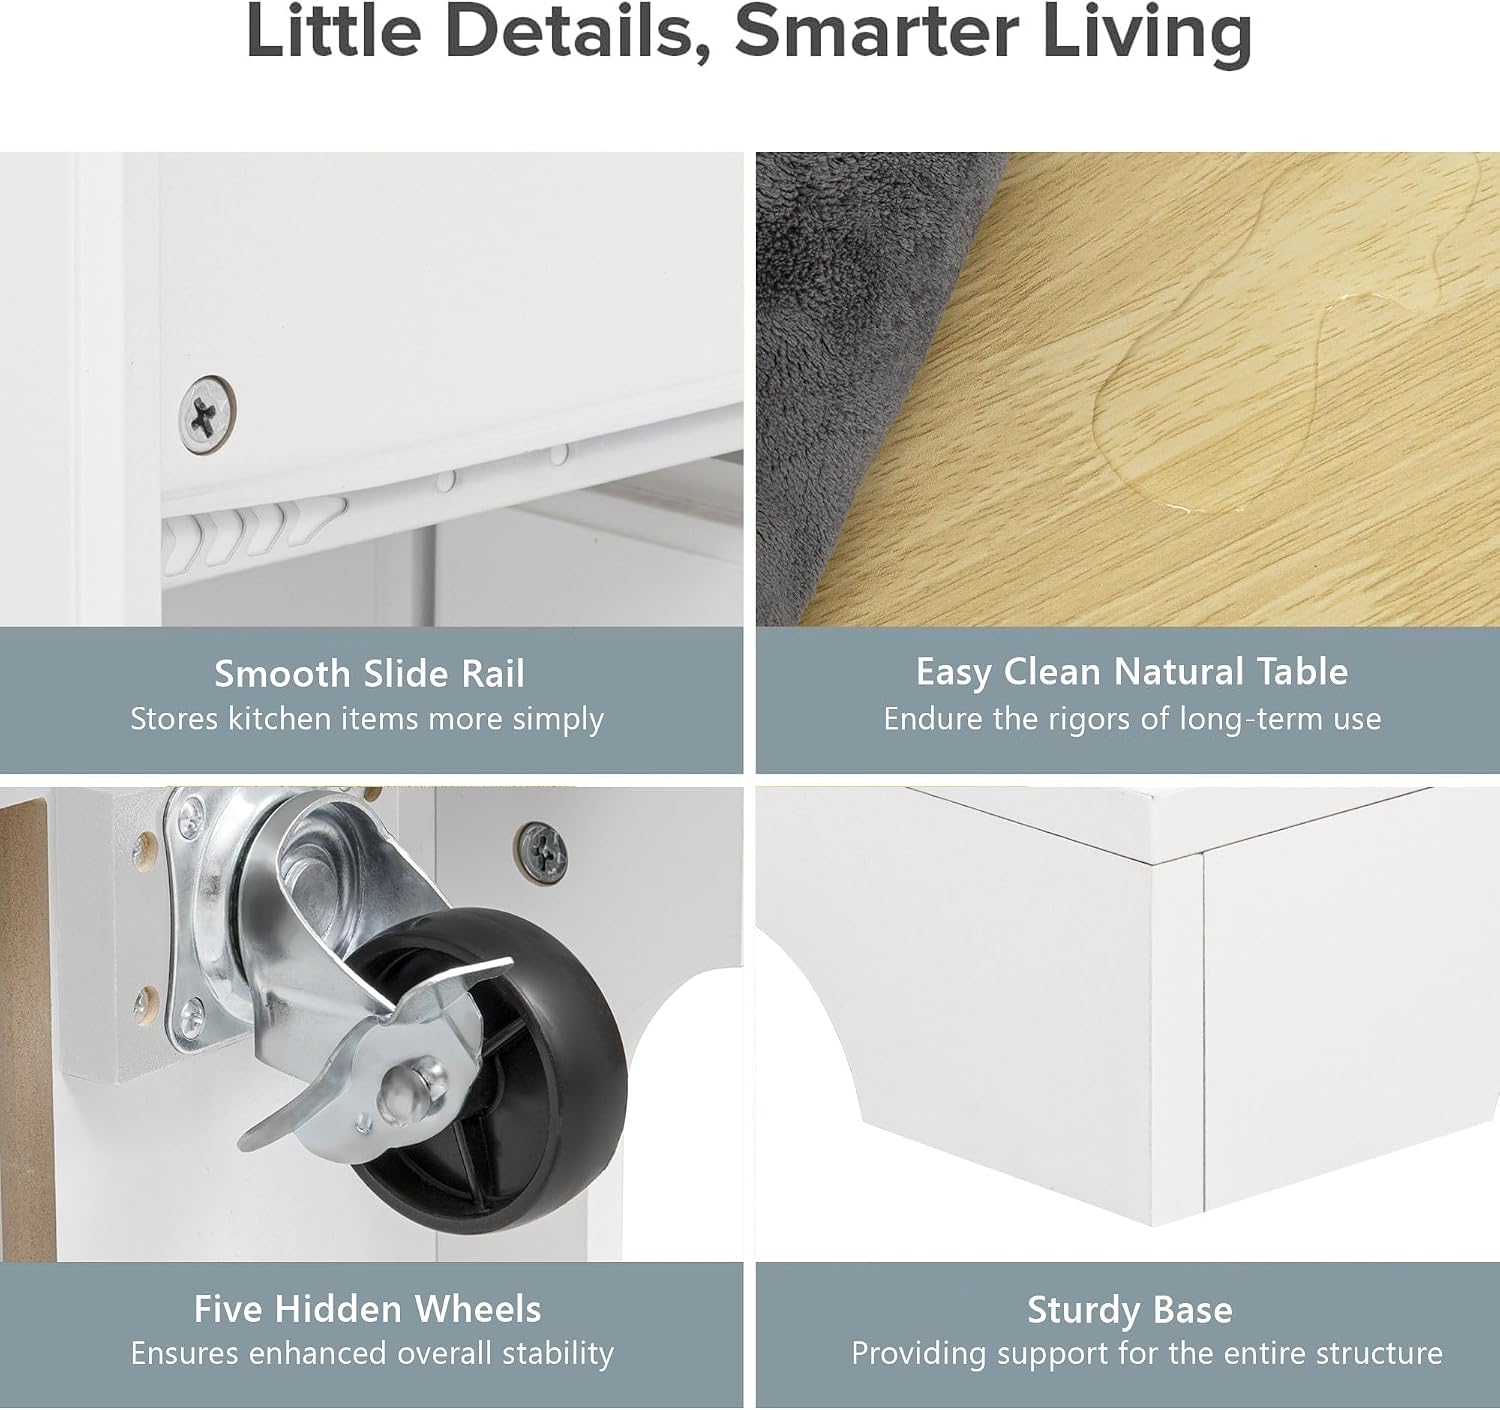
Image 2.3: Detailed views of the kitchen island's construction, including drawer slides, tabletop finish, hidden wheels, and base design.
2.3. Convenience Features
- Built-in Charging Station: An integrated power outlet with 2 AC outlets, 1 USB port, and 1 Type-C port for charging kitchen appliances and devices.
- Large Drop Leaf Design: A rubber wood drop leaf expands the countertop width to 29.5 inches when unfolded, providing additional workspace. It is supported by two solid wave-shaped boards and eight metal hinges for stability.
- Moveable & Stationary: Equipped with five concealed wheels, two of which are lockable. The wheels can be omitted during assembly for a stationary setup.

Image 2.4: The integrated charging station with AC, USB, and Type-C ports.

Image 2.5: Illustration of the space-saving drop leaf design, showing its extension and retraction.
3. Specifications
Refer to the table below for detailed product specifications:

Image 3.1: Detailed dimensions and load capacity of the kitchen island.
| Feature | Detail |
|---|---|
| Product Dimensions (Overall) | 51.2"D x 29.5"W x 36.2"H (with drop leaf extended) |
| Item Weight | 122.4 pounds |
| Frame Material | Rubberwood |
| Tabletop Material | CARB Phase II certified MDF with laminate finish |
| Color | White |
| Load Capacity (Tabletop) | Up to 400 lbs |
| Trash Can Cabinet Dimensions | 16.5"W x 11.3"D x 22.4"H (fits 10-gallon trash can) |
| Power Outlet | 2 AC outlets (120V/12A), 1 USB port (5V/3A), 1 Type-C port (5V/3A) |
| Power Cord Length | 4.9 ft (1.5m) |
| Mobility | 5 concealed wheels (2 lockable), optional installation |
| Assembly Required | Yes |
4. Assembly Instructions
Assembly is required for this kitchen island. Please follow the comprehensive step-by-step instructions provided in the separate assembly guide included with your product. Ensure all parts and hardware are accounted for before beginning assembly.
4.1. Before You Begin
- Check Contents: Verify that all components and hardware listed in the assembly guide are present and undamaged.
- Clear Workspace: Prepare a clean, spacious, and well-lit area for assembly.
- Tools Required: Gather any necessary tools as specified in the assembly guide (e.g., screwdriver, hammer).
- Safety First: Always follow safety precautions. It is recommended to have two people for assembly to prevent injury and ensure proper handling of larger components.
4.2. Wheel Installation (Optional)
The kitchen island is designed with five concealed wheels for mobility. If you prefer a stationary unit, you may choose to omit the installation of the wheels. If installing, ensure the two lockable wheels are placed in accessible positions for effective securing.
5. Operating Instructions
5.1. Using the Drawers
The kitchen island features smooth-gliding drawers. To open, gently pull the golden metal handles. To close, push the drawers back until they are fully seated. Avoid overloading drawers to ensure smooth operation and longevity of the slide rails.
5.2. Extending and Folding the Drop Leaf
To extend the drop leaf, locate the support boards underneath the leaf. Pull the leaf upwards and outwards, then swing the support boards into place to secure the extended countertop. To fold, retract the support boards and gently lower the leaf back into its stored position.
5.3. Utilizing the Charging Station
Plug the kitchen island's power cord into a standard wall outlet. The integrated power strip provides 2 AC outlets, 1 USB port, and 1 Type-C port. Connect your kitchen appliances (e.g., coffee maker, toaster) or electronic devices to the appropriate ports for power or charging.
5.4. Using the Pull-Out Trash Can Cabinet
The bottom left cabinet is designed for a 10-gallon trash can (not included). Simply pull the drawer handle to slide out the cabinet, place your trash can inside, and push it back to conceal it. This helps maintain a tidy kitchen and minimizes odors.
5.5. Moving and Locking the Wheels
If the wheels were installed, the kitchen island can be easily moved. To lock the island in place, engage the brakes on the two lockable wheels by pressing down on their levers. To unlock, lift the levers. Ensure the island is stable before use.
6. Care and Maintenance
Proper care will ensure the longevity and appearance of your kitchen island.
- Cleaning: Wipe surfaces with a soft, damp cloth. For stubborn stains, use a mild, non-abrasive cleaner. Avoid harsh chemicals or abrasive materials that could damage the finish.
- Spills: Clean up spills immediately to prevent moisture damage, especially on the wooden countertop. The laminate finish is scratch-resistant and easy to clean.
- Heat Protection: While the tabletop is durable, always use heat-resistant pads or trivets under hot items to prevent potential damage.
- Drawer Rails: Periodically check drawer slide rails for debris and clean as needed to maintain smooth operation.
- Hardware: Occasionally check and tighten any loose screws or hardware to ensure structural integrity.
7. Troubleshooting
If you encounter any issues with your kitchen island, refer to the following common solutions:
| Problem | Possible Cause | Solution |
|---|---|---|
| Drawers stick or do not slide smoothly | Overloaded drawer, debris in rails, loose hardware | Reduce load, clean rails, tighten screws on slide mechanisms. |
| Drop leaf is unstable when extended | Support boards not fully engaged, loose hinges | Ensure support boards are fully extended and locked into place. Check and tighten hinge screws. |
| Power outlet not working | Island not plugged in, wall outlet issue, circuit breaker tripped | Verify the island's power cord is securely plugged into a functional wall outlet. Check your home's circuit breaker. |
| Island wobbles or is unstable | Uneven floor, loose assembly hardware, wheels not locked | Ensure all assembly hardware is tightened. If on wheels, ensure lockable wheels are engaged. Adjust for uneven floors if necessary. |
8. Warranty and Support
Your jurmiture Kitchen Island is manufactured with quality and durability in mind. While specific warranty details are not provided in this manual, jurmiture stands behind its products.
Should you encounter any challenges during the assembly or use of this kitchen island, or if you have questions regarding its features or maintenance, please do not hesitate to reach out to jurmiture customer support for assistance. Contact information can typically be found on the product packaging or the official jurmiture website.
Please have your model number (JURKSLWTCS) and purchase information ready when contacting support to facilitate a quicker resolution.